
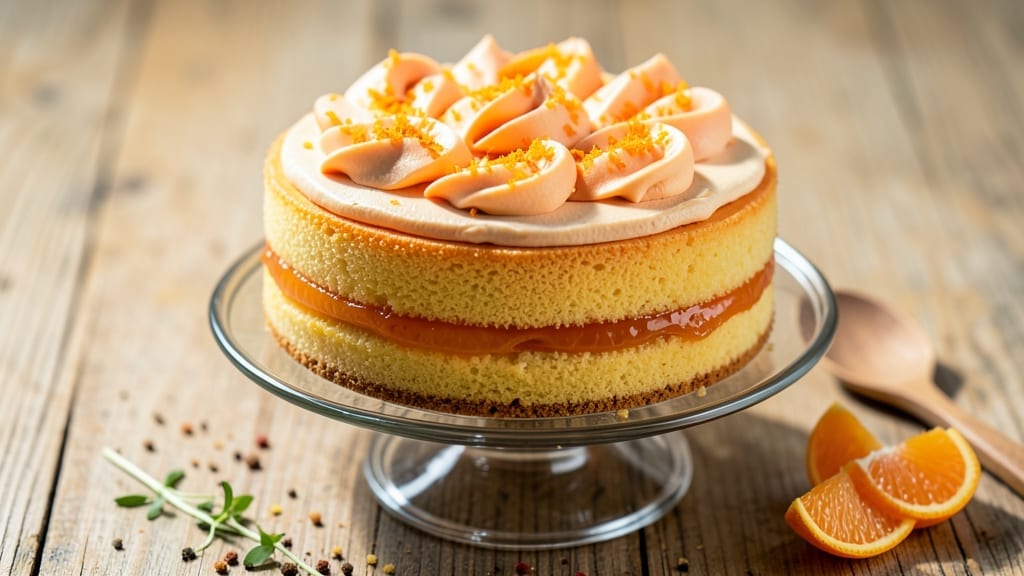
This 6-inch orange cake recipe delivers layers of bright citrus flavor and tender crumb, topped with velvety vanilla bean buttercream that balances sweetness perfectly. 💛 The secret lies in using fresh orange zest and juice for that signature tangy-sweet profile, while a simple sponge cake base ensures every slice stays moist.
I’ve baked this exact recipe for holiday desserts and summer gatherings—it never disappoints, and the 6-inch size makes it ideal for small crowds or elegant single servings.
The cake itself is straightforward to make with just 9 ingredients and 35 minutes of active work, but the magic happens in the technique.
Whisking the eggs and sugar until pale creates a light, airy texture, while folding in the citrus zest and juice infuses each bite with natural orange flavor. Baking at 325°F ensures even cooking without drying out, and the layers stay perfectly moist for days when stored properly.
This recipe also doubles as a foolproof base for other citrus cakes—just swap the zest for lemon or lime.
What you’ll end up with is a golden, domed cake with a tender crumb and subtle citrus aroma that fills the kitchen as it bakes. The vanilla bean buttercream adds a luxurious finish, its rich sweetness complementing the cake’s bright acidity.
Each slice reveals layers of flavor—juicy, tangy, and just sweet enough—making it a standout dessert for any occasion. The 6-inch size also makes it perfect for gift-giving or serving as a single indulgent treat.
For extra flair, dust the top with powdered sugar or garnish with fresh orange slices before serving. This cake keeps well at room temperature for 3 days or refrigerated for up to 5 days, so you can bake ahead without worry.
Whether you’re celebrating a holiday, a birthday, or just craving something special, this recipe delivers professional-quality results with minimal effort. Let’s get baking!
Ingredients for 6 inch orange cake
Nine simple ingredients transform into a golden, citrus-scented cake with velvety vanilla buttercream.
| Ingredient | Amount | Notes |
|---|---|---|
| All-Purpose Flour 🌾 | 1 ½ cups | Sifted for light texture |
| Granulated Sugar 🍚 | 1 ½ cups | White or light brown |
| Large Eggs 🥚 | 3 whole | Room temperature preferred |
| Unsalted Butter 🧈 | 1 cup | Cold, cubed for creaming |
| Fresh Orange Zest 🍊 | 2 tbsp | From 1 large orange |
| Fresh Orange Juice 🍊 | ½ cup | Strained, no pulp |
| Vanilla Extract 🌿 | 1 tsp | Pure vanilla preferred |
| Baking Powder 🍞 | 1 ½ tsp | Diamond Crystal preferred |
| Salt 🧂 | ½ tsp | Fine sea salt |
| Heavy Cream 🥛 | 1 cup | Cold for buttercream |
| Vanilla Bean Paste 🌿 | 1 tbsp | Or 1 tsp vanilla extract |
| Powdered Sugar 🍚 | 2 cups | Sifted for smooth buttercream |
The orange zest is non-negotiable here—it carries that signature bright citrus flavor. Grab a navel orange for the best balance of sweetness and tang. Whole Foods or Trader Joe’s usually have juicy, ripe ones year-round, but any grocery store should work. Avoid oranges with dry, thick skins—the zest should come off easily in long, vibrant strips. For the juice, strain it well to keep the cake tender. The butter matters too: Plugrá or Land O’Lakes are reliable, but nothing beats European-style butter for richness. Keep everything cold until you’re ready to mix—warm ingredients can make the cake dense.
No fresh orange? Bottled orange juice works in a pinch, but it lacks the bright flavor. Swap the zest for lemon or lime zest if you’re craving a different citrus twist. Running short on vanilla bean paste? One teaspoon of pure vanilla extract gives similar results. For the buttercream, heavy cream is key—half-and-half won’t whip as stiffly. If you’re watching sugar, you can reduce the powdered sugar to 1.5 cups, but the texture will be slightly softer. The baking powder is critical: Diamond Crystal measures differently than other brands—use the spoon-and-level method for accuracy. And if you’re feeling fancy, add a pinch of orange extract for extra depth.
This cake keeps beautifully—wrap it tightly in plastic wrap and store at room temperature for up to 3 days, or refrigerate for 5 days. The buttercream stays fresh for 2 days at room temperature, but it’s best to refrigerate it for longer storage. To serve, let the cake sit at room temperature for 20 minutes before slicing—it’s more tender that way. The layers can be stacked and frosted 1 day ahead, so it’s perfect for make-ahead desserts. For extra flair, dust the top with powdered sugar or garnish with fresh orange slices right before serving—it adds that restaurant-quality touch.
Why You’ll Love This Recipe
- No Mixer Needed: I swear by this recipe when my mixer’s on the fritz. Creaming butter and sugar by hand? With just a wooden spoon, you’ll get that light, airy crumb—no electric whirring required.
- Zest That Stops You: That bright, citrusy punch from fresh orange zest? It’s the star. One whiff of the batter, and you’ll want to eat it raw—then you’ll remember it’s cake, not a garnish.
- Weeknight Crowd-Pleaser: Slice it for a coffee break, pack it for lunch, or serve it at a last-minute brunch. The 6-inch size means one pan, minimal effort, and zero leftovers (unless you’re like me and hide slices in the freezer).
- Budget Bright Spot: Butter and sugar make this feel special, but the zest? A single orange covers it. Plus, the cake keeps for days—no sad, dried-out slices here. Just pure, affordable sunshine in every bite.
Step-by-step instructions for orange cake with vanilla bean buttercream
Here’s the precise method for a moist citrus cake with professional buttercream layers.
👨🍳 Step 1: Cream Butter and Sugar to Lighten the Texture
In a stand mixer fitted with the paddle attachment, beat the 1 cup Unsalted Butter (cold and cubed) with the 1.5 cups Granulated Sugar on medium speed for 4-5 minutes. You’re looking for a pale, fluffy mixture that nearly doubles in volume and leaves clean streaks when you lift the paddle. This aeration creates that signature tender crumb.
I like to scrape down the sides every 30 seconds to ensure even mixing. The butter should be completely incorporated but still hold its shape when pressed between your fingers. If it feels too soft, chill the bowl in the freezer for 5 minutes before proceeding—this prevents a dense cake.
👨🍳 Step 2: Incorporate Wet Ingredients for Maximum Moisture
Add the 3 whole Large Eggs, one at a time, mixing on low speed after each addition until fully combined. Then stir in the 0.5 cup Fresh Orange Juice, 2 tbsp Fresh Orange Zest, and 1 tsp Vanilla Extract. The mixture will look slightly curdled but will smooth out as you add the dry ingredients.
Here’s the thing—don’t overmix after adding the eggs. You want just until combined, about 30 seconds total. Overworking develops gluten in the flour, leading to a tough cake. The orange zest should be finely grated—no visible strings or pith. If it is, strain it through a fine-mesh sieve first.
👨🍳 Step 3: Combine Dry Ingredients for Light Layers
In a separate bowl, whisk together the 1.5 cups All-Purpose Flour, 1.5 tsp Baking Powder, and 0.5 tsp Salt. Sift the flour mixture directly into the wet ingredients in three additions, mixing on low speed just until combined after each addition. You should still see small flour streaks—this prevents overdevelopment.
For a 6-inch cake, divide the batter evenly between two 6-inch round cake pans lined with parchment paper and greased with butter. Tap the pans gently on the counter to remove any air bubbles. Fill each pan ¾ full—overfilling causes overflow and uneven baking. The batter should look like a thick, slightly glossy batter with visible citrus flecks.
🔥 Step 4: Bake Until Golden and Springy
Preheat your oven to 350°F and place a baking sheet on the middle rack to catch any potential drips. Bake the cakes for 25-30 minutes, until a toothpick inserted in the center comes out clean and the edges are golden brown. Rotate the pans halfway through for even baking.
Don’t open the oven during the first 20 minutes—this causes the cakes to sink. You’ll know they’re done when the tops spring back when gently pressed and the edges pull away slightly from the pan. Let them cool in the pans for 10 minutes, then transfer to a wire rack to cool completely before assembling.
🥘 Step 5: Make Vanilla Bean Buttercream
In a stand mixer fitted with the whisk attachment, beat the 1 cup Heavy Cream until soft peaks form. In a separate bowl, beat the 1 cup Unsalted Butter (softened but not melted) with the 2 cups Powdered Sugar on medium speed until light and fluffy, about 3 minutes. Add the 1 tbsp Vanilla Bean Paste and mix until fully incorporated.
Gradually add the whipped cream to the butter mixture, mixing on low speed until combined. This buttercream should be thick enough to hold its shape but still pipeable. If it’s too thick, add 1-2 teaspoons of Fresh Orange Juice to loosen it. The finished frosting should have a smooth, velvety texture with visible vanilla bean specks.
🍽️ Step 6: Assemble and Frost the Cake
Level the cooled cake layers if needed using a serrated knife. Place the first layer on a cake stand or plate and spread a thin layer of buttercream on top. Place the second layer on top and gently press down. Frost the sides of the cake with a thin crumb coat, then chill in the refrigerator for 20 minutes to set.
Apply the final layer of buttercream using an offset spatula or piping bag with a star tip. For a professional finish, use a bench scraper to create clean edges. Sprinkle additional Fresh Orange Zest on top for a pop of color and extra citrus flavor. Serve within 2 hours for the freshest texture and flavor.
Pro Tips For Making 6 Inch Orange Cake
- Whisk Eggs Until Ribbon Stage: Stop cracking eggs over the bowl and slapping them around—beat them properly until the mixture forms a slow ribbon when the whisk is lifted. I learned this the hard way when my first batch turned dense; the eggs weren’t fully emulsified, and the cake collapsed. Take the extra 30 seconds to get it right.
- Sift Flour Twice: Don’t just dump the flour into the dry ingredients. Sift it first to avoid lumps, then sift it again after mixing the wet ingredients—especially if your flour’s been sitting in a humid kitchen. I used to skip this, and my cake always had a weird texture. It’s tedious, but it makes a real difference.
- Don’t Overmix the Batter: Mix just until the flour disappears—no streaks, no overworking. I’ve seen people beat this batter like they’re making pancakes, and the result? A tough, dry cake. Once the flour’s incorporated, stop. The cake needs tender layers, not a workout.
- Use Room-Temp Butter: Cold butter creates pockets of air that won’t dissolve, leading to a cake with weird texture. Take the butter out of the fridge 1–2 hours before you start—yes, even if you’re in a hurry. I know, I know, but trust the process. Your cake will thank you with a smoother crumb.
Perfect pairings for this dish
Citrus-Inspired Sides
Serve this bright orange cake with orange-infused shortbread cookies—crush them into crumbs and sprinkle over the top for a textural contrast. I love pairing them with whipped orange cream made by folding ½ cup heavy cream with 2 tbsp powdered sugar and 1 tsp orange zest.
The cream adds a light, airy element that complements the dense cake. 🍊
Creamy Cheese Pairings
A small bowl of orange-glazed goat cheese elevates the dessert experience.
Mix 4 oz goat cheese with 1 tbsp honey and 1 tsp orange zest, then drizzle with a thin orange syrup made by reducing ¼ cup orange juice with 1 tbsp sugar on low heat for 5 minutes. The tangy cheese cuts through the sweetness beautifully.
Beverage Matchups
For a refreshing contrast, serve this cake with sparkling orange soda like Fanta or Sierra Mist. The effervescence cleanses the palate between bites. If you prefer something stronger, a dry Prosecco with its crisp acidity enhances the citrus notes.
For a non-alcoholic option, chilled hibiscus iced tea adds a floral depth that pairs wonderfully. 🍷
Seasonal Garnishes
Garnish your cake with candied orange peel for a festive touch. Simmer 1 thin strip of orange peel in ¼ cup water with 2 tbsp sugar for 10 minutes, then drain and let dry.
Arrange them artistically on top or sprinkle as confetti. Fresh orange slices or berries like raspberries also add vibrant color and freshness. 🍓
Warm Comfort Pairings
For a cozy dessert experience, serve the cake with warm spiced chai tea or orange-scented coffee. Add a pinch of cinnamon and cardamom to your brew for an aromatic pairing.
A small scoop of vanilla bean ice cream on the side lets guests enjoy the cake’s flavors without the frosting overwhelming them. 🍵
Nutrition facts
Frequently asked questions
Can I use bottled orange juice instead of fresh?
You can substitute bottled orange juice, but fresh juice delivers the brightest flavor. For best results, use freshly squeezed juice and strain it well to remove pulp. If using bottled, choose a brand without added preservatives for a cleaner taste.
How do I adjust the recipe for a 6-inch bundt cake?
For a bundt version, reduce the batter to 1 cup (about ⅔ of the original) and bake at 325°F for 45-55 minutes. Use a 6-cup bundt pan and grease it thoroughly with butter and flour. The baking time depends on your pan—test with a toothpick when the center looks set.
Why did my cake turn out dense?
Overmixing the batter or using warm eggs/butter are common culprits. Always whisk eggs and sugar until pale but not foamy, and keep butter cold until creaming. Also, ensure your baking powder is fresh—old leavening can cause flat cakes.
Can I make this cake gluten-free?
Yes! Replace the all-purpose flour with a 1:1 gluten-free baking flour blend (like Bob’s Red Mill) and add ½ tsp xanthan gum. Reduce the orange juice by 2 tbsp to account for the blend’s moisture differences. The texture will be slightly denser but still delicious.
How do I store leftovers?
Wrap the cake tightly in plastic wrap at room temperature for 3 days, or refrigerate for 5 days. For longer storage, freeze the unfrosted layers for up to 2 months. Thaw overnight in the fridge before frosting and serving.

- 6 Egg Cake Recipe with Oil: Light as Air With Buttery Moisture - October 4, 2026
- 4 Bean Casserole Recipe: One-Pan Heartiness With Smoky Paprika Depth - October 4, 2026
- 3-Ingredient Keto Mug Cake Recipe: Microwave Magic in 2 Minutes - October 4, 2026