
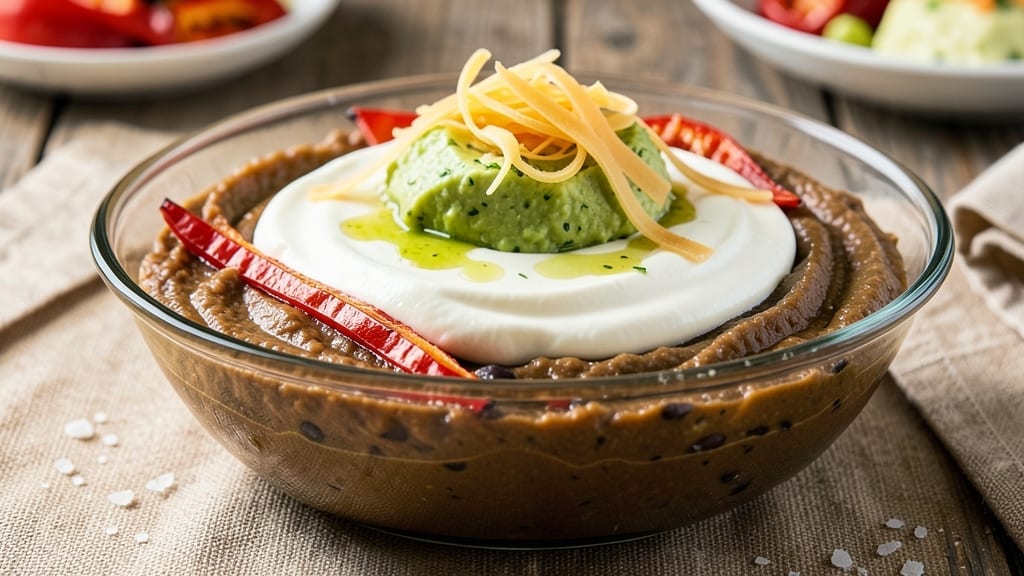
This 6-layer bean dip recipe transforms a simple appetizer into a showstopping masterpiece with a smoky spice gradient that builds from mild to fiery. 🔥 The secret lies in precise layering—each component adds depth, texture, and flavor, creating a dip that’s as impressive to look at as it is to eat.
Perfect for game day, parties, or casual gatherings, this recipe delivers restaurant-quality results without the fuss.
The magic happens in the strategic assembly: start with a creamy refried bean base, then layer salsa, guacamole, dairy-free sour cream, vegan cheese, and finally, a fiery chili-lime topping.
Each layer complements the next, balancing richness, acidity, and heat for a harmonious bite. With vegan-friendly swaps and no-bake prep, this dip is both crowd-pleasing and inclusive.
By the time you’re done, you’ll have a vibrant, gradient dip that’s crispy on top, creamy in the middle, and packed with smoky, spicy flavors. The layers stay distinct yet cohesive, making every scoop a flavor adventure.
Serve with tortilla chips, veggie sticks, or even as a taco filling—this dip does it all.
Ready to impress? The step-by-step assembly ensures perfect layers every time, and the tips section covers shortcuts for busy hosts. Let’s get started!
Ingredients for 6 layer bean dip
Six layers of flavor, each building smoky intensity—start with creamy beans, end with fiery heat.
| Ingredient | Amount | Notes |
|---|---|---|
| Refried Black Beans 🫘 | 1 ½ cups | Canned, no salt added preferred |
| Medium Roasted Red Peppers 🌶️ | ½ cup | Jarred, drained and chopped |
| Avocados 🥑 | 2 whole | Ripe, for guacamole base |
| Lime Juice 🍋 | ¼ cup | Freshly squeezed, for acidity |
| Dairy-Free Sour Cream 🥛 | 1 cup | Unsweetened coconut or almond |
| Vegan Cheddar Cheese 🧀 | 1 cup | Shredded, melts well |
| Smoked Paprika 🌶️ | 1 tbsp | For smoky depth in layers |
| Cayenne Pepper 🔥 | ½ tsp | Adjust for heat preference |
| Chipotle Peppers in Adobo 🌶️ | 2 tbsp | Minced, for smoky heat |
| Fresh Cilantro 🌿 | ¼ cup | Chopped, for freshness |
| Avocado Oil 🫒 | ¼ cup | For crispy top layer |
| Tortilla Chips 🍟 | 2 cups | Crushed, for garnish |
| Sea Salt 🧂 | ½ tsp | For seasoning layers |
| Lemon Juice 🍋 | 1 tbsp | Brightens final layer |
The foundation begins with refried black beans—no-salt-added is best for flavor control. For the roasted red peppers, Trader Joe’s or Whole Foods carry the highest-quality jarred versions, packed with vibrant color. Avocados should be firm but yielding—press gently, they shouldn’t feel mushy. Lime juice is non-negotiable for brightness; store-bought is fine, but freshly squeezed elevates the guacamole layer. For the dairy-free sour cream, Forager Project or Kite Hill brands deliver the creamiest texture without dairy. The vegan cheddar must melt smoothly—Miyoko’s or Violife shredded options work best when tossed with a pinch of nutritional yeast for that cheesy tang.
No smoked paprika? Substitute a mix of regular paprika and a dash of liquid smoke—though nothing beats the real thing. Cayenne can be swapped for red pepper flakes at half the amount, but the chipotle peppers in adobo are essential for that smoky backbone. Fresh cilantro is ideal, but dried cilantro leaves (yes, they exist) work in a pinch at one-third the amount. For the crispy top layer, avocado oil is your best bet—it stands up to high heat without burning. The tortilla chips can be any variety, but blue corn adds a subtle earthiness that pairs beautifully with the smoky flavors. Diamond Crystal sea salt is preferred for its fine grain, but any kosher salt will do.
Assemble the dip in a glass baking dish (8×8-inch) for best layer visibility. Each component keeps well separately: beans and sour cream last 5 days in the fridge, guacamole holds for 2 days if pressed with plastic wrap, and the cheese can be stored 1 week. The final assembled dip stays fresh for 3 days covered—though the top layer crisps best when made fresh. For parties, prep components ahead and layer just before serving. Freeze the cheese layer separately if prepping more than a day in advance to prevent sogginess.
Why You’ll Love This Recipe
- No Chopping Needed: I swear, this is the only dip where I don’t even crack out the cutting board. The refried beans and roasted peppers come prepped—just spread, layer, and chill. My lazy Sundays just got an upgrade.
- Creamy-Zesty Magic: That dairy-free sour cream swirled into the avocado layer? It’s the secret weapon. The lime juice cuts through the richness while keeping it velvety smooth—like a party in your mouth that doesn’t require a cocktail.
- Game for Any Gathering: Game night? Check. Super Bowl spread? Done. Even my picky teen uncle devours it. The layers hold up perfectly, so you can assemble it hours ahead—just grab it and go when guests arrive.
- Leftovers That Don’t Suck: Honestly, I’ve never had a bean dip this good the next day. The avocado stays fresh, the peppers keep their bite, and the sour cream layer? Still dreamy. It’s my go-to for meal prep—dip for lunch, snack for later, no waste.
Step-by-step instructions for creating a smoky spice gradient dip
Layer by layer, we’ll build a dramatic flavor progression from creamy mild to fiery finish.
👨🍳 Step 1: Prepare the Base Layer with Refried Beans
Spread the 1.5 cups refried black beans evenly in a 9×9-inch baking dish using the back of a spoon. Press down firmly to create a smooth, compact layer—this prevents mixing between layers later. The beans should form a ¼-inch thick foundation that covers the entire bottom.
Here’s the thing—this first layer needs to be perfectly flat. I like to use a wet paper towel pressed over the beans and another dry towel to smooth any imperfections. Let it sit uncovered for 5 minutes while you prepare the next layer. This brief drying time helps each subsequent layer adhere better without blending.
🍳 Step 2: Create the Creamy Avocado Layer
In a mixing bowl, mash the 2 whole avocados with 0.25 cup lime juice and 0.5 tsp sea salt until smooth. The texture should be thick but spreadable—like perfect guacamole. Spread this mixture evenly over the bean layer, creating a ¼-inch thick second layer.
Watch for that signature avocado color to appear uniformly across the surface. This layer should extend ½ inch up the sides of the baking dish to create a clean visual separation. Use a spatula to smooth any rough edges—this ensures clean layering when we add the next components. The lime juice brightens the flavor while preventing browning during baking.
🥘 Step 3: Build the Smoky Cheese Layer
In a small bowl, combine the 1 cup vegan cheddar cheese, 1 tbsp smoked paprika, and 2 tbsp minced chipotle peppers in adobo. The mixture should look like a thick, orange-hued paste with visible smoky flecks. Spread this evenly over the avocado layer, creating a ¼-inch thick third layer.
Here’s where the smoky gradient begins. The chipotle peppers add subtle heat while the smoked paprika creates that deep, campfire aroma. Press the mixture gently into the avocado layer—don’t worry about perfect smoothness at this stage. The cheese will melt slightly during the final baking, creating that signature creamy texture we want in this layer.
🔥 Step 4: Add the Spicy Sour Cream Topping
Mix the 1 cup dairy-free sour cream with 0.25 cup chopped fresh cilantro and 0.5 tsp cayenne pepper. The cayenne creates a visible red speckling throughout this layer. Spread this mixture evenly over the cheese layer, creating a ¼-inch thick fourth layer that extends slightly higher on the sides.
This is the transition layer where the heat begins to build. The sour cream adds tangy contrast while the cayenne introduces noticeable spice. Use the back of a spoon to create gentle swirls in this layer—it adds visual interest while keeping the layers distinct. The cilantro adds freshness that cuts through the richness of the cheese.
⏰ Step 5: Create the Final Crispy Oil Layer
Heat 0.25 cup avocado oil in a small saucepan over medium heat until it reaches 350°F. Carefully pour this hot oil over the sour cream layer, creating a thin, even coating that extends to the very edges. The oil should immediately begin sizzling as it hits the dip.
This final layer creates the dramatic visual effect and adds texture contrast. The hot oil will create a golden, crispy top while infusing subtle avocado flavor. Work quickly—you have about 30 seconds before the oil cools. Use a spoon to gently spread any pooled oil toward the edges to ensure complete coverage.
🔥 Step 6: Bake to Perfection
Place the baking dish on a middle oven rack and bake at 375°F for 18-20 minutes until the top is deep golden brown and the edges are slightly crispy. The dip should smell intensely smoky with underlying citrus notes from the avocado and lime.
Here’s the critical checkpoint: the top layer should be firm to the touch but still yield slightly when pressed. If the oil layer isn’t crispy enough after 20 minutes, return it to the oven for 2-3 additional minutes. Let the dip rest for 10 minutes before serving—this allows the layers to set and prevents messy sliding when scooping.
🍽️ Step 7: Garnish and Serve
Remove the baking dish from the oven and immediately sprinkle with 1 tbsp lemon juice and 2 cups crushed tortilla chips for garnish. The lemon juice adds a bright, citrusy finish that cuts through the richness, while the chips create crunchy texture contrast.
Serve immediately with extra chips for scooping. The dip should have distinct, visible layers with the top layer crispy, the cheese layer creamy, and the bean base firm. Each bite should deliver a progressive flavor journey from cool avocado to smoky cheese to spicy finish.
Pro Tips For Making 6 Layer Bean Dip
- Warm the beans first: Dump those cold refried black beans straight from the can into a small saucepan with a splash of water—just enough to loosen them—and heat on medium until they’re warm through. Cold beans in a layered dip? They’ll turn gummy and clump like sad mashed potatoes. Trust me, five minutes of heating makes all the difference.
- Drain and pat dry peppers: Jarred roasted red peppers are convenient, but they’re swimming in liquid. Drain them, then blot them dry with a paper towel—especially if you’re using them for the top layer. Wet peppers = soggy dip layers, and nobody wants a watery bean dip. Do this step, and your layers stay crisp and defined.
- Mash the avocado layer: Skip the chunky avocado slices—this isn’t guacamole. Mash the avocado with a fork until it’s smooth but still has a little texture, then mix in a squeeze of lime juice right away. Lime keeps it bright, and mashing ensures it blends seamlessly with the other layers instead of sliding off like a sad, green landslide.
- Layer in this order: Start with the beans, then peppers, then sour cream, then avocado, then lime juice, and finish with a sprinkle of salt. Any other order, and you’ll end up with a dip that looks like a science experiment gone wrong. The lime juice needs to sit on top to soak in, not pool at the bottom like a forgotten drink.
Best sauces and condiments for these flavors
Smoky Chipotle Sauce
This chipotle-lime sauce is the secret weapon for tying all six layers together. Mix 3 tbsp chipotle peppers in adobo, 2 tbsp lime juice, 1 tbsp avocado oil, and ½ tsp smoked paprika until smooth.
Drizzle 2 tbsp over the finished dip before serving—it adds a bold, smoky kick that bridges the creamy and spicy layers. 🌶️
For extra depth, blend in 1 tbsp roasted red peppers from your ingredients list. This sauce works as a dip for veggie sticks or as a finishing sauce for tacos. Store leftovers in an airtight container for up to 5 days—it keeps beautifully in the fridge.
Cool Cucumber-Lime Crema
Balance the heat with this refreshing crema made from ½ cup dairy-free sour cream, 2 tbsp lime juice, 1 tbsp chopped cilantro, and ½ tsp sea salt.
Blend until silky smooth, then drizzle over the dip or serve on the side for scooping. The cool, tangy contrast makes each spicy bite more enjoyable. ✨
For a spicy twist, add ¼ tsp cayenne pepper to the crema. This version pairs perfectly with the smoky layers, creating a harmonious heat balance. Use it as a dip for tortilla chips or as a topping for nachos.
Spicy Mango-Habanero Salsa
This bright, fruity salsa cuts through the richness of the dip. Combine ½ cup diced mango, ¼ cup diced red onion, 2 tbsp chopped cilantro, 1 tbsp lime juice, and ½ tsp habanero pepper (seeds removed for milder heat). The sweet-spicy contrast elevates every bite. 🍍
For a vegan-friendly option, skip the honey and use agave syrup instead. This salsa works as a dip, topping, or even a marinade for grilled veggies. Store in an airtight container for up to 4 days in the fridge.
Avocado-Lime Crema
Blend 1 ripe avocado, ¼ cup dairy-free sour cream, 2 tbsp lime juice, and ½ tsp sea salt until smooth. This ultra-creamy topping adds a cool, velvety texture that complements the smoky layers. Drizzle over the dip or use as a dip for veggie sticks. 🥑
For extra richness, add 1 tbsp avocado oil to the blend. This crema is versatile—use it as a spread for toast, a sauce for tacos, or a finishing touch for bowls. It keeps for 3 days in the fridge when stored in an airtight container**.
Nutrition facts
Frequently asked questions
Can I make this bean dip without avocado?
Yes! Replace the avocado layer with ½ cup mashed white beans mixed with 1 tbsp lime juice and ½ tsp garlic powder. This keeps the creamy texture while removing the avocado’s richness. For extra flavor, stir in 1 tbsp roasted red peppers from your ingredients. The dip will still have that gradient effect, just with a different base flavor.
How do I adjust the heat level?
The cayenne in the sour cream layer controls most of the heat. For milder spice, reduce it to ¼ tsp or omit entirely. For extra heat, add ½ tsp chipotle powder to the cheese layer. Always taste as you layer—you can adjust the final heat by drizzling extra chipotle sauce on top after baking.
Can I prepare this dip ahead of time?
Assemble all layers except the hot oil in a 9×9-inch dish and refrigerate for up to 24 hours. Add the oil layer and bake just before serving. For make-ahead components, store the cheese mixture separately (up to 5 days) and the guacamole layer (up to 2 days) in airtight containers. Reassemble when ready to bake.
What’s the best serving dish for the gradient effect?
Use a clear glass baking dish (like Pyrex) to showcase the layers beautifully. For extra presentation, serve in a shallow white bowl with a ring mold pressed into the top layer before baking—it creates a perfect circular scoop. The contrast between the dip’s colors and the dish makes it look even more impressive when serving.
Why did my layers mix together?
This usually happens if layers weren’t pressed firmly enough or baked too long. For perfect separation: 1) Press each layer with the back of a spoon, 2) Chill the assembled dip for 30 minutes before baking, and 3) Bake at 375°F for exactly 18-20 minutes. The cheese layer should melt slightly but not run into lower layers. If it does mix, try assembling in a deeper dish next time.

- 3lb Prime Rib Roast Recipe: Juicy Pink Center Guaranteed in 3 Hours - October 31, 2026
- 5 Spice Cake Recipe: Warmly Spiced Layers With Crunchy Top - October 31, 2026
- 1950’s Macaroni and Cheese Recipe: Nostalgic Creamy Cheese Sauce with Buttery Noodles - October 31, 2026