
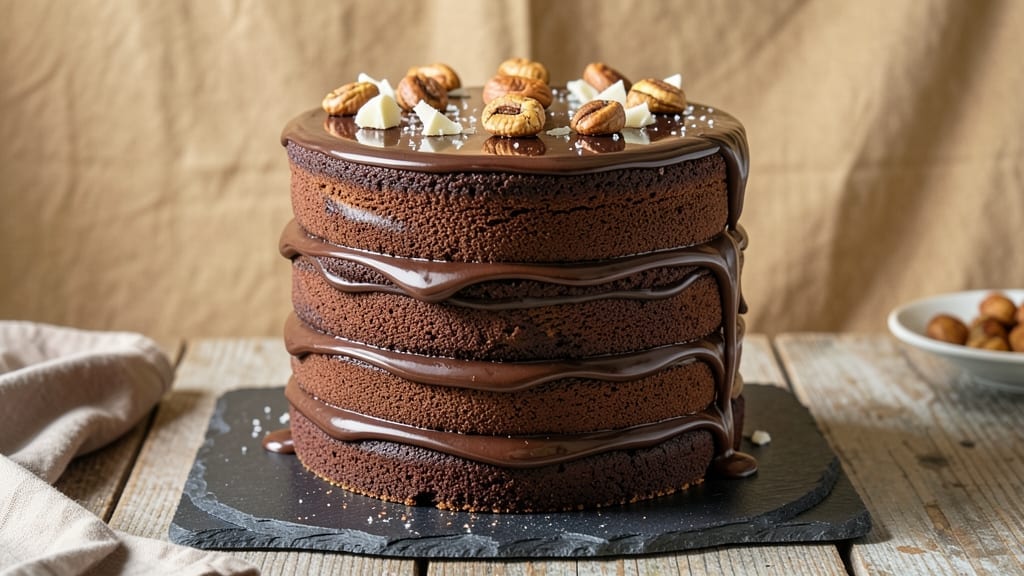
A 6-layer chocolate cake recipe isn’t just dessert—it’s a showstopper that demands attention with its towering height and decadent layers of fudgy perfection. 💫 The secret lies in precision: each layer must be baked to the same thickness, cooled perfectly, and filled with layers of chocolate ganache and buttercream.
I’ve baked this cake for celebrations big and small, and every time, the reaction is the same: awe followed by the first forkful.
What sets this recipe apart is the technique—baking the layers in 8-inch pans ensures even cooling and perfect stacking. The chocolate cake batter is rich but not dense, with a touch of espresso powder to deepen the flavor without bitterness.
Between each layer, a velvety chocolate ganache and smooth buttercream create a symphony of textures: moist cake, creamy fillings, and a glossy chocolate ganache that ties it all together.
By the time you slice into it, you’ll see why this cake is worth the effort: moist layers that don’t dry out, a filling so rich it melts in your mouth, and a finish that looks like it came from a bakery.
The key is patience—chilling between layers ensures clean cuts and prevents sliding. This isn’t just a cake; it’s an experience.
Perfect for birthdays, anniversaries, or any occasion where you want to impress. Let’s get baking!
Ingredients for 6 layer chocolate cake
Six layers of chocolate perfection—moist, fudgy, and stacked like a dream. Here’s what you need to build this showstopper.
| Ingredient | Amount | Notes |
|---|---|---|
| All-Purpose Flour 🌾 | 6 cups | Sifted for light texture |
| Unsalted Butter 🧈 | 2 ½ cups | Room temperature, high-fat |
| Granulated Sugar 🍚 | 3 cups | White or light brown |
| Dark Chocolate Chips 🍫 | 1 ½ cups | 70% cocoa minimum |
| Large Eggs 🥚 | 6 whole | Room temperature |
| Instant Espresso Powder ☕ | 1 tbsp | For deep chocolate flavor |
| Vanilla Extract 🌿 | 2 tbsp | Pure alcohol-free preferred |
| Baking Powder 🧂 | 1 ½ tsp | Aluminum-free preferred |
| Salt 🧂 | 1 ½ tsp | Fine sea salt |
| Heavy Cream 🥛 | 3 cups | Full-fat for richness |
| Chocolate Ganache 🍫 | 4 cups | Homemade or quality store-bought |
| Buttercream Frosting 🍰 | 4 cups | Swiss or American style |
| Dark Chocolate Bars 🍫 | 12 oz | 70% cocoa for ganache |
| Powdered Sugar 🍚 | 2 cups | For buttercream |
The chocolate matters most here. Valrhona or Guittard chocolate chips are my go-to—they melt smoothly and add depth. For the ganache, use 70% cocoa bars (like Lindt or Ghirardelli) that aren’t too sweet. The flour? King Arthur or Gold Medal brands bake evenly. Room-temperature butter is non-negotiable—it should dent when pressed but not be greasy. I always buy my butter in 2-pound blocks from Whole Foods for consistency. The espresso powder? Starbucks or Nescafé work fine—just don’t use instant coffee granules, which can clump.
No heavy cream? Full-fat coconut milk works in a pinch, though the texture won’t be identical. Short on powdered sugar? Blend granulated sugar in a food processor for a second. The buttercream can be Swiss-style (butter + sugar + cream) or American (butter + powdered sugar + milk). For extra richness, add 1 tbsp of cocoa powder to the frosting. The chocolate bars must be chopped finely for the ganache—a sharp chef’s knife or food processor makes this easier. And if you’re worried about the layers sliding, chill the cake for 30 minutes between fillings—it’s worth the wait.
Store the cake components separately: frosting in an airtight container for 1 week, ganache in a sealed jar for 10 days, and cake layers wrapped tightly for 3 days. The assembled cake? Keep at room temperature for 2 days or refrigerate for 5 days. For parties, I always bake the layers 1 day ahead—it lets the flavors meld. The ganache can be reheated gently if it thickens, but the frosting should be whipped fresh before assembly. And trust me, leftovers are rare—this disappears fast.
Why You’ll Love This Recipe
- I’ll be real: this cake costs less than half of what you’d pay at a café, but it looks and tastes like a high-end dessert. You’re using pantry basics—flour, butter, sugar—and stretching them into something impressive. Plus, the leftovers? They disappear faster than I can say “second slice.” My secret weapon for feeding a crowd without breaking the bank.
- No Fuss, Big Payoff: I swear, this cake is the kind of dessert that makes you feel like a baking genius—even if you burn toast. Six layers? Sounds intimidating, but it’s just alternating batter and chocolate chips in one pan, then baking. You won’t even need a stand mixer; a hand mixer does the trick, and the layers stay distinct without any fuss.
- Rich Without the Guilt: Between the dark chocolate chips folded into each layer and the butter-rich batter, this cake tastes like a decadent treat—but honestly, it’s not over-the-top sweet. The eggs add structure, so it doesn’t fall apart, and the sugar balances the bitterness of the chocolate just right. It’s the kind of dessert that feels special but won’t leave you regretting it at 3 AM.
- Party or Puddle: Here’s what sold me—this cake is exactly what you need for birthdays, potlucks, or even a lazy Sunday. Make it ahead, slice it later, and no one will guess it’s not from a bakery. (Yes, even on a Tuesday night.) And between us, it’s the one dessert that actually gets eaten—no sad leftovers here.
Step-by-step instructions for building a 6 layer chocolate cake
Here’s how to assemble this showstopper—layer by layer, with pro tips to keep everything moist and fudgy.
👨🍳 Step 1: Prepare the Cake Batter for Perfect Moisture
In a stand mixer fitted with the paddle attachment, cream the 2.5 cups unsalted butter and 3 cups granulated sugar on medium speed for 5-6 minutes until light and fluffy. You’re looking for a pale, airy texture that nearly doubles in volume—this incorporates air that prevents dense layers. Scrape the bowl occasionally to ensure even mixing.
Add the 6 whole large eggs, one at a time, mixing well after each addition. Then whisk in the 2 tbsp vanilla extract and 1 tbsp instant espresso powder. The espresso powder might seem odd, but it deepens the chocolate flavor without adding bitterness. In a separate bowl, sift together the 6 cups all-purpose flour, 1.5 tsp baking powder, and 1.5 tsp salt. Add this dry mixture to the wet ingredients in three additions, mixing just until combined after each addition. Overmixing develops gluten, which can make your cake tough.
🍳 Step 2: Bake the Cake Layers with Precision Timing
Preheat your oven to 350°F and grease six 6-inch round cake pans with butter and flour, or line them with parchment circles. Divide the batter evenly among the pans—you’ll need about 1 cup batter per pan. Bake for 25-30 minutes, or until a toothpick inserted into the center comes out clean. Rotate the pans halfway through for even baking. Let the layers cool in the pans for 10 minutes, then transfer to a wire rack to cool completely. This gradual cooling prevents cracking.
While the layers cool, melt the 12 oz dark chocolate bars with the 3 cups heavy cream for the ganache. Heat the cream until steaming (not boiling), then pour it over the chocolate in a heatproof bowl. Let it sit for 2 minutes, then whisk until smooth. This ganache will be your secret weapon for keeping each layer moist and rich.
🥘 Step 3: Assemble the Layers with Ganache and Buttercream
Place the first cake layer on your serving plate or cake stand. Spread ⅔ cup of the chocolate ganache evenly over the top, leaving a ½-inch border uncovered. This ensures the ganache doesn’t ooze out the sides. Top with ⅓ cup of the buttercream frosting, then place the second layer on top. Repeat this process for all six layers, alternating ganache and buttercream between each one. The ganache adds moisture, while the buttercream provides structure and sweetness.
Press down gently on each layer as you stack to eliminate air pockets. This step is crucial—if air gets trapped, your cake will be lumpy. Wrap the assembled cake in plastic wrap and refrigerate for at least 4 hours, or preferably overnight. This chilling time allows the ganache to set properly and the flavors to meld.
🎂 Step 4: Crumb Coat and Decorate for a Professional Finish
Once chilled, remove the cake from the refrigerator and let it sit at room temperature for 15-20 minutes to soften slightly. This makes it easier to work with the frosting. Spread a thin layer of buttercream—about ½ cup—over the entire cake to create a crumb coat. This seals in any loose crumbs and gives you a smooth surface for the final decoration. Return the cake to the refrigerator for 20 minutes to firm up the crumb coat.
For the final frosting, spread the remaining 3½ cups buttercream evenly over the cake, using an offset spatula to create smooth, even sides. Use a bench scraper to clean up any uneven areas. For extra flair, you can pipe additional buttercream rosettes or drizzle melted chocolate over the top. The key here is patience—take your time to create clean, professional-looking edges. Serve immediately or refrigerate for up to 2 hours before slicing.
Pro Tips For Making 6 Layer Chocolate Cake
- CHILL THE BATTER: I learned this the hard way—warm batter spreads like crazy between layers. After mixing, pop the bowl in the fridge for 15 minutes (yes, even if you’re impatient like me). The layers will stay distinct, and your cake won’t turn into a single dense slab.
- MELT CHOCOLATE RIGHT: Skip the microwave for your dark chocolate chips—it burns faster than you think. Instead, chop them into rough chunks and melt them in a heatproof bowl over simmering water (double boiler), stirring every 30 seconds. Smooth, glossy chocolate matters more than you’d expect.
- WEIGH YOUR FLOUR: That scoop-and-sweep method? It’s the reason your cake might be dry or gummy. Use a kitchen scale for the flour—6-layer cakes are unforgiving with volume measurements. Level off the top with a knife, but don’t pack it down. Precision here keeps every layer tender.
- ROOM-TEMP EGG TRICK: Cold eggs from the fridge will curdle your butter mixture faster than you can say “disaster.” Take them out 30 minutes before baking—room temp eggs blend smoothly and emulsify better. Trust me, your cake’s texture will thank you.
Dietary considerations for this recipe
Gluten-Free Adaptations
Swap the all-purpose flour for a 1:1 gluten-free baking flour blend like Bob’s Red Mill or King Arthur Measure for Measure. These blends include xanthan gum, which mimics gluten’s structure.
For best results, add an extra ½ tsp xanthan gum to the dry ingredients. Chill the batter for 30 minutes before baking to prevent crumbling. 💫
Dairy-Free Options
Replace the butter with vegan butter like Miyoko’s or Earth Balance, and use full-fat coconut milk instead of heavy cream for the ganache. For the buttercream, swap butter for vegan shortening or coconut oil (solidified).
The cake will still be rich but slightly less dense. Test with a toothpick to ensure doneness.
Lower Sugar Versions
Reduce granulated sugar to 2 cups and replace the remaining ½ cup with unsweetened applesauce or mashed banana. For the buttercream, use ½ cup powdered sugar instead of 1 cup.
The cake will be slightly less sweet but still moist. Add 1 tsp vanilla bean paste to enhance flavor without extra sugar.
Nut-Free Considerations
Check all ingredients for hidden nuts—some chocolate bars and baking blends contain traces. Use enclosed chocolate chips like Enjoy Life brand, and verify that your buttercream ingredients are nut-free. Store all components in separate containers to prevent cross-contamination during assembly.
Egg-Free Substitutions
Replace the eggs with a flax egg mixture: combine 1 tbsp ground flaxseed with 3 tbsp water per egg. Let it sit for 5 minutes to thicken before adding to the batter.
Reduce baking time by 2-3 minutes since egg-free cakes can dry out faster. Chill layers longer (1 hour) between fillings to prevent sliding.
Allergy-Friendly Storage
Store gluten-free or dairy-free versions in airtight containers with parchment paper between layers to prevent sticking. Refrigerate for up to 5 days—these adaptations hold moisture better when cold. Label containers clearly with ingredients and dates. For nut-free cakes, use separate utensils and serving tools** to avoid cross-contamination. ✨
Nutrition facts
Frequently asked questions
Why do I need to bake six layers instead of fewer?
The six layers create a dramatic height and rich flavor profile that smaller cakes can’t match. Each thin layer (1-inch thick) bakes faster and cools evenly, preventing dryness. The alternating ganache and buttercream between layers ensures every bite has both moist cake and creamy filling. Fewer layers would compromise the texture contrast and visual impact!
Can I use regular cake pans instead of 6-inch pans?
No—6-inch pans are essential for even baking and proper layer thickness. Larger pans (like 8-inch) would make each layer too thick, leading to dry centers. If you only have 8-inch pans, reduce the batter to ⅔ cup per pan and bake for 20-25 minutes, but expect slightly denser layers. Precision matters for a perfect stack!
How do I prevent the layers from sliding when stacking?
Chill the cake for 4 hours (or overnight) before decorating—this firms up the ganache. Use a serrated knife to level each layer, and spread fillings only on the top layer (not the sides). Press gently but firmly when stacking. For extra stability, place the cake in the freezer for 10 minutes after assembly before frosting.
What if my ganache is too thick or too thin?
If too thick, gently reheat in 10-second bursts in the microwave while stirring. If too thin, chill for 15 minutes or add 1 tbsp softened butter. For a smoother texture, strain the melted chocolate through a fine-mesh sieve before combining with cream. The ganache should be pourable but coat the back of a spoon—like thick honey!
Can I make this cake ahead of time?
Bake the layers 1 day ahead and store them wrapped in plastic at room temperature. Assemble the cake 24 hours before serving—this lets flavors meld. For the final frosting, add it 2 hours** before serving to prevent melting. The cake actually tastes better after resting, as the ganache softens slightly!

- 3lb Prime Rib Roast Recipe: Juicy Pink Center Guaranteed in 3 Hours - October 31, 2026
- 5 Spice Cake Recipe: Warmly Spiced Layers With Crunchy Top - October 31, 2026
- 1950’s Macaroni and Cheese Recipe: Nostalgic Creamy Cheese Sauce with Buttery Noodles - October 31, 2026