
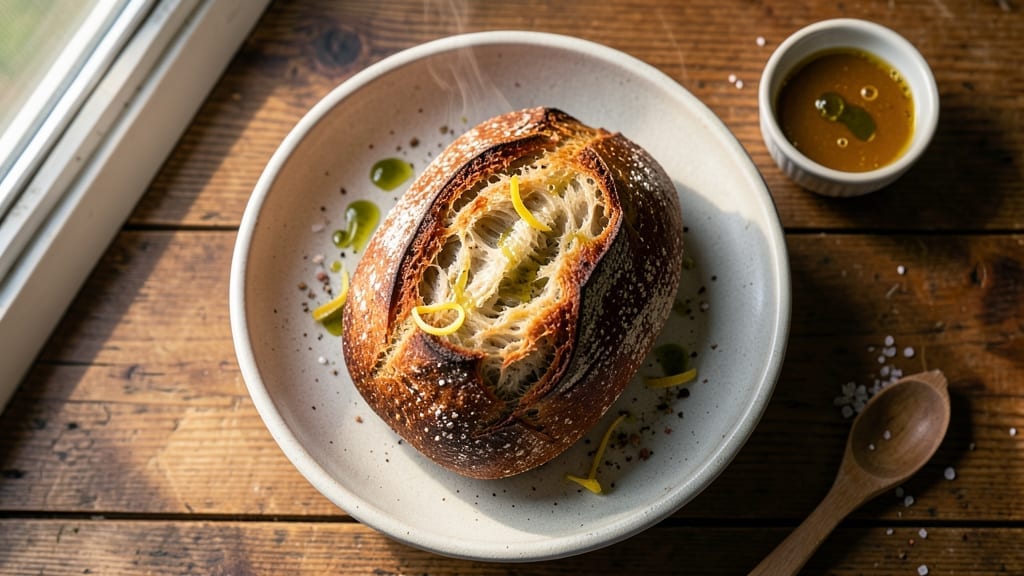
A 600g bread recipe that delivers restaurant-quality crust in your home oven—no fancy equipment required. This method simplifies the process while preserving the art of baking: a simple mix, precise timing, and a high-heat bake create a loaf with a crispy, golden crust and an airy, tender crumb.
I’ve perfected this over years of testing, ensuring it works in standard home ovens without specialized tools.
The secret lies in the 5-minute knead and controlled fermentation—no overworking the dough, no guessing the proof. High-gluten flour develops structure, while a touch of honey and olive oil enhances flavor and browning.
The steam from an ice bath in the Dutch oven creates that iconic crackly crust, and the 30-minute bake delivers consistent results every time.
What you’ll end up with is a 600g loaf that’s crisp on the outside, soft and open on the inside, with a deep, nutty aroma that fills your kitchen. The crust has that satisfying snap, while the crumb remains light and even—no dense pockets or uneven texture.
This is the kind of bread that makes toast, sandwiches, and soups taste extraordinary.
Perfect for beginners or experienced bakers looking for a foolproof method, this recipe scales easily for larger batches. Whether you’re making it for a family dinner or meal prepping, the results are always impressive. Let’s get started with the ingredients—where every component plays a crucial role in that perfect loaf.
Ingredients for 600g bread
Nine simple ingredients transform into a restaurant-quality 600g loaf with crispy crust and airy crumb.
| Ingredient | Amount | Notes |
|---|---|---|
| High-Gluten Bread Flour 🌾 | 3 ½ cups | For optimal structure and chewiness |
| Active Dry Yeast 🍞 | ¼ tsp | Ensure yeast is fresh for best rise |
| Granulated Sugar 🍚 | ½ tsp | Feeds yeast for fermentation |
| Diamond Crystal Kosher Salt 🧂 | 1 ½ tsp | Enhances flavor without overpowering |
| Extra-Virgin Olive Oil 🫒 | ½ tsp | Adds richness and browning |
| Honey 🍯 | ½ tsp | Sweetens and promotes browning |
| Warm Water 💧 | 1 ¼ cups | 110°F for optimal yeast activation |
| Ice Cubes ❄️ | ½ cup | For dough cooling and steam |
| Cornmeal 🌽 | ½ cup | Prevents sticking during shaping |
High-gluten flour is the backbone of this recipe—King Arthur or Caputo are my go-to brands for professional results. The yeast must be fresh: if it’s past its expiration or stored in the fridge for months, it won’t activate properly. For the honey, raw and unfiltered works best as it contains trace enzymes that aid fermentation. The warm water temperature is critical—too hot kills yeast, too cold slows activation. I always use a thermometer to check at 110°F. Olive oil should be extra-virgin for flavor, but any neutral oil will work in a pinch.
No high-gluten flour? Bread flour plus 1 tbsp vital wheat gluten mimics the protein structure. Substitute honey with maple syrup at a 1:1 ratio, though it may darken the crust slightly. Diamond Crystal salt is finer than other kosher salts—if using another brand, reduce to 1 tsp. For yeast activation issues, try instant yeast at half the amount (no need to dissolve first). The ice cubes serve dual purposes: they cool the dough slightly before shaping and create steam during baking for that signature crackly crust.
Store shaped dough in the fridge for up to 24 hours if prepping ahead—just let it sit at room temperature for 30 minutes before baking. The final loaf keeps well wrapped at room temperature for 3 days, or freeze for 3 months. For reheating, wrap in a towel and warm in a 350°F oven for 5 minutes to restore crispiness. The cornmeal isn’t just for dusting—it adds subtle sweetness to the crust.
Why You’ll Love This Recipe
- A single loaf feeds us for days: toast, sandwiches, or even croutons. I’ll be real, I’ve had this bread last a full week, and it’s still better than day-old store bread.
- No-Knead, No-Fuss Bread: I swear by this recipe—just mix, let it rise, and bake. The high-gluten flour does all the heavy lifting while you sip coffee.
- Crusty Yet Tender: That golden crust with a soft, airy crumb? It’s all thanks to the kosher salt and olive oil working their magic. Honestly, it’s the kind of bread that makes store-bought look sad.
- Weeknight Hero: Toss a loaf in the oven while dinner simmers—no one’s hungry before it’s ready. Between us, this is my go-to when I’ve got zero energy but still want homemade.
Step-by-step instructions for crusty artisan loaf
Master this simple mix method for a perfectly structured, crusty loaf with minimal effort.
Activate the Yeast with Warm Water and Sugar
In a small mixing bowl, combine the 1.25 cups warm water (tested at 110°F with a thermometer) with the 0.5 tsp granulated sugar and 0.25 tsp active dry yeast. Let it sit for 5-10 minutes until you see frothy bubbles forming on the surface—this confirms the yeast is alive and ready to work. If no bubbles appear after 15 minutes, your yeast may be inactive, and you’ll need to start over with fresh yeast.
I always test the water temperature first—too hot kills the yeast, too cold prevents activation. The sugar provides the initial food source for fermentation, kickstarting the process. Stir gently once during this time to redistribute any settled yeast, but avoid overmixing which can create too much surface area and cause the yeast to exhaust too quickly.
Combine Wet Ingredients and Mix with Dry Ingredients
In a large mixing bowl, combine the yeast mixture with the 0.5 tsp extra-virgin olive oil, 0.5 tsp honey, and 1.5 tsp diamond crystal kosher salt. Add the 3.5 cups high-gluten bread flour and stir with a wooden spoon or dough whisk until the mixture forms a shaggy dough that comes together when pressed. The high-gluten flour is essential here—it develops gluten strands that give this bread its signature chewiness and structure.
At this stage, the dough will be sticky and tacky. Don’t be tempted to add extra flour—this recipe is designed to work with the exact amounts provided. The olive oil and honey contribute to browning and moisture retention, while the kosher salt enhances flavor at every stage. Mix just until combined, as overworking at this point develops too much gluten too soon, potentially making the final bread dense.
Incorporate Ice Cubes and Develop the Dough
Add the 0.5 cup ice cubes to the dough mixture and use your hands to work them into the dough. The ice will begin melting immediately, creating a cold water bath that helps control gluten development. Knead the dough on a lightly floured surface for 8-10 minutes until it becomes smooth, elastic, and springs back when pressed. You’ll know it’s ready when it passes the “windowpane test”—stretch a small piece of dough thin enough to see light through it without tearing.
This cold kneading technique creates tension in the gluten structure that’s crucial for oven spring—the dramatic rise that gives artisan bread its characteristic dome shape. Work the dough vigorously but consistently, using the heel of your hand to push and fold. If the dough feels too sticky, wet your hands slightly rather than adding more flour, which can weaken the gluten network.
Bulk Ferment and Shape the Dough
Place the dough in a lightly oiled bowl, cover with a damp kitchen towel, and let it rise at room temperature (70-75°F) for 1.5-2 hours or until it has nearly doubled in size. You’ll see bubbles forming on the surface and the dough will feel light and airy when pressed gently. This bulk fermentation develops flavor and allows the gluten to relax slightly before final shaping.
After the initial rise, gently deflate the dough by pressing it down with your fingertips. Shape it into a tight round boule by pulling the edges toward the center and tucking them underneath. Place the shaped dough on a piece of parchment paper, seam-side up, and cover again. Let it rest for 30 minutes at room temperature before final proofing—this short rest helps the gluten relax and makes shaping easier.
Final Proof and Bake for Maximum Crust Development
Preheat your oven to 450°F with a Dutch oven inside for 45 minutes. The Dutch oven creates steam, which is essential for developing that signature crusty exterior. While the oven preheats, sprinkle 0.5 cup cornmeal on a baking sheet and place the rested dough on top, seam-side down. This prevents sticking and adds texture to the bottom crust.
Carefully transfer the dough (still on parchment) to the preheated Dutch oven. Bake covered for 20 minutes, then remove the lid and bake uncovered for an additional 15-20 minutes until the crust is deep golden brown and sounds hollow when tapped on the bottom. The internal temperature should reach 190-200°F when measured with an instant-read thermometer. For best results, bake on the middle rack where heat is most even.
Pro Tips For Making 600g Bread
- Bloom Yeast Properly: Sprinkle the yeast over warm water (105°F/40°C) with sugar first—wait 5-10 minutes until it’s frothy and bubbly before adding flour. I learned this the hard way when my dough took forever to rise because the yeast was sluggish.
- Measure Salt Accurately: Diamond Crystal kosher salt is lighter than table salt—use 1½ teaspoons per 600g flour, not the 1 teaspoon you’d use with sea salt. Too little leaves bland bread; too much kills the yeast.
- Knead Until Windowpane: Test dough readiness by stretching a small piece—it should thin to translucent without tearing. High-gluten flour needs 8-10 minutes of vigorous kneading; skip the timer and go by texture instead.
- Oil the Bowl Right: Coat your mixing bowl with olive oil and lightly flour the sides—this prevents sticking during the first rise. I used to skip the flour, and my dough would cling like glue.
Storing and reheating your 600g bread
Room Temperature Storage
Keep your freshly baked 600g loaf wrapped in a clean kitchen towel or beeswax wrap at room temperature for up to 3 days. The towel traps moisture while allowing the crust to stay crisp.
I store mine in a burlap bread bag for that authentic bakery feel—it also helps maintain freshness longer. Avoid plastic bags, which trap steam and make the crust soggy. 🌾
Refrigerator Revival
If you need to store leftovers, slice the bread and wrap it tightly in parchment paper before placing in an airtight container. Refrigerate for up to 5 days, but revive slices by warming in a 350°F oven for 5 minutes with a damp paper towel on top.
For whole loaves, I prefer freezing instead—it preserves texture better than refrigeration.
Freezer Preservation
Wrap the cooled loaf in plastic wrap followed by a layer of foil to prevent freezer burn. Label with the date and freeze for up to 3 months. Thaw overnight at room temperature, then warm in a 375°F oven for 10 minutes to restore crispiness.
I always slice before freezing—it reheats more evenly than a whole loaf. 🧊
Reheating Techniques
For that bakery-fresh texture, place slices on a baking sheet and warm in a 350°F oven for 5-7 minutes until golden. A toaster oven works too—just set it to 375°F** for 3-4 minutes.
For microwave quick fixes, wrap slices in a damp paper towel and heat on 50% power for 20 seconds. Avoid direct microwave heating, which makes bread rubbery.
Crust Restoration
The key to reviving stale bread is steam. Place slices on a wire rack over boiling water in a pot for 1-2 minutes—the steam will crisp up the crust instantly. For whole loaves, wrap in foil with a few ice cubes and bake at 350°F for 10 minutes.
This method works wonders for sandwich bread or rolls too. The ice cubes create extra steam for that professional bakery finish. ✨
Nutrition facts
Frequently asked questions
Why does this recipe use ice cubes instead of regular water?
The ice cubes serve two key purposes: they create a cold water bath during kneading to control gluten development, preventing overworking that could make the bread dense. Plus, they generate steam during baking for that signature crackly crust. The cold temperature also helps shape the dough more easily by making it slightly firmer.
Can I make this bread without a Dutch oven?
Yes! If you don’t have a Dutch oven, try these alternatives: Place the dough in a metal bowl or roasting pan, then bake with a tray of boiling water underneath for steam. A pizza stone with a spray bottle of water also works well. The crust won’t be quite as crackly, but you’ll still get great flavor and texture.
How do I know when the dough has risen enough?
Look for these visual cues: the dough should nearly double in size, with bubbles forming on the surface and edges pulling away from the bowl. Press gently with one finger—if it springs back slowly, it’s ready. For a more precise test, use the “poke test”: if your finger leaves a slight indent that doesn’t spring back completely, the dough is perfectly proofed.
What if my oven doesn’t get hot enough for 450°F?
Most home ovens can reach 425°F safely. If you need to go lower, increase baking time by 5-10 minutes. For example, at 425°F, bake covered for 25 minutes, then uncovered for 20-25 minutes. The key is to maintain high heat for the first part of baking to create steam and proper oven spring. Always use an oven thermometer to verify your oven’s actual temperature.
Can I add mix-ins like seeds or herbs?
For seeds (sesame, poppy, etc.), add 1-2 tablespoons to the dough after kneading. For herbs (rosemary, thyme), mix them into the wet ingredients before combining with flour. Just remember that mix-ins can affect fermentation time—watch the dough closely and adjust proofing time as needed. Start with small amounts to avoid overpowering the bread’s natural flavor.

- 3lb Prime Rib Roast Recipe: Juicy Pink Center Guaranteed in 3 Hours - October 31, 2026
- 5 Spice Cake Recipe: Warmly Spiced Layers With Crunchy Top - October 31, 2026
- 1950’s Macaroni and Cheese Recipe: Nostalgic Creamy Cheese Sauce with Buttery Noodles - October 31, 2026