
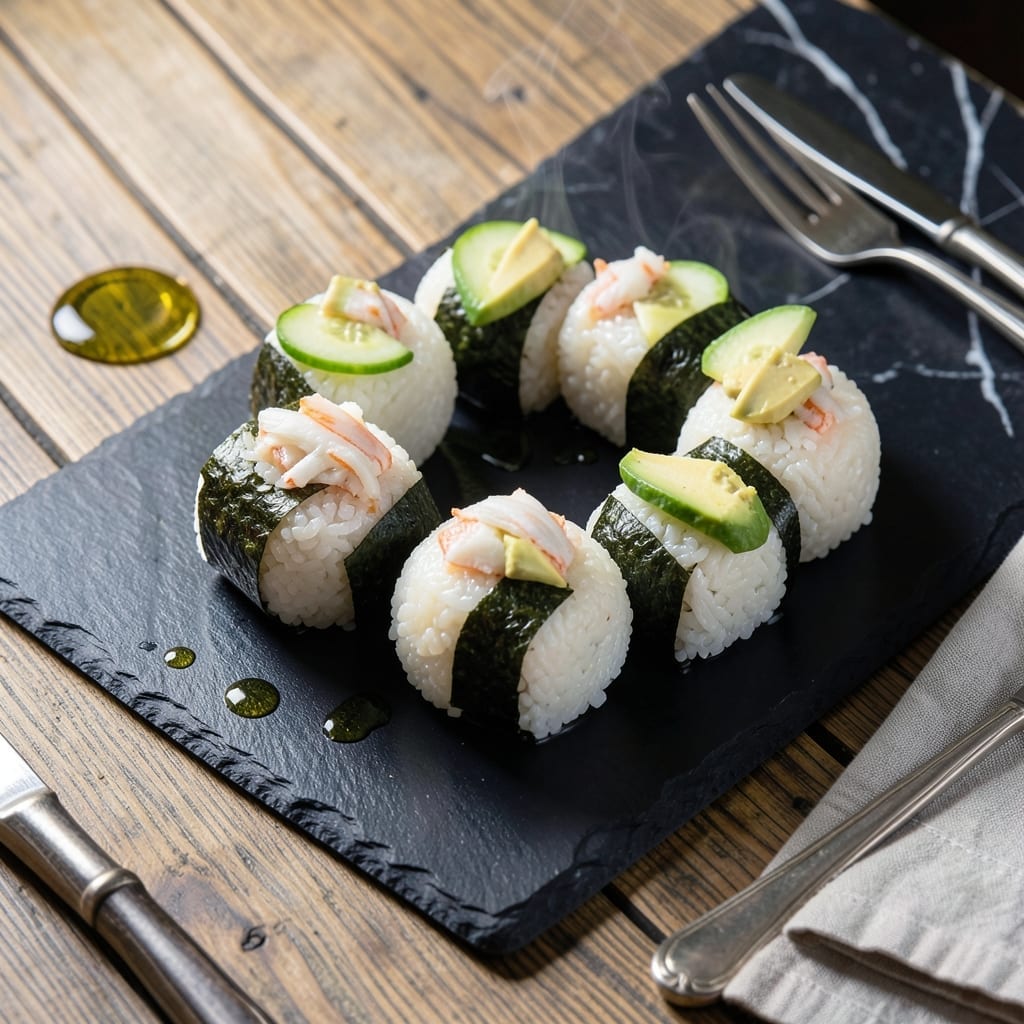
These portable delights bring restaurant-quality sushi flavor to your home kitchen without the rolling mat. I’ve perfected a method that ensures each bite delivers perfectly seasoned rice with balanced texture and taste.
The secret lies in the rice preparation—rinsed thoroughly, cooked precisely, and seasoned with the right ratio of vinegar, sugar, and salt. This creates the ideal sticky yet separate grain texture that holds its shape while remaining tender.
You’ll shape these by hand, creating uniform balls that can be filled with your favorite ingredients or left simple. The technique is straightforward but requires attention to detail for professional results every time.
Serve these as appetizers, pack them for lunches, or enjoy as a light meal. The versatility and portability make them ideal for any occasion.
Ingredients for Sushi Rice Balls
Short list of fresh ingredients makes these restaurant-quality bites at home without fuss.
| Ingredient | Amount | Notes |
|---|---|---|
| Sushi Rice 🍚 | 2 cups | Short-grain Japanese rice, rinsed well |
| Water 💧 | 2 ½ cups | Filtered for best results |
| Rice Vinegar 🍶 | ¼ cup | Unseasoned variety preferred |
| Granulated Sugar 🍚 | 2 tbsp | Dissolved in vinegar mixture |
| Sea Salt 🧂 | 1 tsp | Fine grain for even distribution |
| Nori Sheets 🌿 | 2 sheets | Cut into strips for garnish |
| Sesame Seeds 🌰 | 1 tbsp | Toasted for extra flavor |
| Soy Sauce 🫒 | ¼ cup | For dipping or seasoning |
| Imitation Crab 🦀 | 8 oz | Chopped finely for filling |
| Cucumber 🥒 | ½ whole | Peeled, seeded, diced small |
| Avocado 🥑 | 1 whole | Ripe, diced for filling |
| Pickled Ginger 🌸 | 2 tbsp | Chopped, optional garnish |
| Wasabi Paste 🌶️ | 1 tsp | Optional for heat lovers |
The rice is everything here. Short-grain Japanese rice like Koshihikari or Nishiki gives you that perfect sticky texture—avoid jasmine or basmati. Asian markets have the best selection, but most Whole Foods locations carry it too. Rinse it until the water runs clear (this removes excess starch and prevents mushiness). The vinegar matters too—Mizkan or Marukan brands are what you’ll find in most sushi restaurants.
No rice vinegar? Apple cider vinegar with a pinch more sugar works in a pinch, though the flavor won’t be quite as clean. Want to skip the imitation crab? Cooked shrimp or tuna (canned works) are great alternatives. Fresh out of nori? Furikake seasoning adds that umami kick without the seaweed. The avocado can be swapped for mango if you want something sweeter (trust me, it’s delicious).
These hold up surprisingly well—store in an airtight container in the fridge for up to 2 days. Don’t add avocado until serving time though (it browns fast). The rice itself can be made 1 day ahead—just keep it covered at room temp. Leftovers? Freeze the rice balls without fillings for up to 1 month.
Why You’ll Love This Recipe
- One Pot Wonder: I just dump everything in the rice cooker and let it do the work. The vinegar-sugar-salt mix practically seasons itself.
- Sweet-Tangy Magic: That first bite of rice with the vinegar’s zing and a hint of sugar? I could eat a whole bowl plain.
- Lunchbox Hero: My kids devour these cold in their lunches, and I pack them for picnics. Between us, they’re even better the next day.
- Pennywise Bite: A bag of sushi rice and a few pantry staples feed us for days. I’ll be real: it’s cheaper than takeout and just as satisfying.
Step-by-Step Instructions for Sushi Rice Balls
Here’s the method I use to create these little umami bombs with perfect texture every time.
Step 1: Prepare and Season the Sushi Rice
Rinse the 2 cups Sushi Rice under cold water until the water runs clear—this removes excess starch for fluffier grains. Combine it with the 2.5 cups Water in a rice cooker and cook until tender.
While the rice cooks, heat the 0.25 cup Rice Vinegar, 2 tbsp Granulated Sugar, and 1 tsp Sea Salt in a small saucepan just until the sugar dissolves. Fold this mixture gently into the warm rice once it’s done. Let it cool slightly—you want it sticky but not scalding when you handle it.
Step 2: Prepare the Fillings and Toppings
Chop the 8 oz Imitation Crab finely so it blends well into each bite. Peel, seed, and dice the 0.5 whole Cucumber into tiny pieces—this adds a refreshing crunch. Dice the 1 whole Avocado just before assembling to prevent browning.
Cut the 2 sheets Nori Sheets into thin strips for garnish, and toast the 1 tbsp Sesame Seeds in a dry pan until fragrant. Have the 0.25 cup Soy Sauce, 2 tbsp Pickled Ginger, and 1 tsp Wasabi Paste ready for serving—these are your flavor boosters.
Step 3: Shape the Rice Balls with Fillings
Wet your hands with water to prevent sticking—this is non-negotiable. Take a handful of seasoned rice (about ½ cup) and press a small indentation in the center. Add a spoonful of your fillings—crab, cucumber, and avocado work beautifully together.
Fold the rice around the filling, gently pressing to form a smooth ball or triangle. The key is to keep the pressure light but firm enough to hold its shape. If the rice cracks, you’re pressing too hard—moisten your hands again and try once more.
Step 4: Garnish and Serve
Roll the shaped rice balls in the toasted Sesame Seeds for a nutty finish, or wrap a strip of Nori Sheets around the base for a classic look. Arrange them on a platter with the Pickled Ginger and Wasabi Paste on the side.
Serve with the Soy Sauce for dipping, and watch them disappear. These bites are best enjoyed fresh, so assemble them just before serving to keep the rice moist and the fillings vibrant.
Pro Tips For Making Sushi Rice Balls
- Rinse the Rice: Wash the sushi rice under cold water until it runs clear—this removes excess starch so your rice balls hold shape without turning mushy. I learned this the hard way after my first batch collapsed into a sticky mess.
- Warm the Vinegar: Dissolve the sugar and salt in the rice vinegar while it’s still warm, about 10-15 seconds in the microwave. This ensures even distribution and prevents those awkward bites of pure sugar or salt.
- Use Wet Hands: Keep a bowl of water nearby and dip your hands in it before shaping each rice ball. Sounds obvious, but it stops the rice from sticking to your palms and ruining the shape.
- Rest Before Shaping: Let the seasoned rice sit covered for 5-10 minutes after mixing in the vinegar. My grandmother swore by this, and she was right—the rice absorbs the flavors better and holds together tighter when you form the balls.
Perfect Pairings for This Recipe
Dipping Sauces
Classic soy sauce is a must—use low-sodium if you prefer less salt. I mix mine with a dash of rice vinegar and a drop of sesame oil for extra depth. For a creamy option, whisk 2 tbsp mayo with 1 tsp sriracha for a spicy kick. 🌟
Fresh Sides
A simple edamame salad with 1 cup shelled beans, 1 tsp sea salt, and 1 tsp toasted sesame seeds adds protein. Quick-pickled cucumbers with 2 tbsp rice vinegar and 1 tsp sugar cut through the richness.
Beverage Pairings
Green tea, either hot or iced, complements the flavors perfectly. For beer lovers, a light Japanese lager like Sapporo or Asahi cleanses the palate. Sake, served chilled or at room temperature, enhances the umami notes beautifully.
Garnish Ideas
Sprinkle with furikake seasoning for a salty, savory boost. A drizzle of eel sauce adds sweetness, while a few drops of chili oil bring heat. Fresh scallions or cilantro add a pop of color and freshness.
For a fun twist, wrap each ball with a thin strip of nori or top with a small piece of pickled ginger. 💫
Nutrition Facts
Frequently Asked Questions
What’s the best rice for making rice balls?
Use short-grain Japanese rice like Koshihikari or Nishiki. Its high starch content makes it sticky enough to hold shape. Avoid long-grain varieties—they won’t clump properly.
How do I keep the rice from sticking to my hands?
Wet your hands with cold water before handling the rice, and re-wet as needed. This creates a barrier so the rice won’t cling. A small bowl of water nearby helps.
Can I make these ahead of time?
Shape and store unfilled rice balls in an airtight container in the fridge for 1 day. Add fillings like avocado just before serving to prevent browning.
What fillings work best for beginners?
Start with simple, dry fillings like imitation crab or tuna salad. Wet ingredients like fresh fish or avocado require more precision to avoid soggy rice.

- 6 Egg Cake Recipe with Oil: Light as Air With Buttery Moisture - October 4, 2026
- 4 Bean Casserole Recipe: One-Pan Heartiness With Smoky Paprika Depth - October 4, 2026
- 3-Ingredient Keto Mug Cake Recipe: Microwave Magic in 2 Minutes - October 4, 2026