
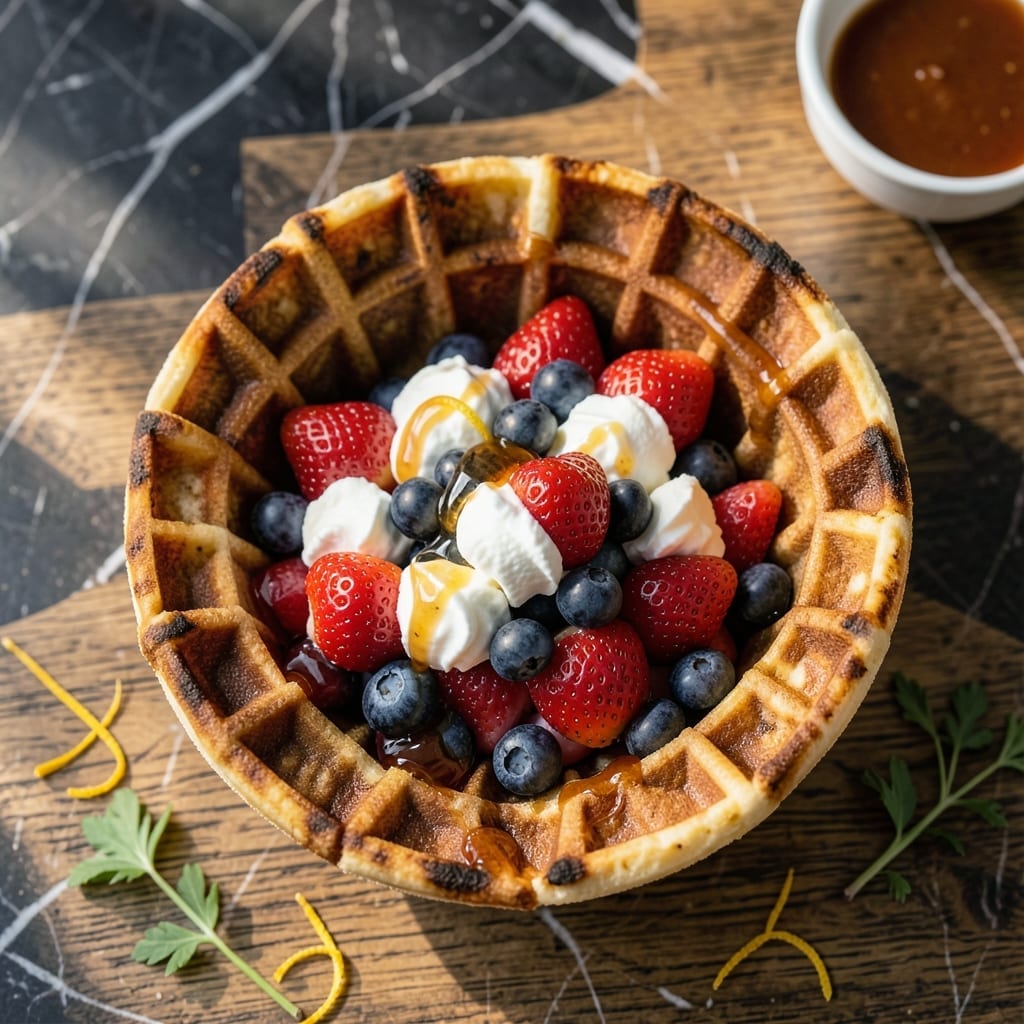
Breakfast just got more exciting with these creative waffle bowl vessels that transform ordinary mornings into something special. This method delivers crispy, golden edges and a sturdy structure perfect for holding both sweet and savory fillings.
The key is using a waffle iron to mold the batter into bowl shapes while maintaining that signature crunch. I’ve streamlined the process to make it fast without sacrificing texture or flavor, so you can focus on the fun part—filling them up.
These bowls hold up beautifully to everything from fresh fruit and whipped cream to scrambled eggs and cheese. They’re versatile enough for breakfast, brunch, or even dessert, making them a practical and impressive addition to any meal.
No special equipment beyond a waffle iron is needed. Here’s how to make them perfectly every time.
Ingredients for Waffle Bowl Recipe Ideas
Pantry staples plus a few fresh picks make these crispy waffle bowls a breeze.
| Ingredient | Amount | Notes |
|---|---|---|
| All-Purpose Flour 🌾 | 2 cups | Sifted for lighter texture |
| Granulated Sugar 🍚 | 2 tbsp | Adjust to taste preference |
| Baking Powder 🧂 | 2 tsp | Ensures proper rise and crispness |
| Salt 🧂 | ½ tsp | Fine grain preferred |
| Large Eggs 🥚 | 2 whole | Room temperature for best results |
| Whole Milk 🥛 | 1 ½ cups | Full-fat for richness |
| Unsalted Butter 🧈 | ¼ cup | Melted and cooled |
| Vanilla Extract 🌿 | 1 tsp | Pure extract preferred |
| Vegetable Oil 🫒 | 2 tbsp | For greasing waffle iron |
| Fresh Berries 🍓 | 1 cup | For sweet filling option |
| Whipped Cream 🍦 | ½ cup | Optional for topping |
| Scrambled Eggs 🍳 | 4 whole | For savory filling option |
| Shredded Cheddar Cheese 🧀 | ½ cup | For savory topping |
The flour is your foundation here. King Arthur or Gold Medal all-purpose give consistent results (that crispy edge you want). I always keep a bag in the pantry—no need for anything fancy. The baking powder? Check the expiration date; old stuff won’t rise right. For the milk, whole milk is non-negotiable for richness (trust me on the full-fat version). Organic Valley is my go-to brand for both milk and butter.
No buttermilk? Milk plus 1 tbsp vinegar gets you close. Out of fresh berries? Frozen works in a pinch—just thaw and drain first. For savory fillings, swap berries for scrambled eggs or even chili (leftover works great). The sugar can be reduced by half if you prefer less sweetness. Vanilla extract is worth the splurge—Nielsen-Massey is my favorite (or whatever’s on sale).
Batter keeps in the fridge for 24 hours—great for morning prep. Cooked bowls? 5 days in an airtight container. Reheat in the toaster or oven to restore that crunch (microwave = soggy). Freeze unfilled bowls for up to 1 month.
Why You’ll Love This Recipe
- Mix and Match: That’s the beauty of this recipe—I can bake the batter into bowls, then fill them with ice cream, fruit, or even chili for a sweet-savory twist.
- Pantry Staples: I already keep all-purpose flour, sugar, and eggs on hand, so I’m never more than five minutes from fresh, crisp waffle bowls.
- Crisp Edges: The baking powder gives them that golden, slightly crunchy shell that holds up to toppings without getting soggy.
- Double Duty: I’ll make a batch on Sunday and store extras in the freezer; they reheat in the oven in under ten minutes, so dessert is always a snap.
Step-by-Step Instructions for Waffle Bowls
Here’s the method I use to create crispy, moldable waffle bowls that hold both sweet and savory fillings perfectly.
Step 1: Prepare the Waffle Batter
In a large mixing bowl, whisk together the 2 cups All-Purpose Flour, 2 tbsp Granulated Sugar, 2 tsp Baking Powder, and 0.5 tsp Salt until evenly combined. I always sift my flour first—this creates a lighter texture that’s essential for bowls that aren’t too dense.
In a separate bowl, beat the 2 whole Large Eggs lightly, then whisk in the 1.5 cups Whole Milk, 0.25 cup Unsalted Butter (melted and cooled), and 1 tsp Vanilla Extract. Pour the wet mixture into the dry ingredients and stir just until combined—a few lumps are fine. Overmixing develops gluten and makes the bowls tough instead of tender.
Step 2: Cook the Waffles Until Golden and Crisp
Preheat your waffle iron and brush it generously with some of the 2 tbsp Vegetable Oil. This prevents sticking and ensures a crispy exterior that will hold its shape. Pour about ½ cup of batter onto the hot iron and cook for 3-4 minutes until the waffle is deep golden brown and crisp.
Here’s the thing—waffles for bowls need to be extra crispy to maintain their shape. If your waffle iron has a browning setting, use the highest level. You want them to be almost overdone, not soft and bendy. Cook one waffle at a time to ensure perfect results.
Step 3: Shape the Bowls While Hot
Immediately after removing a waffle from the iron, place it over a heatproof bowl or mug. Gently press the center down to form a bowl shape while the waffle is still hot and pliable. Hold it in place for 30-60 seconds until it firms up and holds its shape.
I’ve found that working quickly is key here. The waffles cool fast, and once they’re cool, they won’t mold properly. If you’re making multiple bowls, keep a stack of clean kitchen towels nearby to help insulate and shape them as you work.
Step 4: Fill with Sweet or Savory Options
For a sweet version, fill your waffle bowl with 1 cup Fresh Berries and top with 0.5 cup Whipped Cream. The contrast between the warm, crispy waffle and the cool, creamy filling is incredible. Drizzle with a little extra vanilla or berry syrup if you like.
For a savory option, fill the bowl with 4 whole Scrambled Eggs and sprinkle with 0.5 cup Shredded Cheddar Cheese. The cheese will melt slightly from the warmth of the waffle and eggs, creating a delicious, gooey topping. Serve immediately while everything is hot and fresh.
Pro Tips For Making Waffle Bowl Recipe Ideas
- Heat Your Waffle Iron: Crank it to medium-high and let it preheat for at least 5 minutes—I learned this the hard way after pulling apart too many undercooked bowls.
- Whisk Eggs First: Beat the eggs until they’re pale and frothy before mixing with dry ingredients; it adds lift that baking powder alone can’t.
- Skip Overmixing: Stir just until the flour disappears—lumps are fine, and overworking makes the bowls tough instead of crisp.
- Use Melted Butter: Swap the oil for 1/4 cup melted butter in the batter; it browns better and gives that rich, bakery-style flavor.
Common Mistakes When Making This Dish
Undercooked Batter
Don’t pull your waffle too early—it needs that deep golden brown color to hold its shape. If it’s pale and soft, it’ll collapse when you try to mold it. I always cook mine for the full 3-4 minutes or until the steam stops rising from the iron. 🌡️
Skipping the Oil
Even non-stick waffle irons need a light brush of vegetable oil before each batch. This prevents sticking and ensures a crisp exterior that won’t tear when shaping. I use a pastry brush to apply it evenly—no puddles, just a thin coat.
Cooling Too Long
Waffles harden fast, so shape them immediately. If they sit for more than 10 seconds after cooking, they’ll lose the pliability needed to form a bowl. I keep my heatproof bowl right next to the iron for a seamless transition.
Overmixing the Batter
Stir just until the flour is mostly incorporated—lumps are fine. Overmixing develops gluten, leading to tough, dense bowls instead of tender ones. I stop mixing as soon as I see no more dry flour streaks.
Using Low Heat
Set your waffle iron to its highest browning level. Low heat produces soft, pale waffles that won’t hold their shape. If your iron doesn’t have settings, cook for the full 4 minutes to guarantee crispness.
Wrong Molding Tool
Avoid using a small cup or glass—they’re too narrow and create steep sides that crack. I use a ceramic soup bowl (about 6 inches wide) for a gentle, sturdy shape. Always use heatproof tools to prevent burns.
Nutrition Facts
Frequently Asked Questions
What’s the best way to keep them crispy?
Store cooled bowls in a single layer in an airtight container at room temperature for up to 2 days. Reheat in a 350°F oven for 5 minutes to restore crunch.
Can I make them ahead of time?
Yes! Prepare the batter the night before and refrigerate. Cook, shape, and cool completely, then store in an airtight container for up to 3 days. Re-crisp before serving.
Why do my bowls keep cracking?
They’re likely not crispy enough when shaped. Cook until deep golden brown and mold immediately. Using a heatproof bowl that’s 6 inches wide helps prevent cracks.
Can I use a different batter?
Pancake mix works in a pinch, but add 1 extra egg for structure. For gluten-free, use a 1:1 baking flour and let batter rest 10 minutes before cooking.

- 6 Egg Cake Recipe with Oil: Light as Air With Buttery Moisture - October 4, 2026
- 4 Bean Casserole Recipe: One-Pan Heartiness With Smoky Paprika Depth - October 4, 2026
- 3-Ingredient Keto Mug Cake Recipe: Microwave Magic in 2 Minutes - October 4, 2026