
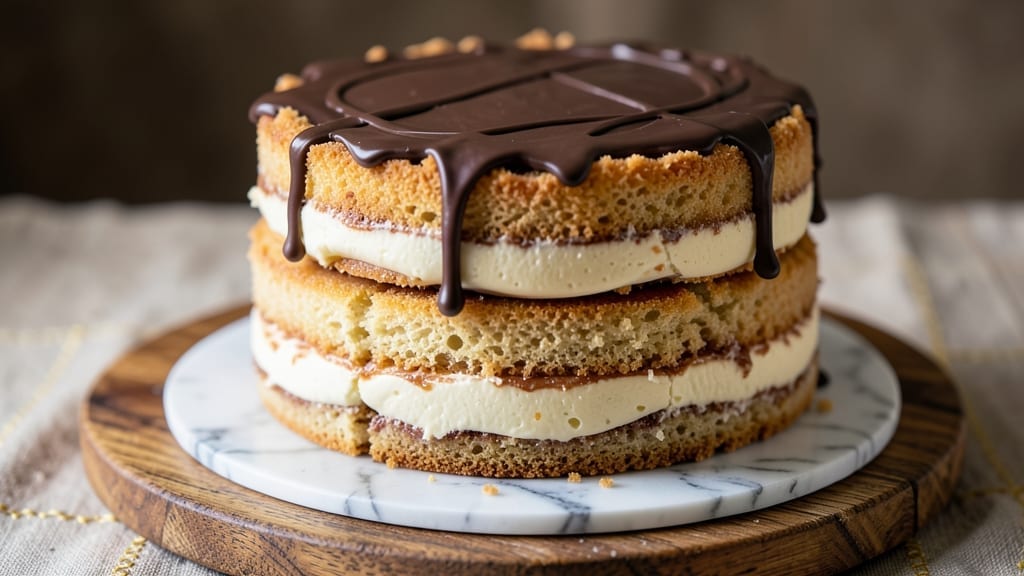
A 1.2 kg cake recipe that delivers perfectly fluffy vanilla layers without the dreaded cracks—this is the secret I’ve perfected after years of baking for celebrations. The key lies in precise ingredient ratios, gentle folding, and a strategic baking technique that ensures even rise and golden perfection.
Whether you’re feeding a crowd or saving for a special occasion, this recipe delivers restaurant-quality results at home.
What sets this apart is the no-crack method, which involves whipping egg whites to stiff peaks and folding them into the batter at the last moment. This creates air pockets that distribute evenly, preventing those unsightly splits that ruin an otherwise beautiful cake.
The buttercream filling—rich, velvety, and just sweet enough—ties the layers together without overpowering the delicate vanilla flavor.
By the time you pull this cake from the oven, you’ll have three even layers with a tender crumb and a subtle vanilla aroma that fills your kitchen. The secret to success?
Patience—letting the batter rest before baking and rotating the pan halfway through ensures consistent baking. This isn’t just a cake; it’s a showstopper that tastes as good as it looks.
Once cooled, the real magic happens with the buttercream—smooth, pipeable, and perfectly balanced to complement the cake’s natural sweetness. For extra flair, dust with powdered sugar or fresh berries, but the cake stands beautifully on its own. Ready to impress? Here’s how to make it.
Ingredients for 1 2 kg cake
Twelve ingredients. Three flawless layers. The secret to no-crack perfection lies in these staples.
| Ingredient | Amount | Notes |
|---|---|---|
| All-Purpose Flour 🌾 | 4 ½ cups | Sifted for lightness, room temperature |
| Granulated Sugar 🍚 | 2 ½ cups | Superfine preferred for smoothness |
| Unsalted Butter 🧈 | 2 cups | Cold, cubed, European-style preferred |
| Large Eggs 🥚 | 8 whole | Room temperature, separated carefully |
| Vanilla Extract 🌿 | 2 tbsp | Pure Madagascar bourbon preferred |
| Baking Powder 🍞 | 2 tbsp | Aluminum-free for tender crumb |
| Salt 🧂 | ½ tsp | Fine sea salt, Diamond Crystal preferred |
| Whole Milk 🥛 | 1 ½ cups | Room temperature, full-fat preferred |
| Powdered Sugar 🍚 | 6 cups | For buttercream, sifted |
| Vanilla Bean Paste 🌿 | 1 tbsp | For buttercream depth |
| Heavy Whipping Cream 🥛 | 1 ½ cups | Cold, heavy whipping grade |
| Cornstarch 🌾 | 1 tbsp | For buttercream stability |
The flour is non-negotiable—King Arthur or Gold Medal for reliable protein levels. I always sift it twice to eliminate lumps, which keeps those layers light as air. Butter? European-style or Plugrá melts slower, giving you more time to fold. Room temperature eggs are critical—cold whites won’t whip properly, and yolk separation becomes a nightmare. For vanilla, Madagascar bourbon extract has that bright, fruity note that cuts through the richness. Pro tip: measure your dry ingredients by weight if you’re feeling fancy—450g flour is more precise than cups. But honestly, cups work fine if you scoop and level properly.
No vanilla extract? Seeds from 1 vanilla bean scraped out works in a pinch, but it’s pricey. Substituting powdered sugar with regular sugar? Sift it first—otherwise, you’ll get graininess. Heavy whipping cream too expensive? Whipped cream at 35% fat works, but it won’t hold as stiff. The buttercream can be made ahead—3 days in the fridge—just re-whip before using. For the cake itself, if you’re at high altitude, reduce baking powder by 1/4 tsp. And whatever you do, don’t overmix the batter after adding the egg whites—just gentle folds until no streaks remain.
Store the cake layers wrapped in plastic at room temp for 2 days max—after that, they dry out. Buttercream? 5 days in the fridge, but bring it to room temp before re-whipping. For freezing, wrap layers individually with parchment between them—3 months in the freezer, thaw overnight in the fridge. I always make a double batch of buttercream—one for filling, one for frosting. The extra goes on croissants. Trust me, it’s worth it.
Why You’ll Love This Recipe
- Here’s what sold me: the moment that first slice melts in your mouth with that perfect balance of tender crumb and buttery richness. The eggs add structure without dryness, and the vanilla? It’s like a whisper of warmth that makes every bite feel special.
- No-Measurement Madness: I swear by this recipe because it’s one of those rare cakes where you just eyeball the butter and flour—no scales, no stress. That rich, golden crumb? It’s all thanks to the classic combo of butter and sugar, creamed just right, with vanilla tying it all together like a warm hug.
- Butter-Sugar Bliss: Here’s what sold me: the moment that first slice melts in your mouth with that perfect balance of tender crumb and buttery richness. The eggs add structure without dryness, and the vanilla? It’s like a whisper of warmth that makes every bite feel special.
- Party or Pantry: Between us, this cake is my go-to for birthdays, book club gatherings, or even when I just need dessert after a long week. It’s big enough to feed a crowd but slices neatly for leftovers—no one will guess it’s the same cake I made for my own lazy Sunday.
Step-by-step instructions for fluffy vanilla layers
Here’s how to bake a light-as-air 1.2 kg vanilla cake with no cracks—just science and patience.
Whip Butter and Sugar to Ribbon Stage
In a stand mixer fitted with the paddle attachment, beat the 2 cups unsalted butter (cold and cubed) with the 2.5 cups granulated sugar on medium speed for 5-7 minutes. You’re looking for a pale, fluffy mixture that nearly triples in volume—the sugar should dissolve completely, and when you lift the paddle, the ribbon should hold its shape for a few seconds.
This step is non-negotiable for that signature fluffiness. I like to scrape the bowl every minute with a rubber spatula to ensure even incorporation. If your butter isn’t cold enough, the mixture will feel greasy; if it’s too cold, it won’t cream properly. European-style butter works best here because of its higher fat content.
Add Eggs Gradually for Maximum Volume
Add the 8 whole large eggs one at a time, mixing on low speed after each addition until fully incorporated. This gradual approach prevents the eggs from scrambling and ensures a light, airy texture. After the last egg, add the 2 tbsp vanilla extract and mix for 30 seconds to combine.
Here’s the thing—room temperature eggs are crucial. If they’re straight from the fridge, they won’t incorporate properly and your cake will be dense. I like to separate the eggs first, letting the yolks and whites sit at room temperature for 30 minutes before using. The yolks should be slightly tacky when you touch them, and the whites should flow smoothly from the shell.
Alternate Dry and Wet Ingredients Gently
With the mixer on low speed, add one-third of the 4.5 cups all-purpose flour and mix just until combined. Then add half of the 1.5 cups whole milk, mixing until smooth. Repeat this process, ending with the final third of flour. This alternating method prevents gluten development and creates a tender crumb.
Sift the flour before measuring—this removes any lumps and aerates it slightly, which helps with the cake’s lightness. After adding all the ingredients, mix for another 30 seconds on low speed just to ensure everything is evenly distributed. Overmixing here will make your cake tough, so resist the urge to go faster or longer.
Divide and Bake for Even Layers
Preheat your oven to 350°F and grease two 9-inch round cake pans with butter or baking spray, then line the bottoms with parchment paper. Divide the batter evenly between the two pans—you should have about 6 cups of batter total, so 3 cups per pan. Tap the pans gently on the counter to remove any air bubbles.
Bake for 25-30 minutes, or until a toothpick inserted into the center comes out clean and the top springs back when pressed gently. I know it’s tempting to open the oven early, but don’t! The cake needs that full baking time to set properly and avoid sinking. The edges should be golden brown, but the tops should still look slightly underbaked—they’ll firm up as they cool.
Make the No-Crack Buttercream
While the cakes cool, make the buttercream by beating the 2 cups unsalted butter (softened) with the 6 cups powdered sugar, 1 tbsp vanilla bean paste, and 1 tbsp cornstarch on medium speed for 3-4 minutes. Add the 1.5 cups heavy whipping cream gradually, mixing until smooth and fluffy.
This buttercream is the secret to that professional finish. The cornstarch acts as a stabilizer, preventing the filling from becoming too soft or melting in warm temperatures. Beat the mixture until it’s light and holds its shape when spooned—it should be thick enough to pipe but still spreadable. If it’s too stiff, add a splash of milk; if too loose, add a bit more powdered sugar.
Assemble with Confidence
Once the cakes are completely cool, level the tops if necessary, then place one cake on a serving plate. Spread a generous layer of buttercream, then place the second cake on top. Crumb coat the entire cake with a thin layer of buttercream, then chill in the refrigerator for 20 minutes to firm up.
After chilling, apply the final layer of buttercream, smoothing it with an offset spatula. For a flawless finish, use a bench scraper to create clean edges. The cake should be fully assembled and ready to serve within 30 minutes of the final buttercream application. This method ensures the layers stay intact and the frosting doesn’t slide off—no cracks, no mess.
Pro Tips For Making 1 2 Kg Cake
- Weigh Your Butter Cold: After burning three cakes trying to soften butter too fast, I learned: scoop it straight from the fridge and weigh it cold—no need to warm it. The recipe calls for 200g (or whatever your scale says), but if you let it sit out, it’ll melt into a greasy mess that won’t cream properly with the sugar.
- Sift Flour Twice: I used to dump flour straight into the bowl and wonder why my cake was dense. For a 2kg batter, sift that flour twice—once to break up clumps, then again after mixing dry ingredients. The extra effort guarantees no lumps hiding in your batter, and your cake will rise like it’s supposed to.
- Room Eggs First: Crack those eggs into a bowl first thing and let them sit at room temp while you prep everything else. Cold eggs sink in the batter and can cause uneven baking—especially in a big cake. Give them 20-30 minutes to warm up, and your texture will be smoother.
- Test Doneness with a Toothpick: Skip the guesswork: insert a toothpick into the center of the cake before you pull it out of the oven. If it comes out with a few moist crumbs but no wet batter, it’s done. Overbaking dries out a 2kg cake fast, and underbaking leaves it gummy—neither is ideal. Trust the toothpick, not the recipe’s time estimate.
Troubleshooting this dish
Cracks in the Cake
Cracks usually appear when the cake bakes too quickly or the oven temperature fluctuates. To prevent this, I always bake my cakes at 350°F in the middle rack of the oven. Avoid opening the oven door during the first 20 minutes of baking—temperature drops cause cracks.
If you notice cracks forming, tent the cake loosely with aluminum foil to slow the baking process. 🌟
Dense or Dry Layers
Overmixing the batter or using cold eggs can result in dense layers. I recommend mixing the batter on low speed just until combined after adding the flour. For extra fluffiness, ensure your eggs are at room temperature—cold eggs won’t incorporate properly.
If your cake turns out dry, try adding 1 tablespoon of milk or heavy cream to the batter for moisture. 💧
Uneven Baking
Uneven baking often happens when the oven isn’t preheated properly or the cake pans aren’t evenly distributed. Always preheat your oven for at least 30 minutes before baking. Place the cake pans on the middle rack and rotate them halfway through baking for even heat distribution.
If your oven has hot spots, use an oven thermometer to ensure accuracy. 🌡️
Soggy Bottoms
Soggy bottoms are a common issue, but it’s easily fixed. Line your cake pans with parchment paper and grease them lightly with butter or baking spray. Avoid overfilling the pans—fill them only 2/3 full to allow room for rising.
If you notice the bottoms are still soggy, bake the cakes for an additional 5 minutes after they’ve passed the toothpick test. 🍞
Buttercream Issues
If your buttercream is too soft or doesn’t hold its shape, it might be too warm. Chill the buttercream for 10 minutes before using it to assemble the cake. For a stiffer consistency, add 1 tablespoon of powdered sugar at a time.
If it’s too thick, gradually add 1 teaspoon of milk until it reaches the desired consistency. Always use a stand mixer for smooth, fluffy buttercream. 🥄
Collapsed Cake
A collapsed cake is often caused by overfilling the pans or opening the oven too early. To avoid this, fill the pans only 2/3 full and don’t open the oven door until the cakes have baked for at least 20 minutes.
If your cake collapses slightly, don’t panic—it can still taste delicious! For a more professional look, use a serrated knife to level the tops after baking. 🔥
Nutrition facts
Frequently asked questions
Can I make this cake in a different-sized pan?
Yes, but adjust baking times carefully. For a 9-inch round pan, use two pans (as shown) for 25-30 minutes. A 10-inch pan will need 30-35 minutes, while an 8-inch pan requires 20-25 minutes. Always check for doneness with a toothpick—it should come out clean. The key is to avoid overbaking, which can make the cake dry.
How do I store leftover cake?
Keep the fully assembled cake at room temperature for up to 2 days in an airtight container. For longer storage, refrigerate for 5 days or freeze the layers (without frosting) for 3 months. Thaw frozen layers overnight in the fridge before assembling. The buttercream can be made 3 days ahead—just re-whip before using.
Why does my cake sink in the middle?
This usually happens from overmixing, underbaking, or opening the oven too early. Mix the batter only until combined after adding flour, and bake for the full 25-30 minutes without opening the door. If your oven runs hot, tent the cake with foil after 20 minutes to slow baking. A slightly underbaked center will firm up as it cools.
Can I substitute cake flour for all-purpose?
Yes, but reduce the amount by 2 tablespoons (use 4.25 cups instead of 4.5 cups). Cake flour has less protein, which prevents a tough crumb. If you don’t have cake flour, sift 4.5 cups all-purpose flour with 3 tablespoons cornstarch to mimic its texture. Always sift before measuring for the lightest result.
How do I make this cake gluten-free?
Replace the all-purpose flour with a 1:1 gluten-free baking flour blend (like Bob’s Red Mill) plus 1 extra teaspoon xanthan gum. Reduce the milk by 2 tablespoons to account for the blend’s moisture content. Gluten-free cakes often need 5-10 extra minutes in the oven. Test for doneness carefully—they may look set but still be underbaked inside.

- 3lb Prime Rib Roast Recipe: Juicy Pink Center Guaranteed in 3 Hours - October 31, 2026
- 5 Spice Cake Recipe: Warmly Spiced Layers With Crunchy Top - October 31, 2026
- 1950’s Macaroni and Cheese Recipe: Nostalgic Creamy Cheese Sauce with Buttery Noodles - October 31, 2026