
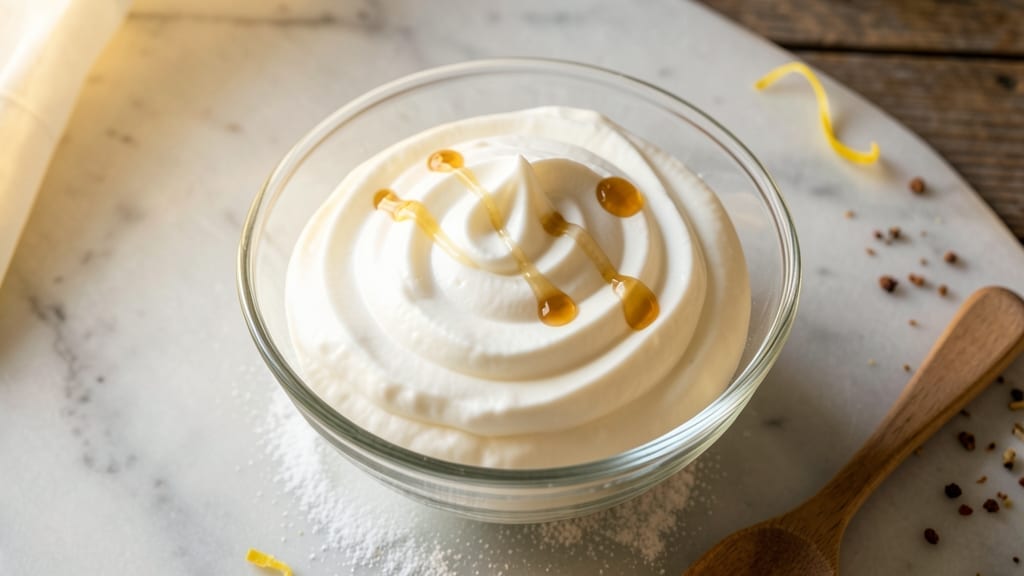
Creating 1 cup of whipped cream that’s light, airy, and ready in just 5 minutes is easier than you think. This recipe delivers restaurant-quality results with minimal effort—perfect for topping desserts, coffee, or fruit.
The secret lies in chilling the bowl and beaters, which ensures stiff peaks every time without overworking the cream.
All you need are two simple ingredients: heavy whipping cream and powdered sugar (or vanilla extract for flavor). The process is straightforward—just chill your mixing bowl and beaters for 15 minutes, then whip the cold cream on medium-high speed until soft peaks form.
This method guarantees fluffy, stable whipped cream that won’t deflate when folded into other dishes.
What you’ll end up with is cloud-like whipped cream that’s smooth, sweet, and ready to use immediately. The texture is light enough to pipe decoratively but sturdy enough to hold its shape.
For extra flavor, fold in vanilla, cocoa powder, or a splash of liqueur—endless possibilities start with this basic recipe.
Store any leftovers in an airtight container in the fridge for up to 24 hours, though it’s best used fresh. This recipe is your go-to for quick desserts, holiday treats, or a fancy coffee bar at home. Let’s get started!
Ingredients for 1 cup of whipped cream
Two core ingredients transform into restaurant-worthy whipped cream in minutes.
| Ingredient | Amount | Notes |
|---|---|---|
| Heavy Whipping Cream 🥛 | 1 cup | Cold, full-fat preferred |
| Powdered Sugar 🍚 | 1 tbsp | Sifted for smoothness |
| Vanilla Extract 🌸 | ½ tsp | Optional for flavor |
The heavy whipping cream is non-negotiable—full-fat (36% or higher) delivers the best stability and volume. Store-bought brands like Land O’Lakes or Organic Valley work perfectly, but avoid ultra-pasteurized varieties (they whip poorly). Chill your mixing bowl and beaters in the freezer for 15 minutes before starting—this critical step prevents butter formation. For powdered sugar, Domino or C&H brands are reliable, but sift it first to avoid graininess. The vanilla extract? Pure, alcohol-based extracts like McCormick or Nielsen-Massey elevate flavor without overpowering.
No vanilla extract? Vanilla bean paste or a pinch of ground cinnamon adds warmth instead. Short on powdered sugar? Superfine white sugar (pulse regular sugar in a blender) works in a pinch, but dissolve it first in 1 tsp water to prevent clumping. For extra stability, add 1 tsp cornstarch to the sugar—this trick prevents deflation when folding into other dishes. The cream must be cold** (not refrigerated cold—freezer cold) for optimal results. If your cream starts to curdle or grain, it’s overwhipped; stop immediately and fold in 1 tbsp meringue powder or an extra 1 tsp sugar to rescue it.
Use whipped cream immediately for peak texture, but it holds in an airtight container for up to 24 hours in the fridge. For longer storage, pipe into a freezer-safe bag, seal, and freeze for up to 1 month. Thaw overnight in the fridge before use. Pro tip: Wipe your beaters with lemon juice after washing to prevent rust. This recipe scales perfectly—double the ingredients for 2 cups while maintaining the same technique. For decorative piping, fit a pastry bag with a star tip for elegant swirls.
Why You’ll Love This Recipe
- Three Ingredients Only: That’s it—just cold cream, a pinch of sugar, and a splash of vanilla. No overcomplicating, no hunting for obscure spices. I keep a bowl and whisk in my fridge because honestly, this is the kind of recipe that should live in your back pocket for when you need something fast.
- Velvet Smooth Magic: The moment that chilled cream turns into fluffy clouds? Pure satisfaction. That first dollop melts on your tongue—just sweet enough, with vanilla cutting through like a whisper. It’s the kind of simple flavor that makes you wonder why you ever bought store-bought.
- Instant Crowd-Pleaser: Dessert for two? A coffee upgrade? A last-minute topping for pie? This fits everywhere. I’ve used it to top hot chocolate when friends drop by, dolloped it over fresh berries for my kid’s breakfast, and even mixed it into my morning oatmeal (don’t judge). It’s the ultimate “yes, and” ingredient.
- Never Wasted Again: A full cup of heavy cream won’t last long, but the leftovers? I freeze them in a silicone cup. Thaw it out later for pancakes, or microwave it for 10 seconds to revive it. And if you’re worried about cost? A single can of cream stretches to three batches—no guilt, just fluff.
Step-by-step instructions for whipped cream perfection
Mastering this classic topping takes just five minutes—here’s how to achieve flawless, stable whipped cream every time.
Chill Your Equipment and Ingredients
Place your mixing bowl and beaters (or whisk attachment) in the freezer for 10 minutes before starting. The cold equipment helps the cream whip faster and reach higher volume. I also recommend chilling the 1 cup heavy whipping cream in the refrigerator for at least 30 minutes beforehand—this ensures proper fat content activation for maximum volume.
While everything chills, sift the 1 tablespoon powdered sugar through a fine-mesh sieve into a small bowl. This removes any lumps that could create graininess in your finished whipped cream. The sugar isn’t just for sweetness—it stabilizes the cream by increasing surface tension, which prevents deflation. Keep the 0.5 teaspoon vanilla extract at room temperature unless you prefer a subtle vanilla flavor.
Whip the Cream to Soft Peaks
Remove the chilled bowl and beaters from the freezer and immediately pour the cold cream into the bowl. Add the sifted powdered sugar and vanilla extract, then begin whipping on medium speed using your electric mixer. After about 1 minute, you’ll notice the cream thicken slightly and small bubbles form on the surface—this is the beginning of the emulsification process.
Continue whipping for another 1-2 minutes until the cream forms soft peaks—when you lift the beaters, the cream should hold its shape momentarily but still drape slightly at the tip. This stage is crucial: over-whipping at this point leads to butter. If you’re using a hand mixer, you might need to work in 30-second bursts to avoid overheating the motor. The cream should feel cool to the touch throughout this process—warmth is the enemy of stability.
Achieve Stiff Peak Perfection
Increase the mixer speed to high and continue whipping until the cream forms stiff peaks. To test, lift the beaters and turn the bowl upside down—if the cream holds its shape without collapsing, you’ve reached the ideal consistency. This typically takes an additional 1-2 minutes of high-speed whipping, but timing can vary based on your cream’s fat content and room temperature.
Here’s the professional trick: stop whipping the instant you see stiff peaks forming. The cream will continue to thicken slightly even after you turn off the mixer. I like to give it a final 10-second burst on medium speed to ensure even distribution of the sugar and vanilla. At this stage, the cream should be glossy with no visible liquid—if you see weeping, you’ve over-whipped and may need to start over with fresh cream.
Serve Immediately for Best Results
Transfer the whipped cream to a serving bowl using a spatula, working quickly to minimize air exposure. For best texture, use the whipped cream immediately—it begins to deflate within 15 minutes as the air escapes. If you need to store it temporarily, cover the surface with plastic wrap pressed directly onto the cream to prevent a skin from forming.
The ideal serving temperature is chilled—place the bowl in the refrigerator for 5-10 minutes before using if it’s been sitting at room temperature. This recipe yields enough for 4 servings (about ¼ cup each), perfect for topping hot chocolate, fruit desserts, or coffee cakes. Remember that freshly whipped cream has the lightest, airiest texture—don’t wait too long before serving to your guests.
Pro Tips For Making 1 Cup Of Whipped Cream
- CHILL THE BOWL FIRST: Cold matters more than you think—pop your mixing bowl in the freezer for 10 minutes before starting. I learned this the hard way when my cream took three times longer to stiffen because the bowl was still room temperature. (Yes, even if you’re impatient like me.)
- USE COLD CREAM STRAIGHT: Skip the “let it sit out” step—just grab the heavy cream from the fridge and measure it cold. Room-temperature cream loses its ability to hold air, and you’ll end up with something closer to pudding than whipped cream. Trust the process.
- WHISK BEFORE SWEETENING: Whip the cream to soft peaks first, then fold in the powdered sugar and vanilla. Adding sugar too early can weigh down the mixture and make it grainy. I was skeptical until I tried it—now I never skip this.
- STOP AT SOFT PEAKS: Over-whipping turns cream into butter, and no one wants that. Aim for soft peaks (the cream holds its shape but flops over when the whisk is lifted). For 1 cup, this usually takes about 2-3 minutes of steady whipping—less if your cream is extra cold.
Perfect pairings for this 1 cup of whipped cream
Dessert Toppings
This whipped cream is perfect for topping warm apple pie or chocolate lava cakes—its light texture contrasts beautifully with rich desserts. For a festive touch, fold in ½ cup crushed peppermint candies or 1 tbsp cocoa powder before serving.
I love pairing it with fresh berries like raspberries or strawberries for a bright, summery dessert. 🍓
Coffee Bar Upgrade
Elevate your morning coffee with a dollop of vanilla whipped cream. For an extra-special treat, add ½ teaspoon instant espresso powder to the sugar before whipping—this creates a mocha-inspired topping that pairs perfectly with cappuccinos or lattes.
A sprinkle of cinnamon or sea salt on top adds a sophisticated finish. 💛
Fruit Pairings
Whipped cream and fruit are a match made in heaven. Try it with sliced bananas, peaches, or mango for a tropical-inspired dessert. For a savory twist, pair it with grilled pineapple or watermelon—the sweetness balances the cream’s richness.
I also recommend a lemon zest garnish to brighten the flavors. 🍍
Beverage Pairings
Beyond coffee, this whipped cream pairs wonderfully with hot chocolate or spiked cider. For a boozy twist, fold in 1 tablespoon bourbon or grand marnier before whipping.
It also works as a creamy topping for milkshakes or smoothies, adding a luxurious touch. Serve immediately for the best texture and flavor. 🍷
Savory Applications
Don’t limit whipped cream to desserts! Fold it into savory sauces for dishes like beef Wellington or stuffed mushrooms. A touch of Dijon mustard or soy sauce in the whipped cream adds depth.
For a lighter option, mix it with herb butter for a creamy spread on grilled vegetables or toasted bread. 🌿
Nutrition facts
Frequently asked questions
Can I use regular whipping cream instead of heavy whipping cream?
No, you should always use heavy whipping cream (36% fat or higher) for this recipe. Regular whipping cream (30% fat) won’t whip as high or hold its shape as well. The higher fat content is what creates those perfect stiff peaks. If you’re in a pinch, you can try half-and-half, but it won’t give the same luxurious texture—it’ll be more liquid and won’t hold its form.
What if my whipped cream turns into butter?
Over-whipping is the most common cause! Stop immediately when you see stiff peaks forming—the cream will continue thickening slightly even after you turn off the mixer. If it’s already butter-like, don’t panic: mix in 1 tablespoon powdered sugar and 1 teaspoon cold water, then whip again for 30 seconds. This often revives it. For future attempts, whip on medium-high speed and stop the moment peaks form.
How do I make flavored whipped cream without changing the texture?
Fold in flavorings after achieving stiff peaks to preserve the airiness. For vanilla, add ½ teaspoon extract to the sugar before whipping. For chocolate, gently stir in 1 tablespoon cocoa powder> or melted chocolate until fully combined. For fruit flavors, mix 1 teaspoon fruit puree with the sugar before whipping. Never add liquids like juice or milk—they’ll deflate the cream.
Can I whip cream without an electric mixer?
Yes! Use a hand mixer> or even a whisk, but you’ll need to work faster and more carefully. Chill your whisk in the freezer for 10 minutes> first, then whip vigorously in 30-second bursts> to avoid overheating. It takes 5-7 minutes> of continuous effort to reach stiff peaks. For best results, use a deep, narrow bowl> to maximize surface area. Patience is key—don’t rush the process!
Why did my whipped cream deflate so quickly?
Deflation happens when air escapes from the cream’s structure. The most common causes are: 1) warm cream> (always use cold ingredients), 2) over-whipping> (stop at stiff peaks), or 3) exposure to heat>. Store whipped cream in an airtight container> in the fridge and use within 24 hours> for best results. If it deflates while you’re working, try folding in 1 teaspoon meringue powder> to stabilize it.

- 3lb Prime Rib Roast Recipe: Juicy Pink Center Guaranteed in 3 Hours - October 31, 2026
- 5 Spice Cake Recipe: Warmly Spiced Layers With Crunchy Top - October 31, 2026
- 1950’s Macaroni and Cheese Recipe: Nostalgic Creamy Cheese Sauce with Buttery Noodles - October 31, 2026