
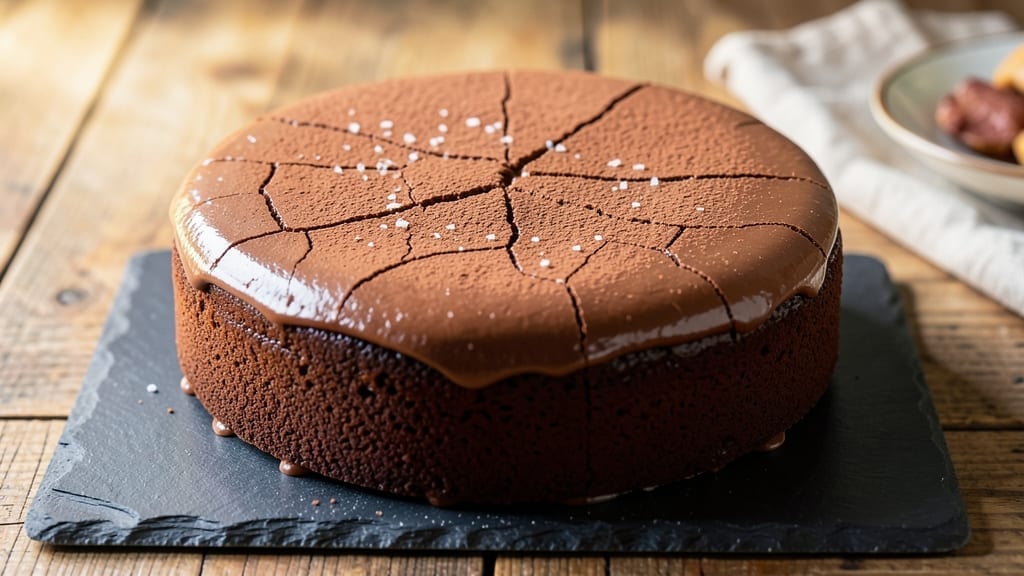
A 1-layer 6-inch chocolate cake recipe delivers restaurant-quality richness without the fuss of layering or assembly. This recipe focuses on a fudgy core with a velvety finish, perfect for individual servings or small gatherings.
The secret lies in precise ingredient ratios and controlled baking—no guesswork, just consistently delicious results every time.
What sets this cake apart is its single-pan simplicity: no layering, no frosting stress, just one perfectly baked cake with a smooth, spreadable chocolate frosting. The recipe uses standard pantry staples—flour, cocoa powder, butter, and eggs—so you won’t need to hunt for specialty ingredients.
Baking time is tight at 25-30 minutes, ensuring a moist center and golden edges.
By the time you pull it from the oven, you’ll have a dense, moist cake with a crackly top and a crumb that’s just shy of too tender. The frosting—made with the same chocolate base—stays smooth and spreadable without being overly sweet, letting the rich cocoa flavor shine.
This is the kind of cake that feels indulgent yet remains approachable for home bakers.
Whether you’re serving it solo or as part of a dessert spread, this cake’s portable size makes it ideal for parties, potlucks, or a special treat. The frosting can be adjusted for thickness, and optional toppings like crushed nuts or chocolate shavings add texture.
Ready to bake a cake that’s as impressive as it is easy?
Ingredients for 1 layer 6 inch chocolate cake
Pantry staples meet precision baking for a decadent single-pan chocolate cake.
| Ingredient | Amount | Notes |
|---|---|---|
| Unsalted Butter 🧈 | ¾ cup | Room temperature for creaming |
| Granulated Sugar 🍚 | 1 ½ cups | Light brown sugar for depth |
| Dutch-Processed Cocoa Powder 🍫 | ½ cup | High-quality for rich flavor |
| All-Purpose Flour 🌾 | ¾ cup | Sifted for light texture |
| Large Eggs 🥚 | 2 whole | Room temperature for blending |
| Vanilla Extract 🌿 | 1 tbsp | Pure Madagascar preferred |
| Baking Powder 🧂 | ½ tsp | Aluminum-free for best results |
| Salt 🧂 | ¼ tsp | Fine sea salt preferred |
| Hot Water 💧 | ½ cup | For activating cocoa |
| Milk 🥛 | ¼ cup | Whole milk for richness |
| Dark Chocolate Chips 🍫 | ½ cup | 70% cocoa for texture |
| Powdered Sugar 🍚 | 1 ½ cups | For smooth frosting |
| Heavy Cream 🥛 | ½ cup | Cold for whipped frosting |
The butter and cocoa powder are your flavor anchors here. European-style butter (like Plugrá) melts more smoothly, but any good unsalted will work. For cocoa, Hershey’s Special Dark is reliable, but Valrhona or Ghirardelli take it to the next level. The sugar matters too—light brown adds subtle caramel notes. Grab the Domino or Bob’s Red Mill brands for consistent quality. Room-temperature eggs blend better and create a lighter crumb, so take them out 30 minutes before baking. The milk and water should be hot when mixed with cocoa—just enough to dissolve it completely without curdling.
No Dutch-processed cocoa? Natural cocoa plus 1 tsp baking soda works in a pinch, but the flavor won’t be as refined. Short on butter? Coconut oil can replace half, but the texture will be denser. The frosting can handle substitutions too—cream cheese mixed with powdered sugar gives a tangy twist. For a lighter frosting, whip the cream to soft peaks and fold in powdered sugar gradually. The chocolate chips? Enjoy Life brand if you’re avoiding dairy, or Guittard for premium chocolate. Prefer white chocolate? Swap in 0.25 cup white chips and reduce the dark by the same amount.
Butter and eggs should sit at room temp for 1-2 hours before mixing. The batter keeps for 24 hours in the fridge—stir before using. Baked cake reheats beautifully in a 200°F oven for 10 minutes if it’s been chilled. Frosting can be made 2 days ahead and stored in an airtight container. For make-ahead baking, assemble the cake 1 day before serving—the flavors develop overnight. Portion into individual slices with a serrated knife for clean cuts. Store leftovers covered at room temp for 3 days or freeze for 1 month.
Why You’ll Love This Recipe
- One-Bowl Wonder: I swear by this recipe—just mix, bake, repeat. No extra bowls, no messy cleanup, and that rich cocoa butter base means every bite tastes like you spent hours layering.
- Fudgy Perfection: Between us, the Dutch-processed cocoa and melted butter create a texture that’s almost too good. Crusty edges, moist center—it’s the kind of cake that disappears in one sitting.
- Portion Control: A single 6-inch cake? My go-to for date nights or solo cravings. No stress over leftovers, but if there are, I’ll take it—it reheats beautifully for breakfast the next morning.
- Budget-Friendly Indulgence: Four simple ingredients, no specialty items. That butter and sugar combo delivers restaurant-quality richness without the markup, and a small pan means I’m not baking a whole sheet for one serving.
Step-by-step instructions for 1 layer 6 inch chocolate cake
Here’s how to bake a rich, fudgy 6-inch cake with a perfectly smooth frosting—no fancy equipment needed.
Cream Butter and Sugar for Maximum Fluffiness
In a stand mixer fitted with the paddle attachment, beat the 0.75 cup unsalted butter and 1.5 cups granulated sugar on medium speed for 3-4 minutes. You’re aiming for a light, airy texture that nearly doubles in volume and turns pale in color. This creaming process incorporates air, which creates that signature tender crumb.
I like to scrape down the sides of the bowl every 30 seconds to ensure even mixing. The butter should look completely smooth with no graininess—this prevents dense spots in your cake. If your butter isn’t room temperature (it should leave a slight indent when pressed), warm it gently in the microwave for 10-second intervals until just soft.
Incorporate Eggs and Dry Ingredients
Add the 2 whole large eggs, one at a time, mixing on low speed for 30 seconds after each addition. Then stir in the 1 tablespoon vanilla extract and 0.5 cup hot water. The hot water activates the 0.5 cup Dutch-processed cocoa powder and 0.5 teaspoon baking powder for better rise.
In a separate bowl, whisk together the 0.75 cup all-purpose flour, 0.25 teaspoon salt, and remaining 0.5 teaspoon baking powder. With the mixer on low speed, gradually add the dry ingredients to the wet mixture, mixing just until combined—30-45 seconds total. Overmixing develops gluten, which can make your cake tough. You’ll still see a few flour streaks, and that’s perfect.
Fold in Chocolate and Bake
Remove the bowl from the mixer and gently fold in the 0.5 cup dark chocolate chips using a silicone spatula. Pour the batter into a 6-inch round cake pan lined with parchment paper (pressed up the sides to prevent sticking). Smooth the top with a spatula.
Bake in a preheated 350°F oven for 25-30 minutes, or until a toothpick inserted in the center comes out with moist crumbs (not wet batter). The edges should be pulling away slightly from the pan, and the top should have a crackly crust. If the top browns too quickly, tent loosely with foil after 15 minutes and adjust baking time accordingly.
Prepare the Frosting While Cake Cools
While the cake bakes, prepare the frosting by whipping the 0.5 cup cold heavy cream to soft peaks in a chilled bowl. Gradually add the 1.5 cups powdered sugar and 0.25 cup milk, mixing until smooth and fluffy. The frosting should hold its shape when spooned—if it’s too thin, chill for 10 minutes before proceeding.
Once the cake has cooled completely (about 1 hour), spread the frosting evenly over the top. For extra richness, you can also pipe a simple border around the edges. The contrast of the fudgy cake and silky frosting is what makes this recipe special—don’t skip the cooling step, or the frosting will melt into the warm cake.
Serve and Enjoy
Slice the cake into 4 equal wedges and serve immediately. The texture should be dense and moist in the center with a slightly crisp exterior, while the frosting remains smooth and creamy. For best results, store leftovers in an airtight container in the refrigerator for up to 3 days—though it rarely lasts that long!
Here’s the thing—this cake tastes even better the next day as the flavors meld. If you’re feeling fancy, dust the top with a little extra cocoa powder before serving. The key to success? Precision in measuring and patience during baking. Trust the process, and you’ll have a showstopping dessert every time.
Pro Tips For Making 1 Layer 6 Inch Chocolate Cake
- MELT BUTTER SLOWLY: I learned this the hard way—dumping cold butter into hot sugar makes a greasy mess that fights you the whole time. Instead, melt the butter first, then stir it into the sugar just until combined. The texture stays smooth, and you won’t end up with a cake that tastes like it was mixed with lard.
- SIFT THE FLOUR: Skipping this step means lumps hiding in your batter, which turn into dense pockets in the cake. Use a fine-mesh sieve to toss the flour into the dry ingredients—it’s the only way to guarantee no gritty surprises. (Yes, even if you’re impatient.)
- ROOM-TEMP EGG WHITES: Cold egg whites won’t whip properly, and you’ll end up with a sad, flat cake. Take the whites out of the fridge 10 minutes before you need them—just enough time to warm up, but not enough to get rubbery. Trust me, your cake’s rise depends on it.
- DON’T OVERMIX THE BATTER: I used to beat this batter until it looked like it had a mind of its own. Too much mixing = tough cake. Stop as soon as the flour disappears—just a few swirls after that. The second you see streaks of dry flour, call it done. (Your future self will thank you.)
Dietary considerations for these flavors
Gluten-Free Adaptations
Swap the 0.75 cup all-purpose flour for a 1:1 gluten-free baking flour blend like Bob’s Red Mill or King Arthur. These blends include xanthan gum, which mimics gluten’s structure. Measure carefully—gluten-free flours absorb moisture differently. For best results, add 1 extra tablespoon of flour to compensate for dryness. 🌾
Dairy-Free Options
Replace the 0.75 cup butter with 0.75 cup coconut oil (solid at room temp) or dairy-free margarine. For the frosting, use 0.5 cup coconut cream (chilled overnight) whipped with 1.5 cups powdered sugar.
The texture will be slightly denser but still delicious. Substitute dairy-free dark chocolate chips like Enjoy Life brand for the cake.
Lower Sugar Version
Reduce the 1.5 cups granulated sugar to 1 cup and add 0.25 cup unsweetened applesauce or mashed banana to maintain moisture. For the frosting, cut the powdered sugar to 1 cup and add 1 teaspoon vanilla extract for extra flavor.
The cake will still be rich but with fewer calories per slice.
Vegan Substitutions
Use 0.75 cup vegan butter (like Earth Balance) and replace the 2 eggs with 0.5 cup flaxseed meal mixed with 1 cup water (let sit for 5 minutes to thicken).
For the frosting, whip 0.5 cup coconut cream with 1.5 cups powdered sugar and 1 tablespoon lemon juice for tang. The texture remains creamy and spreadable.
Nut-Free Considerations
Skip the 0.5 cup dark chocolate chips or use dairy-free, nut-free chocolate chips like Pascha brand. For added texture, sprinkle crushed freeze-dried strawberries or toasted coconut flakes on top before baking. These alternatives keep the cake visually appealing without nuts.
Allergen-Friendly Tips
Always check labels for hidden allergens—some brands of cocoa powder or vanilla extract may contain traces of dairy or nuts. For a completely allergen-free version, use a dedicated mixing bowl and utensils.
Store the cake in an airtight container with a label noting any substitutions made. This ensures safe sharing with guests who have dietary restrictions. ✨
Nutrition facts
Frequently asked questions
Can I bake this cake in a different-sized pan?
Yes, but adjust the baking time. For a 7-inch pan, bake 30-35 minutes at 350°F, and for an 8-inch pan, increase to 35-40 minutes. Always check doneness with a toothpick—it should come out with moist crumbs. The cake’s thickness affects baking time, so never rely solely on the original time.
Why did my cake turn out dry?
Overbaking is the most common cause. The cake is done when a toothpick comes out with moist crumbs, not wet batter. If your oven runs hot, reduce the temperature by 25°F and check at 20 minutes. Another culprit? Not enough fat—ensure your butter is properly creamed and consider adding 1 tablespoon sour cream to the batter for extra moisture.
How do I make this cake less sweet?
Reduce the granulated sugar to 1 cup and replace the remaining 0.5 cup with unsweetened applesauce or mashed banana. For the frosting, cut the powdered sugar to 1 cup and add 1 teaspoon vanilla extract or 1 tablespoon lemon juice to enhance flavor without extra sweetness. The cake will still taste rich but with a more balanced profile.
Can I use this recipe for a layer cake?
This recipe is designed for a single 6-inch layer to maintain optimal texture and baking time. For a two-layer cake, you’d need to double the ingredients and bake two 6-inch pans simultaneously. The frosting quantity would also need to be adjusted to 3 cups to properly cover both layers. The structure of this recipe prioritizes fudgy density, which works best in single layers.
What’s the best way to store leftovers?
Keep the cake in an airtight container at room temperature for up to 3 days. For longer storage, wrap individual slices in plastic wrap and freeze for up to 1 month. To reheat, warm slices in a 200°F oven for 5-7 minutes or microwave for 10-15 seconds. The frosting may soften slightly when reheated, but it remains spreadable and delicious.

- 3lb Prime Rib Roast Recipe: Juicy Pink Center Guaranteed in 3 Hours - October 31, 2026
- 5 Spice Cake Recipe: Warmly Spiced Layers With Crunchy Top - October 31, 2026
- 1950’s Macaroni and Cheese Recipe: Nostalgic Creamy Cheese Sauce with Buttery Noodles - October 31, 2026