
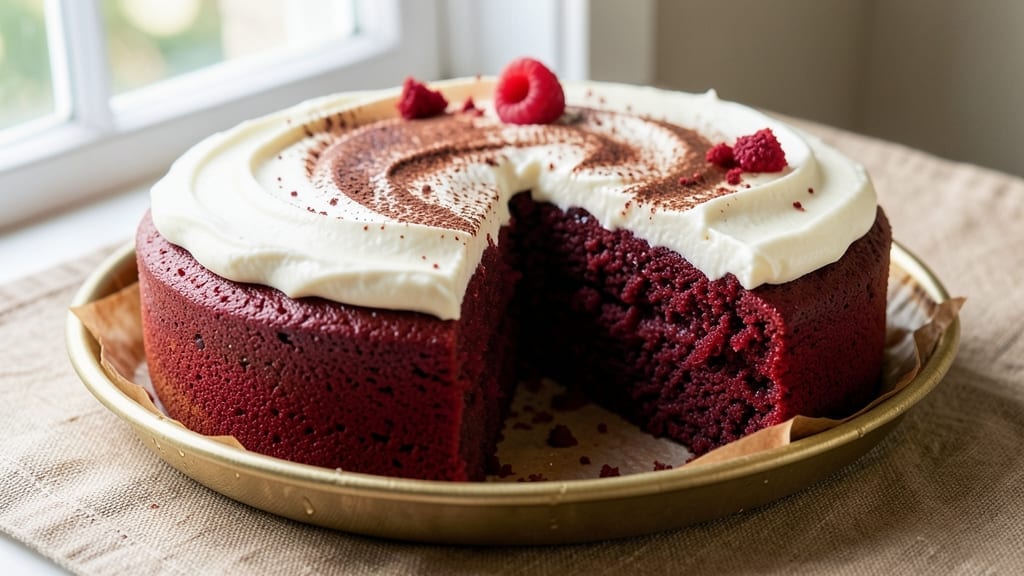
This 1-layer red velvet cake recipe delivers the perfect balance of tender crumb and velvety cream cheese frosting in every bite. The secret lies in buttermilk and precise measurements—no dry cake here.
I’ve perfected this version to stay moist for hours, with a subtle cocoa depth that’s neither too chocolatey nor too mild. The frosting? Rich, tangy, and just sweet enough to complement the cake’s signature flavor.
What sets this recipe apart is the foolproof technique for a moist crumb without overmixing, which keeps the texture light yet sturdy. The cake bakes in a single layer for even cooking, ensuring no dense spots or uneven edges.
And the frosting? It’s whipped to a smooth, pipeable consistency that clings beautifully without being too heavy. This is the kind of cake that disappears faster than you can say “red velvet.”
By the time you’re done, you’ll have a perfectly golden-topped cake with a tender crumb that’s moist but not soggy, topped with a layer of creamy, tangy frosting that’s the ideal match.
The flavor is classic—slightly sweet, with just enough cocoa to satisfy, and a hint of vanilla that ties it all together. It’s the kind of dessert that feels like a hug in cake form.
Whether you’re baking for a celebration or just craving a slice of comfort, this recipe delivers restaurant-quality results with minimal fuss. The ingredients are simple, the steps straightforward, and the outcome? Pure indulgence. Let’s get started—your taste buds will thank you.
Ingredients for 1 layer red velvet cake
Simple ingredients, restaurant-quality red velvet cake with velvety moist crumb and tangy frosting.
| Ingredient | Amount | Notes |
|---|---|---|
| All-Purpose Flour 🌾 | 2 ½ cups | Sifted for light texture |
| Granulated Sugar 🍚 | 1 ½ cups | White or light brown |
| Cocoa Powder 🍫 | ½ cup | Dutch-processed for smoothness |
| Buttermilk 🥛 | 1 cup | Room temperature preferred |
| Vegetable Oil 🫒 | ½ cup | Light or canola oil |
| Distilled White Vinegar 🍶 | 1 tbsp | For tangy flavor |
| Pure Vanilla Extract 🌿 | 1 tsp | High-quality preferred |
| Baking Soda 🧂 | 1 tsp | Freshly measured |
| Salt 🧂 | ½ tsp | Fine sea salt |
| Red Food Coloring 🎨 | ½ tsp | Liquid for even coloring |
| Large Eggs 🥚 | 2 whole | Room temperature |
| Cream Cheese 🧀 | 8 oz | Room temperature |
| Powdered Sugar 🍚 | 3 cups | Sifted for smooth frosting |
| Heavy Whipping Cream 🥛 | 1 cup | Cold for whipping |
| Pure Vanilla Extract 🌿 | 1 tsp | Same batch as cake |
The cocoa powder is where the magic happens—Dutch-processed gives that signature smooth flavor without bitterness. Bob’s Red Mill or Hershey’s Special Dark are my go-tos, but any high-quality brand works. Buttermilk? Room temperature is key—it mixes better and gives a lighter crumb. No buttermilk? Mix 1 cup milk with 1 tbsp vinegar, let sit 5 minutes. The red food coloring can be tricky—liquid gives even coloring, but gel works too if you prefer. Just use half the amount and dissolve in a little warm water first.
No vegetable oil? Melted butter works in a pinch (same amount), but the cake will have a slightly different texture. For the frosting, cold cream cheese and powdered sugar are non-negotiable—room temp cream cheese gets grainy. The powdered sugar should be sifted for a silky finish. Want extra tang? Add a pinch of salt to the frosting. And if you’re feeling fancy, swap the vanilla for a vanilla bean paste—those little specks of vanilla bean are worth it.
This cake keeps beautifully—3 days at room temp covered loosely, or 1 week refrigerated. The frosting? 3 days max in the fridge, but bring it to room temp before spreading. Freeze the unfrosted cake for up to 1 month—just thaw overnight before decorating. Pro tip: Wrap the cake in plastic wrap directly after baking to lock in moisture. And if you’re making it ahead, assemble the cake a day before—flavors meld even better.
Why You’ll Love This Recipe
- One-Bowl Wonder: I swear by this recipe—just mix everything in one bowl, no fuss. The buttermilk and vegetable oil make the batter so tender, you’ll forget it’s even cake.
- Velvet Magic: That cocoa powder and sugar combo? It’s the secret to the rich, slightly tangy flavor you can’t get anywhere else. Honestly, the first bite has me reaching for another slice.
- Birthday Every Day: Slice it for a quick dessert, frost it for a celebration, or serve it plain with whipped cream—this cake handles any occasion without extra effort. (Yes, even on a Tuesday night.)
- Budget Buster: Uses pantry staples you already own, and a single layer means no wasted ingredients. Plus, leftovers? They disappear faster than I can say “red velvet.”
Step-by-step instructions for 1 layer red velvet cake
Here’s how to bake a velvety-smooth red velvet cake with a perfectly balanced cream cheese frosting.
Prepare the Cake Batter for Maximum Moisture
Preheat your oven to 350°F and grease an 8-inch round cake pan, lining the bottom with parchment paper. In a medium bowl, whisk together the 1.5 cups granulated sugar, 0.5 cup vegetable oil, and 2 whole large eggs until fully combined and slightly thickened. This step ensures your cake will have that signature tender crumb.
In a separate bowl, sift together the 2.5 cups all-purpose flour, 0.5 cup cocoa powder, 1 tsp baking soda, and 0.5 tsp salt. Gently fold this dry mixture into your wet ingredients until just combined. I like to use a spatula to fold in the 1 cup buttermilk and 1 tbsp distilled white vinegar next, making sure to stop folding once everything is just incorporated—overmixing develops gluten and makes the cake tough.
Finally, stir in the 1 tsp pure vanilla extract and 0.5 tsp red food coloring until the batter is smooth and evenly colored. The batter should be thick but pourable. Pour it into your prepared cake pan and smooth the top with a spatula. Here’s the thing—don’t tap the pan on the counter to remove air bubbles. Instead, gently run a knife through the center to release any trapped air and ensure even baking.
Bake Until Perfectly Set
Place your cake pan in the preheated oven and bake for 30-35 minutes, or until a toothpick inserted into the center comes out clean with just a few moist crumbs clinging to it. This is the moment that matters: you want the cake to be fully set but still moist—not dry. If you pull it out too early, the center might be undercooked. If you bake it too long, it’ll dry out.
I recommend checking the cake at the 25-minute mark because ovens vary. When the top looks golden and the toothpick test passes, remove the cake from the oven and let it cool in the pan for 10 minutes. Then transfer it to a wire rack to cool completely. This gradual cooling prevents cracking and ensures the cake sets properly for frosting.
Make the Cream Cheese Frosting
While your cake cools, prepare the frosting by beating the 8 oz cream cheese and 3 cups powdered sugar together in a mixing bowl until smooth and creamy. I use a hand mixer for this step—it’s quicker and easier than a stand mixer. Add the 1 cup heavy whipping cream and 1 tsp pure vanilla extract gradually, mixing on high speed until the frosting is light and fluffy.
Here’s where it gets fun—taste your frosting and adjust the sweetness if needed. If it tastes too sweet, add a pinch of salt. If it’s not sweet enough, add a little more powdered sugar. The frosting should be thick enough to hold its shape but still spreadable. Real talk: don’t skip this tasting step. The frosting should complement the cake’s subtle sweetness and tangy flavor.
Frost and Serve Your Cake
Once your cake is completely cool, spread the cream cheese frosting evenly over the top and sides using an offset spatula. For a smooth finish, I like to dip the spatula in warm water between layers and wipe off any excess frosting. This ensures a clean, professional look. If you’re feeling fancy, you can create a simple border with extra frosting or sprinkle crushed red velvet cake on top for texture.
Let the cake sit at room temperature for 30 minutes before slicing to allow the frosting to set slightly. This resting period also lets the flavors meld together, giving you that perfect balance of moist cake and tangy frosting. Serve your red velvet cake at room temperature for the best experience—each slice should be rich, tender, and perfectly balanced.
Pro Tips For Making 1 Layer Red Velvet Cake
- Sift the Cocoa: I learned this the hard way—lumping cocoa powder ruins the texture. Use a fine-mesh sieve to sift it directly into the dry ingredients. This keeps the red velvet cake light and prevents those annoying gritty bits that make you question your life choices.
- Measure Buttermilk Cold: Warm buttermilk thins out faster than you’d think. Grab it straight from the fridge—no need to chill it extra—and measure it in the cup it comes in. This ensures you’re using the right thickness, which directly impacts how tender the cake turns out.
- Avoid Overmixing the Batter: Once you add the buttermilk, mix just until combined. Overmixing develops gluten and turns your cake into a dense brick. Stop when there are a few streaks of flour—your future self will thank you when slicing is effortless.
- Grease the Pan Twice: This isn’t the prettiest method, but it’s the tastiest. First, coat the pan with oil, then dust it with flour, tapping out the excess. Finally, rub a thin layer of softened butter over the flour. The cake won’t stick, and the sides will release cleanly—no scraping required.
Creative variations of this dish
Classic Southern Style
This version keeps the cake’s roots in the South but elevates it with a few key tweaks. Add ½ tsp ground cinnamon to the dry ingredients for warmth, and fold in ¼ cup sour cream with the buttermilk for extra moisture.
Top with a thin layer of homemade cream cheese glaze (mix ½ cup powdered sugar with 2 tbsp cream cheese and 1 tsp milk) before the frosting for that iconic Southern touch. 🌶️
Espresso Infusion
Swap ½ cup hot brewed coffee (cooled) for the buttermilk to deepen the flavor profile. The espresso enhances the cocoa without overpowering it—trust me, it’s a game-changer. For the frosting, add ½ tsp instant espresso powder dissolved in the vanilla extract.
This version is perfect for coffee lovers who want a sophisticated twist on the classic.
White Chocolate Swirl
Melt ½ cup white chocolate chips with ¼ cup heavy cream until smooth, then swirl it into the batter before baking. The white chocolate melts into delicate ribbons, creating a stunning marbled effect.
For the frosting, fold in ¼ cup mini white chocolate chips for extra texture and a sweet contrast. This variation is ideal for special occasions when you want to impress.
Spiced Orange Glaze
Skip the frosting and drizzle the cooled cake with a bright orange glaze made from 1 cup powdered sugar, 2 tbsp fresh orange juice, 1 tsp grated orange zest, and a pinch of cinnamon.
The citrus cuts through the richness of the red velvet, adding a refreshing twist. Garnish with toasted pecans for crunch. This variation is perfect for spring or summer celebrations.
Chocolate-Dipped Layers
After frosting the cake, melt ½ cup dark chocolate (60% cocoa) and drizzle it over the top in zigzag patterns. Let it set slightly before adding crushed red velvet cake crumbs for texture.
This variation adds a decadent touch that’s perfect for chocolate lovers. For extra flair, add gold leaf or edible gold dust on top before serving.
Vegan Adaptation
Replace the eggs with 2 flax eggs (2 tbsp ground flaxseed + 6 tbsp water, mixed and rested for 5 minutes). Use vegan butter instead of vegetable oil, and swap the buttermilk for 1 cup unsweetened almond milk + 1 tbsp apple cider vinegar.
For the frosting, use vegan cream cheese (like Kite Hill) and ensure your powdered sugar is vegan-friendly. This version keeps all the classic flavors while being completely plant-based. 🌱
Nutrition facts
Frequently asked questions
Why does my red velvet cake turn out dry?
Overbaking is the #1 culprit! Remove your cake when a toothpick comes out with moist crumbs (not clean). Another common mistake is overmixing—the batter should be just combined. For extra moisture, brush the warm cake with simple syrup (equal parts sugar and water) before frosting. The buttermilk and oil in this recipe are designed to keep it tender.
Can I make this cake in a different pan size?
Yes, but adjust baking time! For a 9-inch pan, bake 25-30 minutes (shorter time, wider surface area). For a 6-inch pan, bake 35-40 minutes. Always check with a toothpick. The cake should be set but still springy to the touch. Grease your pan well to prevent sticking, especially for darker pans that conduct heat differently.
How do I fix frosting that’s too thick or too thin?
Too thick? Add 1-2 tablespoons heavy cream and whip again. Too thin? Mix in 1-2 tablespoons powdered sugar until smooth. For extra stability, chill the frosting for 15 minutes before spreading—this helps it hold its shape. Pro tip: Use a hand mixer on high speed for 2-3 minutes to incorporate air and lighten the texture.
What’s the secret to that perfect red velvet color?
Use liquid red food coloring (not gel) and start with just ¼ teaspoon. Mix it into the wet ingredients first, then adjust gradually. For a deeper hue, add a pinch of beet powder (food-grade). Avoid overmixing—the batter should be vibrant but not neon. If the color seems off, remember: the frosting’s creaminess balances any intense red tones.
Can I make this cake ahead of time?
Bake the cake 1 day ahead and store it wrapped tightly at room temperature. Frost it 4 hours before serving to let flavors meld. For longer storage (3 days), refrigerate the frosted cake and bring to room temperature before slicing. Freeze unfrosted cakes for up to 1 month—thaw overnight in the fridge before decorating.

- 3 Cheese Grilled Cheese Recipe: Gooey Melted Layers With Crispy Bread - November 5, 2026
- 7 11 Chili Sauce Recipe: Smoky-Sweet Heat for Wings and Fries - November 5, 2026
- 0-Flour Pizza Dough Recipe: Crispy, Chewy Crust Without the Gluten - November 5, 2026