
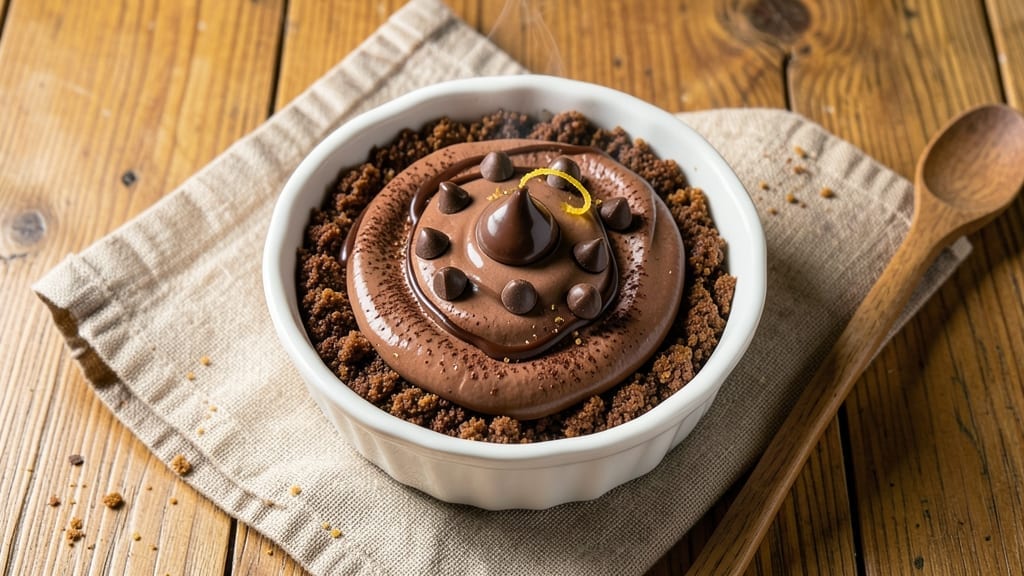
A 4-inch chocolate cheesecake in a ramekin delivers all the richness of a full-size dessert without the commitment—just one perfect bite of velvety texture and deep cocoa flavor. This single-serving recipe uses a graham cracker crust and a creamy filling that stays luscious thanks to a water bath baking method.
The secret to avoiding cracks lies in proper ingredient ratios and careful cooling, which I’ve perfected after testing countless variations. The crust gets crisped just enough to hold the filling while staying tender, and the chocolate layer develops a smooth, fudgy center with a slightly set exterior.
No special equipment is needed beyond a water bath setup, which ensures even baking and that signature silky texture. This recipe serves as the ideal dessert for one, whether you’re craving something indulgent after dinner or need a make-ahead treat for a cozy night in.
What you’ll end up with is a restaurant-quality cheesecake that’s rich, dense, and perfectly portioned—no leftovers to worry about. The chocolate flavor shines through without overpowering the creamy filling, and the crust provides just the right contrast.
Once chilled, it’s ready to serve with a dollop of whipped cream or a drizzle of chocolate sauce for extra decadence. The best part? This recipe scales effortlessly for larger batches, but the 4-inch size makes it perfect for special occasions or when you simply can’t resist a single slice.
Let’s get started on creating your perfect single-serving dessert.
Ingredients for 4 inch chocolate cheesecake
Restaurant-quality chocolate cheesecake in single-serving ramekins—rich, fudgy, and crack-free every time.
| Ingredient | Amount | Notes |
|---|---|---|
| Graham Cracker Crumbs 🍪 | ½ cup | Homemade or store-bought, finely crushed |
| Unsalted Butter 🧈 | ¼ cup | Melted, full-fat for richness |
| Granulated Sugar 🍚 | ¼ cup | For crust sweetness |
| Large Eggs 🥚 | 2 whole | Room temperature preferred |
| Cream Cheese 🧀 | 8 oz | Full-fat, room temperature |
| Semisweet Chocolate Chips 🍫 | ½ cup | High-quality, 60% cocoa |
| All-Purpose Flour 🌾 | 2 tbsp | For smooth texture |
| Vanilla Extract 🌸 | 1 tsp | Pure, high-quality |
| Milk 🥛 | ¼ cup | Whole milk for creaminess |
| Salt 🧂 | ¼ tsp | Fine sea salt |
| Dark Chocolate 🍫 | ¼ cup | 70% cocoa, chopped fine |
| Heavy Whipping Cream 🥛 | ¼ cup | Optional, for serving |
The cream cheese is the star here—Philadelphia brand is my go-to, but any full-fat works. Grab the block version if it’s cheaper at Costco or Walmart, and let it sit out for 30 minutes before mixing. For the chocolate, Ghirardelli or Guittard chips make all the difference—they melt smoother than store brands. The graham crackers? Honey Maid works best, but any sturdy cracker will do. If you’re making multiple, toast the crumbs in the oven for 5 minutes before adding butter—it keeps them crisp even after baking.
No cream cheese? Substitute with ricotta plus extra milk—it’s not identical, but close. Running low on chocolate chips? Melt a chocolate bar and let it cool slightly before mixing. The vanilla extract can be swapped for 1 tsp vanilla sugar if you’re out, but pure extract is worth the splurge. For a vegan version, use coconut cream cheese and flax eggs, but the texture won’t be exactly the same. And if you’re scaling up? Double the recipe, but use 6-inch ramekins—4-inch ones fill up fast with this rich batter.
This keeps beautifully for 4-5 days in the fridge, but honestly? It’s best eaten fresh. If you’re making ahead, bake it 1 day before serving and store covered. The chocolate layer sets as it cools, so don’t rush the chilling. For serving, a quick drizzle of melted dark chocolate or dollop of whipped cream takes it to the next level. Freezes for 2 months if wrapped tightly in plastic—just thaw at room temp before serving. And trust me, the first bite is always the best.
Why You’ll Love This Recipe
- Single-Serve Portion Control: I swear by these tiny cakes when I’m craving dessert but don’t want a full cheesecake. Four inches? Just right—one slice satisfies, and the rest stays fresh for days. No guilt, no waste.
- Rich Without Effort: That first bite of melted chocolate crust into velvety cream cheese filling? It’s like a hug for your taste buds. The graham cracker crumbs add texture, but honestly, the eggs and butter do all the heavy lifting—smooth, creamy, and foolproof.
- Party in a Pan: Between us, these are my secret weapon for gatherings. Bake a batch ahead, chill them, and slice when guests arrive. No last-minute stress, no messy serving—just grab a plate and go. (Yes, even on a Tuesday night.)
- Budget-Friendly Indulgence: Cream cheese and eggs stretch farther than you’d think, and graham crackers are cheaper than store-bought crusts. I make four for the price of one restaurant slice. Plus, leftovers? They disappear faster than I can say “second helping.”
Step-by-step instructions for 4 inch chocolate cheesecake
Here’s how to create a perfect single-serving chocolate cheesecake with a rich filling and crispy crust.
Prepare the Crust
Preheat your oven to 350°F. In a small bowl, mix together the 0.5 cup graham cracker crumbs and 0.25 cup melted unsalted butter until fully combined. The mixture should look like wet sand with no dry spots remaining.
Press the crumb mixture evenly into the bottom of four 4-inch ramekins, packing it down gently with a spoon or your fingers. You want the crust to be about ¼-inch thick and cover the entire base. Here’s the thing—don’t worry if it’s not perfect. The key is even distribution, not precision.
Bake the crusts for 8-10 minutes until they’re just starting to turn golden around the edges. Watch closely—they should be set but not browned. Remove from the oven and let them cool slightly while you prepare the filling.
Make the Chocolate Filling
In a medium bowl, beat the 8 oz cream cheese and 0.25 cup granulated sugar together until completely smooth and creamy. I use a hand mixer for this—it takes about 2-3 minutes on medium speed. You’ll know it’s ready when there are no lumps and the mixture looks silky.
Add the 2 whole large eggs, one at a time, mixing well after each addition. Then stir in the 1 tsp vanilla extract, 0.25 cup milk, and 0.25 tsp salt until fully incorporated. The batter should be thick but pourable—if it looks too stiff, add a splash more milk.
In a separate small bowl, melt the 0.25 cup dark chocolate and 0.5 cup semisweet chocolate chips together in 30-second intervals in the microwave, stirring between each interval. You want a smooth chocolate mixture that’s fully melted but not overheated. Fold this chocolate into your cream cheese mixture until evenly distributed.
Assemble and Bake
Divide the chocolate filling evenly among your prepared ramekins, filling each about ¾ full. Sprinkle 2 tbsp all-purpose flour evenly over the tops of each cheesecake—this creates a beautiful crust when baked.
Place the ramekins on a baking sheet (for easy transfer) and bake at 350°F for 25-30 minutes. You’ll know they’re done when the edges are set and the centers still have a slight wobble—like a perfect jiggle. A toothpick inserted should come out with a few moist crumbs, not wet batter.
Remove from the oven and let cool completely at room temperature. Real talk—this waiting period is crucial. The cheesecakes need time to set properly, or they’ll be too soft to cut. Once fully cooled, refrigerate for at least 2 hours (or up to 24 hours) before serving.
Serve with Whipped Cream
When ready to serve, top each cheesecake with a dollop of lightly whipped 0.25 cup heavy whipping cream. I like to whip it just until soft peaks form—enough to hold its shape but still creamy. The contrast of cool cream against warm chocolate is pure indulgence.
For the ultimate presentation, garnish with additional chocolate shavings or a dusting of cocoa powder. Each bite should deliver a perfect balance of creamy cheesecake and rich chocolate flavor with that crispy graham cracker crust. Enjoy immediately or store in the fridge for up to 3 days—they taste even better the next day!
Pro Tips For Making 4 Inch Chocolate Cheesecake
- Preheat Like a Boss: Run your oven to 325°F and give it a solid 20 minutes to stabilize—this tiny cake’s edges are unforgiving if the pan isn’t hot enough. I learned this the hard way when my first batch cracked like a dried riverbed because the pan was still cold.
- Melt Butter Slowly: Warm the butter for the crust in the microwave in 10-second bursts, stirring between each, until just melted—not steaming. Overdoing it turns it greasy, and your graham crumb base will turn to sad, clumpy paste instead of a crisp, cohesive layer.
- Whip Cream Cheese First: Beat the cream cheese and sugar together until completely smooth before adding eggs—no lumps, no streaks. I used to rush this, and the final texture was always grainy. Take the extra 30 seconds; your cheesecake will thank you with a velvety finish.
- Water Bath Without Foil: Wrap the pan in heavy-duty aluminum foil first, then place it in the water bath—this keeps moisture out while allowing even heat transfer. Skip the foil, and you’ll end up with a soggy bottom (yes, even with a 4-inch pan). Trust me, it’s worth the extra step.
Essential equipment for great 4 inch chocolate cheesecake
Ramekin Essentials
You’ll need four 4-inch ramekins—I recommend Wilton brand or Nordic Ware for their even heat distribution. These should be oven-safe up to 400°F and have straight sides for easy removal.
If you’re making just one cheesecake, a single 4-inch ramekin with a removable bottom (like USA Pan) makes cleanup a breeze. 🧑🍳
Water Bath Setup
A shallow baking dish (like a 9×13-inch metal pan) is critical for the water bath. Place your ramekins inside this dish, then fill the pan with hot water (about 1 inch deep) before baking.
This prevents cracking by creating even heat distribution. I use a pyrex dish because it’s heat-resistant and easy to handle.
Mixing Tools
For the filling, a hand mixer (like KitchenAid or Cuisinart) is a game-changer—it blends the cream cheese ultra-smooth in 2-3 minutes. A spatula helps scrape down the bowl for no missed lumps.
For melting chocolate, a microwave-safe bowl (like Pyrex) with 30-second intervals prevents scorching. A fine-mesh sieve ensures smooth chocolate integration.
Crust Prep Tools
A small mixing bowl (for crust) and a spoon or fork work perfectly to press crumbs into ramekins. For even distribution, I tap the ramekins gently on the counter after pressing.
A pastry brush (optional) helps coat the crust edges with melted butter for extra crispiness. Pre-baking the crust for 8-10 minutes ensures it holds up to the filling.
Cooling & Storage
After baking, let cheesecakes cool completely at room temperature (about 1 hour) before refrigerating. I use airtight containers (like Rubbermaid) for storage—stack them with parchment paper between layers to prevent sticking. For serving, a small offset spatula helps scoop out the cheesecake cleanly from ramekins.
Optional Garnishes
For presentation, a microplane creates chocolate shavings, and a sifter dusts unsweetened cocoa powder. A piping bag with a star tip adds whipped cream elegantly. Fresh raspberries or mint leaves balance the richness—just add them right before serving to keep them vibrant. 💫
Nutrition facts
Frequently asked questions
Why do I need a water bath for these mini cheesecakes?
A water bath (or bain-marie) is essential for 4-inch chocolate cheesecakes because it creates even heat distribution, preventing cracks and ensuring a silky texture. The steam helps the filling set gradually while keeping the center moist. Without it, the edges overbake while the center stays too soft—resulting in a dense, rubbery texture. This method mimics professional bakeries’ techniques for perfect results every time.
Can I make these without a hand mixer?
Yes! While a hand mixer makes blending cream cheese smooth in 2-3 minutes, you can achieve similar results with a whisk and elbow grease. Beat the cream cheese and sugar vigorously for 5-7 minutes until completely smooth. For the eggs, add them one at a time and mix thoroughly with a spatula. The key is patience—don’t rush this step, or you’ll end up with lumps that affect the texture.
How do I prevent cracks in my chocolate cheesecake?
Cracks happen when the cheesecake cools too quickly or the oven isn’t hot enough. First, ensure your oven is fully preheated to 350°F. Second, don’t open the oven door during baking—this causes temperature fluctuations. Third, let the cheesecakes cool completely at room temperature before refrigerating. For extra insurance, sprinkle the 2 tbsp flour on top before baking, which creates a protective crust that minimizes cracking.
Can I use a different crust instead of graham crackers?
For a nutty flavor, try 1 cup crushed pecans or walnuts mixed with 0.25 cup melted butter. For a cookie twist, use Oreo crumbs (about 0.5 cup crushed Oreos) with 0.25 cup melted butter. Just ensure your crust ingredients are sturdy enough to hold the filling. If using a softer crust (like vanilla wafers), pre-bake it for 10-12 minutes to ensure it stays crisp.
How do I serve these without a ramekin?
If you don’t want to serve in ramekins, chill the baked cheesecakes for 2 hours, then run a thin knife around the edges to loosen. Gently invert onto a plate or use a small offset spatula to scoop them out. For a rustic look, serve in mini mason jars or espresso cups. If you’re feeling fancy, place them on a dessert plate with a drizzle of chocolate sauce and fresh berries for a stunning presentation.

- 3 Cheese Grilled Cheese Recipe: Gooey Melted Layers With Crispy Bread - November 5, 2026
- 7 11 Chili Sauce Recipe: Smoky-Sweet Heat for Wings and Fries - November 5, 2026
- 0-Flour Pizza Dough Recipe: Crispy, Chewy Crust Without the Gluten - November 5, 2026