
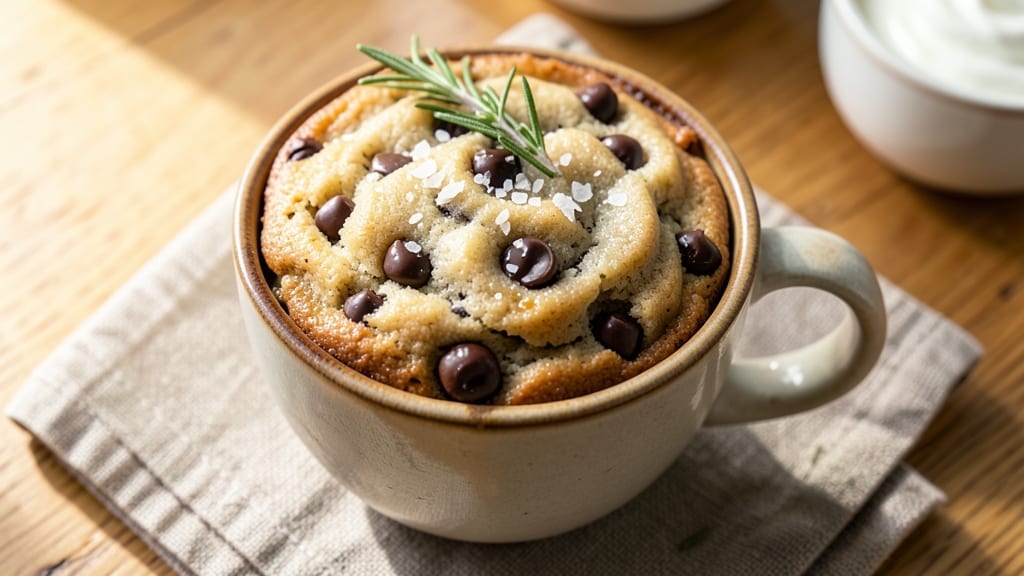
When you crave chocolate chip cookies but don’t have time for the oven, this 1-minute microwave recipe delivers restaurant-quality results with minimal effort. The secret lies in a precise microwave technique that creates gooey centers and crispy edges without waiting for an oven to preheat.
I developed this method during a particularly busy week when I needed cookies faster than I could say “preheat to 350°F”—and it never fails to impress.
The beauty of this method is its simplicity: just 5 basic ingredients and 30 seconds of prep time. You’ll use a microwave-safe mug or small bowl, which means no extra dishes to wash.
The key to success is pressing the dough into the mug evenly and cooking it in 10-second bursts—this ensures the edges crisp up while the center stays soft and melty. It’s the kind of shortcut that makes you question why you ever baked cookies the traditional way.
What you’ll end up with is a perfectly proportioned cookie with a golden-brown exterior and a warm, gooey center that’s still slightly underdone when you pull it out. The chocolate chips stay melty, creating pockets of rich, sweet goodness in every bite.
This isn’t just a quick fix—it’s a foolproof technique that delivers results you’d expect from a full baking session, even when you’re pressed for time.
Best served warm with a glass of milk, these cookies are ideal for last-minute cravings, impromptu gatherings, or when you need to satisfy a sweet tooth without the commitment of a full batch.
The method scales easily too—just double the ingredients for two mugs. Here’s everything you need to make them.
Ingredients for 1 minute chocolate chip cookie
Five ingredients, one mug, and a microwave—this is your quick cookie fix.
| Ingredient | Amount | Notes |
|---|---|---|
| All-Purpose Flour 🌾 | ½ cup | Sifted for light texture |
| Granulated Sugar 🍚 | ¼ cup | White or brown preferred |
| Unsalted Butter 🧈 | ¼ cup | Room temperature, cubed |
| Semi-Sweet Chocolate Chips 🍫 | ¼ cup | Enjoy Life brand for allergy-free |
| Vanilla Extract 🌿 | ½ tsp | Pure extract preferred |
| Pinch of Salt 🧂 | ⅛ tsp | Kosher or sea salt |
| Microwave-Safe Mug 🍵 | 1 whole | Small, 10-12 oz size |
The butter is non-negotiable here—it’s what gives these cookies that melt-in-your-mouth texture. Use unsalted butter so you can control the saltiness, and make sure it’s at room temperature (press a cube—it should leave a slight indent). Trader Joe’s has great prices on butter, and I always grab their European-style for extra richness. If you’re in a rush, microwave the butter for 20 seconds to soften it while you prep the rest. The chocolate chips? Enjoy Life brand is my go-to since it’s allergy-friendly, but any semi-sweet will do—just don’t use chips with nuts if you’re avoiding allergens.
No vanilla extract? A dash of vanilla sugar works in a pinch, though it’s not the same. Running low on butter? Coconut oil is a decent substitute (use the same amount), but it has a different flavor. The salt is crucial—skip it and the cookie will taste flat. For the mug, any microwave-safe ceramic or glass will work, but smaller mugs (like the ones from IKEA) give you that perfect cookie-to-mug ratio. Pro tip: if your mug is too big, use two tablespoons of dough for a mini cookie—still delicious, just smaller.
This dough keeps for 3 days in the fridge, covered tightly. If you make extra, portion it into 1-tablespoon balls and freeze them on a tray before transferring to a bag. Microwave the frozen dough straight from the freezer—just add 10 seconds to the cooking time. The cookies are best eaten right out of the microwave, but if you need to reheat, pop them back in for 5 seconds to revive the gooey center. Store-bought chocolate chips? Check the expiration date—they lose flavor fast, so use within 6 months of opening.
Why You’ll Love This Recipe
- No Mixing Needed: I swear by this recipe when I’m in a rush—just smash the butter and sugar with my fingers until it’s almost smooth (no food processor required). The dough comes together faster than I can say “chocolate chip,” and honestly? That’s half the battle.
- Butter-Sugar Magic: That creamy, cold butter mixed with sugar? It’s the secret weapon here. The dough stays soft but holds its shape, and the moment those edges turn golden while the centers stay gooey? Pure satisfaction. (Yes, even on a Tuesday night.)
- Party in a Jar: Between us, this is my go-to for last-minute gatherings. I’ll make a big batch, portion it into jars, and send them to friends with a note: “Bake at 350°F for 10-12 minutes—no guilt, all joy.” It’s the kind of cookie that disappears faster than my willpower.
- Pantry Staple Power: Five ingredients, all of which I already have on hand. No weird substitutions, no last-minute grocery runs—just flour, sugar, butter, chocolate chips, and a splash of vanilla. Budget-friendly, shelf-stable, and the leftovers? They last way longer than my resolve to share them.
Step-by-step instructions for 1 minute chocolate chip cookies
Here’s how to make perfect cookies in just 60 seconds—crispy edges, gooey centers, every time.
Mix Dry and Wet Ingredients Together
In your microwave-safe mug, combine the 0.5 cup all-purpose flour with the 0.125 tsp pinch of salt. Give it a quick stir with a fork to break up any flour clumps. This ensures even distribution of salt throughout the dough.
Next, add the 0.25 cup granulated sugar and the 0.25 cup unsalted butter (still cubed if not fully softened). Stir vigorously with a fork until the butter melts completely and the mixture becomes smooth. The sugar will help dissolve the butter faster, creating a cohesive dough.
Finally, stir in the 0.5 tsp vanilla extract and 0.25 cup semi-sweet chocolate chips. The vanilla adds depth, while the chocolate chips will melt into delicious pockets of gooey goodness. Mix just until the chocolate chips are evenly distributed—overmixing isn’t an issue here since we’re not developing gluten.
Microwave for Maximum Crisp
Place the mug in the microwave and cook on high for 45 seconds. Stop and stir immediately—this breaks up any large bubbles forming on the surface. The edges should start to set while the center remains soft and gooey.
If your microwave varies in power, check at 40 seconds instead. You’re looking for the edges to turn golden brown while the center still looks slightly underdone. The dough will continue cooking slightly after you remove it from the microwave.
Here’s the thing—don’t peek before the 40-second mark. Opening the microwave door releases steam, which can make your cookies gummy instead of crisp. Trust the timing and let it work its magic.
Finish with Perfect Texture
After the initial 45 seconds, remove the mug and let it sit for 10 seconds. Then microwave for another 10-15 seconds until the edges are golden brown and the top has a few cracks. This second burst of heat ensures the cookies develop that bakery-style crust.
Immediately remove the mug and let the cookies cool in the mug for 30 seconds. This resting period allows the heat to distribute evenly, preventing a raw center. The chocolate chips should be soft but not melted completely—you want those gooey pockets when you bite in.
Use a butter knife to loosen the edges of the cookies from the mug, then carefully lift them out. Serve warm for the ultimate experience—the contrast of crispy edges and molten chocolate centers is what makes these cookies magical.
Pro Tips For Making 1 Minute Chocolate Chip Cookie
- CHILL THE DOUGH: I learned this the hard way—skipping the fridge makes for flat, greasy cookies. Wrap the dough in plastic and refrigerate for at least 30 minutes (even if you’re impatient). The cold butter firms up, giving you those perfect chewy centers and crisp edges.
- WEIGH THE FLOUR: Scooping flour from the bag packs in air, which means your cookies won’t hold together. Use a kitchen scale for precision—1 cup of all-purpose flour is about 120 grams. Trust me, the difference in texture is night and day.
- DON’T OVERBAKE: The edges should be golden but still slightly soft when you pull them out. Overbaking turns them dry and tough—set a timer for 9-11 minutes (depending on your oven) and check early. They’ll firm up as they cool.
- USE ROOM-TEMP BUTTER: Cold butter creates pockets that steam into soft cookies, but room-temperature butter (65°F) spreads better and gives a chewier bite. Cut the butter into small cubes, let it sit for 15-20 minutes, or microwave for 5 seconds if you’re in a rush.
Pro cooking tips for great 1 minute chocolate chip cookie
Microwave Power Matters
Not all microwaves are created equal, and your cookie’s success depends on it. Most standard microwaves work with the 45 + 10-15 seconds method, but if your cookies turn out too dry or undercooked, adjust accordingly.
I’ve found that GE Carousel models tend to cook slightly faster, so I reduce the second burst to 5-10 seconds.
For older or less powerful microwaves, you might need 55 seconds total—just watch closely after 40 seconds and stop when the edges start to pull away from the mug. 🌡️
Butter Temperature Tricks
The butter’s temperature is non-negotiable for that perfect melt-in-your-mouth texture. If your butter is too cold, the cookies will be dense and greasy; if it’s too warm, they’ll spread unevenly. I keep my butter at room temperature by placing it in a small bowl while I prep the other ingredients.
For a quick fix, microwave the butter for 15 seconds (covered) to soften it—just don’t let it melt completely. If you’re in a hurry and your butter is still in the fridge, cut it into smaller cubes before mixing to help it incorporate faster. 🧈
Mug Size and Shape
The right mug makes all the difference—use a small, wide mug (like a 10-12 oz ceramic mug) for even cooking. Narrow mugs can create uneven heat distribution, leading to raw centers or burnt edges. IKEA’s 365+ series mugs are perfect for this—affordable, microwave-safe, and just the right size.
If you’re using a larger mug, reduce the dough to 1 tablespoon per cookie to maintain the ideal ratio. Pro tip: Avoid metal or dark-colored mugs, as they can absorb heat unevenly and ruin your cookies. 🍵
Chocolate Chip Placement
For the most decadent cookies, distribute the chocolate chips evenly but strategically. Sprinkle half the chips on top after mixing, then press them gently into the dough with a fork. This ensures pockets of melted chocolate in every bite.
If you’re feeling fancy, save a few chips to press into the center of the dough before microwaving—they’ll create a stunning gooey surprise when you take that first bite.
For extra richness, I sometimes swap 1 tablespoon of the chocolate chips for 1 tablespoon of mini M&M’s—the color contrast is fun and the flavor is next-level. 🍫
Resting Prevents Disaster
Skipping the 30-second rest after microwaving is a rookie mistake—it’s what transforms your cookies from sad to spectacular. This short pause lets the heat distribute evenly, preventing a raw center and ensuring the edges stay crisp.
I’ve learned this the hard way: once, I was so impatient that I pulled the cookies out too soon, and they ended up gummy and undercooked. Now, I set a timer and resist the urge to peek.
If you’re really struggling to wait, at least let them rest for 10 seconds—it makes a noticeable difference. ✨
Double Batch Hacks
Making two cookies at once is easy—just double the ingredients and use a larger microwave-safe bowl (like a 16 oz Pyrex measuring cup). Divide the dough evenly between two 1-tablespoon portions and microwave them side by side on a microwave-safe plate.
For even cooking, rotate the plate halfway through the 45-second cook time. If your microwave has a turntable, skip the rotation step. This method works best with a 1,000-watt microwave—lower wattage models may need an extra 5 seconds per cookie. 🔥
Nutrition facts
Frequently asked questions
Can I make these cookies without butter?
Yes! For a dairy-free version, substitute the 0.25 cup unsalted butter with 0.25 cup coconut oil (melted) or 0.25 cup vegan butter. The texture will be slightly different but still delicious. Just ensure your coconut oil is fully melted and mixed smoothly into the dough for best results.
Why do my cookies turn out gummy instead of crispy?
Gummy cookies usually happen from undercooking or opening the microwave too soon. Always cook for the full 45 seconds first, then add 10-15 seconds more. Never peek before 40 seconds—the steam makes them soggy. Also, make sure your butter is at room temperature and your mug is microwave-safe. If your microwave is weak, try 55 seconds total instead.
How do I make these cookies in a regular oven?
For oven-baked cookies, preheat to 350°F and spread the dough into a 1/4-inch thick circle on a parchment-lined baking sheet. Bake for 8-10 minutes until edges are golden. The microwave method is faster, but oven-baked cookies will have a slightly crispier texture. For best results, flatten the dough with your palm before baking.
Can I add other mix-ins besides chocolate chips?
Try 1/4 cup chopped nuts (walnuts or pecans), 1/4 cup dried cranberries, or 1/4 cup white chocolate chips. For a fun twist, swap half the chocolate chips with mini M&M’s—they add a pop of color and extra sweetness. Just reduce the total mix-ins to 1/4 cup to keep the texture balanced.
Will these cookies keep their texture when cooled?
They’ll stay warm and gooey for about 10 minutes after microwaving, but they’ll firm up as they cool. For best results, eat them immediately. If you need to store them, let them cool completely, then wrap in plastic wrap. To revive the gooey center, microwave for 5-10 seconds before eating. They won’t be as soft as fresh, but still delicious!

- 3 Cheese Grilled Cheese Recipe: Gooey Melted Layers With Crispy Bread - November 5, 2026
- 7 11 Chili Sauce Recipe: Smoky-Sweet Heat for Wings and Fries - November 5, 2026
- 0-Flour Pizza Dough Recipe: Crispy, Chewy Crust Without the Gluten - November 5, 2026