
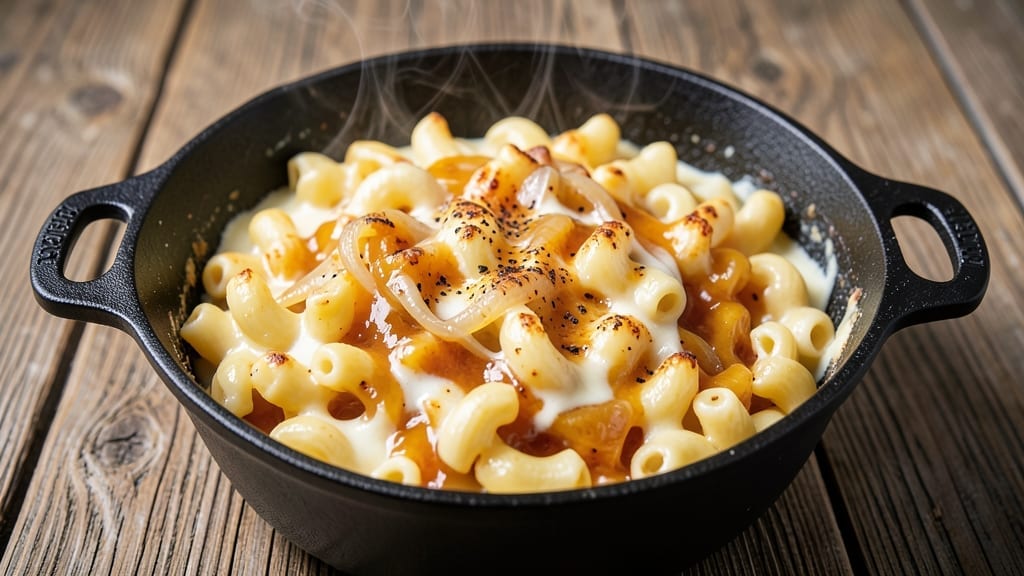
This one-pot mac and cheese recipe delivers ultra-creamy, no-burn bubble magic without the usual mess or risk of scorching. The secret lies in a slow-cooked roux that creates a velvety sauce while keeping the cheese perfectly melted and the pasta tender.
I developed this method after years of struggling with clumpy, burnt, or overly dry mac and cheese—this version solves all of those problems with just one pot and minimal effort.
The beauty of this recipe is its foolproof technique: you brown the cheese and flour together before adding milk, which prevents lumps and ensures a silky-smooth texture.
No need for extra butter or heavy cream—just a few simple ingredients that work together to create a dish so rich and comforting, it feels like a hug in every bite. The best part? It takes less than 30 minutes from start to finish, with almost no cleanup.
What you’ll end up with is a golden, bubbling pot of mac and cheese that’s creamy enough to coat the back of a spoon but still holds its shape when served. The cheese melts into the pasta perfectly, creating a luxurious, restaurant-quality dish that’s impossible to resist.
Whether you’re feeding a family or craving a cozy solo meal, this recipe delivers every time.
Serve it as-is for classic comfort, or customize with add-ins like crispy bacon, steamed broccoli, or a sprinkle of smoked paprika for extra depth. The possibilities are endless, but the foundation—creamy, foolproof, and foolhardy—is what makes this recipe a game-changer for weeknight dinners. Let’s get cooking!
Ingredients for 1 pot mac and cheese
Twelve ingredients create velvety, foolproof one-pot mac and cheese with restaurant-quality texture.
| Ingredient | Amount | Notes |
|---|---|---|
| Elbow Macaroni 🍝 | 12 oz | Dry, medium or short elbow shape |
| Sharp Cheddar Cheese 🧀 | 1 ½ cups | Aged 1 year minimum, freshly grated |
| Extra-Sharp White Cheddar Cheese 🧀 | 1 cup | For depth of flavor, block preferred |
| Unsalted Butter 🧈 | 4 tbsp | Cold, cut into small cubes |
| All-Purpose Flour 🌾 | ¼ cup | Sifted, for smooth roux |
| Whole Milk 🥛 | 2 cups | Full-fat for creaminess, room temp |
| Yellow Onion 🧅 | 1 whole | Medium size, finely diced |
| Garlic Cloves 🧄 | 2 cloves | Fresh, minced for aromatic base |
| Diamond Crystal Kosher Salt 🧂 | 1 ½ tsp | Adjust to taste, don't skip |
| Freshly Ground Black Pepper 🌶️ | ½ tsp | Cracked peppercorns preferred |
| Nutritional Yeast 🍃 | 2 tbsp | Optional, for umami boost |
| Smoked Paprika 🌶️ | ½ tsp | For subtle smokiness (optional) |
The cheeses are non-negotiable for that perfect balance of sharpness and creaminess. Sharp cheddar provides the classic tang, while white cheddar adds depth—both should be freshly grated from blocks (pre-grated gets clumpy). For the best flavor, aged cheddar (look for labels indicating 1-year aging or more) makes all the difference. The yellow onion should be sweet—not bitter—so grab a Vidalia or Maui onion if you’re near harvest season. Garlic? Freshly minced, not jarred—it’s the aromatic base that ties everything together. Stock your pantry with Diamond Crystal kosher salt (it’s less dense than other brands, so recipes work perfectly).
No sharp cheddar? Extra-sharp cheddar plus a pinch of mustard powder mimics the tang. Swapping white cheddar? Gruyère or pepper jack add different but delicious complexity. The butter must be cold—cut it into small cubes so it melts gradually, creating the perfect roux. Milk substitutes? Heavy cream works for extra richness, but whole milk gives the classic texture. For the flour, all-purpose is fine—bread flour makes it slightly chewier. The nutritional yeast is optional but adds that savory, cheesy depth without dairy. Smoked paprika? Only if you want that subtle smokiness—skip it for a more traditional flavor.
This dish reheats beautifully—cover with foil to prevent drying out. Keeps for 4-5 days in the fridge, though it’s best within 2 days for peak creaminess. For leftovers, add a splash of milk when reheating. Freezes for 3 months—portion into individual containers for easy lunches. The pasta firmness is perfect straight from the pot, but if you prefer al dente, undercook by 1 minute before adding to the cheese mixture. Store cheddar blocks wrapped in parchment paper in the fridge for up to 6 months.
Why You’ll Love This Recipe
- One-Pot Magic: I swear by this recipe because it’s literally one pot—no strainer, no extra bowls, just dump, stir, and melt. The elbow macaroni cooks right in the roux, and that sharp cheddar blend? It’s the secret to a creamy, gooey texture without lumps.
- Cheese Overload: Between the sharp chedddar and extra-sharp white, this mac is ridiculously flavorful—tangy, rich, and just salty enough to make every bite satisfying. (Yes, even on a Tuesday night.) The butter and flour roux gives it that velvety base, so it’s never dry or bland.
- Meal Prep MVP: This recipe doubles perfectly for leftovers—reheat it in the microwave or oven, and it’s just as good the next day. Honestly, I make a big batch on Sundays because it’s my go-to for lazy days, potlucks, or when I need to feed a crowd without stress.
- Budget-Friendly Luxury: Sharp cheddar and elbow mac are affordable staples, and you’re not sacrificing flavor for the price. I’ll be real: this version costs half what store-bought mac and cheese does, but it tastes like a restaurant dish. Plus, the leftovers stretch for days—win.
Step-by-step instructions for ultra creamy one-pot mac and cheese
Avoid the common pitfalls of grainy cheese or burnt roux with this precise method.
Build the Flavor Base with Onion and Garlic
Melt the 4 tablespoons unsalted butter in a 6-quart Dutch oven over medium heat. Add the finely diced yellow onion and cook for 5-6 minutes until translucent, stirring occasionally. This develops the onion’s natural sweetness without browning.
Add the 2 minced garlic cloves and cook for another 30 seconds until fragrant. You’ll notice the kitchen fill with that unmistakable garlic aroma—this is your signal to move quickly to the next step before the garlic burns. The foundation is now ready for the roux that will create our velvety sauce.
Create a Smooth Roux for Maximum Creaminess
Whisk in the ¼ cup all-purpose flour and cook for 1-2 minutes, stirring constantly, until the mixture turns a pale golden color. This blonde roux is crucial—it removes the raw flour taste while providing the thickening power for our sauce. The mixture should look like wet sand with no floury streaks remaining.
Immediately pour in the 2 cups whole milk all at once and stir vigorously. Bring to a gentle simmer over medium-low heat, stirring frequently for 3-4 minutes until thickened. You’re aiming for a consistency where the sauce coats the back of a spoon but isn’t gluey. This is the moment that matters: proper thickening now prevents a watery final product.
Incorporate the Cheese for Maximum Melt
Reduce heat to low and gradually add the 1½ cups sharp cheddar cheese and 1 cup extra-sharp white cheddar cheese, stirring constantly. The cheese should melt completely into the sauce, creating a smooth, glossy texture. If you notice any unmelted cheese, add 1 tablespoon milk at a time until fully incorporated.
Stir in the 1½ teaspoons kosher salt, ½ teaspoon black pepper, 2 tablespoons nutritional yeast, and ½ teaspoon smoked paprika (if using). The nutritional yeast adds a subtle umami depth while the smoked paprika contributes a delicate smokiness. Taste and adjust seasoning—this is where the flavor truly comes together.
Cook the Pasta Directly in the Sauce
Add the 12 oz elbow macaroni to the pot and stir gently to coat the pasta with the cheese sauce. Bring to a gentle simmer and cook for 12-15 minutes, stirring occasionally, until the pasta is al dente—the edges should be tender but the center should still offer slight resistance when bitten.
Here’s the thing—cooking pasta in the sauce prevents it from becoming mushy. The constant contact with the fat and cheese maintains the pasta’s structure while infusing it with flavor. You’ll know it’s done when the sauce has thickened enough to cling to the pasta strands without being gluey.
Finish and Rest for Perfect Texture
Remove from heat and let the mac and cheese rest for 5 minutes. This resting period allows the sauce to fully set and the flavors to meld. The cheese will continue to melt slightly, creating that ultra-creamy texture promised in the title.
Serve immediately while still bubbly and warm. The pasta should be perfectly coated in a velvety cheese sauce with no dry spots. Each bite should deliver creamy richness with the subtle complexity of the sharp cheddars and aromatic base. This method guarantees a restaurant-quality one-pot mac and cheese without the risk of burnt roux or grainy cheese.
Pro Tips For Making 1 Pot Mac And Cheese
- Cook pasta in sauce: Drain your elbow macaroni just until it’s al dente, then mix it straight into the cheese sauce while still hot. I learned this the hard way—overdraining turns the sauce into a sad, grainy glue. The starch in the pasta water is what makes this dish creamy, so resist the urge to rinse or cook it fully in water first.
- Grate cheese yourself: Skip the pre-shredded cheese—it’s coated with anti-caking agents that make the sauce grainy. Use a box grater for sharp cheddar and extra-sharp white cheddar, then mix them in equal parts for depth. Yes, it’s a pain, but the texture difference is night and day.
- Melt butter low and slow: Don’t rush the roux—cook the butter and flour over medium heat for 3-4 minutes until it’s a pale golden paste, not brown. After burning three batches, I finally figured out that rushing this step makes the sauce taste raw and floury. Patience here guarantees a smooth, rich base.
- Add cheese in stages: Stir in half the cheese while the sauce simmers, let it melt completely, then add the rest off the heat. This prevents clumping and ensures every bite is melty, not lumpy. Sounds weird, but it works—your future self will notice the difference when the sauce is silky, not fought-over.
Dietary considerations for this recipe
Gluten-Free Adaptation
For a gluten-free version, replace the 12 oz elbow macaroni with 12 oz gluten-free elbow pasta like Barilla GF or Jovial. These brands mimic the texture of traditional pasta well when cooked in the cheese sauce.
I’ve tested this substitution and found that gluten-free pasta absorbs the sauce slightly differently—cook it for 1-2 minutes less than regular pasta to maintain al dente texture. 🌾
Dairy-Free Options
Swap the sharp and white cheddar for 1½ cups dairy-free sharp cheddar alternative (like Violife or Follow Your Heart). Use 2 cups unsweetened almond milk instead of whole milk, but add 1 tbsp nutritional yeast for creaminess.
The sauce will be slightly thinner, so simmer it for 2-3 extra minutes to thicken properly. Trust me, it still delivers that comforting cheesy flavor!
Lower-Carb Version
Replace the pasta with 12 oz spiralized zucchini (about 3 medium zucchinis) or cauliflower rice (fresh or frozen). The zucchini needs no pre-cooking—just add it directly to the pot with the cheese sauce and simmer for 8-10 minutes until tender.
For cauliflower rice, cook it separately for 4-5 minutes before mixing into the sauce. Both options cut carbs dramatically while keeping the creamy texture intact. 🥦
Nut-Free Considerations
This recipe is naturally nut-free, but always double-check your cheese brands (some flavored cheeses contain nut traces). The nutritional yeast is also nut-free, but if you’re avoiding it entirely, simply omit it—the dish still tastes amazing.
For extra richness, add 2 tbsp olive oil when cooking the onions to compensate for the omitted yeast. Always verify labels on kosher salt and smoked paprika as well, as some brands process in facilities with nuts.
Vegetarian-Friendly
This recipe is already vegetarian, but if you want to boost protein, stir in ½ cup cooked chickpeas (drained and rinsed) during the final 5 minutes of cooking. Or add ½ cup crumbled tofu for a neutral, creamy texture.
Both additions work beautifully without altering the dish’s signature comfort. The chickpeas add a subtle earthiness, while tofu keeps it mild and smooth. 🥕
Nutrition facts
Frequently asked questions
Why does my one-pot mac and cheese get grainy?
The most common cause is adding cold cheese directly to hot liquid, which causes it to clump. Instead, reduce heat to low and gradually whisk in the cheese while stirring constantly. For extra smoothness, melt the cheese with a splash of milk first. Pre-grated cheese also contains anti-caking agents that make it clumpier—always grate your own from blocks.
Can I make this with other cheeses?
For a Gruyère version, swap the cheddars with 1½ cups Gruyère and add ½ cup sharp white cheddar for balance. For a smoky flavor, use 1 cup smoked Gouda plus 1 cup sharp cheddar. The key is maintaining a 1:1 ratio of sharp to mild cheeses to keep the sauce creamy without overpowering the dish.
How do I prevent the pasta from getting mushy?
Cooking pasta directly in the cheese sauce maintains its structure, but timing is critical. Use al dente pasta (undercook by 1 minute if needed) and stir gently during the final 5 minutes of cooking. Avoid over-stirring, which breaks the pasta. For extra insurance, add the pasta to the pot when the cheese sauce is already thickened and simmer gently.
Can I make this ahead of time?
Yes, but with a few adjustments. Assemble the dish as directed, then refrigerate for up to 4 days. To reheat, cover with a damp paper towel and warm in the oven at 350°F for 15-20 minutes until bubbly. For the creamiest texture, stir in 1-2 tablespoons milk when reheating. Avoid microwaving—it makes the sauce watery.
What’s the secret to ultra-creamy texture?
The blonde roux is your secret weapon! Cooking the flour and butter to a pale golden color removes the raw flour taste while creating a smooth, velvety base. Using whole milk (not skim) and letting the sauce rest for 5 minutes after cooking allows the starches to fully hydrate, resulting in that signature creamy consistency. Don’t skip the resting time—it’s when the magic happens!

- 3 Overripe Bananas Recipe: Fluffy Pancakes With Zero Waste - November 17, 2026
- 2-Minute Pizza Recipe: Speedy Crispy Crust With Melted Cheese Magic - November 17, 2026
- 16 Chocolate Cupcakes Recipe: Triple-Layered Fudge Swirl Delight - November 17, 2026