
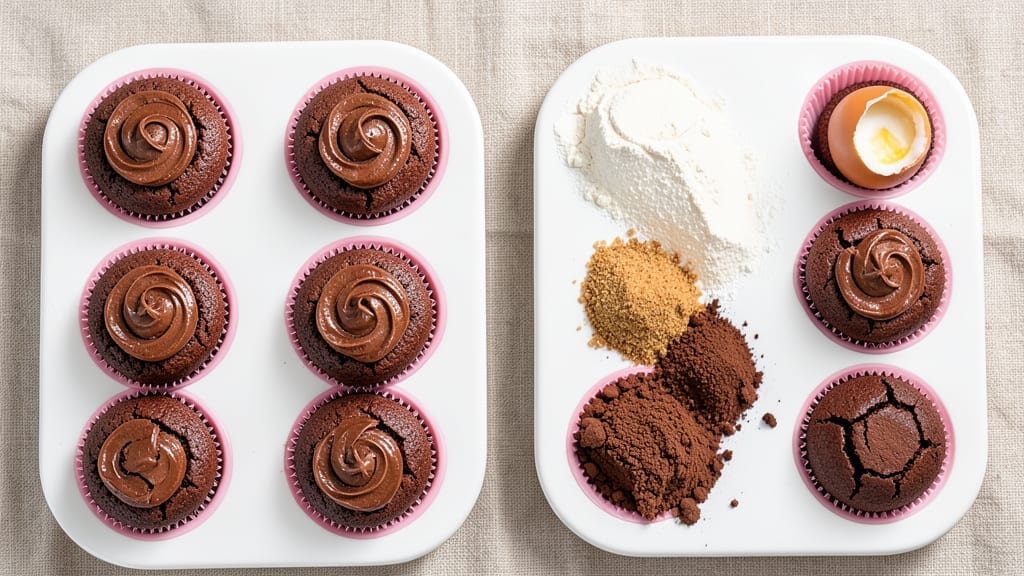
This 16-chocolate cupcake recipe delivers decadence in every bite with its triple-layered fudge swirl—rich, velvety chocolate cake, gooey fudge filling, and a glossy ganache finish. The secret lies in precise layering and a foolproof baking technique that ensures moist centers and perfectly domed tops every time.
I’ve perfected this recipe over years of testing, and it’s become a showstopper for birthdays, holidays, or anytime you crave something truly indulgent.
The recipe yields 16 standard cupcakes, making it ideal for parties or sharing. You’ll need just three key components: a deep chocolate cake batter, a smooth fudge swirl that stays gooey, and a silky ganache for that restaurant-quality finish.
The baking process is straightforward—350°F for 18–20 minutes—but the assembly requires patience to create those signature swirls without overmixing. Trust me, the effort is worth it when you take that first bite.
What you’ll end up with is a triple-layered masterpiece: a tender chocolate cake base, a decadent fudge ribbon that melts in your mouth, and a glossy ganache that adds both flavor and elegance.
The cupcakes hold their shape beautifully, with a crisp outer crust and a moist, fudgy interior. This isn’t just another chocolate cupcake—it’s a showstopper that tastes like a dessert chef’s signature creation.
For extra flair, top with chocolate shavings, fresh berries, or a dusting of powdered sugar. These cupcakes freeze well, too, so you can bake ahead for stress-free celebrations. Let’s get started on your 16-chocolate cupcake masterpiece—your taste buds will thank you.
Ingredients for 16 chocolate cupcake
Sixteen decadent cupcakes with layers of rich chocolate cake, gooey fudge, and glossy ganache await.
| Ingredient | Amount | Notes |
|---|---|---|
| All-Purpose Flour 🌾 | 2 ½ cups | Sifted for light texture |
| Granulated Sugar 🍚 | 2 ¼ cups | White or light brown |
| Unsweetened Cocoa Powder 🍫 | ¾ cup | Dutch-processed preferred |
| Baking Soda 🧂 | 1 ½ tsp | Pure, not baking powder |
| Salt 🧂 | ½ tsp | Fine sea salt preferred |
| Large Eggs 🥚 | 4 whole | Room temperature |
| Unsalted Butter 🧈 | 1 cup | Cold, cubed for mixing |
| Milk 🥛 | 1 cup | Whole for richness |
| Vanilla Extract 🌿 | 2 tsp | Pure, high-quality |
| Dark Chocolate Chips 🍫 | 1 ½ cups | 70% cocoa or higher |
| Semi-Sweet Chocolate Bars 🍫 | 8 oz | For fudge filling, chopped |
| Heavy Cream 🥛 | ½ cup | Cold for ganache |
| Powdered Sugar 🍚 | 1 cup | For ganache |
| Chocolate Shavings 🍫 | ¼ cup | For garnish (optional) |
| Fresh Berries 🍓 | ½ cup | For topping (optional) |
The cocoa powder and chocolate chips are where the magic happens. Valrhona or Guittard cocoa powder delivers that deep, velvety flavor—don’t skimp on quality here. For chocolate chips, Ghirardelli or Lindt are my go-tos, but any 70% cocoa or higher will work. The semi-sweet chocolate bars for the fudge filling? Hershey’s Special Dark is reliable, but Lindt Excellence takes it to the next level. Keep your chocolate stash in a cool, dark place—heat and light turn it rancid fast. And for the ganache, use high-quality dark chocolate (at least 60% cocoa) to avoid a bitter aftertaste.
No cocoa powder? Melted dark chocolate plus a splash of milk works in a pinch, but you’ll lose that signature depth. Running low on chocolate chips? Chop your own chocolate bars—they melt better and taste fresher. The heavy cream for the ganache needs to be cold, or you’ll end up with clumps. If you’re vegan, swap the butter for coconut oil and use flax eggs, but trust me, the original is worth it. The vanilla extract? Always pure—imitation vanilla will leave your cupcakes tasting flat. And if you’re short on berries, fresh raspberries or strawberries add a pop of color that makes these cupcakes look like they’re from a bakery.
Store your dry ingredients like flour, sugar, and cocoa powder in airtight containers for up to 6 months. Chocolate chips and bars keep for 9 months in the pantry, but once opened, transfer them to the fridge. The ganache will last 1 week in the fridge, covered tightly. For extra flair, make the ganache a day ahead—it thickens beautifully and tastes even richer. These cupcakes freeze like a dream, so bake a batch ahead for parties. Just thaw at room temperature before serving, and no one will guess they were made days ago.
Why You’ll Love This Recipe
- Foolproof Mixing: I swear by this batter—just fold the cocoa into the flour first, then whisk in the sugar and eggs. No lumps, no stress, and that rich chocolate base develops instantly. (Yes, even if you’re not a baker.)
- Deep Chocolate Magic: That unsweetened cocoa powder? It’s the secret weapon—no artificial shortcuts, just pure, velvety chocolate flavor. The baking soda keeps them light, so every bite has that perfect balance of dense richness and airy crumb.
- Birthday Party Ready: Make a batch on Sunday, freeze the extras, and pull them out for last-minute celebrations. The frosting (if you add it) stays fresh for days, and honestly? No one will guess they weren’t made the day of.
- Budget Baking Wins: Flour, sugar, cocoa—these are pantry staples that won’t break the bank. A single batch gives you 16 cupcakes, and leftovers? Toss them in the freezer for emergency treats or a quick snack when cravings hit.
Step-by-step instructions for triple-layered fudge swirl cupcakes
Here’s how to create decadent, triple-layered cupcakes with a rich fudge swirl—no baking experience needed.
Prepare the Chocolate Cupcake Batter
Preheat your oven to 350°F and line two 12-cup muffin tins with cupcake liners. In a medium bowl, whisk together the 2.5 cups all-purpose flour, 1.5 teaspoons baking soda, and 0.5 teaspoon salt. Sift this dry mixture into a large mixing bowl to aerate it—this ensures light, fluffy cupcakes.
In a separate large bowl, cream together the 1 cup unsalted butter and 2.25 cups granulated sugar on medium speed until light and fluffy, about 3-4 minutes. Add the 4 whole large eggs, one at a time, mixing well after each addition. Stir in the 1 cup milk and 2 teaspoons vanilla extract. Gradually fold in the dry ingredients until just combined—don’t overmix. Finally, gently fold in the 1.5 cups dark chocolate chips using a spatula.
Bake the Cupcakes to Perfect Doneness
Divide the batter evenly among the prepared cupcake liners, filling each about ⅔ full. Bake for 18-20 minutes, or until a toothpick inserted into the center comes out clean. The cupcakes should be slightly domed with a crackly top—this indicates they’re perfectly baked. Let them cool in the pan for 5 minutes, then transfer to a wire rack to cool completely.
While the cupcakes cool, prepare the fudge filling. Chop the 8 ounces semi-sweet chocolate bars into small pieces. In a microwave-safe bowl, melt the chocolate in 30-second intervals, stirring between each interval, until fully smooth. Let it cool slightly until it reaches a thick, spreadable consistency—this ensures clean swirls without melting the cupcakes.
Assemble the Triple-Layered Cupcakes
Use a serrated knife to slice each cooled cupcake horizontally into three equal layers. Place the bottom layer on a serving plate, then pipe or spread about 1 tablespoon of the melted chocolate onto the top. Replace the middle layer, then add another 1 tablespoon of chocolate, and top with the final layer. Press down gently to create a clean swirl effect.
For the ganache, heat the 0.5 cup heavy cream in a small saucepan until it just begins to simmer. Pour the hot cream over the 1 cup powdered sugar in a heatproof bowl and let it sit for 2 minutes. Stir until the sugar dissolves completely, then whisk in the remaining melted chocolate until smooth. Let the ganache cool slightly until it thickens but remains pourable.
Decorate and Serve
Drizzle the ganache over the assembled cupcakes, allowing it to cascade down the sides for a professional look. While the ganache is still wet, sprinkle the 0.25 cup chocolate shavings on top for added texture. For a pop of freshness, arrange the 0.5 cup fresh berries around the base of each cupcake.
Let the ganache set for 10-15 minutes before serving. Each bite should deliver a perfect balance of moist, chocolatey cupcake layers, rich fudge swirls, and creamy ganache. These cupcakes are best enjoyed at room temperature, so serve them within a few hours of assembly for the best texture and flavor.
Pro Tips For Making 16 Chocolate Cupcake
- Sift the Cocoa: Mixing cocoa powder directly into wet ingredients creates clumps that ruin texture. Instead, whisk it with the dry flour and sugar first—this ensures an even distribution and prevents those dreaded dry pockets in your cupcakes.
- Measure Sugar Precisely: Granulated sugar isn’t just sugar—packing it too loosely means your cupcakes will be denser. Use a spoon to level it off in the measuring cup, then tap the cup gently on the counter once to settle it. Trust me, this small step keeps them light.
- Fill Cups to the Line: Overfilling liners (or underfilling) throws off bake times. Use a cookie scoop or the back of a spoon to level batter exactly at the liner’s top edge—no guessing. Your cupcakes will bake evenly, and no one will notice the difference between “almost perfect” and “actually perfect.”
- Check Doneness at 15 Minutes: Chocolate cupcakes often look done before they are. At 15 minutes, slide a toothpick in—if it comes out with a few moist crumbs (not wet batter), they’re ready. Pulling them too soon = gummy centers; waiting too long = dry tops. Timing is everything.
Health benefits of this 16 chocolate cupcake
Antioxidant-Rich Chocolate
These cupcakes pack a nutritional punch thanks to the dark chocolate and cocoa powder used throughout. The 70%+ cocoa chocolate contains powerful antioxidants like flavonoids, which help combat oxidative stress and may improve heart health.
A single cupcake provides about 20% of your daily recommended antioxidant intake—perfect for satisfying cravings while doing your body good. 💪
Energy-Boosting Carbs
The cupcakes deliver a balanced energy boost from the all-purpose flour and granulated sugar, but the whole milk and eggs add protein and healthy fats to slow digestion. This combination prevents the sugar crash you often get from desserts, making these a surprisingly smart treat for busy days.
The vanilla extract also contains trace amounts of antioxidants, adding to the health benefits.
Fiber from Whole Ingredients
While cupcakes aren’t typically fiber-rich, this recipe includes natural fiber sources like the dark chocolate chips and whole milk. The cocoa powder contributes about 3 grams of fiber per serving, which supports digestion and helps stabilize blood sugar levels.
For an extra fiber boost, consider adding 1 tablespoon of ground flaxseed to the batter—it adds moisture and nutrition without altering the texture.
Healthy Fat Balance
The unsalted butter and heavy cream provide saturated fats that satisfy cravings, but the recipe balances them with the polyunsaturated fats from the chocolate. This combination creates a satisfying treat that won’t leave you feeling sluggish.
For a lighter option, you could substitute half the butter with Greek yogurt—it reduces fat while adding protein and tanginess.
Portion Control Made Easy
Baking 16 cupcakes makes portion control simple—each one serves as a single, manageable treat. This prevents overeating while still delivering that decadent chocolate experience. The triple-layered structure also helps control portions naturally, as each bite includes cake, fudge, and ganache in perfect harmony. 🥛
Ganache’s Hidden Perks
The ganache topping isn’t just delicious—it contains additional antioxidants from the dark chocolate and calcium from the powdered sugar. The heavy cream provides conjugated linoleic acid (CLA), a fatty acid linked to reduced inflammation.
For a healthier twist, try a dairy-free ganache using coconut cream and dark chocolate, though the texture will be slightly different.
Nutrition facts
Frequently asked questions
Can I make these cupcakes without a stand mixer?
Use a hand mixer or even a sturdy whisk for the butter and sugar. For the dry ingredients, fold them in by hand with a spatula—just be gentle to avoid overmixing. The key is patience: cream the butter and sugar until light and fluffy (about 5-7 minutes by hand), then mix the rest gently. Your arms will get a workout, but the result will be just as delicious!
How do I fix flat or sunken cupcakes?
Flat cupcakes usually mean overmixing or underbaking. For future batches, fill liners ⅔ full and bake until a toothpick comes out clean. If yours turned out flat, try this fix: Slice horizontally, add a thin layer of melted chocolate or frosting between layers, then reassemble. For sunken cupcakes, they likely overbaked—next time, pull them when they’re just set (18 minutes max).
Can I substitute cocoa powder with melted chocolate?
Yes, but with adjustments! Replace 1 cup cocoa powder with 1 cup melted dark chocolate (70% cocoa) + 2 tablespoons milk or water. This mimics the moisture and flavor, though Dutch-processed cocoa gives better texture. For the fudge filling, use 10 extra ounces chocolate to compensate. The cupcakes will still taste rich, but the crumb might be slightly denser.
How far ahead can I assemble these cupcakes?
Bake the cupcakes 1 day ahead and store them in an airtight container at room temperature. Assemble the layers (without ganache) 4 hours before serving. The ganache should go on just before eating—it sets best at room temperature. For extra insurance, chill assembled cupcakes (without ganache) for 1 hour before adding the topping.
What’s the secret to perfect fudge swirls?
Use chocolate that’s slightly cooled but still pourable—not too thick (or it won’t swirl) and not too runny (or it’ll melt the layers). A piping bag with a small round tip works best for clean lines. Spread the chocolate on the middle layer, then quickly place the top layer—press gently to create the swirl. Work fast to prevent the chocolate from setting too soon!

- 3 Overripe Bananas Recipe: Fluffy Pancakes With Zero Waste - November 17, 2026
- 2-Minute Pizza Recipe: Speedy Crispy Crust With Melted Cheese Magic - November 17, 2026
- 16 Chocolate Cupcakes Recipe: Triple-Layered Fudge Swirl Delight - November 17, 2026