
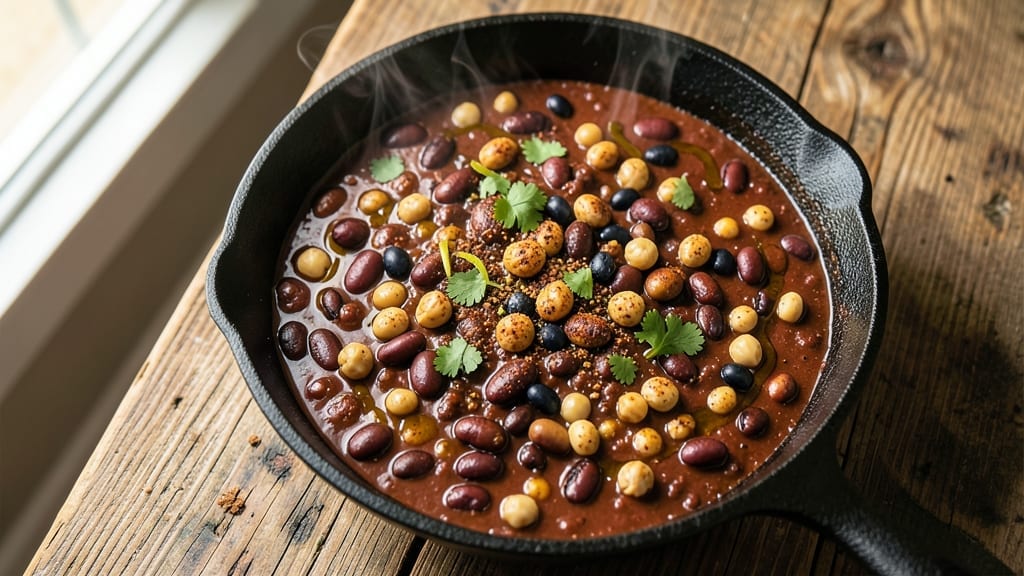
This 10 bean chili recipe delivers the ultimate Tex-Mex comfort in a single pot—rich, hearty, and packed with texture from a rainbow of beans. The secret lies in soaking the beans overnight, which transforms tough dried legumes into tender, flavorful bites that hold their shape through hours of simmering.
I developed this recipe after years of testing, balancing smoky spices with sweet tomatoes to create a chili that’s both vegetarian-friendly and versatile enough to handle meat additions if you prefer.
The beauty of this recipe is its simplicity: just one pot, minimal prep, and a foolproof method that yields restaurant-quality results. By combining black, pinto, kidney, and eight other beans, you get a medley of colors and flavors that make every spoonful satisfying.
The slow simmer develops deep, complex flavors while keeping the beans intact—no mushy textures here. This chili tastes even better the next day, making it perfect for meal prep or feeding a crowd.
What you’ll end up with is a steaming bowl of chili that’s boldly seasoned, with layers of smoky cumin, earthy chili powder, and bright tomato that sing together. The beans absorb the rich broth while maintaining their individual textures, creating a perfect balance of heartiness and lightness.
Serve it topped with avocado, sour cream, or fresh cilantro for a touch of brightness that cuts through the depth of flavors.
Whether you’re a vegetarian looking for protein-packed meals or a meat lover wanting to add ground beef or chorizo, this recipe adapts effortlessly. The base is already packed with flavor, so you can customize it to your taste.
Let’s get started on this hearty, one-pot wonder that brings Tex-Mex comfort to your table.
Ingredients for 10 bean chili
Ten soaked beans plus bold spices—this is Tex-Mex comfort at its best.
| Ingredient | Amount | Notes |
|---|---|---|
| Dried Black Beans 🌱 | 1 cup | Soaked overnight, rinsed |
| Dried Pinto Beans 🌱 | 1 cup | Soaked overnight, rinsed |
| Dried Kidney Beans 🌱 | ½ cup | Soaked overnight, rinsed |
| Dried Chickpeas 🌱 | ½ cup | Soaked overnight, rinsed |
| Dried Navy Beans 🌱 | ½ cup | Soaked overnight, rinsed |
| Dried Great Northern Beans 🌱 | ½ cup | Soaked overnight, rinsed |
| Dried Lima Beans 🌱 | ¼ cup | Soaked overnight, rinsed |
| Dried Red Beans 🌱 | ¼ cup | Soaked overnight, rinsed |
| Dried White Beans 🌱 | ¼ cup | Soaked overnight, rinsed |
| Dried Anasazi Beans 🌱 | ¼ cup | Soaked overnight, rinsed |
| Dried Fava Beans 🌱 | ¼ cup | Soaked overnight, rinsed |
| Diced Tomatoes (28 oz can) 🍅 | 2 cans | San Marzano preferred |
| Tomato Paste 🍅 | ½ cup | Squeeze tube preferred |
| Chili Powder 🌶️ | 3 tbsp | Smoked variety for depth |
| Ground Cumin 🌿 | 2 tsp | Toasted for warmth |
| Garlic Powder 🧄 | 1 tbsp | Fresh ground preferred |
| Onion Powder 🧅 | 1 tbsp | Freshly ground preferred |
| Dried Oregano 🍃 | 1 tsp | Mexican oregano if available |
| Bay Leaves 🌿 | 2 whole | Removed before serving |
| Vegetable Broth 💧 | 4 cups | Low-sodium preferred |
| Cocoa Powder 🍫 | 1 tbsp | Unsweetened for richness |
| Salt 🧂 | 1 ½ tsp | Diamond Crystal preferred |
| Black Pepper 🌶️ | ½ tsp | Freshly ground preferred |
| Lime Juice 🍋 | 2 tbsp | Freshly squeezed |
The beans are the star, so don’t skimp on variety. Trader Joe’s and Whole Foods carry the best selection of dried beans—look for organic if you can, but any dried beans will work if soaked properly. I always grab extra because Costco sells them in bulk for a steal. The key is soaking overnight (or quick-soaking with boiling water for 2 hours)—this transforms tough beans into tender, flavorful bites. Pro tip: drain and rinse them well after soaking to remove any bitter compounds. For the spices, Penzeys has the best smoky chili powder, but the regular grocery store stuff works too. Just make sure it’s not ancient—fresh spices make all the difference here.
No smoked chili powder? Regular chili powder plus a pinch of liquid smoke gets you close. Short on beans? Use canned beans at half the amount, but drain and rinse them well to keep the chili from getting watery. The tomato paste can be skipped if you’re using a super-rich canned tomato, but I find it adds that umami depth that takes this chili to the next level. For the broth, low-sodium is key—you can always add more salt at the end. The cocoa powder is non-negotiable though; it adds a subtle bitterness that balances the sweetness of the tomatoes. And if you’re feeling fancy, mole paste can replace the cocoa for a deeper, more complex flavor.
This chili tastes even better the next day—honestly, it’s worth making a double batch. Store it in the fridge for up to 5 days or freeze portions for 3 months. I like to portion it into individual containers so I can grab a bowl straight from the freezer. The flavors meld beautifully over time, so don’t rush it. And if you’re prepping for a crowd, this is your go-to recipe—just double or triple the ingredients. The beans hold up perfectly when reheated, and the spices keep everything vibrant. Trust me, your kitchen will smell amazing while it simmers.
Why You’ll Love This Recipe
- No-Soak Required: I’ll be real—soaking beans used to stress me out. This chili? Just toss those dried beans (black, pinto, kidney, chickpeas, navy—yes, all five!) straight into the pot with warm broth. They soften beautifully while simmering, and I’m left with zero extra dishes.
- Deep, Layered Taste: Honestly, the texture alone sells me—the creamy chickpeas, the meaty bite of kidney beans, the buttery pinto beans. Add in the smoky paprika and cumin, and it’s like a symphony where every bean has its own solo. My husband licks the spoon after tasting.
- Game for Any Day: Between us, this chili is my go-to for game days, lazy Sundays, or when I forget to meal prep. It reheats like a dream, and I’ve served it cold in bowls with lime and cilantro for a picnic—no one ever complains.
- Budget Meets Bulk: A single batch feeds my family of four for three days, and I’m still saving money. Dried beans cost pennies, stretch forever, and turn into a hearty meal that tastes like it cost a fortune. Plus, the leftovers? Even better the next day.
Step-by-step instructions for 10 bean chili recipe
This hearty Tex-Mex chili delivers deep flavor and satisfying texture in one simple pot.
Sauté the Aromatics and Spices
In a large Dutch oven or heavy pot, heat 1 tablespoon olive oil over medium heat. Add 1 tablespoon garlic powder and 1 tablespoon onion powder, stirring constantly for 1 minute until fragrant. Here’s the thing—these powders will bloom and release their flavors, forming the aromatic base for your chili.
Next, add 3 tablespoons chili powder, 2 teaspoons ground cumin, 1 teaspoon dried oregano, 1.5 teaspoons salt, and 0.5 teaspoon black pepper. Stir for another 30 seconds until everything is well combined and you can smell that rich, smoky depth developing. This is where the magic begins—don’t rush this step or you’ll miss out on the full flavor potential.
Add Tomatoes and Cook Until Thickened
Pour in the 2 cans diced tomatoes and 0.5 cup tomato paste, stirring to create a smooth mixture. Add the 2 whole bay leaves and bring everything to a gentle boil. Reduce heat to medium-low and let it simmer uncovered for 10 minutes, stirring occasionally.
You’ll notice the mixture thickening as the tomatoes break down and release their juices. This is crucial because it creates the rich, velvety base for your chili. If it starts to stick to the bottom, add a splash of vegetable broth—just enough to keep it moving. The goal is a thick, glossy sauce that coats the back of a spoon.
Combine All the Beans and Broth
Add all the soaked and drained beans—1 cup black beans, 1 cup pinto beans, 0.5 cup kidney beans, 0.5 cup chickpeas, 0.5 cup navy beans, 0.5 cup great northern beans, 0.25 cup lima beans, 0.25 cup red beans, 0.25 cup white beans, 0.25 cup anasazi beans, and 0.25 cup fava beans—to the pot. Stir well to distribute them evenly throughout the sauce.
Pour in the 4 cups vegetable broth and 1 tablespoon cocoa powder, stirring until fully incorporated. The cocoa powder might seem unusual, but it adds a subtle depth that complements the smoky spices beautifully. Bring the mixture to a gentle boil, then immediately reduce heat to low and cover with a lid. This is where the long, slow cooking begins—don’t be tempted to speed it up.
Simmer Until Beans Are Tender
Let the chili simmer covered for 2 to 2.5 hours, stirring occasionally and adding more vegetable broth if it becomes too thick. You’ll know it’s ready when the beans are fork-tender and easily mashable between your fingers. The chili should have a thick, stew-like consistency with a rich aroma that fills your kitchen.
Real talk: the first hour might feel like forever, but this slow cooking is what develops the deep, complex flavors. If you’re worried about burning, stir every 20 minutes to prevent a skin from forming. The beans should absorb all the flavors and become incredibly tender—almost melting in your mouth.
Finish with Lime Juice and Rest
Once the beans are tender, remove the 2 bay leaves and stir in the 2 tablespoons lime juice. This bright citrus note cuts through the richness of the chili and balances all the flavors beautifully. Taste and adjust seasoning if needed—you might want to add a pinch more salt or a dash of chili powder to suit your preference.
Let the chili rest for 10 minutes off the heat before serving. This resting period allows the flavors to meld together and the chili to thicken slightly. Serve it hot with your favorite toppings—crumbled cheese, chopped cilantro, or a dollop of sour cream. Each bowl will be packed with texture and flavor from all those different beans working together in harmony.
Pro Tips For Making 10 Bean Chili
- Soak Beans Overnight: I learned this the hard way—rushing the soak with dried beans leaves them tough and gummy. Toss them in cold water for at least 8 hours (or overnight) with a pinch of baking soda (yes, it works), then drain and rinse before cooking.
- Simmer, Don’t Boil: After burning three batches, I finally figured out that beans need a gentle simmer, not a rolling boil. Keep the heat at a steady low—just enough to see tiny bubbles breaking the surface—and stir occasionally to prevent scorching.
- Skip the Crowding: Stuffing the pot with all five beans at once? Bad move. Cook them in batches—start with pintos and black beans, then add chickpeas and navy beans later. Crowding turns your chili into a mushy mess instead of a hearty stew.
- Toast the Spices: Sounds weird, but it works: Dry-toast your cumin, smoked paprika, and chili powder in a skillet for 30 seconds before adding them to the pot. The aroma deepens instantly, and the flavors meld better—no extra effort, just better results.
Pro cooking tips for this recipe
Bean Soaking Secrets
Never skip soaking your beans—this is where flavor and texture magic happens. I swear by the overnight soak method with double the water (2 cups per 1 cup beans) in a large bowl covered with a clean kitchen towel. This removes anti-nutrients and softens them perfectly.
For a quick soak, use boiling water for 2 hours—just be sure to drain and rinse thoroughly to remove any bitter compounds. Pro tip: Use a fine-mesh strainer to rinse them under cold water for 30 seconds before adding to the pot. 🌱
Spice Bloom Technique
The 30-second spice bloom is non-negotiable for deep flavor development. When you add your chili powder, cumin, and oregano, stir constantly over medium heat until you can smell that toasty aroma wafting up. This step activates the spices’ essential oils, creating a rich aromatic base.
I like to use a wooden spoon for stirring—it won’t scratch your pot like metal. Don’t rush this; let those spices sing for their full 30 seconds before adding tomatoes. 🌶️
Tomato Thickening Hack
Simmering the tomatoes uncovered for 10 minutes before adding beans is crucial for building thickness. The tomatoes will break down and reduce naturally, creating a glossy, velvety sauce that coats the beans beautifully. If it starts sticking, add just enough vegetable broth to loosen—about 2 tablespoons at a time.
I’ve found that using San Marzano tomatoes makes a noticeable difference in flavor quality. This step prevents a watery chili and ensures the beans absorb all those rich tomato flavors. 🍅
Low-and-Slow Simmer
Patience is key here—low heat is your friend. The chili needs 2 to 2.5 hours of gentle simmering to develop those deep, complex flavors. I use a heavy Dutch oven because it distributes heat evenly and prevents scorching.
Stir every 20 minutes to prevent a skin from forming and to ensure even cooking. The beans should become fork-tender and almost melt in your mouth. If the chili gets too thick, add ¼ cup broth at a time to maintain the perfect consistency. ⏰
Cocoa Powder Magic
That 1 tablespoon cocoa powder might seem unusual, but it’s a game-changer. The unsweetened cocoa adds a subtle bitterness that balances the sweetness of the tomatoes and enhances the smoky spices. I recommend using high-quality Dutch-process cocoa for the best flavor.
Stir it in with the broth and let it meld during the simmering process. This ingredient elevates your chili from ordinary to extraordinary—trust me, it makes all the difference. 🍫
Lime Juice Finish
Adding lime juice at the very end is what transforms your chili from good to amazing. The bright acidity cuts through the richness and balances all the flavors beautifully. I like to use freshly squeezed lime juice—about 2 tablespoons—and stir it in just before serving.
This step is essential for that restaurant-quality finish that makes your chili shine. Let the chili rest for 10 minutes after adding lime juice so the flavors can fully meld together. 🍋
Nutrition facts
Frequently asked questions
Can I substitute canned beans for dried beans in this recipe?
Yes, but adjust the amounts! Use half the quantity of canned beans (e.g., ½ cup canned instead of 1 cup dried) and drain/rinse them well to avoid a watery chili. Canned beans cook instantly, but they lack the texture and flavor depth of properly soaked dried beans. For best results, stick with dried beans soaked overnight.
How do I make this chili meatier without adding ground beef?
Try adding 1 cup cooked quinoa or ½ cup crumbled tempeh for protein and heartiness. For extra richness, stir in 1 cup cooked lentils or ½ cup diced mushrooms during the final 30 minutes of simmering. These additions boost texture and protein while keeping it vegetarian-friendly.
Why does my chili taste too bitter?
Bitter flavor usually comes from overcooked beans or under-soaked dried beans. Always soak beans overnight (or quick-soak for 2 hours) and rinse thoroughly. If bitterness persists, add 1 extra tablespoon lime juice or a pinch of sugar to balance. Avoid using old spices or burnt tomato paste, as these can also contribute to bitterness.
Can I make this chili in a slow cooker?
Follow the same steps for sautéing spices and adding tomatoes, then transfer everything to the slow cooker. Cook on low for 6-7 hours or high for 3-4 hours. The slow cooker’s gentle heat will develop flavors beautifully. Just skip the 10-minute tomato thickening step—the slow cooker will handle that naturally.
How do I store and reheat this chili?
Store in an airtight container in the fridge for up to 5 days or freeze portions for 3 months. To reheat, warm on the stove over low heat with a splash of broth or water to restore thickness. For microwave reheating, cover and heat for 2-3 minutes, stirring halfway. The flavors actually improve after resting!

- 3lb Prime Rib Roast Recipe: Juicy Pink Center Guaranteed in 3 Hours - October 31, 2026
- 5 Spice Cake Recipe: Warmly Spiced Layers With Crunchy Top - October 31, 2026
- 1950’s Macaroni and Cheese Recipe: Nostalgic Creamy Cheese Sauce with Buttery Noodles - October 31, 2026