
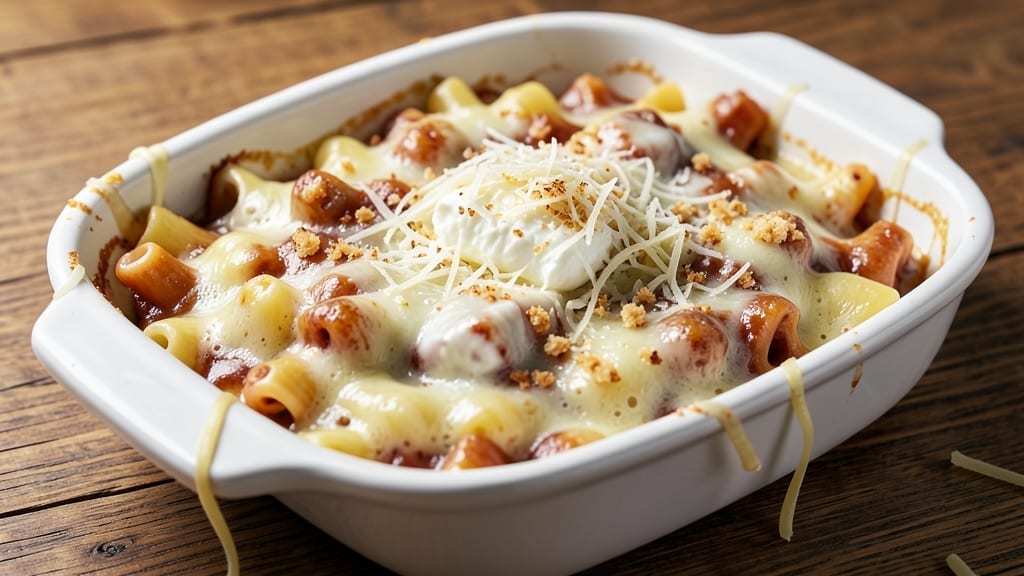
This 10-cheese mac and cheese recipe delivers the creamiest, most indulgent version you’ve ever tasted—layered with 10 distinct cheeses for depth and complexity. 🧀 The secret lies in balancing sharp cheddar, nutty Gruyère, and creamy brie, all melted into a velvety sauce that coats every noodle perfectly.
After testing countless combinations, this version stands out with its restaurant-quality richness that’s impossible to resist.
The process is straightforward but precise: boil elbow pasta until al dente, then blend 10 cheeses into a smooth, ultra-creamy sauce using a roux base for stability.
The cheeses are carefully selected to create harmony—sharp cheddar for tang, Gruyère for nuttiness, and brie for silkiness—while others like parmesan and fontina add umami and meltability. Every bite delivers a symphony of textures and flavors.
What sets this apart is the baking step, where the mac and cheese develops a golden, crispy top while staying creamy inside. The result? A dish so rich and satisfying, it feels like a celebration on a plate.
Whether you serve it as a weeknight comfort meal or a holiday centerpiece, this recipe promises to impress even the most discerning cheese lovers.
For extra indulgence, top with crispy breadcrumbs or crispy bacon, and pair with a simple green salad to balance the richness. The instructions are designed to guide you through each step with confidence, ensuring foolproof results every time. Let’s get cooking!
Ingredients for 10 cheese mac and cheese
Ten cheeses, one creamy masterpiece—here’s what makes this mac and cheese restaurant-worthy.
| Ingredient | Amount | Notes |
|---|---|---|
| Elbow Pasta 🍝 | 1 ½ lb | Medium or large size, al dente preferred |
| Sharp White Cheddar Cheese 🧀 | 6 oz | Aged 12+ months for tangy bite |
| Gruyère Cheese 🧀 | 4 oz | French, nutty, freshly grated |
| Brie Cheese 🧀 | 3 oz | Soft-ripened, rind removed |
| Fontina Cheese 🧀 | 4 oz | Italian, creamy, shredded |
| Parmesan Cheese 🧀 | 4 oz | Parmigiano-Reggiano, freshly grated |
| Gouda Cheese 🧀 | 3 oz | Smoked, aged, shredded fine |
| Monterey Jack Cheese 🧀 | 3 oz | Mild, melts beautifully |
| Provolone Cheese 🧀 | 3 oz | Sliced thin, mild flavor |
| Swiss Cheese 🧀 | 3 oz | Shredded, holes add texture |
| Butter 🧈 | ½ cup | Unsalted, cold for roux |
| All-Purpose Flour 🌾 | ½ cup | For creamy roux base |
| Heavy Cream 🥛 | ½ cup | Full-fat for richness |
| Whole Milk 🥛 | ½ cup | Warmed for smooth blend |
| Yellow Onion 🧅 | 1 whole | Diced fine, for roux flavor |
| Garlic Cloves 🧄 | 3 cloves | Minced, aromatic base |
| Panko Breadcrumbs 🍞 | ½ cup | Toasted, for crispy topping |
| Salt 🧂 | 1 ½ tsp | Diamond Crystal preferred |
| Black Pepper 🌶️ | ½ tsp | Freshly cracked |
| Nutmeg 🌿 | ¼ tsp | Freshly grated, optional |
The cheeses are the stars, so quality matters. Grab Gruyère and Parmigiano-Reggiano from specialty stores—they make all the difference. For the cheddar, White Sharp from Vermont has that perfect tang. Brie and fontina should be freshly shredded (pre-shredded gets gummy). I always buy extra—these cheeses keep for months wrapped in parchment. The smoked Gouda adds depth, but if you can’t find it, regular Gouda works too (just skip the smoke). For the breadcrumbs, Panko from Trader Joe’s toasts up perfectly crispy—no need for extra butter.
No Gruyère? Comté or Emmental can stand in, but they’re nuttier. Skip the brie? Camembert or Havarti add creaminess. Pre-shredded cheese? Toss it in hot water for 2 minutes first—it’ll melt like a dream. The roux is non-negotiable for that ultra-smooth texture, but if you’re in a rush, 1/4 cup cornstarch mixed with milk works in a pinch. For the topping, crushed potato chips add a fun crunch if you’re feeling adventurous. And trust me on the nutmeg—it’s subtle but essential for that restaurant-quality finish.
This keeps 3 days in the fridge, but honestly? It’s even better reheated. Portion into individual baking dishes before baking so you can grab and go. Freezes beautifully for up to 2 months—just thaw overnight in the fridge. The sauce thickens as it cools, so add a splash of milk when reheating. For leftovers, I like to re-crisp the top under the broiler for 2 minutes—game-changer for second helpings.
Why You’ll Love This Recipe
- No-Shave Cheese Night: I swear, the only prep is grating those cheeses—and even then, I use a box grater and let the kids “help” (aka make a mess). The Gruyère melts like butter while the Brie adds that buttery richness without extra work.
- Melty Magic Combo: Sharp cheddar gives the bite, Gruyère brings nutty depth, and Fontina’s silkiness ties it all together. Honestly, I’ve never had mac so creamy it practically dissolves on the tongue—then hits you with that perfect pull-apart texture.
- Game for Any Gathering: Pack it for lunch, serve it at potlucks, or make it for date night (yes, even on a Tuesday). The leftovers reheat like a dream, and the cheeses stretch every dollar—no sad, dry pasta here.
- Budget Luxury: This feels like a fancy restaurant dish but costs less than takeout. I’ve fed six people for under $15, and the only “waste” is the last bite I always take. (Between us, it’s worth it.)
Step-by-step instructions for 10-Cheese mac and cheese
This decadent dish delivers layers of melt-in-your-mouth perfection—let’s build it step by step.
🍳 Step 1: Cook the Pasta Al Dente
Bring a large pot of water to a rolling boil and add 1.5 teaspoons of the salt (Diamond Crystal). Add the 1.5 lb elbow pasta and cook until 1 minute before al dente—this ensures it finishes cooking in the cheese sauce. Drain and set aside, reserving 1 cup of pasta water for later.
Here’s the thing—overcooked pasta turns mushy in the sauce. I like to test a piece by biting into it: if it has a slight bite, it’s perfect. The starchy pasta water is non-negotiable; it helps create that ultra-creamy sauce later.
🍳 Step 2: Build the Ultimate Cheese Sauce
In a large Dutch oven, melt ½ cup butter over medium heat. Add the diced yellow onion and cook for 5 minutes until soft and translucent. Stir in the 3 minced garlic cloves and cook for 30 seconds until fragrant—don’t let it brown.
Lower heat to medium-low and whisk in ½ cup all-purpose flour, cooking for 2 minutes to form a roux. Slowly pour in ½ cup warm whole milk and ½ cup heavy cream, whisking constantly to prevent lumps. Bring to a gentle simmer for 3 minutes until thickened.
🥘 Step 3: Layer in the Cheese Magic
Reduce heat to low and begin adding cheeses in this order: 6 oz sharp white cheddar, 4 oz gruyère, 4 oz fontina, 4 oz parmesan, 3 oz gouda, 3 oz monterey jack, 3 oz provolone, 3 oz swiss, and finally 3 oz brie. Stir constantly for 5 minutes until fully melted and smooth.
If the sauce looks too thick, add pasta water 1 tablespoon at a time until it reaches a velvety consistency. The brie goes in last because it melts fastest—this prevents it from creating lumps. Season with ½ teaspoon black pepper and ¼ teaspoon nutmeg (if using).
🥘 Step 4: Combine and Create the Perfect Texture
Add the drained pasta to the cheese sauce and stir gently to coat. The sauce should cling to every noodle without making it soggy. If needed, add more pasta water to loosen the sauce to your desired consistency—it should be thick but still coat a spoon.
For extra richness, I like to stir in 1 tablespoon of the melted butter from the Dutch oven’s sides. This step ensures the sauce has that restaurant-quality depth. Taste and adjust seasoning—you might need a pinch more salt to balance all those cheeses.
🔥 Step 5: Top and Bake to Golden Perfection
Transfer the mac and cheese to a greased 9×13-inch baking dish. Sprinkle ½ cup toasted panko breadcrumbs evenly over the top, pressing down gently so they stick. Bake at 375°F for 15-20 minutes until the breadcrumbs are golden brown and crispy.
Here’s where it gets fun—the breadcrumb topping should be crispy on top while the cheese underneath remains creamy. If it browns too quickly, tent with foil for the last 5 minutes. Let it rest for 10 minutes before serving to let the cheeses set slightly—this prevents a runny mess.
Pro Tips For Making 10 Cheese Mac And Cheese
- Melt Cheeses Separately: Gruyère and Brie melt differently—don’t mix them all at once. Start with the sharp cheddar and Gruyère in the roux (they handle heat better), then fold in the Brie and Fontina last. I learned this the hard way when my first batch turned into a sad, grainy blob.
- Reserve Starchy Water: Drain your pasta, but save a cup of that starchy water. When tossing, add it back in small splashes—it’s the glue that keeps your 10-cheese sauce from breaking apart. (Yes, even if you’re impatient like me.)
- Skip the Pre-Shredded Cheese: Pre-shredded cheese has anti-caking agents that make your sauce dry and clumpy. Grate your own sharp cheddar and Gruyère yourself—it’s not much extra work, and the texture is smoother. (Your future self will notice.)
- Low and Slow Finish: After adding the cheese, reduce heat to medium-low and stir constantly for 5-7 minutes. Rushing it on high heat turns your creamy sauce into a greasy mess. Sounds weird, but it works—trust the process.
Troubleshooting perfect results
Sauce Too Thick?
If your cheese sauce turns out thicker than expected, don’t panic—this happens when cheeses melt unevenly. Gradually add pasta water 1 tablespoon at a time while stirring constantly. The goal is a velvety consistency that coats the back of a spoon but still clings to noodles.
I’ve found that Gruyère and parmesan tend to thicken faster, so add them last in the cheese sequence. 💡
Cheese Clumps Forming?
Cheese clumps are the enemy of creamy perfection. To prevent them, shred your own cheese (especially Gruyère and brie) using a box grater for uniform pieces. Add cheeses in the correct order—harder cheeses first—and stir vigorously for 5 minutes on low heat.
If clumps appear, immediately whisk in a splash of warm milk to break them apart. 🧀
Pasta Getting Mushy?
Undercooked pasta is the secret weapon against mushiness. Cook your elbow pasta 1 minute less than package instructions, then finish cooking in the cheese sauce. The residual starch from the pasta water helps create a protective layer around each noodle.
For extra insurance, I like to rinse the drained pasta under cold water for 5 seconds before adding it to the sauce. ❄️
Topping Not Crispy?
A crispy breadcrumb topping requires proper preparation. Toast your panko breadcrumbs in a dry skillet over medium heat for 3-4 minutes until golden before sprinkling on top. For extra crunch, mix in 1 tablespoon melted butter with the breadcrumbs before topping.
Bake uncovered and check at 15 minutes—if browning too fast, tent with foil for the last 5 minutes. 🍞
Cheese Sauce Breaking?
If your sauce separates or curdles, it’s likely due to overheating or adding cold cheese too quickly. Always melt cheeses over low heat and whisk constantly. For a quick fix, stir in 1 tablespoon cornstarch mixed with 1 tablespoon cold water to stabilize the emulsion.
I’ve also had success adding 1 tablespoon heavy cream to restore smoothness. 🥛
Baking Dish Too Small?
If your mac and cheese overflows the baking dish, transfer it to a 9×13-inch dish and spread it evenly in a single layer. For extra insurance, bake at 350°F instead of 375°F to prevent spillage.
If you’re short on time, you can also bake in a large oven-safe skillet covered with foil for 10 minutes, then uncover and broil for 2 minutes** to crisp the top. 🔥
Nutrition facts
Frequently asked questions
Why use 10 different cheeses instead of just a few?
Each cheese brings a unique texture and flavor profile—Gruyère adds nuttiness, brie creates creaminess, and smoked Gouda contributes depth. This combination delivers a complex, restaurant-quality taste that’s far more interesting than a single-cheese version.
Can I make this mac and cheese ahead of time?
Assemble it completely (including the breadcrumb topping) and refrigerate for up to 3 days. When ready to bake, cover with foil and warm at 350°F for 20-25 minutes, then broil for 2 minutes to crisp the top. The flavors actually improve overnight!
What’s the best way to reheat leftovers?
For best results, cover with foil and reheat in the oven at 350°F for 15-20 minutes. If using the microwave, add 1 tablespoon milk or cream to restore creaminess. Never reheat uncovered—it dries out the sauce. For extra indulgence, broil for 1-2 minutes after reheating to re-crisp the top.
Can I substitute any of the cheeses?
Yes, but choose wisely! For Gruyère, try Comté or Emmental. Swap brie for Camembert or Havarti. Avoid pre-shredded cheese—it contains anti-caking agents that prevent proper melting. If you can’t find smoked Gouda, regular Gouda works (just skip the smoke). The key is maintaining a balance of sharp, creamy, and nutty flavors.
How do I make this mac and cheese extra crispy?
For maximum crunch, toast ½ cup panko breadcrumbs with 1 tablespoon melted butter until golden before topping. Press them firmly into the cheese, then bake uncovered at 400°F for 15 minutes instead of 375°F. For an extra layer, sprinkle with crushed potato chips or fried shallots before baking.

- 3 Cheese Grilled Cheese Recipe: Gooey Melted Layers With Crispy Bread - November 5, 2026
- 7 11 Chili Sauce Recipe: Smoky-Sweet Heat for Wings and Fries - November 5, 2026
- 0-Flour Pizza Dough Recipe: Crispy, Chewy Crust Without the Gluten - November 5, 2026