
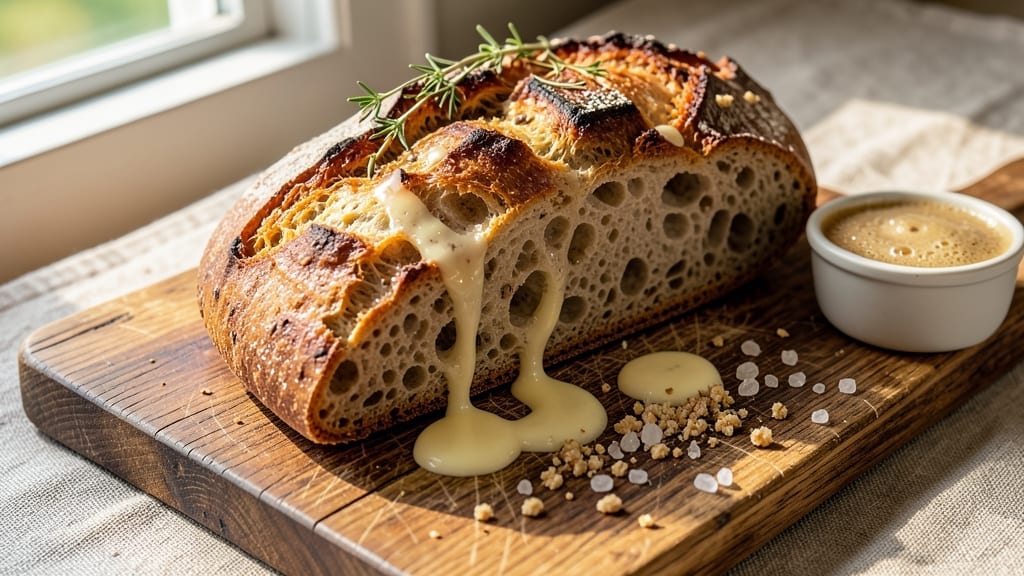
Mastering a 10-day sourdough bread recipe transforms simple flour and water into a loaf with unmatched depth of flavor and texture. This method builds a robust starter over nine days, ensuring a wild yeast culture that delivers that signature tang and airy crumb.
The patience pays off with a crust so crisp it shatters and a crumb so open it practically melts in your mouth.
The beauty of this approach lies in its hands-off nature once the starter is established. Each day’s feeding—just flour and water—strengthens the culture, while the final dough on day 10 requires minimal effort but maximum attention to temperature and timing.
We’ll guide you through every step, from the first discard to the golden-brown bake, so you can achieve bakery-quality results without the guesswork.
By day 10, your dough will be ready for its final proof, where it nearly doubles in size—a sure sign it’s ready for the oven. The high heat of baking transforms that fermented dough into a loaf with a caramelized crust and a crumb so tender it defies store-bought versions.
This is bread that tastes like art, and the process is simpler than you’d expect.
The key to success? Consistency in temperature and timing, which we’ll break down in precise steps. Whether you’re a beginner or a seasoned baker, this method delivers perfect sourdough every time. Let’s get started on your first loaf—your kitchen will never smell the same again.
Ingredients for 10 day bread
Flour, water, and patience—these three ingredients transform into bread with soulful crumb and crisp crust.
| Ingredient | Amount | Notes |
|---|---|---|
| Unbleached All-Purpose Flour 🌾 | 8 cups | High-protein preferred (11-12%) |
| Whole Wheat Flour 🌾 | 2 cups | Optional for texture variation |
| Unsalted Butter 🧈 | ½ cup | Cold, cubed for lamination |
| Granulated Sugar 🍚 | ¼ cup | For final dough enrichment |
| Instant Yeast 🍞 | ¼ tsp | Optional for starter boost |
| Kosher Salt 🧂 | 2 tsp | Diamond Crystal preferred |
| Water 💧 | 4 cups | Lukewarm, filtered preferred |
| Cornmeal 🌽 | ½ cup | For dusting baking sheet |
| Ice Water ❄️ | ¼ cup | For final dough shaping |
| Honey 🍯 | 1 tbsp | For starter feeding (days 1-3) |
| Rye Flour 🌾 | ½ cup | For starter diversity (optional) |
| Olive Oil 🫒 | 1 tbsp | For dough bowl coating |
Flour is non-negotiable here. King Arthur or Caputo Tipo 00 are my go-tos—they handle fermentation like pros. The whole wheat adds texture but can be swapped for more white flour if you’re nervous about density. Water quality matters too: filtered or spring water avoids mineral interference. For the starter, I use King Arthur’s unsifted flour—it’s got the right protein level for reliable fermentation. If you’re in a pinch, any high-protein flour (11-12%) works, but avoid bread flour with added vitamins/minerals.
No honey? Maple syrup at half the amount works in a bind. The rye flour is optional but gives that subtle tang—Bob’s Red Mill is my store-bought backup. For the yeast, instant is easiest, but if you’ve got active dry, let it proof in water for 5 minutes first. The butter should be cold but pliable—if it’s rock-hard, let it sit 10 minutes at room temp. And that ice water? Freeze ice cubes overnight for instant chilling when shaping. Pro tip: Use a kitchen scale for accuracy—cups vary wildly with flour packing.
Store your starter in a glass jar with a loose lid—it breathes better. Keep it at 70-75°F for consistent fermentation; warmer climates may need a cooler spot. The final dough keeps 24 hours in the fridge if you need to delay baking. For best flavor, bake within 8 hours of shaping. The crust stays crisp for 3 days if wrapped in a towel, but the crumb gets gummy after day 2—eat it fresh or toast slices to revive texture.
Why You’ll Love This Recipe
- No-Knead Magic: I’ll be real—this dough takes zero energy. Just mix the unbleached flour, whole wheat, and instant yeast with warm water, then let it rise over 10 days. No rolling, no punching, just a slow, hands-off process that leaves me free to do other things (like binge-watch something while the bread does the work).
- Sweet Butter Crust: That touch of unsalted butter in the dough? Everything. It makes the crust golden and shatteringly crisp while keeping the inside soft—like a hug for your sandwich. And the sugar? Just enough to caramelize slightly, giving it this subtle, addictive depth that turns plain toast into a treat.
- Weeknight Workhorse: This bread is my secret weapon for lazy mornings. Toast it for breakfast, use it for sandwiches all week, or even turn slices into croutons for salads. Between us, I’ve had it last five days in my fridge with zero complaints—proof it’s built to handle real life.
- Budget-Friendly Staple: Honestly, the ingredient list won’t break the bank. Whole wheat and all-purpose flour are cheap, butter stretches far, and a little sugar goes a long way. Plus, baking a big batch means I’m not scrambling for bread every few days—just grab and go, no guilt. My wallet (and my stomach) thank me.
Step-by-step instructions for 10-Day sourdough bread
Let’s create a perfectly crusty loaf with minimal daily effort—just follow these tested steps.
Build Your Starter and Feed Daily for 10 Days
Day 1: Mix 1 cup of the unbleached all-purpose flour with 1 cup of the water in a jar. Cover loosely and let sit at room temperature for 24 hours. You’ll see bubbles form—this is fermentation beginning. On days 2-10, feed your starter daily by discarding half, then adding 1 tbsp honey and ½ cup of the rye flour (if using) plus enough water to make a thick batter. Stir well and let ferment 4-8 hours until bubbly and doubled.
By day 10, your starter should be active, bubbly, and ready to use. I like to test it by dropping a spoonful in water—if it floats, it’s ready. This daily feeding develops the complex flavors that make sourdough taste so amazing. If you miss a day, don’t worry—just feed it when you remember and continue for the remaining days.
Mix the Final Dough with Butter and Sugar
On day 10, combine 8 cups of the unbleached all-purpose flour, 2 cups of the whole wheat flour, 2 tsp of the kosher salt, and 0.25 tsp of the instant yeast in a large bowl. Add 4 cups of the water and mix until just combined. Let rest for 30 minutes—this hydrates the flours and makes mixing easier.
In a separate small bowl, soften the 0.5 cup unsalted butter by cutting it into small cubes and letting it sit at room temperature for 15 minutes. Add the butter to the dough along with the 0.25 cup granulated sugar, then mix by hand until fully incorporated. The dough will be sticky but manageable. Cover with a damp towel and let rest for 1 hour—this allows the gluten to relax and makes shaping easier later.
Laminate and Shape for Crusty Texture
Coat a large mixing bowl with 1 tbsp olive oil to prevent sticking. Transfer the dough to the bowl, cover, and refrigerate for 12 hours (overnight). The cold slows fermentation and develops flavor. In the morning, remove the dough and place it on a lightly floured surface. Divide it into 4 equal pieces (about 1.5 pounds each) and shape each into a round boule.
To create the signature lamination, gently press each boule into a flat disc, then fold it like a letter. Place the folded dough seam-side down in a lined baking sheet, cover, and let rise at room temperature for 2-3 hours or until doubled in size. The folds create those beautiful layers and help develop the crust. If your kitchen is warm, reduce rise time to 1.5 hours to prevent overproofing.
Score and Bake for Maximum Crust Development
Preheat your oven to 450°F with a Dutch oven inside for 1 hour. This gets the pot piping hot for that perfect crust. Once preheated, carefully remove the Dutch oven and place the shaped dough inside. Score the top of each boule with a sharp razor or lame at a 45-degree angle—this releases steam and prevents bursting during baking.
Bake covered for 20 minutes, then remove the lid and bake for another 20-25 minutes until the crust is deep golden brown and the internal temperature reaches 205°F. The bread should sound hollow when tapped on the bottom. Let it cool on a wire rack for at least 1 hour before slicing—this prevents a gummy interior. The crust should be crispy enough to shatter, while the crumb remains soft and airy.
Store Properly for Freshness
Once completely cooled, wrap the loaves in a clean kitchen towel and place them in a paper bag. Store at room temperature for up to 3 days, or freeze for up to 3 months. The towel helps maintain moisture while allowing the crust to stay crisp. When ready to serve, slice with a serrated knife for clean cuts and enjoy with your favorite butter or jam.
This method guarantees a perfectly balanced loaf every time—crispy crust, open crumb, and that unmistakable sourdough flavor. The 10-day process might seem long, but the hands-off nature makes it perfect for busy schedules. Each day builds complexity, resulting in bread that tastes like it came from a professional bakery.
Pro Tips For Making 10 Day Bread
- Weigh Your Flours: The 10-day process makes this bread unforgiving—flour by volume is a disaster. Use a kitchen scale for both the all-purpose and whole wheat. I learned this the hard way when my first loaf collapsed like a sad soufflé; the whole wheat absorbs differently, and even a 5-gram mismeasure throws off hydration.
- Chill the Dough: Skip the overnight fridge trick—this dough needs a real rest. After the final knead, shape the loaves and let them sit uncovered in the fridge for at least 12 hours (yes, even if you’re impatient). The cold slows yeast activity, tightens the gluten, and guarantees that crust you’re dreaming of. I used to rush this, and my bread always tasted gummy.
- Butter at Room Temp: Cold butter creates pockets of steam during baking, which this dense dough can’t handle. Let your unsalted butter sit out for 2-3 hours (or microwave in 10-second bursts) until it’s soft but not melted. I was skeptical until I tried it—the crumb became noticeably lighter, and the sugar dissolved properly without clumping.
- Steam the First 10 Minutes: This isn’t your average sandwich bread—it’s heavy on whole wheat, which means it’s prone to cracking. Place a metal tray on the oven rack below the loaves, then boil water in a pot on the stovetop. The steam mimics a professional bake, giving you that shingled, bakery-style top. I skip this, and my crust turns into a sad, uneven mess.
Make-ahead tips for this recipe
Starter Prep Ahead
Kickstart your 10-day journey by preparing your starter 3 days in advance. Mix 1 cup flour and 1 cup water in a jar, cover loosely, and let ferment at 70-75°F.
Feed daily with ½ cup flour and ½ cup water (plus 1 tbsp honey on days 1-3) to build a strong culture. Store it in the fridge after day 3—just feed it when you’re ready to bake.
This head start ensures your starter is active and ready by day 10 without daily attention. 💫
Dough Prep Timeline
Mix your final dough on day 10 morning, then refrigerate it overnight for 12 hours—this slows fermentation and develops deeper flavor. Shape the dough into boules in the morning, then let them rise for 2-3 hours.
If you need to delay baking, keep the shaped dough in the fridge for up to 24 hours before baking. The cold slows proofing, so let it sit at room temp for 1 hour before baking to revive activity. ⏰
Baking Schedule Flexibility
Preheat your Dutch oven while the dough bakes—this takes 1 hour but ensures a crispy crust. If your schedule is tight, bake the bread first thing in the morning after shaping overnight.
For evening bakers, shape the dough in the morning, refrigerate, then bake in the evening. The key is consistent temperature—your oven should stay at 450°F for the entire bake. 🔥
Freezing for Later
Freeze fully baked loaves by wrapping them in plastic wrap, then placing them in a paper bag for up to 3 months. Thaw at room temperature for 2 hours before toasting.
For freshness, freeze shaped but unbaked boules—thaw overnight in the fridge, then bake as directed. This is perfect for meal prep or gifting. The crust stays crisp even after freezing! ❄️
Batch Baking Tips
Make two loaves at once by doubling the dough recipe and baking them side by side in your Dutch oven. Use a baking stone on the lower rack to catch any drips.
For weekly bread, keep your starter alive in the fridge—feed it once a week with ½ cup flour and ½ cup water to maintain activity. This keeps your sourdough ecosystem ready for your next bake. 🌾
Storage Hacks
Keep baked loaves fresh by storing them in a bread box or paper bag at room temperature. For extra crispiness, place an unglazed ceramic plate under the bread while cooling—it absorbs excess moisture.
Toast slices from day-old bread to revive texture and enjoy buttery, fresh-tasting toast. The crust stays crisp for 3 days if stored properly. 💡
Nutrition facts
Frequently asked questions
Why does this recipe take 10 days?
The extended time builds a robust sourdough starter with strong wild yeast cultures, creating that signature tang and complex flavor. Each daily feeding (days 1-9) strengthens the fermentation power—skipping this step results in weaker flavor and less reliable rise. Think of it as nurturing beneficial bacteria that transform simple flour into bread with soul!
Can I use this method with store-bought yeast instead?
While possible, it defeats the purpose of developing wild fermentation. The 10-day process relies on natural yeast/bacteria for that authentic sourdough taste. If you’re impatient, try a 3-day starter with commercial yeast as a backup, but the flavor won’t match. The wait is worth the reward for true artisan bread!
What if my starter doesn’t bubble after 3 days?
Check your environment—ideal temperature is 70-75°F. If too cold, move it to a warmer spot (like near your oven with light off). Add 1 tsp sugar to feedings to encourage activity. If still sluggish, discard half and start fresh with fresh flour. Patience is key—some starters take up to 7 days to fully activate!
How do I know when the dough is properly proofed?
Look for these signs: dough should nearly double in size, feel springy when gently poked (like pressing a jelly), and have visible bubbles. For boules, the top should dome noticeably. If it rises too quickly, it’s overproofed—shape and refrigerate immediately to slow fermentation. The poke test is your best friend!
Can I make this recipe without a Dutch oven?
Yes! Use a heavy baking sheet or pizza stone with a metal bowl inverted over the dough to trap steam. Preheat both for 1 hour at 450°F before baking. Remove the bowl after 15 minutes to develop crust. The texture won’t be identical, but you’ll still get great results with proper steam retention.

- 3lb Prime Rib Roast Recipe: Juicy Pink Center Guaranteed in 3 Hours - October 31, 2026
- 5 Spice Cake Recipe: Warmly Spiced Layers With Crunchy Top - October 31, 2026
- 1950’s Macaroni and Cheese Recipe: Nostalgic Creamy Cheese Sauce with Buttery Noodles - October 31, 2026