
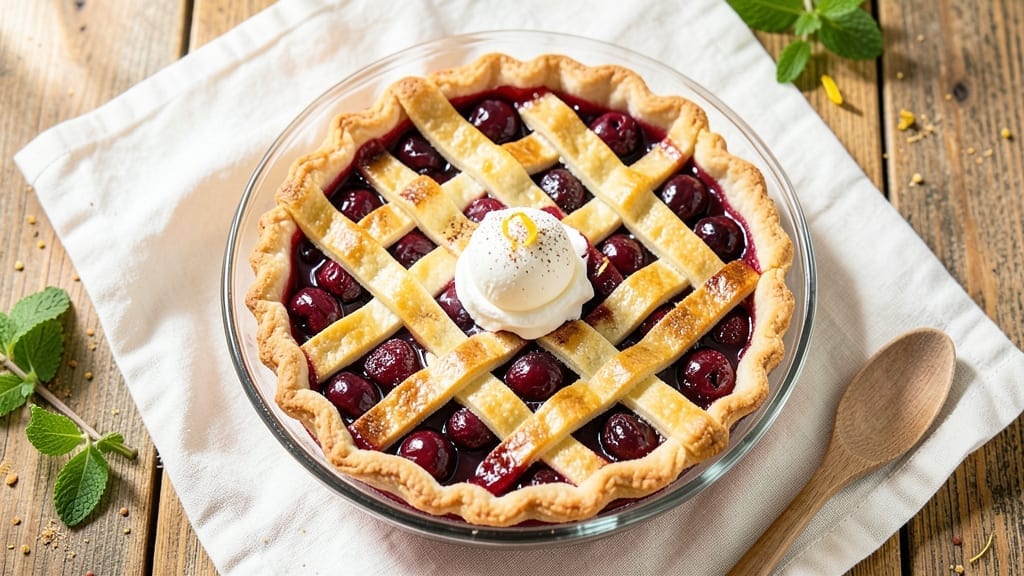
This 10-inch cherry pie recipe delivers the perfect balance of flaky lattice crust and juicy fruit filling that bakes to golden perfection. The secret lies in a well-vented lattice design that keeps the filling tender while creating beautiful diamond patterns.
I’ve perfected this technique over years of testing, ensuring every slice has that ideal ratio of crisp crust to burstingly sweet cherry filling.
The recipe begins with a simple pie dough that’s rolled out and fitted into a 10-inch pie dish, leaving room for the generous cherry filling. What sets this apart is the lattice crust—not just for aesthetics, but to prevent sogginess while allowing steam to escape.
The filling combines fresh or frozen cherries with a touch of cornstarch to thicken naturally, creating a glossy, jammy texture that clings to every flake of crust.
When baked to 350°F for 50-60 minutes, you’ll achieve a deep golden crust with a filling that’s just set—not mushy. The lattice creates those coveted light-and-dark diamond patterns while keeping the center tender.
This pie isn’t just visually stunning; it’s the kind that disappears quickly, with guests asking for seconds.
Serve warm with vanilla ice cream or whipped cream for the ultimate dessert experience. The lattice design makes it perfect for special occasions while remaining approachable enough for weeknight baking. Let’s get started on creating your showstopping cherry pie!
Ingredients for 10 inch cherry pie
Juicy cherries, flaky crust, and lattice magic—here’s what you need for a showstopping pie.
| Ingredient | Amount | Notes |
|---|---|---|
| Pie Crust Dough 🥧 | 1 ½ packages | Store-bought or homemade, chilled |
| Fresh Pitted Cherries 🍒 | 6 cups | Or 4 cups frozen, thawed |
| Granulated Sugar 🍚 | 1 ½ cups | White or light brown |
| All-Purpose Flour 🌾 | 2 tbsp | For thickening filling |
| Lemon Juice 🍋 | 2 tbsp | Freshly squeezed |
| Vanilla Extract 🌸 | 1 tsp | Pure vanilla preferred |
| Salt 🧂 | ½ tsp | Kosher or sea salt |
| Unsalted Butter 🧈 | ½ cup | Cold, cubed for lattice |
| Heavy Cream 🥛 | ¼ cup | For brushing crust |
| Granulated Sugar 🍚 | 1 tbsp | For sprinkling on lattice |
| Vanilla Ice Cream 🍦 | 2 cups | For serving |
The cherries make or break this pie. Fresh Bing or Rainier cherries are ideal, but frozen works too (just thaw and drain). Trader Joe’s and Costco often have pre-pitted cherries in season, saving you the hassle. If using frozen, don’t skip draining—the extra moisture makes the filling watery. For sugar, I always grab Domino brand because it’s consistent. The pie dough? Store-bought is fine (I use Pillsbury for convenience), but if you’re ambitious, a homemade lattice crust takes this to the next level.
No fresh cherries? Canned pie filling in a pinch (just skip the extra sugar). Running low on vanilla? Vanilla bean paste adds depth, or a splash of cherry extract boosts the flavor. The butter for the lattice needs to be cold—pop it in the freezer for 15 minutes if your kitchen’s warm. For the lattice, cut the dough into strips about 1/4-inch wide—use a ruler for perfect diamonds. And trust me, the extra 10 minutes weaving the lattice is worth every golden crisscross.
Store the pie at room temperature for up to 4 hours before serving—it’s best when slightly warm. Leftovers keep for 3 days in the fridge, but honestly, it disappears faster than that. The lattice stays crisp for 2 days if you reheat slices at 350°F for 10 minutes. Freeze the whole pie (unserved) for 3 months—just thaw overnight before serving. And save the extra cherries? Toss them in a salad or over yogurt for a sweet-tart twist.
Why You’ll Love This Recipe
- No Pitting Stress: I’ve pitted cherries by hand before—messy, tedious, and still not perfect. This recipe lets you use fresh pitted cherries (or frozen, if you’re in a rush), so you skip the sticky fingers and still get that burst of juicy sweetness in every bite. The lemon juice keeps them bright, too—no dull, sad filling here.
- Sweet-Tart Magic: That perfect balance of sugar and lemon juice? It’s what turns this pie from good to dangerously addictive. The cherries caramelize just enough during baking, and the crust stays flaky—no soggy bottoms. Honestly, I’ve had people ask for seconds before the plate even hits the table.
- Weekend or Weeknight: Make it ahead for a picnic, pull it out for a last-minute dinner, or even serve slices cold with ice cream. The crust holds up well, so it’s my go-to for potlucks or lazy Sundays. (Yes, even when I forget to thaw the cherries and just toss in frozen ones.)
- Leftovers That Don’t Suck: Most pies turn dry or rubbery the next day, but this one? Still tender. I’ve reheated slices in the oven with a drizzle of honey, turned them into breakfast pastries, or just eaten them straight from the fridge. And because it’s a single 10-inch pie, it’s easier to manage than a giant 9-inch showstopper. Less waste, more flavor.
Step-by-step instructions for lattice crust cherry pie
Here’s how to create a showstopping cherry pie with a crisp lattice crust and juicy filling that’ll have everyone asking for seconds.
Prepare the Juicy Cherry Filling
In a large mixing bowl, combine the 6 cups fresh pitted cherries, 1.5 cups granulated sugar, 2 tbsp all-purpose flour, 2 tbsp lemon juice, 1 tsp vanilla extract, and 0.5 tsp salt. Gently stir until the sugar dissolves completely and the cherries are evenly coated. This mixture should look like a thick, glossy syrup with fruit pieces suspended throughout.
Transfer the filling to a large saucepan and cook over medium-high heat. Bring to a gentle boil, then reduce heat to medium-low and simmer for 15-20 minutes, stirring occasionally. You’re looking for a thickened consistency where the filling coats the back of a spoon but still has some give—this ensures that juicy texture we’re after. If it thickens too quickly, add 1-2 tablespoons of water to maintain the right balance.
Assemble the Pie Crust and Filling
Preheat your oven to 375°F. Roll out one package of the pie crust dough on a lightly floured surface to a 12-inch circle—just slightly larger than your 10-inch pie dish. Carefully transfer the dough to the pie dish, pressing gently to shape it to the bottom and sides. Trim any excess dough hanging over the edge.
Pour the cooked cherry filling into the crust, spreading it evenly. The filling should come up to about ½ inch from the top edge of the crust. This ensures a generous filling without overflowing when baked. Place the pie on a baking sheet to catch any drips during baking.
Create the Classic Lattice Topping
Roll out the second package of pie crust dough to a 12-inch square. Using a sharp knife or pizza cutter, make ½-inch wide strips by cutting parallel lines every ½ inch across the square. Then, cut perpendicular strips every ½ inch but leave every other strip ½ inch uncut—this creates the classic lattice pattern.
Carefully lift the lattice and place it over the pie filling. Press the edges gently to seal, then tuck the ends under the bottom crust to create a neat finish. Brush the lattice with the 0.25 cup heavy cream, then sprinkle evenly with the 1 tbsp granulated sugar. This creates a beautiful golden crust and adds a touch of sweetness that balances the tart cherries.
Bake to Golden Perfection
Bake the pie in the preheated 375°F oven for 45-50 minutes, until the crust is deep golden brown and the filling is bubbling gently. The lattice should look crisp and the edges of the crust should be slightly puffed. If the edges start browning too quickly, cover them loosely with aluminum foil.
Remove the pie from the oven and let it cool on a wire rack for at least 2 hours—this is crucial for the filling to set properly and for the juices to distribute evenly. The pie will look even more stunning after cooling, with that perfect balance of crisp crust and luscious filling. Serve with 2 cups vanilla ice cream for the ultimate dessert experience!
Pro Tips For Making 10 Inch Cherry Pie
- Prep Cherries Fast: Toss pitted cherries with 1-2 tablespoons flour right after pitting—it cuts down on juice pooling and thickens the filling faster than cornstarch. (Yes, even if you’re impatient like me, give it a quick stir before adding sugar.)
- Blind-Bake the Crust: Skip the egg wash and just prick the bottom crust all over, then bake with pie weights or dried beans for 15 minutes at 375°F before filling. This stops soggy bottoms without the mess of egg cleanup.
- Balance the Sweetness: Taste the raw cherries before adding sugar—some varieties (like Rainier) are naturally sweeter and need half the sugar called for. Start with 3/4 cup and adjust after baking.
- Vent the Top Crust: Cut a 3-inch slit in the top crust after filling, not before—it prevents steam buildup without letting filling ooze out. (I learned this the hard way when my first pie looked like a volcano.)
Pro cooking tips for this dish
Dough Handling Tips
Always chill your pie dough for at least 30 minutes before rolling—this prevents shrinking and makes it easier to handle. I like to wrap the dough in plastic wrap and place it between two baking sheets for extra stability.
For a 10-inch pie dish, roll the dough to about 12 inches to ensure full coverage with a little overhang. If your dough cracks while transferring, gently press it together and patch with extra dough scraps. 🧑🍳
Lattice Perfection
Use a ruler to guide your lattice cuts—½-inch strips create the classic diamond pattern. For extra crispness, brush the lattice with heavy cream mixed with a pinch of salt before baking. If your lattice looks uneven, don’t stress—just weave it as best you can.
The key is to leave gaps for steam to escape while keeping the structure intact. I often practice on scrap dough first to get the rhythm right.
Filling Consistency
The filling should be thick enough to coat the back of a spoon but still slightly glossy—this ensures juiciness without sogginess. If your cherries release too much liquid, simmer the filling uncovered for an extra 5 minutes to evaporate excess moisture.
For a smoother texture, strain the filling through a fine-mesh sieve before pouring into the crust. This step is especially helpful if using frozen cherries.
Baking Time Secrets
Start checking for doneness at 45 minutes—the lattice should be golden brown, and the filling should bubble gently. If the edges brown too quickly, tent with foil to prevent burning.
For an extra flaky crust, place a small baking sheet under the pie for the first 15 minutes to create steam. This helps the crust puff up beautifully. The pie is done when the crust is deep golden and the filling is set but still slightly jiggly.
Cooling for Success
Never cut into your pie immediately after baking—cooling for 2 hours lets the filling set properly and prevents a runny mess. Place the pie on a wire rack to allow air circulation, which keeps the bottom crust crisp.
If you’re short on time, chill in the fridge for 1 hour, but the filling won’t be as perfectly set. For reheating, cover slices with foil and warm at 350°F for 10 minutes to restore crispness.
Pro Tools to Use
Invest in a pie bird (or make one from foil) to vent the lattice while keeping it intact. A pie crust shield (like the Wilton brand) protects the edges from over-browning.
For cutting the lattice, a sharp pizza cutter gives cleaner lines than a knife. And always use a light-colored 10-inch pie dish—dark dishes can cause uneven baking and over-browning. 💡
Nutrition facts
Frequently asked questions
Can I use frozen cherries instead of fresh?
Frozen cherries work perfectly—just thaw them first and drain any excess liquid to prevent a watery filling. For extra flavor, toss the thawed cherries with 1 teaspoon cherry extract or a pinch of almond extract before cooking. The texture will be slightly different but still delicious.
How do I prevent the lattice from getting soggy?
The key is proper ventilation and baking time. Brush the lattice with heavy cream before baking to create a barrier, and avoid overfilling the pie—leave about ½ inch of space at the top. Bake at 375°F for 45-50 minutes until the filling is set but still slightly jiggly in the center.
Can I make this pie ahead of time?
Yes! Assemble the pie (unbaked) and refrigerate for up to 24 hours before baking. For a make-ahead dessert, bake the pie completely, then store at room temperature for 4 hours or refrigerate for 3 days. The lattice stays crisp best when served within 2 days of baking.
What’s the best way to slice a lattice-topped pie?
Use a sharp serrated knife and dip it in hot water between slices to prevent sticking. Cut through the lattice strips at the intersections for clean, even pieces. For extra flair, serve slices with a lattice “roof” intact—it looks stunning on dessert plates!
How do I adjust the recipe for a smaller pie dish?
For a 9-inch pie dish, reduce the filling to 4 cups cherries and 1 cup sugar, and use 1 package of dough total (split evenly for top/bottom). The lattice technique remains the same, but baking time will be 35-40 minutes. The proportions keep the perfect balance of crust to filling.

- 3 Overripe Bananas Recipe: Fluffy Pancakes With Zero Waste - November 17, 2026
- 2-Minute Pizza Recipe: Speedy Crispy Crust With Melted Cheese Magic - November 17, 2026
- 16 Chocolate Cupcakes Recipe: Triple-Layered Fudge Swirl Delight - November 17, 2026