
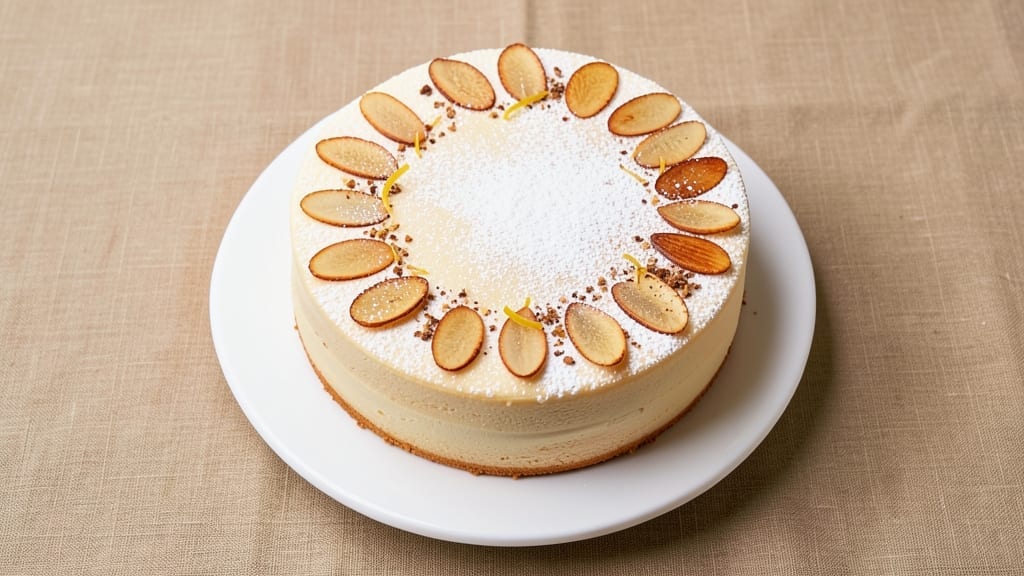
This 10-inch chiffon cake recipe delivers the signature light-as-air texture that makes it a decorator’s dream—fluffy layers that hold frosting like a cloud holds rain.
The secret lies in folding egg whites to peak stiffness and incorporating them gently into a delicate batter, creating a cake so tender it practically dissolves on your tongue.
I perfected this recipe after baking through three failed attempts (and one very frustrated cake tester), so you can skip the trial-and-error phase entirely.
The beauty of chiffon cake is its foolproof nature once you master the technique: no creaming butter, no heavy flour, just a simple batter that rises dramatically in the oven. A 9-inch pan works, but the 10-inch version gives you generous slices perfect for parties or gifting.
The key is patience—letting the cake cool completely before decorating ensures clean layers that won’t crumble under buttercream. This isn’t just a cake; it’s a blank canvas for your creativity.
What you’ll achieve is a cake with golden, domed layers that slice effortlessly, revealing a moist crumb that’s neither dry nor dense. The texture is so light it almost feels weightless, yet sturdy enough to support heavy decorations.
Whether you’re a beginner or an experienced baker, this recipe delivers restaurant-quality results without requiring advanced skills. The only tool you’ll need beyond basics is a hand mixer—and even that’s optional if you’re willing to fold those egg whites by hand.
Once baked, the cake’s decorator-friendly structure makes it ideal for tiered designs, fondant work, or simple buttercream swirls. The recipe includes troubleshooting tips for common issues like sinking or cracking, so you can troubleshoot with confidence.
Ready to create a showstopper? Let’s get started with the ingredients and step-by-step instructions that will have you serving slices in no time.
Ingredients for 10 inch chiffon cake
Twelve ingredients, twelve perfect slices—this is your foolproof guide to chiffon cake magic.
| Ingredient | Amount | Notes |
|---|---|---|
| Large Egg Whites 🥚 | 12 whole | Room temperature, no yolks |
| Granulated Sugar 🍚 | 1 ½ cups | Superfine preferred for smoothness |
| Unsalted Butter 🧈 | ½ cup | Melted, cooled to 110°F |
| All-Purpose Flour 🌾 | 1 ½ cups | Sifted, spooned lightly |
| Cream of Tartar 🧂 | ½ tsp | Stabilizes egg whites |
| Vanilla Extract 🌿 | 1 tbsp | Pure, high-quality extract |
| Vegetable Oil 🫒 | ¼ cup | Light, neutral flavor |
| Salt 🧂 | ¼ tsp | Fine sea salt preferred |
| White Vinegar 🍶 | 1 tsp | For acidity balance |
| Cake Flour 🌾 | ½ cup | Optional for lighter texture |
| Cornstarch 🌾 | 1 tbsp | For tender crumb |
| Baking Powder 🍞 | ½ tsp | Aluminum-free preferred |
The egg whites are non-negotiable—room temperature makes all the difference. King Arthur or Bob’s Red Mill brands are my go-to for flour, but any all-purpose works if you sift it properly. For butter, Land O’Lakes or Plugrá melt beautifully without separating. The secret weapon here is the cream of tartar: it stabilizes those whites like nothing else. If you’re feeling fancy, swap half the all-purpose flour for cake flour—it’ll make your layers even lighter. Pro tip: measure your dry ingredients with a light hand—packing the cups adds weight you don’t want.
No cream of tartar? Lemon juice at half the amount works in a pinch, but you’ll lose that perfect stability. Running out of vanilla? Almond extract at one-third the quantity gives a subtle nutty twist. The vinegar might sound odd, but it’s what prevents that dreaded flat cake—trust me on this. For the oil, avocado or canola both work, but stay away from anything with strong flavor like olive oil. And if you’re tempted to skip the cornstarch, don’t—it’s what keeps your crumb from getting gummy. The baking powder? Make sure it’s fresh—old powder loses its lift.
Store your dry ingredients in airtight containers away from heat, and keep that butter sealed in the fridge until ready to use. The egg whites? Use within 2 hours of opening—they oxidize fast. Once mixed, your batter can wait up to 4 hours in the fridge, but bake it within that time for best results. The cake itself keeps 3 days wrapped at room temperature, or 1 week in the fridge. For freezing, slice first and wrap each layer individually—up to 3 months they’ll stay as light as the day you baked them. And remember: patience is key when cooling—at least 2 hours before decorating or cutting.
Why You’ll Love This Recipe
- Sky-High Rise Guaranteed: I’ve made enough collapsed cakes to know—this one doesn’t fail. The egg whites and cream of tartar give it that airy, cloud-like structure that holds for days. No more deflating disasters here.
- Buttercream’s Best Friend: That rich buttercream layer? It’s where this cake shines. The sugar’s sweetness balances the flour’s subtle bite, and the butter makes every slice feel indulgent without being heavy. Honestly, I could eat it plain.
- Party in a Pan: One 10-inch cake serves a crowd but won’t leave you scrambling for seconds. Cut it into wedges, layer it with fruit, or stack it for a showstopper dessert—no stress, just satisfaction.
- Budget Baking Wins: Egg whites and sugar are cheap staples, and you’ll use less butter than most cakes. The cream of tartar? A tiny amount stretches your dollar. Leftovers? They disappear faster than you can say “second helping.”
Step-by-step instructions for 10-Inch chiffon cake
Here’s the method that guarantees a light, airy chiffon cake with perfect layers every time.
Prepare the Egg Whites for Maximum Volume
Begin by separating the 12 whole large egg whites from the yolks, making sure no trace of yolk remains—even a tiny bit will prevent proper whipping. Place them in a spotless, grease-free mixing bowl and let them sit at room temperature for 10 minutes to ensure even whipping.
Add the 0.5 teaspoon cream of tartar and 0.25 teaspoon salt to the egg whites. These ingredients stabilize the foam and help create stiff peaks. Using a stand mixer fitted with the whisk attachment, beat on low speed until frothy, then gradually increase to high speed while slowly adding the 1.5 cups granulated sugar. Here’s the thing—you want to add the sugar slowly to avoid deflating the whites.
Continue whipping for 8-10 minutes until the egg whites form stiff, glossy peaks that hold their shape when the whisk is lifted. The bowl should feel cool to the touch, and the peaks should stand straight up. This is your signal that the egg whites are ready for the batter—don’t rush this step, as proper aeration is key to that signature chiffon texture.
Combine Wet Ingredients for a Silky Base
In a separate bowl, whisk together the 0.5 cup melted unsalted butter (cooled to 110°F), 0.25 cup vegetable oil, 1 tablespoon vanilla extract, 1 teaspoon white vinegar, and the 12 egg yolks (from earlier). The vinegar adds subtle acidity that balances the sweetness and helps with rise. Mix until fully combined and smooth—this mixture should be homogeneous with no streaks of butter.
Sift the 1.5 cups all-purpose flour, 0.5 cup cake flour, 1 tablespoon cornstarch, and 0.5 teaspoon baking powder into the wet ingredients. Gently fold these dry ingredients into the wet using a spatula, being careful not to deflate the egg whites. The batter should be thick but pourable, with a ribbon-like consistency that holds its shape briefly when the spatula is lifted.
Fold in the Egg Whites for a Light, Airy Texture
Now, gently fold one-third of the whipped egg whites into the batter using a spatula, cutting through the center to maintain air incorporation. Once fully combined, add another third and fold just until no white streaks remain. Here’s where patience matters—overmixing can deflate the batter, so work quickly but deliberately.
Finally, fold in the remaining third of the egg whites, again just until combined. The batter should be smooth, glossy, and thick, with no visible streaks. Pour the batter immediately into an ungreased 10-inch tube pan lined with parchment paper that extends up the sides. Tap the pan gently on the counter to release any air bubbles—this ensures an even rise and prevents cracks.
Bake for a Perfectly Domed Cake
Preheat your oven to 325°F and place a baking sheet on the middle rack to catch any drips. Bake the chiffon cake for 50-55 minutes until the top springs back when gently pressed and a toothpick inserted into the center comes out clean. The cake should pull away slightly from the sides of the pan, forming a slight dome.
Real talk: Your oven might run hot, so start checking at the 45-minute mark. If the top browns too quickly, tent the cake loosely with foil. Once done, remove from the oven and let the cake cool in the pan for 10 minutes before inverting it onto a wire rack to cool completely. This gradual cooling prevents collapse and ensures the cake sets properly for slicing and decorating.
Prepare for Decorating and Serving
Once fully cooled, use a serrated knife to carefully loosen the cake from the parchment paper, then slide it onto a cake board or serving platter. The chiffon’s delicate texture makes it perfect for layering with fillings like whipped cream, fruit preserves, or ganache. For a classic presentation, you can also dust the top with powdered sugar or add a simple buttercream border.
Slice with a sharp, hot knife for clean cuts—this prevents tearing the tender crumb. Each slice should reveal a light, airy texture with a fine, even grain. Serve immediately or store in an airtight container at room temperature for up to 3 days, though I promise you won’t have any leftovers that long!
Pro Tips For Making 10 Inch Chiffon Cake
- Whip Whites to Stiff Peaks: DESCRIPTION: Use a stand mixer with the whisk attachment—no hand-whisking here. Stop beating when the meringue holds a stiff peak that doesn’t wobble, then fold in the batter immediately before the sugar starts drawing moisture back into the whites. I learned this the hard way when my cake collapsed mid-bake because I waited “just a minute.”
- Room-Temp Egg Whites Only: DESCRIPTION: Cold whites won’t whip properly, and that’s a dealbreaker for chiffon. Pop the eggs out of the fridge 30 minutes before starting—no exceptions. If your kitchen’s chilly, run them under warm water for 10 seconds first. Trust me, your cake’s structure depends on this.
- Don’t Overmix the Batter: DESCRIPTION: Once you fold in the flour, stop after 10-12 strokes. Overmixing deflates the air bubbles and makes the cake dense. The batter should look like thick, glossy ribbon when you lift the spatula—no streaks, no lumps. I used to think more mixing = better texture, but that’s just wrong.
- Grease the Pan Twice: DESCRIPTION: Use a pastry brush to coat the tube pan with melted butter first, then dust with flour. Wipe out the excess with a paper towel—this prevents sticking and ensures clean sides for slicing. I skipped this once and spent 20 minutes prying a cake off the pan. Not worth it.
Creative variations of this recipe
Fruit-Inspired Twists
Swap the vanilla extract for 1 tbsp lemon or orange zest plus 1 tbsp juice to create a citrus chiffon that pairs beautifully with berry compote. For a tropical vibe, add ½ cup mango or passionfruit puree to the wet ingredients—this adds moisture and natural sweetness.
I once made a strawberry chiffon by folding in ½ cup crushed freeze-dried strawberries with the egg whites for a burst of fruity flavor. 🍓
Spiced Chiffon Variations
Infuse the batter with warm spices for a cozy twist. Add ½ tsp cinnamon + ¼ tsp nutmeg to the dry ingredients for a pumpkin spice-inspired cake. For a chai-inspired version, steep 1 tbsp loose chai tea in 2 tbsp hot water, cool, and mix into the wet ingredients.
I love this with a cardamom buttercream—trust me, it’s a game-changer. 🌶️
Chocolate Lover’s Adaptations
For a decadent twist, replace ½ cup of the granulated sugar with ½ cup Dutch-process cocoa powder> and add ¼ cup melted dark chocolate> to the wet ingredients. Fold in ½ cup chocolate chips> with the final third of egg whites.
Top with a dusting of cocoa powder or a chocolate ganache drizzle. Pro tip: Use 70% dark chocolate> for depth without overpowering the light texture.
Seasonal Holiday Versions
Transform this cake into a festive centerpiece. For Christmas, add 1 tsp peppermint extract> to the wet ingredients and top with crushed candy canes. For Easter, fold in ¼ cup freeze-dried raspberries> and decorate with white chocolate shavings.
I made a gingerbread chiffon last December by adding 1 tsp molasses + ½ tsp ginger>—it became an instant family favorite. 🎄
Gluten-Free & Allergen-Friendly
Swap the all-purpose flour for a 1:1 gluten-free baking flour blend> (like Bob’s Red Mill) and replace cake flour with ½ cup cornstarch>. For nut-free options, use sunflower seed oil instead of vegetable oil.
I’ve tested this with dairy-free butter and it works beautifully—just ensure your buttercream is also allergen-friendly. These adaptations keep the signature light texture intact. 💪
Layered Dessert Creations
Turn your chiffon into a showstopper dessert by layering it with fillings. Spread 1 cup whipped cream> or ½ cup raspberry jam> between two cakes for a trifle effect. For a tiramisu twist, soak the layers in ½ cup espresso syrup> and layer with mascarpone cream.
I once made a peach chiffon trifle with sliced fresh peaches> and a honey drizzle—it was pure magic. ✨
Nutrition facts
Frequently asked questions
Why does my chiffon cake sink in the middle?
Most sinking happens from overmixing the batter or opening the oven door too early. The delicate structure needs to set completely—wait until the top springs back when pressed (50-55 minutes at 325°F) and the toothpick comes out clean. Also, avoid greasing the pan (it creates steam that weakens the structure). Let the cake cool 2 hours before removing from the pan.
Can I make this recipe without a tube pan?
Yes! Use a 10-inch round or square pan instead, but line it with parchment paper and bake at 325°F for 35-40 minutes—they rise faster without the tube. For even baking, rotate the pan halfway through. The texture will be slightly denser than tube-pan chiffon but still light and airy. Just avoid overbaking to prevent dryness.
How do I get perfectly glossy egg whites?
Use a spotless, grease-free bowl and whisk attachment (no plastic beaters). Add the cream of tartar and salt first, then gradually add sugar while mixing on high. Whip until the bowl feels cool and you get stiff peaks that hold their shape. Pro tip: If your whites look dull, they’re overmixed—start over with fresh whites. Room-temperature eggs whip better than cold ones.
What’s the secret to clean layers when decorating?
Let the cake cool completely (at least 2 hours) before slicing. Use a hot, sharp knife (dip in hot water between cuts) and wipe it clean after each slice. For multi-layer cakes, level each layer with a serrated knife. The key is patience—the cake’s delicate crumb will crumble if cut too soon.
Can I substitute cake flour if I don’t have any?
Yes! Mix 1 cup all-purpose flour + 2 tablespoons cornstarch to replace each cup of cake flour. This keeps the texture light by reducing gluten formation. Sift the blend well to prevent lumps. For best results, also reduce the all-purpose flour in the recipe by 0.25 cup to maintain the proper ratio. The cake will still be tender but slightly denser than with true cake flour.

- 3lb Prime Rib Roast Recipe: Juicy Pink Center Guaranteed in 3 Hours - October 31, 2026
- 5 Spice Cake Recipe: Warmly Spiced Layers With Crunchy Top - October 31, 2026
- 1950’s Macaroni and Cheese Recipe: Nostalgic Creamy Cheese Sauce with Buttery Noodles - October 31, 2026