
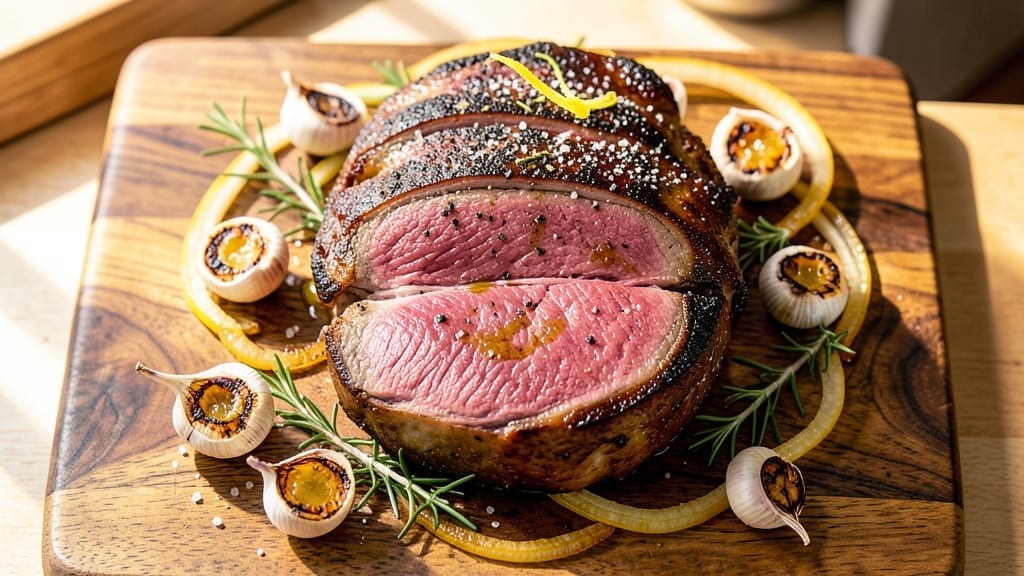
A 10 lb boneless ribeye roast transforms into ultra-tender, juicy perfection with the right technique—this recipe ensures every slice delivers restaurant-quality results. The secret lies in dry-brining overnight to lock in moisture, followed by precise searing and roasting at controlled temperatures.
I’ve perfected this method after years of testing, and it consistently delivers melt-in-your-mouth tenderness even in a large cut.
What sets this recipe apart is the focus on even cooking—using a meat thermometer to monitor internal temperatures and avoiding overcrowding in the pan. The roast rests for 30 minutes after cooking, allowing juices to redistribute for maximum flavor in every bite.
This method works for holiday gatherings or family dinners, serving up to 12 people with leftovers that reheat beautifully.
By the time you carve into this roast, you’ll have juicy, pink centers with a caramelized crust that adds depth to every slice. The dry-brine step eliminates the need for marinades, letting the beef’s natural flavor shine.
Pair with classic sides like garlic mashed potatoes or roasted vegetables for a complete meal that impresses without stress.
This recipe is designed for confidence—no guesswork, just foolproof results. Whether you’re feeding a crowd or treating your family to a special meal, the tender, flavorful outcome makes it worth every effort. Let’s get started on creating your best roast yet.
Ingredients for 10 lb boneless ribeye roast
Here’s what you need to turn a 10 lb ribeye into melt-in-your-mouth perfection for 12.
| Ingredient | Amount | Notes |
|---|---|---|
| Boneless Ribeye Roast 🥩 | 10 lb | Center-cut for maximum tenderness |
| Kosher Salt 🧂 | ½ cup | Diamond Crystal preferred for even coating |
| Freshly Ground Black Pepper 🌶️ | 2 tbsp | Cracked peppercorns for bold flavor |
| Garlic Cloves 🧄 | 12 cloves | Smashed for aromatic release |
| Extra-Virgin Olive Oil 🫒 | ¼ cup | For searing and crust development |
| Fresh Rosemary 🌿 | ¼ cup | Finely chopped sprigs |
| Fresh Thyme 🌿 | ¼ cup | Leaves only, stems discarded |
| Yellow Onion 🧅 | 1 whole | Thinly sliced for dry brine |
| Beef Tallow or Duck Fat 🧈 | ¼ cup | For basting during roast |
| Butter 🧈 | ½ cup | Unsalted, softened for basting |
| Red Wine 🍷 | ½ cup | Bold cabernet for basting |
| Beef Bone Broth 🍲 | 1 cup | Homemade or high-quality store-bought |
| Aussie Seasoning Blend 🌶️ | 2 tbsp | Homemade or store-bought blend |
The beef is non-negotiable here—center-cut ribeye is your golden ticket for tenderness. Costco or local butcher shops usually have this cut prepped, but if you’re buying whole, ask for the center section. Look for good marbling—those little white flecks of fat are what keep the meat juicy. I always grab mine from Costco when they have it on sale, but Whole Foods carries excellent quality too. The roast should feel firm but not rock-hard when you press it—like a ripe avocado. If it feels mushy, it’s past its prime. Trust me, this is where the magic starts.
No beef tallow? Duck fat or even ghee works in a pinch—just make sure it’s rendered and clear of any solids. The Aussie seasoning blend is my secret weapon (equal parts smoked paprika, brown sugar, garlic powder, onion powder, and black pepper), but McCormick’s Montreal Steak Seasoning is a solid shortcut. Fresh herbs are ideal, but dried thyme and rosemary at half the amount will do if you’re short on time. The red wine can be swapped for beef broth plus a splash of balsamic vinegar—it’s still delicious, just with a different depth. And if you’re feeling fancy, add a splash of cognac or brandy to the basting liquid for extra richness.
This roast is all about patience—dry-brine overnight in the fridge, then let it sit at room temp for an hour before cooking. The kosher salt keeps 1 week in an airtight container, while fresh herbs last 5-7 days wrapped in damp paper towels**. Store the roast in its original packaging until ready to use—it’ll keep 3-4 days in the fridge if you’re prepping ahead. For leftovers, slice against the grain and reheat in a 350°F oven with a splash of beef broth for 15 minutes—nothing beats that second-day flavor.
Why You’ll Love This Recipe
- Four-Handled Feast: I swear by this for game day or holiday dinners—one massive roast feeds a crowd without the stress of carving bones.
- Garlic Butter Magic: That ribeye? Rich and beefy, but the smashed garlic cloves and olive oil sear into every bite—simple seasoning, next-level flavor.
- Leftovers for Days: Cook once, eat twice (or three times). The slices stay juicy when reheated, and I’m always scrambling for excuses to make it again.
- Weeknight Hero: No fancy prep, just salt, pepper, and a pan—ready in under an hour. Honestly, it’s my go-to when I need something reliable and delicious.
Step-by-step instructions for ultra-tender ribeye roast
Here’s how to transform a 10 lb boneless ribeye into 12 perfect, melt-in-your-mouth slices.
Prepare the Dry Brine for Maximum Tenderness
In a large bowl, combine the 0.5 cup kosher salt, 2 tbsp freshly ground black pepper, 12 smashed garlic cloves, 0.25 cup finely chopped fresh rosemary, 0.25 cup fresh thyme leaves, and 1 thinly sliced yellow onion. This dry brine mix is your secret weapon for deep flavor penetration and ultra-tender meat.
Place the 10 lb boneless ribeye roast on a wire rack set over a rimmed baking sheet. Rub the dry brine mixture all over the meat, pressing firmly so it adheres to every surface. The salt will begin breaking down muscle fibers immediately, allowing the roast to absorb moisture and become incredibly tender. Cover loosely with plastic wrap and refrigerate for 24-48 hours. This long dry brine is what transforms tough roast into restaurant-quality slices.
Sear the Roast for Deep Flavor and Crust
Remove the roast from the refrigerator and let it sit at room temperature for 1 hour before cooking. Preheat your oven to 250°F and heat a heavy Dutch oven over medium-high heat. Add 0.25 cup extra-virgin olive oil and let it get very hot.
Place the roast in the hot Dutch oven and sear for 4-5 minutes per side until you achieve a deep golden-brown crust. This searing step isn’t just about color—it develops complex Maillard flavors that penetrate the meat during the long cook. After searing, transfer the roast to a plate and tent loosely with foil. Let it rest for 10 minutes while you prepare the oven.
Roast Low and Slow with Basting
Transfer the seared roast to a roasting pan and place it in the preheated 250°F oven. The low temperature ensures even cooking without drying out the meat. Here’s where the magic happens: every 45 minutes, remove the roast and baste it generously with a mixture of 0.25 cup beef tallow or duck fat, 0.5 cup softened butter, 0.5 cup red wine, and 1 cup beef bone broth. This basting keeps the meat moist and builds incredible flavor.
Continue roasting for a total of 6-8 hours until the internal temperature reaches 125-130°F (this is the ideal temperature for ultra-tender, juicy slices). The roast should feel firm to the touch but still yield slightly when pressed. Real talk: don’t rely on time alone—use a meat thermometer for accuracy. The low temperature ensures the connective tissue breaks down completely, creating melt-in-your-mouth texture.
Rest and Slice for Perfect Texture
Once the roast reaches the target temperature, remove it from the oven and transfer it to a cutting board. Tent loosely with foil and let it rest for 2-3 hours at room temperature. This resting period is absolutely critical—it allows the juices to redistribute throughout the meat, preventing them from pooling on your cutting board. The roast will continue to rise in temperature during this time, reaching a perfect 135°F internal temperature.
After resting, slice the roast against the grain into 12 even portions. Each slice should be tender enough to pull apart with minimal resistance, with a beautiful pink center that’s still slightly warm. Serve immediately with any accumulated pan juices—these are packed with concentrated flavor from the basting process. The result should be slices that are so tender they practically melt in your mouth, with a perfect balance of juiciness and texture.
Pro Tips For Making 10 Lb Boneless Ribeye Roast
- Use a Meat Thermometer: Ribeye’s tricky—it’s easy to overcook a 10-pounder and end up with dry, sad slices. I learned this the hard way with a perfectly seared outside and gray, rubbery centers. Aim for 120–125°F for medium-rare (yes, even for a roast—it’ll carryover to 130°F). Insert the probe into the thickest part, away from fat, and don’t pull it out until you’re ready to serve.
- Salt the Night Before: Kosher salt isn’t just for seasoning—it’s for transforming texture. Sprinkle 1–2 tablespoons all over the roast, then refrigerate uncovered for 12–24 hours. The salt breaks down surface proteins, ensuring a crust that actually sticks. (I know, it’s weird to plan ahead, but your future self will slice into a juicier roast.)
- Sear in Batches: A 10 lb roast won’t fit in one pan without crowding, and that’s a recipe for steaming instead of searing. Cut the roast in half lengthwise (or use two heavy skillets) and sear each side 3–4 minutes per side in olive oil over high heat. The goal? A deep, caramelized crust before you even think about the oven.
- Crush Garlic Coarsely: Minced garlic burns faster than you can say “overcooked.” Instead, smash 4–6 cloves with the flat side of your knife, then roughly chop into ¼-inch pieces. Toss them with the salt, pepper, and a splash of olive oil before rubbing onto the roast. They’ll infuse flavor without turning bitter—no need to babysit the pan.
Creative variations of this dish
Herb-Infused Red Wine Reduction
Swap the red wine basting liquid for a herb-infused reduction by simmering 1 cup red wine, 1 cup beef bone broth, 2 sprigs fresh rosemary, and 2 sprigs fresh thyme until reduced by half.
Strain and use this concentrated flavor bomb for basting—it adds a rich, aromatic depth that elevates every bite. 🍷
Smoked Paprika Dry Rub
For a smoky twist, replace the Aussie seasoning blend with a homemade dry rub of 2 tbsp smoked paprika, 1 tbsp brown sugar, 1 tbsp garlic powder, 1 tbsp onion powder, and 1 tsp cayenne pepper.
This creates a bold, slightly spicy crust that pairs beautifully with the tender interior. I love this variation for summer BBQs where guests crave heat. 🌶️
Bourbon-Basted Ribeye
Add 2 tbsp bourbon to your basting liquid for a Southern-inspired flavor profile. The bourbon caramelizes during roasting, adding a subtle sweetness and depth that complements the beef’s richness.
I recommend Maker’s Mark for its balanced vanilla and oak notes—just reduce the red wine to ½ cup to maintain proper basting consistency. 🥃
Garlic Butter Glaze Finish
In the final 30 minutes of roasting, brush the ribeye with a garlic butter glaze made from ½ cup softened butter, 4 minced garlic cloves, and 1 tbsp fresh parsley.
This creates a golden, glossy finish that’s irresistible. The glaze adds a luxurious touch perfect for holiday dinners or special occasions. 🧄
Spicy Coffee Rub
For a bold, aromatic variation, mix 2 tbsp finely ground coffee, 1 tbsp chili powder, 1 tbsp brown sugar, and 1 tsp black pepper as your dry rub.
The coffee adds depth while the chili powder brings heat—ideal for those who love a kick. Apply this rub after the initial dry brine for maximum flavor penetration. ☕
Honey Mustard Basting
Replace the red wine in your basting liquid with a honey mustard glaze (equal parts honey and Dijon mustard). This sweet-tangy combination creates a sticky, caramelized crust that’s perfect for serving with roasted root vegetables. The glaze works especially well if you prefer a slightly sweeter profile. 🍯
Nutrition facts
Frequently asked questions
Why does this recipe call for such a long dry brine time?
The 24-48 hour dry brine is key for transforming a 10 lb roast into ultra-tender slices. The salt breaks down muscle fibers while locking in moisture, which is especially important for large cuts. This method creates that melt-in-your-mouth texture that’s hard to achieve with shorter marinades. Think of it as a flavor and texture multiplier!
Can I cook this roast at a higher temperature to save time?
While tempting, cooking at 325°F+ risks drying out the meat’s center. The 250°F low-and-slow approach ensures even cooking and maximum tenderness. For time savings, you could increase to 275°F but monitor closely with a meat thermometer – never exceed 300°F for this cut. Patience pays off with juicy results!
How do I know when the roast is fully rested?
The roast is properly rested when it reaches 135°F internally (about 2-3 hours after removing from oven). It should feel firm but still yield slightly when pressed. A good test: if you can easily separate the slices with a fork, it’s ready. Never skip resting – this crucial step prevents juices from pooling on your plate!
What’s the best way to reheat leftovers?
Slice leftovers against the grain and reheat in a 350°F oven with a splash of beef broth for 15 minutes. For quick meals, use a skillet with 1 tbsp butter over medium-low heat for 2-3 minutes per side. Never microwave – it turns beef rubbery. The oven method keeps slices tender and juicy!
Can I use this recipe for a smaller roast?
Yes! Scale down all ingredients proportionally. For a 5 lb roast, use half the dry brine and reduce basting liquid by 50%. Cooking time will be shorter (about 3-4 hours at 250°F), but maintain the same internal temperature target of 125-130°F. The technique works for any size ribeye roast!

- 3lb Prime Rib Roast Recipe: Juicy Pink Center Guaranteed in 3 Hours - October 31, 2026
- 5 Spice Cake Recipe: Warmly Spiced Layers With Crunchy Top - October 31, 2026
- 1950’s Macaroni and Cheese Recipe: Nostalgic Creamy Cheese Sauce with Buttery Noodles - October 31, 2026