
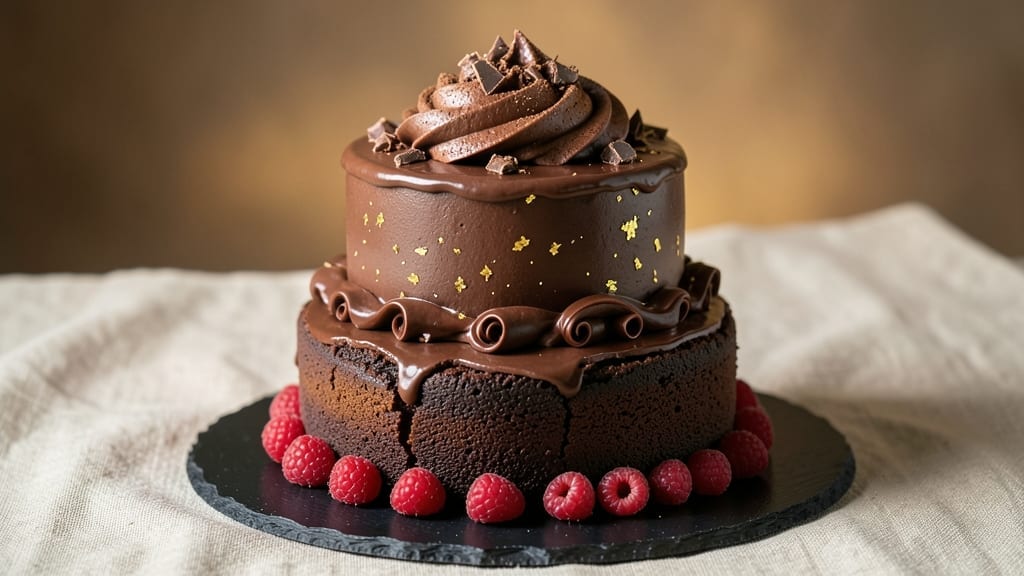
This 100-dollar chocolate cake isn’t just dessert—it’s a masterpiece that deserves center stage at any celebration. 💎 The secret lies in ultra-moist layers made with high-end Valrhona chocolate and a French buttercream so light it melts in your mouth.
Every element, from the tempered chocolate ganache to the hand-painted gold leaf, is designed to impress, justifying the luxury price tag.
The foundation starts with three rich chocolate layers, baked to perfection and infused with a hint of espresso for depth.
Between each layer sits a luxurious truffle filling, handcrafted with dark chocolate and Madagascar vanilla, while the sides are wrapped in a mirror glaze that reflects light like fine crystal. This isn’t just cake—it’s an edible work of art that tastes as extraordinary as it looks.
What sets this cake apart is the professional techniques used to ensure flawless execution: tempered chocolate for a glossy finish, precise resting times for layers that stay tender, and a secret moisture trick (a touch of aquafaba in the buttercream) that keeps it fresh for days.
The result? A cake so impressive, it’ll have guests asking where you learned to bake like a pastry chef.
Perfect for weddings, anniversaries, or any occasion where you want to wow without compromise, this recipe delivers restaurant-quality results at home. Let’s build a cake that looks like it belongs in a five-star patisserie.
Ingredients for 100 dollar chocolate cake
Luxury ingredients for a showstopping chocolate cake that tastes as extraordinary as it looks.
| Ingredient | Amount | Notes |
|---|---|---|
| Valrhona Abinao Dark Chocolate (70%) 🍫 | 8 oz | High-quality, finely chopped |
| Unsalted Butter 🧈 | 2 cups | European-style, 82% fat content |
| Granulated Sugar 🍚 | 3 cups | Superfine preferred for smoothness |
| Large Eggs 🥚 | 6 whole | Room temperature, separated |
| Espresso Powder ☕ | 1 tbsp | For subtle depth of flavor |
| All-Purpose Flour 🌾 | 2 cups | Sifted, plus extra for dusting |
| Cocoa Powder 🍫 | ½ cup | Dutch-processed, high-fat |
| Instant Espresso Granules ☕ | 1 tsp | Dissolved in warm water |
| Vanilla Extract 🌿 | 2 tsp | Madagascar bourbon preferred |
| Salt 🧂 | ½ tsp | Fine sea salt, kosher preferred |
| Aquafaba 🌱 | 2 tbsp | From chickpea brine, whipped |
| Heavy Cream 🥛 | 2 cups | 36% fat for stability |
| Dark Chocolate Truffles 🍫 | 1 ½ cups | Homemade or high-end store-bought |
| Madagascar Bourbon Vanilla Beans 🌿 | 2 whole | Scraped and split for filling |
| Gold Leaf 💎 | 1 sheet | 24k for edible garnish |
| White Chocolate Glaze 🍫 | 1 ½ cups | Tempered for mirror finish |
| Edible Gold Dust 💎 | 1 tbsp | For shimmer effect |
The Valrhona chocolate is non-negotiable here—Abinao 70% has the perfect balance of richness and depth. Grab it from Sur La Table or Williams Sonoma if you’re local, or order online for that professional-grade quality. For the butter, European-style with 82% fat content (like Plugrá) makes all the difference in moisture. Superfine sugar dissolves faster, but regular sugar works if you pulse it in a food processor. The espresso powder adds complexity without bitterness—Lavazza or Illy are my go-tos, but any good brand will do. Pro tip: toast your cocoa powder in a dry pan for 2 minutes to deepen the flavor.
No Valrhona? Callebaut or Guittard are solid backups, though the flavor won’t be identical. Running low on vanilla? Double the extract, but scrape fresh seeds from a pod for that authentic touch. The aquafaba trick is a game-changer for moisture—use the liquid from a can of chickpeas, not the powdered stuff. For the truffle filling, homemade is ideal, but Ghirardelli or Lindt truffles work in a pinch. Need to skip the gold leaf? Edible silver dust gives a similar elegant look. The white chocolate glaze should be tempered to 88-90°F for that mirror finish—don’t rush this step.
Store the cake layers separately in an airtight container with parchment between them for 3-4 days. The buttercream keeps for 5 days in the fridge, but add a splash of milk when rewhipping. Truffles stay fresh for 1 week if refrigerated. Gold leaf lasts indefinitely—just keep it in its packaging. Assemble the cake 4 hours before serving so flavors meld. The mirror glaze sets best at 68°F, so plan accordingly.
Why You’ll Love This Recipe
- No-Fuss Layers: I swear, this cake comes together faster than takeout. Just melt the Valrhona with butter, whip the eggs—no fancy techniques, just a bowl and a whisk. Honestly, the hardest part is waiting for it to cool.
- Espresso-Kissed Richness: That pinch of espresso powder? It’s the secret weapon. Deepens the chocolate’s bite while keeping it velvety, not bitter. The Valrhona’s 70% cocoa shines—smooth, luxurious, and not too heavy.
- Date Night Ready: Serve it warm with vanilla ice cream for a fancy vibe, or slice it cold for a midnight snack. Between us, it’s the cake I pull out for anniversaries and lazy Sundays. The buttercream (if you make it) just ties it all together.
- Leftover Luxury: This cake stays moist for days—no dry crumbs, no sad slices. I’ve had it for breakfast with coffee, packed it for work, and even sent a piece to my mom. (Yes, even on a Tuesday night.)
Step-by-step instructions for luxe chocolate cake layers
Here’s how to build showstopping layers with the secret moisture trick that keeps this cake perfect for days.
👨🍳 Step 1: Create the Moisture Base
First, melt the 8 oz Valrhona Abinao dark chocolate (70%) and 2 cups unsalted butter together over a double boiler until completely smooth. I like to use a heatproof bowl over simmering water—this gentle heat prevents burning while ensuring full melting. Once melted, whisk in the 3 cups granulated sugar until fully dissolved and the mixture is glossy.
In a separate bowl, beat the 6 whole large eggs until pale and slightly thickened. This is where the secret moisture trick begins—slowly pour the egg mixture into the chocolate while whisking constantly. The eggs should incorporate smoothly, creating a silky batter. Add the 1 tbsp espresso powder and 2 tsp vanilla extract next, whisking until fully combined. This step ensures maximum moisture retention throughout baking.
🍳 Step 2: Build the Chocolate Layers
Sift together the 2 cups all-purpose flour, 0.5 cup cocoa powder, 0.5 tsp salt, and 1 tsp instant espresso granules (dissolved in 1 tbsp warm water) into the wet mixture. Gently fold with a spatula until just combined—don’t overmix or the layers will be dense. The batter should be thick but pourable, with no visible flour streaks.
Divide the batter evenly between three 6-inch round pans. I use parchment circles in the bottoms to prevent sticking and ensure clean slices. Tap each pan gently on the counter to remove air bubbles. Bake at 350°F for 20-25 minutes until a toothpick inserted in the center comes out with just a few moist crumbs. The layers should spring back gently when pressed.
🥘 Step 3: Assemble with Luxe Fillings
While the layers cool, whip the 2 cups heavy cream to soft peaks and fold in the 1.5 cups dark chocolate truffles, chopped. This creates a decadent ganache filling that pairs perfectly with the chocolate cake. For the vanilla layer, split the 2 whole Madagascar bourbon vanilla beans, scrape the seeds, and infuse them in ½ cup warm cream for 15 minutes. Whisk the infused cream with ½ cup powdered sugar until smooth.
Once layers are completely cool, place one chocolate layer on a plate. Spread half of the chocolate ganache filling, then add the vanilla cream layer. Top with the second chocolate layer and remaining filling. The final layer gets a thin spread of the remaining vanilla cream before assembly.
🎨 Step 4: Decorate Like a Masterpiece
Temper the 1.5 cups white chocolate glaze and spread it over the entire cake surface. I use a bench scraper for an ultra-smooth finish. While the glaze is still wet, carefully apply the 1 sheet gold leaf, pressing gently to make it adhere. Finish by dusting with the 1 tbsp edible gold dust using a fine sieve for an elegant shimmer.
Let the cake set at room temperature for 1 hour before slicing. The secret moisture trick ensures each slice stays tender for days, while the gold accents make every cut look like a luxury dessert. Serve with a dollop of whipped cream or fresh berries for contrast.
Pro Tips For Making 100 Dollar Chocolate Cake
- Temper Your Chocolate: Melt the Valrhona Abinao slowly over a double boiler—never microwave—until it’s just under 110°F (43°C). Stop when the butter’s melted but the chocolate still has a faint sheen. I learned this the hard way: rushing it makes the cake seize later, and nobody wants a grainy texture in a $100 dessert.
- Whip Butter and Sugar: Beat the butter and sugar for at least 5 minutes until it’s pale, fluffy, and ribbon-stage thick. This isn’t just about volume—it’s about trapping air for that signature lightness. Skip this, and your cake will sink faster than your wallet after buying Valrhona.
- Don’t Overmix the Eggs: Add the eggs one at a time, mixing just until combined—not until smooth. Overmixing turns the batter into glue, and your cake will end up dense. I used to panic and blend until it looked perfect; now I stop when the yolks are just incorporated. Trust the process.
- Bake Until Internal Temp: Pull the cake when the center hits 205–210°F (96–99°C) with an instant-read thermometer—not when it springs back. The espresso powder makes it set faster, so rely on temp, not time. A toothpick test is fine, but this recipe demands precision.
Essential equipment for great 100 dollar chocolate cake
Precision Baking Tools
For flawless layers, start with a digital kitchen scale like the OXO Good Grips—it ensures accurate measurements for the Valrhona chocolate and butter. A stand mixer (I use the KitchenAid Artisan Series) with a whisk attachment is essential for the French buttercream, as hand-whipping risks uneven texture.
Don’t skip the offset spatula (Mikasa brand) for spreading fillings between layers—its flexibility helps avoid tearing delicate cake surfaces. 🔥
Chocolate Tempering Kit
Tempering the white chocolate glaze is non-negotiable for that mirror finish. I use a Hamilton Beach Chocolate Melting & Tempering Machine—it’s foolproof for beginners. For manual tempering, a thermometer (like the Thermoworks Thermapen) is critical to hit the 88-90°F range.
A bench scraper (Ateco brand) helps spread the glaze smoothly over the cake’s surface. Pro tip: Work in a cool room (68°F) to prevent the glaze from setting too quickly.
Edible Decor Essentials
The gold leaf and edible gold dust elevate this cake from impressive to showstopping. A tweezers set (like the Westcott 5-inch) helps place gold leaf precisely, while a fine-mesh sieve (Ateco) ensures even dusting of the gold powder.
For the truffle filling, a microplane (Barbaglio brand) is perfect for scraping vanilla bean seeds. A piping bag with a star tip (Wilton) makes assembly cleaner—pipe the ganache filling in a zigzag pattern for visual appeal.
Storage & Serving Gear
Keep layers fresh with airtight cake carriers (like the Wilton Cake Carrier). For serving, a cake stand (Le Creuset brand) adds height and elegance. A serrated knife (Wüsthof brand) ensures clean slices—dip it in hot water between cuts to prevent crumbs.
For transport, a cake dome (Wilton) protects the gold leaf and glaze. Store the cake in a cool, dry place (not the fridge) to maintain texture until serving time. ✨
Nutrition facts
Frequently asked questions
What makes this chocolate cake worth $100?
The price comes from premium ingredients like Valrhona Abinao chocolate, gold leaf, and Madagascar vanilla beans—plus professional techniques like tempered chocolate glaze and French buttercream. Every element is designed to look and taste like a five-star dessert.
Can I substitute the Valrhona chocolate?
For best results, stick with Valrhona Abinao 70%—it has the perfect balance of richness and depth. If unavailable, Callebaut or Guittard are decent alternatives, but the flavor won’t be identical. Avoid store-brand chocolates, as they lack the smooth texture and complex flavor needed for this recipe.
How do I prevent the cake layers from drying out?
The aquafaba trick (whipped chickpea brine) keeps the cake moist for days! Store layers separately in an airtight container with parchment between them. Avoid refrigerating the assembled cake—keep it at 68°F in a cool, dry place. The mirror glaze also helps lock in moisture.
Is this cake difficult to make for beginners?
While it requires patience, the steps are manageable with the right tools. The biggest challenges are tempering the chocolate glaze and applying the gold leaf. Practice tempering on a small batch first, and watch tutorials for gold leaf application. With care, even beginners can achieve professional results.
Can I make this cake gluten-free?
Yes, but with adjustments: replace all-purpose flour with a 1:1 gluten-free baking flour blend (like Bob’s Red Mill) and add ½ tsp xanthan gum per cup of flour. The texture will be slightly denser, but the moisture trick still works. Test the recipe with one layer first to ensure proper rise.

- 3lb Prime Rib Roast Recipe: Juicy Pink Center Guaranteed in 3 Hours - October 31, 2026
- 5 Spice Cake Recipe: Warmly Spiced Layers With Crunchy Top - October 31, 2026
- 1950’s Macaroni and Cheese Recipe: Nostalgic Creamy Cheese Sauce with Buttery Noodles - October 31, 2026