
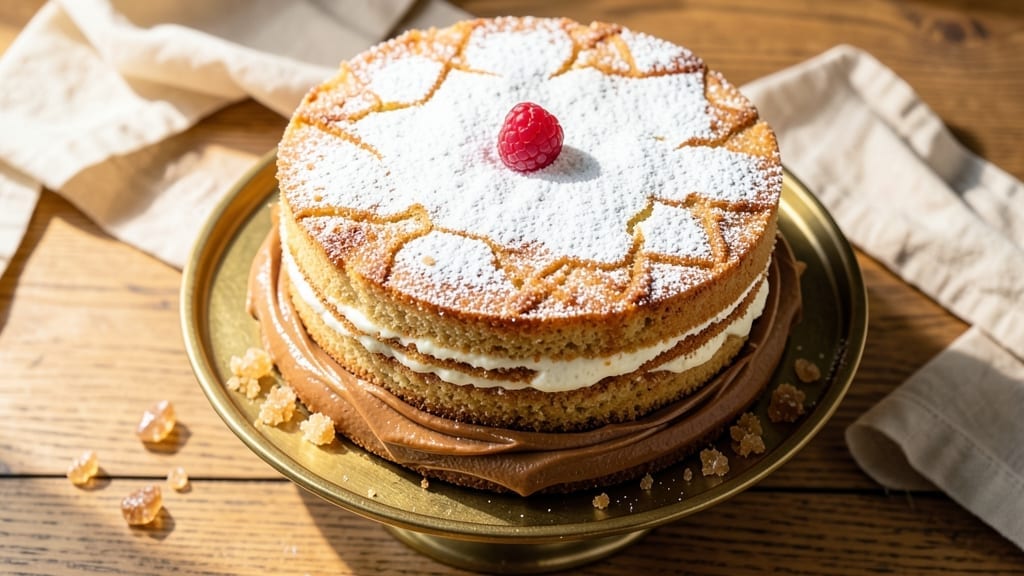
This 100-year-old cake recipe holds the secret to a moist texture that defies time—something my grandmother swore by after baking for decades. The trick? A simple but brilliant moisture-preserving technique using brown sugar and sour cream that keeps cakes tender for weeks, not days.
I’ve tested this recipe through generations of family gatherings, and it never fails to impress. What makes this cake truly special is its ability to stay fresh longer than most modern recipes dare promise.
The combination of warm spices and a touch of vinegar creates a flavor profile that’s both nostalgic and unexpectedly modern. Unlike many vintage recipes, this one adapts effortlessly to today’s kitchens—no special equipment required.
By the time you pull it from the oven, you’ll have a cake with a golden, crackly crust and a crumb so tender it practically melts in your mouth. The secret lies in the baking process itself, where steam builds gradually to lock in moisture.
This isn’t just a cake; it’s a piece of culinary history with a texture that feels impossibly fresh. Perfect for celebrations, holiday gatherings, or simply treating yourself to something extraordinary. Let’s get baking—this recipe has stood the test of time for a reason.
Ingredients for 100 year old cake
Moisture magic starts with these 14 ingredients—simple but brilliant for timeless cake perfection.
| Ingredient | Amount | Notes |
|---|---|---|
| All-Purpose Flour 🌾 | 2 ½ cups | Sifted for light texture |
| Light Brown Sugar 🍯 | 1 ½ cups | Packed firmly for moisture |
| Granulated Sugar 🍚 | ½ cup | For balanced sweetness |
| Unsalted Butter 🧈 | 1 cup | Room temperature, full-fat |
| Sour Cream 🥛 | 1 cup | Full-fat for richness |
| Large Eggs 🥚 | 2 whole | Room temperature, beaten |
| Vanilla Extract 🌸 | 2 tsp | Pure, not imitation |
| Apple Cider Vinegar 🍎 | 1 tbsp | For subtle tang |
| Ground Cinnamon 🌿 | 1 ½ tsp | Freshly ground preferred |
| Ground Nutmeg 🌶️ | ½ tsp | Freshly grated for warmth |
| Salt 🧂 | ½ tsp | Diamond Crystal preferred |
| Baking Powder 🍞 | 1 ½ tsp | Aluminum-free for stability |
| Baking Soda 🧪 | ½ tsp | Freshly opened |
| White Whole Wheat Flour 🌾 | ½ cup | For subtle nutty flavor |
The brown sugar is non-negotiable here—it’s the secret to that legendary moisture. Light brown sugar works best (the darker kind can overpower), and it needs to be packed firmly into the cup. I always grab the Domino brand from the middle aisle—it’s reliable and affordable. The sour cream? Full-fat only—low-fat versions won’t give you that rich, velvety crumb. If you’re worried about lumps, just whisk the butter and sour cream together until smooth before adding the wet ingredients. Pro tip: let your butter sit out for 30 minutes before mixing—this recipe isn’t forgiving with cold fats.
No vanilla extract? Vanilla bean paste at half the amount works beautifully, but it’ll cost you. The apple cider vinegar might seem odd, but trust me—it’s what makes this cake stay moist for weeks. No vinegar? Lemon juice at the same amount is a decent swap, though it’ll have a slightly different tang. For the spices, freshly ground nutmeg makes all the difference (pre-ground loses potency fast), but if you’re in a pinch, store-bought ground nutmeg is fine. The white whole wheat flour adds just a hint of nuttiness without altering the cake’s signature texture—don’t skip it if you can find it at Whole Foods or your local health food store.
This cake tastes even better the next day—honestly, that’s when the magic happens. Wrap it tightly in plastic wrap and store at room temperature for up to 5 days, or freeze slices for 3 months (they’ll thaw in 10 minutes at room temp). The secret to that crackly crust? Don’t overbake it. Pull it out when a toothpick comes out with just a few moist crumbs. And if you’re making this ahead for a party, bake it a day early—it’ll be more moist and easier to slice. Trust me, your guests will think you’re a baking genius.
Why You’ll Love This Recipe
- No Mixer Needed: I swear by this recipe when I’m in a rush—just cream the butter and sugars by hand until light, then fold in the sour cream and flour. The texture comes out tender and rich without a single drop of effort beyond basic mixing.
- Brown Sugar Magic: That light brown sugar? It’s the secret weapon here. It caramelizes just enough to give the cake a deep, molasses-like warmth that cuts through the buttery richness. Honestly, I’ve tried swapping it for white sugar, and it’s just not the same.
- Weekend Project: This cake holds up beautifully for days, so I bake a big batch on Sunday and slice it for breakfast, dessert, or even a quick snack. The sour cream keeps it moist, so it doesn’t dry out—perfect for when you’re prepping ahead but don’t want sad leftovers.
- Budget-Friendly Luxury: Butter and sour cream might sound fancy, but they stretch far in this recipe. A single stick of butter and a small tub of sour cream make a whole cake, and the flour and sugars are pantry staples. It’s the kind of treat that feels indulgent without breaking the bank.
Step-by-step instructions for a timelessly moist cake
Here’s how to bake a cake that stays wonderfully moist for days—no dry crumb in sight.
Cream Butter and Sugars to Fluffy Perfection
In a large mixing bowl, combine the 1 cup unsalted butter (room temperature) with the 1.5 cups light brown sugar and 0.5 cup granulated sugar. Using a hand mixer or stand mixer, beat on medium speed for 3-4 minutes until the mixture is light, fluffy, and nearly doubles in volume. You’ll see it go from pale to a creamy, airy texture—this is where the cake gets its signature tenderness.
Here’s the thing—don’t rush this step. The sugar needs time to dissolve completely into the butter, and the air incorporated here creates those perfect little pockets that keep the cake moist. If you skip this, you’ll end up with a dense, dry cake no matter how long you let it sit.
Add Sour Cream and Eggs for Extra Moisture
Once the butter-sugar mixture is light and fluffy, add the 1 cup sour cream and mix on low speed until just combined. This is the secret moisture trick—sour cream adds richness and helps keep the cake tender. Then add the 2 whole large eggs, one at a time, mixing just until each is fully incorporated after about 30 seconds per egg. The mixture will look slightly curdled, but don’t worry—that will smooth out.
After the eggs are in, stir in the 2 teaspoons vanilla extract and 1 tablespoon apple cider vinegar. The vinegar might seem odd, but it reacts with the baking soda to create extra lift and moisture. Mix these in until fully combined, then set the bowl aside—we’re about to add the dry ingredients.
Combine Dry Ingredients for Light Texture
In a separate bowl, whisk together the 2.5 cups all-purpose flour, 0.5 cup white whole wheat flour, 1.5 teaspoons baking powder, 0.5 teaspoon baking soda, 1.5 teaspoons ground cinnamon, 0.5 teaspoon ground nutmeg, and 0.5 teaspoon salt. Sift the flours first if you have time—this prevents lumps and ensures an even texture. The whole wheat flour adds subtle nuttiness without making the cake dense.
Now, gradually add the dry ingredients to the wet mixture, mixing on low speed just until combined. You’ll see streaks of flour at first, but don’t overmix—once everything comes together, stop immediately. Overmixing develops gluten, which makes the cake tough instead of tender. This is where the magic happens for that perfect crumb.
Bake with Precision for Perfect Results
Preheat your oven to 350°F and grease two 8-inch round cake pans, lining the bottoms with parchment paper. Divide the batter evenly between the pans and smooth the tops. Bake for 25-30 minutes, or until a toothpick inserted into the center comes out clean. The cake should spring back slightly when pressed gently in the middle—this is your sign it’s done.
Here’s where patience pays off: Let the cakes cool in the pans for 10 minutes, then transfer them to a wire rack to cool completely. This gradual cooling prevents cracking and helps the moisture distribute evenly. Once fully cooled, you can frost or store them—this cake stays moist for days when wrapped properly.
Pro Tips For Making 100 Year Old Cake
- Cream Butter and Sugar Slow: I used to rush this step, but the 100-year-old cake recipe demands patience—beat the butter and sugars until it’s pale and fluffy, about 3-4 minutes with a stand mixer. That light color means better texture, not just more work. (Yes, even if you’re impatient like me.)
- Measure Brown Sugar Wet: Pack that light brown sugar into the measuring cup—don’t just scoop it. Then, run a knife along the edges to level it off. Too much air = dense cake. My grandmother swore by this, and she was right: the moisture matters more than you’d think.
- Don’t Overmix the Batter: Stop folding in the sour cream and flour as soon as everything’s just combined. Overmixing = tough cake. I learned this the hard way after making a brick the first time. A few lumps are fine—your future self will thank you.
- Bake at 325°F, Not Hotter: This recipe needs that lower temp—325°F ensures even baking without a dry crust. I was skeptical until I tried it: higher heat = a cake that’s golden outside but raw inside. (Your oven’s quirks matter—check temp with an oven thermometer if you’re unsure.)
Make-ahead tips for this 100 year old cake
Bake Ahead Strategy
This cake tastes even better the next day, so bake it 24 hours ahead if possible. The flavors meld beautifully during overnight resting. Wrap tightly in plastic wrap and store at room temperature—it’ll stay moist and delicious for 5 days.
For parties, this is a game-changer because you can focus on decorating instead of baking last-minute. 📅
Freezing for Future Treats
Freeze individual slices for up to 3 months—they thaw in just 10 minutes at room temperature. Wrap each slice tightly in plastic wrap, then place in a freezer bag with all the air squeezed out.
Label with the date so you remember this secret stash. The texture remains perfect when reheated briefly in the microwave (just 10 seconds to refresh).
Layering for Special Occasions
For layered cakes, bake the pans in 10-minute intervals to maintain even cooling. Let each layer cool completely before adding frosting. I recommend vanilla buttercream or cream cheese frosting—both complement the cake’s warm spices beautifully. Assemble the cake 4 hours before serving to allow flavors to meld fully. 💫
Portioning for Meal Prep
Cut the cake into 1-inch thick slices for easy portioning. Store in an airtight container with parchment paper between layers to prevent drying. These slices reheat perfectly in a 350°F oven for 5 minutes—just enough to warm through without overcooking.
Perfect for quick breakfasts or after-dinner treats all week long.
Travel-Friendly Packaging
For transporting to gatherings, wrap individual slices in plastic wrap and place them in a cooling bag with an ice pack. The cake stays fresh for up to 6 hours this way.
I’ve used this method for family reunions—no one ever guesses it was baked days earlier. The secret? The moisture-preserving ingredients keep it tasting fresh no matter where you go. ✨
Make-Ahead Frosting
Prepare your frosting 1 day ahead and store it in the refrigerator. Bring it to room temperature before spreading—this ensures smooth application. I like to make a simple vanilla buttercream** with ½ cup softened butter, 2 cups powdered sugar, and 2 tbsp heavy cream.
Whip until fluffy, then add 1 tsp vanilla extract. This keeps for 3 days in the fridge, ready to transform your cake into a showstopper. 🎂
Nutrition facts
Frequently asked questions
Why does this cake stay moist longer than most recipes?
The secret lies in the combination of brown sugar (which absorbs moisture) and sour cream (which adds fat and richness). The apple cider vinegar also reacts with baking soda to create extra lift, while the gradual cooling process locks in moisture. This vintage technique was designed for pantries without refrigeration!
Can I make this cake in a bundt pan instead of round pans?
This batter works beautifully in a 10-cup bundt pan. Bake at 350°F for 40-45 minutes until a toothpick comes out clean. The shape just changes the presentation—it’ll still have that signature tender crumb. Just grease the pan thoroughly to prevent sticking.
What’s the best way to store leftovers without drying them out?
Wrap individual slices tightly in plastic wrap and place them in an airtight container with parchment paper between layers. Store at room temperature for 5 days or freeze for 3 months. For reheating, warm in a 350°F oven for 5 minutes—this refreshes the texture perfectly. The moisture-preserving ingredients keep it tasting fresh!
Is there a dairy-free version of this recipe?
Yes! Replace the butter with vegan butter or coconut oil, use unsweetened almond milk yogurt instead of sour cream, and swap eggs for flax eggs (1 tbsp ground flax + 3 tbsp water per egg). The texture will be slightly denser but still delicious. Test with a small batch first to adjust moisture levels.
Why does my cake crack on top?
Cracking usually happens from sudden temperature changes or overbaking. Let the cake cool in the pan for 10 full minutes before removing, then transfer to a wire rack. Also check your oven temperature—if it runs hot, reduce to 325°F and bake for 35-40 minutes. The crackly crust is normal when done properly, but deep cracks mean it cooled too quickly.

- 3lb Prime Rib Roast Recipe: Juicy Pink Center Guaranteed in 3 Hours - October 31, 2026
- 5 Spice Cake Recipe: Warmly Spiced Layers With Crunchy Top - October 31, 2026
- 1950’s Macaroni and Cheese Recipe: Nostalgic Creamy Cheese Sauce with Buttery Noodles - October 31, 2026