
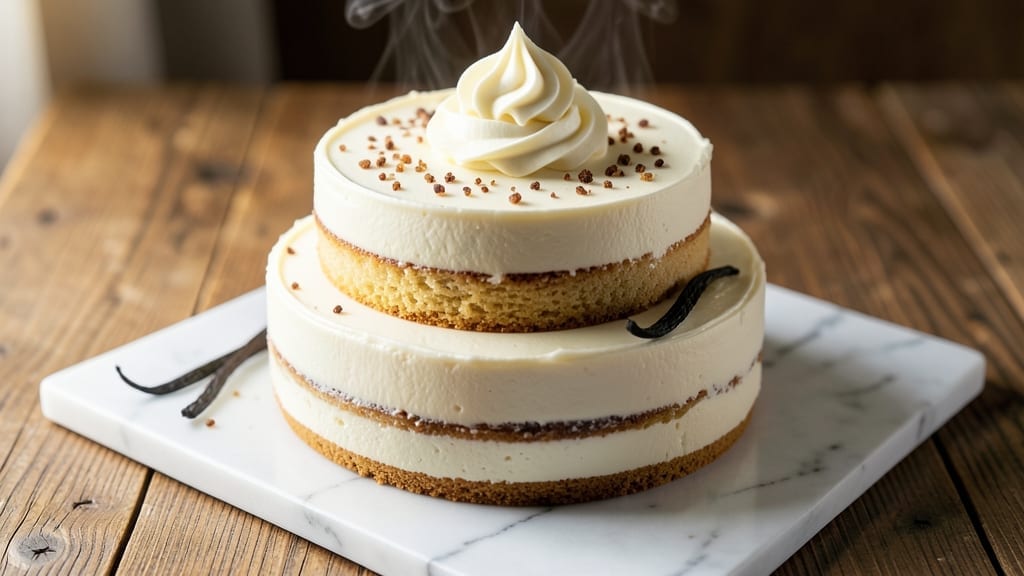
An 11×15 vanilla cake with vanilla bean swirls is the showstopper you need for any celebration—whether it’s a birthday, bridal shower, or holiday dessert table. ✨ The secret to its restaurant-quality height and texture lies in precise layering, proper mixing, and a foolproof baking technique that prevents sinking or cracking.
I’ve perfected this recipe over years of baking for large gatherings, and it consistently delivers a cake that’s light, tender, and packed with real vanilla flavor.
What sets this recipe apart is the vanilla bean swirl—a luxurious touch that elevates a classic vanilla cake into something truly special. The cake itself is baked in a single 11×15-inch pan, then carefully layered with a vanilla bean-infused buttercream for that signature swirled look.
The result? A cake that’s easier to serve than a traditional layer cake but just as impressive, with even layers and no dry spots. This method also means less cleanup and fewer pans to monitor in the oven.
The baking process is straightforward but requires attention to detail—room-temperature ingredients, gentle folding of the batter, and precise oven temperature to ensure even baking. Once cooled, the cake is frosted with layers of vanilla bean buttercream, then swirled with a piping bag for that elegant, restaurant-worthy finish.
The final product is moist, flavorful, and visually stunning, with a perfectly balanced sweetness that keeps it crowd-pleasing for all ages.
This cake is ideal for feeding a crowd—it serves 12 to 16 and can be easily halved or quartered for smaller gatherings. Serve it at room temperature with fresh berries, whipped cream, or a sprinkle of powdered sugar for extra flair. Let’s get baking—your guests won’t believe it’s homemade!
Ingredients for 11×15 vanilla cake
Precision-measured ingredients for a restaurant-quality 11×15-inch vanilla cake with signature swirls.
| Ingredient | Amount | Notes |
|---|---|---|
| All-Purpose Flour 🌾 | 4 ½ cups | Sifted for even texture |
| Granulated White Sugar 🍚 | 2 ½ cups | Superfine preferred for smoothness |
| Unsalted Butter 🧈 | 2 cups | Room temperature, cubed |
| Large Eggs 🥚 | 6 whole | Room temperature for even mixing |
| Pure Vanilla Extract 🌿 | 2 tbsp | High-quality, Madagascar bourbon |
| Vanilla Beans 🍃 | 2 whole | Split lengthwise for infusion |
| Baking Powder 🧂 | 2 ½ tsp | Diamond Crystal preferred |
| Salt 🧂 | ½ tsp | Fine sea salt |
| Whole Milk 🥛 | 1 cup | Room temperature |
| Vanilla Bean Buttercream 🧈 | 4 cups | Homemade recipe included separately |
| Powdered Sugar 🍚 | 2 cups | Sifted for smooth buttercream |
| Heavy Cream 🥛 | 1 ½ cups | Cold for whipped cream |
| Fresh Vanilla Beans 🍃 | 1 whole | For buttercream infusion |
| Unsalted Butter 🧈 | 1 cup | Room temperature for buttercream |
The flour and sugar are the foundation—King Arthur or Gold Medal brands ensure consistent rise and tenderness. Room-temperature butter is non-negotiable; cold butter creates pockets that prevent even mixing. For the vanilla, Madagascar bourbon beans deliver the richest flavor, but Tahitian works beautifully too. The baking powder matters: Diamond Crystal has more lift than generic brands. Store your flour in the freezer to prevent rancidity, and always sift before measuring to avoid dense layers. The milk should be whole for optimal moisture, but 2% works in a pinch if that’s what you have.
No bourbon vanilla beans? Mexican vanilla extract at double the amount works, though the seeds add depth. Substituting powdered sugar for granulated in the buttercream? Yes, but reduce the liquid by 2 tbsp to maintain consistency. The buttercream requires room-temperature butter—microwave in 20-second bursts if needed. For a lighter texture, whip the cream to soft peaks before folding. The cake batter should be smooth but not stiff—overmixing develops gluten and creates a tough crumb. If your kitchen is humid, reduce the milk by 1 tbsp to prevent a gummy texture.
This cake keeps beautifully—covered at room temperature for 3 days or fridge for 5 days in airtight layers. For long-term storage, freeze fully frosted layers for up to 3 months (thaw at room temperature before serving). The buttercream can be made 2 days ahead and stored in the fridge; rewhip before assembling. To prevent soggy layers, level the cake perfectly with a serrated knife after cooling. Serve at 68°F for optimal texture—neither too warm nor chilled.
Why You’ll Love This Recipe
- No Mixer Needed: I swear by this—just creaming butter and sugar by hand (or with a fork in a pinch) until it’s light and fluffy. The eggs blend right in, and the vanilla? It’s the kind of scent that turns your kitchen into a bakery without any fuss.
- Butter-Sugar Magic: That creamed butter and sugar combo? It’s where the real flavor happens. The sugar dissolves just enough to keep the cake tender, while the butter keeps it rich—no dry crumbs here. One bite and you’ll taste why this isn’t your average vanilla cake.
- Bulk Baking Bliss: This 11×15 pan is perfect for parties, potlucks, or meal prep—slice it, freeze it, or serve it warm with ice cream. Honestly, I’ve had leftovers for a week, and it’s still just as good the third day.
- Budget-Friendly Luxury: All-purpose flour, butter, sugar, eggs—these are pantry staples. No fancy ingredients, no overpriced shortcuts. Yet it tastes like you spent hours decorating it. My secret weapon for impressing guests without breaking the bank.
Step-by-step instructions for layered vanilla cake with swirls
Precision and patience create this elegant vanilla cake with signature swirls.
👨🍳 Step 1: Prepare the Vanilla Bean Infusion
Split the 2 whole vanilla beans lengthwise and scrape out the seeds using the tip of a knife. Place the seeds and scraped pods into the 1 cup whole milk in a small saucepan. Heat over medium-low heat until steaming but not boiling (180°F). Remove from heat, cover, and let steep for 30 minutes to fully infuse the milk with vanilla flavor.
Strain the milk through a fine-mesh sieve into a measuring cup, pressing gently on the pods to extract every last drop. You should have about 1 cup of fragrant vanilla milk. Let it cool completely before using—warm milk can cause the butter to melt prematurely in the batter. This infusion elevates the cake’s vanilla profile beyond standard extracts.
🍳 Step 2: Cream Butter and Sugar for Light Texture
In a stand mixer fitted with the paddle attachment, beat the 2 cups unsalted butter (room temperature) and 2.5 cups granulated white sugar on medium speed for 3-4 minutes until light and fluffy. You’re looking for a pale, airy mixture that nearly doubles in volume—the butter should leave a ribbon when the beaters are lifted.
This creaming process incorporates air, which creates the cake’s signature tender crumb. If the mixture feels grainy or doesn’t lighten, let the butter soften another 10 minutes at room temperature. Scrape down the sides of the bowl occasionally to ensure even mixing.
👨🍳 Step 3: Incorporate Eggs and Vanilla Infusion
Add the 6 whole large eggs, one at a time, mixing on low speed after each addition until fully incorporated. After the last egg, add the 2 tablespoons pure vanilla extract and the 1 cup cooled vanilla milk infusion. Mix on low speed for 1 minute to combine completely.
The vanilla milk infusion adds moisture and depth, while the extract provides that bright vanilla aroma. Be careful not to overmix here—just until everything is homogenous. Overmixing develops gluten and can make the cake dense. The batter should be smooth with no visible streaks of egg.
👨🍳 Step 4: Combine Dry Ingredients and Fold Gently
In a separate bowl, whisk together the 4.5 cups all-purpose flour, 2.5 teaspoons baking powder, and 0.5 teaspoon salt. Sift the mixture directly into the wet ingredients. Using a silicone spatula, gently fold the dry ingredients into the wet mixture just until combined—you should still see some flour streaks. This prevents overdevelopment of gluten.
For the swirl effect, divide the batter evenly between two mixing bowls. To one bowl, add 1 cup of the 4 cups vanilla bean buttercream and gently fold it in using the spatula. The buttercream should be evenly distributed but not overmixed. This creates the signature marbled effect when layered.
🔥 Step 5: Bake Layers at Precise Temperature
Preheat your oven to 350°F and line three 11×15-inch baking pans with parchment paper. Divide the plain batter evenly among the three pans, spreading it into even layers. Bake for 18-20 minutes until a toothpick inserted in the center comes out clean and the edges are lightly golden.
Rotate the pans halfway through baking for even heat distribution. The layers should be fully set but still slightly springy to the touch. Overbaking dries out the cake—immediate removal from the oven is crucial. Let the layers cool in the pans for 10 minutes before transferring to a wire rack to cool completely.
🥘 Step 6: Assemble and Swirl the Cake
Once completely cool, level the tops of the cake layers if needed. Place the first layer on a cake stand or plate. Spread 1 cup of the remaining 3 cups vanilla bean buttercream evenly over the layer, leaving a ½-inch border at the edges. Repeat with the second layer.
For the swirl effect, spread the final 1 cup buttercream over the top layer. Using an offset spatula or butter knife, gently drag the buttercream through the layers in a swirling motion, creating marbled patterns. Top with the final layer, pressing down gently. Chill the assembled cake in the refrigerator for 30 minutes to set before slicing.
Pro Tips For Making 11×15 Vanilla Cake
- Weigh Your Butter: Grab a kitchen scale instead of eyeballing that butter—this isn’t a guess-the-weight game. A standard 11×15 recipe needs about 1½ cups (340g) of butter, but scooping straight from the fridge leaves you short. Packed butter = dense cake; soft butter = airy layers. Take it out 30 minutes early, let it sit at room temp, and measure it properly.
- Sift the Flour Twice: I learned this the hard way—skipping the second sift leads to dense, heavy cake. First sift breaks up clumps, but the second one aerates the flour, which matters more than you’d think. Use a fine-mesh sieve and do it right over the mixing bowl. (Yes, it’s extra work, but your cake will thank you.)
- Don’t Overmix the Batter: Stop mixing the moment the flour disappears—no streaks, no gray patches. Overmixing develops gluten, and that’s how you end up with a tough, chewy cake instead of tender layers. Use a spatula to gently fold in the last bit of flour if needed. (And for the love of cake, don’t use a stand mixer on high.)
- Test for Doneness at 325°F: Your oven runs hot, and so does mine—350°F is a starting point, but this cake is happier at 325°F. Insert a toothpick at the center: it should come out with moist crumbs, not wet batter. If it’s sticky, bake another 5-10 minutes. Underbaking is easier to fix than overbaking; just cover it with foil and let it steam.
Creative variations of this dish
Citrus Twist Variation
Brighten the vanilla flavor with a zest infusion by adding 2 tablespoons fresh lemon or orange zest to the dry ingredients. The citrus complements the vanilla beautifully while adding a refreshing contrast.
For extra flair, fold 1 tablespoon citrus juice into the buttercream before swirling. This variation works especially well for spring or summer gatherings when you want a lighter, fruitier profile. 🍋
Chocolate-Dipped Layers
For a decadent twist, dip the bottom of each cake layer in melted dark chocolate before assembling. Use a 70% cacao bar for depth without overpowering the vanilla. Spread the chocolate on the layer with an offset spatula, then let it set for 5 minutes before adding buttercream.
This creates a stunning marbled effect when sliced. Pair with raspberry filling for a sophisticated dessert. 🍫
Spiced Vanilla Bean Cake
Infuse warmth by adding 1 teaspoon ground cinnamon and ½ teaspoon cardamom to the dry ingredients. These spices enhance the vanilla’s natural sweetness while adding complexity. For extra depth, steep the milk infusion with ¼ teaspoon whole cloves alongside the vanilla beans.
This variation feels cozy and works perfectly for fall or holiday celebrations. 🌶️
Coconut Vanilla Swirl
Swap the buttercream for a coconut vanilla version by replacing ½ cup of the butter with ½ cup coconut cream (chilled overnight). Add 1 teaspoon coconut extract to the buttercream for a tropical twist.
The coconut pairs surprisingly well with vanilla, creating a rich, creamy texture. Garnish with toasted coconut flakes for added crunch. 🥥
Salted Caramel Layers
Add a gourmet touch by incorporating salted caramel into the buttercream. Warm ½ cup heavy cream with ½ cup granulated sugar and 2 tablespoons unsalted butter until caramelized, then whisk into the buttercream.
Fold in ½ teaspoon flaky sea salt for balance. Drizzle the assembled cake with extra caramel before serving for a luxurious finish. 🍯
Gluten-Free Adaptation
Replace the 4.5 cups all-purpose flour with a 1:1 gluten-free baking blend like King Arthur Measure for Measure. Add ½ teaspoon xanthan gum to improve structure. For the buttercream, ensure your powdered sugar is gluten-free certified.
This version maintains the same tender crumb and swirl effect while accommodating dietary needs. Always weigh ingredients for precision when baking gluten-free. 🌾
Nutrition facts
Frequently asked questions
Can I bake this cake in a 9×13-inch pan instead?
This recipe is specifically designed for an 11×15-inch pan to create the signature layered effect and even baking. If you must use a 9×13-inch pan, reduce the batter by 25% and bake for 20-22 minutes at 350°F, but you’ll lose the dramatic height and swirl presentation. The recipe’s structure relies on the larger surface area for proper layer separation.
How do I prevent the cake from cracking between layers?
Cracking usually happens from uneven cooling or overfilling with buttercream. Let each layer cool completely (at least 2 hours) before assembling. Use 1 cup buttercream per layer (not more) and spread it evenly with a thin border. Chill the assembled cake for 30 minutes before slicing to help it hold together.
What’s the best way to store leftover cake?
For short-term storage, keep the cake at room temperature in an airtight container for up to 3 days. For longer storage, wrap each layer individually in plastic wrap, then place in a sealed container in the fridge for 5 days or freeze for 3 months. Thaw frozen cake at room temperature for 2-3 hours before serving.
Can I make this cake without vanilla beans?
Yes! Replace the 2 whole vanilla beans with 4 tablespoons high-quality vanilla extract (like Madagascar bourbon). For the buttercream, use 1 tablespoon vanilla extract per cup of buttercream. The flavor will still be delicious, though slightly less complex than with fresh beans. Tahitian vanilla extract works well too if you prefer a floral note.
Why did my cake sink in the middle?
Sinking usually occurs from overmixing the batter, opening the oven door too early, or underbaking. Check your technique: mix just until combined (no visible flour streaks), avoid opening the oven before 18 minutes, and bake until a toothpick comes out clean. Also ensure your oven thermometer is accurate—many ovens run 25°F hotter than set.

- 3lb Prime Rib Roast Recipe: Juicy Pink Center Guaranteed in 3 Hours - October 31, 2026
- 5 Spice Cake Recipe: Warmly Spiced Layers With Crunchy Top - October 31, 2026
- 1950’s Macaroni and Cheese Recipe: Nostalgic Creamy Cheese Sauce with Buttery Noodles - October 31, 2026