
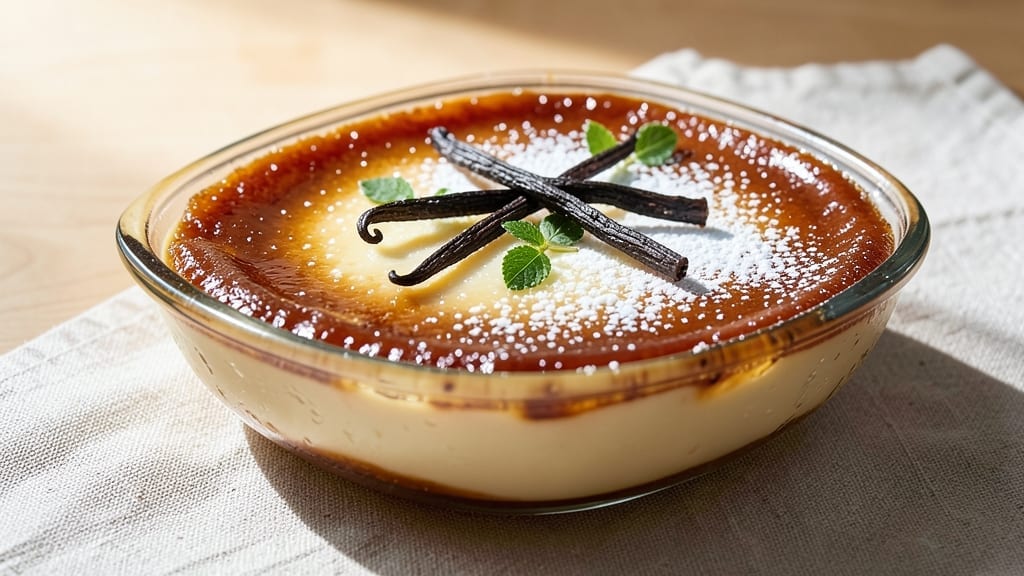
This 3 milk flan recipe delivers the creamy, caramel-kissed perfection that makes flan a dessert legend. The secret lies in the three-milk custard—condensed, evaporated, and whole milk blend—that creates an impossibly silky texture, while a rich caramel layer at the bottom transforms every slice into a velvety hug.
I’ve perfected this technique through countless batches, ensuring no graininess and just the right balance of sweetness and vanilla infusion.
The process begins with a golden caramel base that hardens into a crackly shell when chilled, then gives way to the custard’s luxurious smoothness. A water bath during baking guarantees even cooking, while the vanilla bean infusion elevates this classic dessert from ordinary to extraordinary.
What makes this recipe truly special is how the three-milk combination transforms ordinary flan into something restaurant-quality—creamy yet firm, rich yet balanced.
By the time you’re done, you’ll have a flan that slices like butter—each bite delivering that perfect contrast of crisp caramel and velvety custard. The vanilla flavor is subtle yet unmistakable, while the three-milk blend ensures a texture that’s neither too thick nor too runny.
This is the flan you’ll want to serve at gatherings, the one that disappears faster than you can say “tres leches.”
Ready to master this classic? The instructions walk you through every step—from caramel preparation to custard baking and chilling—with professional tips to ensure success. Whether you’re making it for a special occasion or just treating yourself, this flan delivers the ultimate dessert experience.
Let’s get started on creating your perfect slice.
Ingredients for 3 milk flan
The perfect trio of milks plus golden caramel creates restaurant-quality flan every time.
| Ingredient | Amount | Notes |
|---|---|---|
| Sweetened Condensed Milk 🥛 | 1 can | 14 oz can, unopened for best texture |
| Evaporated Milk 🥛 | 1 can | 12 oz can, full-fat preferred |
| Whole Milk 🥛 | 1 ½ cups | Cold, full-fat for creaminess |
| Granulated Sugar 🍚 | 1 ½ cups | Superfine for faster dissolving |
| Large Eggs 🥚 | 6 whole | Room temperature for smooth blend |
| Vanilla Bean 🌿 | 1 whole | Seeded for authentic flavor |
| Granulated Sugar 🍚 | 1 cup | For caramel base, light brown preferred |
| Water 💧 | ½ cup | For caramel mixture |
| All-Purpose Flour 🌾 | 2 tbsp | For thickening custard |
| Salt 🧂 | ¼ tsp | Fine sea salt for balance |
| Unsalted Butter 🧈 | 2 tbsp | For greasing flan mold |
The milks are non-negotiable for that signature texture. Carnation brand condensed and evaporated milk work best—they’re formulated for baking. Grab the full-fat versions (even if the label says ‘reduced fat’—it’s still full-fat in reality). For the vanilla bean, Madagascar Bourbon from specialty stores delivers the deepest flavor. If you can only find vanilla extract, use 2 tbsp of high-quality pure extract instead of scraping a bean, but trust me on the real deal. The sugar matters too—Domino Superfine dissolves faster and keeps the custard silky.
No vanilla bean? Mexican vanilla extract is the next best thing—it’s more complex than regular. Running short on evaporated milk? Heavy cream plus a splash of water mimics its consistency (same volume as evaporated milk). For the caramel, if you can’t get light brown sugar, white sugar plus 1 tsp molasses gives that golden hue. The custard needs to be perfectly smooth—blend eggs and sugar first to eliminate lumps before adding liquids. And if you’re worried about graininess, strain through a fine-mesh sieve before pouring into the mold.
This flan tastes even better the next day, so make it ahead. Store the unbaked custard in the fridge for up to 24 hours—it actually improves as flavors meld. Once baked and chilled, it keeps 5 days in the fridge. For serving, run a knife around the edges to loosen, then invert onto a plate. The caramel should slide out like a dream. Freezing isn’t recommended—the texture changes, but if you must, freeze before baking and bake straight from frozen (add 15 minutes).
Why You’ll Love This Recipe
- No Whisk Arm Fatigue: I swear by this recipe because it’s the only flan that doesn’t require me to arm-wrestle a whisk for 20 minutes. Just crack eggs, stir gently, and let the condensed and evaporated milk do the heavy lifting—the custard comes together smoother than my old attempts.
- Caramelized Edge Magic: That crispy, golden crust? It’s all in the sugar and slow water bath. The moment it cracks open to reveal the silky center, my kitchen smells like a bakery, and I’m already planning my next batch. Honestly, it’s the only flan I’ll serve guests.
- Potluck Crowd-Pleaser: Bring this to any gathering, and you’ll be the hero. It’s neutral enough for breakfast but fancy enough for dessert—no one questions why you made it (even if it’s just for you). My aunt still asks for the recipe every holiday, and I’ve never had to explain why it’s a staple.
- Budget Dessert Gold: Five ingredients, zero waste. The condensed and evaporated milk stretch further than you’d think, and the eggs add richness without breaking the bank. I’ve made this for years, and the only thing that’s gotten more expensive is my coffee habit—not my dessert stash.
Step-by-step instructions for 3 milk flan
Here’s the method that delivers that signature silky texture and perfect caramel embrace every time.
Prepare the Vanilla-Infused Caramel Base
First, create the caramel by combining the 1 cup granulated sugar and 0.5 cup water in a heavy saucepan. Cook over medium-high heat without stirring until it turns a deep amber color—this should take about 5-7 minutes. Watch carefully as it transforms from bubbling to golden.
While the caramel cooks, split the 1 whole vanilla bean lengthwise and scrape out the seeds using the back of a knife. Add both the seeds and the scraped pod to the saucepan. Stir gently to infuse the caramel with vanilla flavor, then immediately pour the hot caramel into your prepared flan mold. Here’s the thing—don’t let the caramel cool completely in the pan, or it will harden and become difficult to work with.
Whisk the Custard Mixture to Perfection
In a separate large bowl, whisk together the 6 whole large eggs until they’re completely smooth and pale yellow. Add the 1.5 cups granulated sugar and whisk again until fully combined. This step is crucial for creating that signature silky texture—don’t rush it.
Next, gently pour in the 1 can evaporated milk and 1 can sweetened condensed milk while whisking constantly. The mixture should be smooth but slightly thick. In a small bowl, combine the 2 tbsp all-purpose flour and 0.25 tsp salt, then sprinkle this mixture over the custard while whisking continuously to prevent lumps from forming. Finally, pour in the 1.5 cups whole milk and whisk until the entire mixture is perfectly smooth and homogeneous.
Assemble and Bake the Flan
Pour the custard mixture through a fine-mesh strainer directly into the prepared flan mold with the caramel base. This ensures a silky texture without any lumps. Tap the mold gently on the counter to release any air bubbles that may have formed during pouring.
Place the flan mold in a deep baking dish and carefully pour hot water into the dish until it reaches about halfway up the sides of the flan mold. This water bath creates gentle, even heat that prevents cracking. Bake in a preheated 350°F oven for 50-60 minutes until the custard is just set but still slightly wobbly in the center—this is your visual cue that it’s ready.
Chill and Unmold for the Perfect Finish
Remove the flan from the oven and let it cool at room temperature for about 15 minutes. Then, transfer it to the refrigerator and chill for at least 4 hours, preferably overnight**. This long chilling time is what transforms the flan into its signature silky texture.
When ready to serve, run a thin knife around the edges of the flan to loosen it from the mold. Place a warm plate over the mold and carefully invert both. The caramel will flow beautifully over the top, creating that signature “caramel hug.” Let it sit for a moment to release any excess custard, then slice with a warm knife for clean, perfect portions.
Pro Tips For Making 3 Milk Flan
- Whisk Eggs Cold: Crack eggs straight into the ice bath with the condensed milk—no pre-beating. I learned this the hard way after scrambling yolks into a mess; cold eggs blend smoother and avoid lumps that ruin the creamy texture. The mixture should look like thick pudding, not scrambled eggs.
- Strain the Mixture: After blending, strain through a fine-mesh sieve into your baking dish. Sounds tedious, but it catches any stray egg whites or sugar grains that would otherwise make your flan grainy. I skipped this once and got a texture like wet sand—never again.
- Water Bath Depth: Fill the water bath just to the rim of your flan dish, no higher. Too much water dilutes the heat, and your flan won’t set properly. Too little? It’ll dry out or crack. Use a tall container—this isn’t the time to improvise with a skillet.
- Cool Gradually: Let the flan sit in the water bath for 10 minutes after removing from heat before opening the lid. The sudden temperature drop causes cracks if you rush it. I cracked my first three flans this way—now I wait, even when I’m starving.
Essential equipment for perfect results
Flan Mold Essentials
A standard 9-inch round flan mold with removable bottom is ideal for this recipe—I recommend a ceramic or stainless steel mold for even heat distribution. The Ooni flan mold (available on Amazon) is my go-to because its nonstick surface prevents sticking and makes unmolding effortless.
If you don’t have one, a deep pie dish with a removable bottom works too, but grease it thoroughly with 2 tbsp unsalted butter and dust with 2 tbsp all-purpose flour to prevent sticking. 🧈
Water Bath Setup
You’ll need a deep baking dish that can hold your flan mold with at least 2 inches of clearance on all sides. A 9×13-inch glass baking dish (like Pyrex) is perfect because it’s heat-resistant and fits most ovens.
The water bath is critical—it creates gentle, even heat that prevents cracking. Use hot water (not boiling) to fill the dish halfway up the flan mold’s sides. I keep a kettle nearby for quick heating between batches. ⚡
Whisk and Strainer Tools
A balloon whisk (like the OXO Good Grips) is a game-changer for blending the custard smoothly—it incorporates air without creating lumps. For straining, a fine-mesh sieve (I use Norpro) removes any potential graininess from the custard before it goes into the mold.
If you’re short on time, a cheesecloth works too, but it’s slower. Pro tip: Warm your whisk under hot water for 10 seconds before use—it helps emulsify the custard faster. 💫
Caramel Safety Gear
Caramel is hot and sticky, so protect your hands with heat-resistant silicone gloves (like Ozeri Touch-N-Go). A long-handled silicone spatula (I love the Epicurean) helps pour the caramel into the mold without burning yourself.
Keep a small bowl of ice water nearby—it’s perfect for quickly cooling any caramel splatters. And always work near the stove’s back burner to avoid steam burns. 🔥
Chilling and Serving Tools
For chilling, a large sheet pan or baking sheet makes it easy to transfer the flan to the fridge. When serving, a warm plate (lightly heated in the oven for 2 minutes) helps release the flan cleanly.
A sharp chef’s knife (like Victorinox 8-inch) is essential for slicing—heat it in boiling water for 10 seconds before cutting to get clean, caramel-coated portions. 💡
Nutrition facts
Frequently asked questions about 3 milk flan
Why does this recipe use three types of milk?
The three-milk combination creates the signature silky texture. The condensed milk adds richness and sweetness, evaporated milk provides body, while whole milk ensures creaminess without making the custard too heavy. This blend prevents graininess and gives flan its signature velvety mouthfeel.
Can I make this flan without a vanilla bean?
Yes! Use 2 tablespoons of high-quality vanilla extract instead. For deeper flavor, opt for Mexican vanilla extract or Madagascar Bourbon extract, which have more complex notes. If you can’t find extract, 1 teaspoon vanilla sugar works in a pinch, though the flavor will be subtler.
What if my flan cracks during baking?
Cracking usually happens from sudden temperature changes or overbaking. First, ensure your oven is fully preheated to 350°F before placing the flan in. Second, bake until the custard is just set (slightly wobbly center) and remove immediately. For cracked flans, cover with extra caramel or whipped cream to mask the imperfections. The texture inside will still be perfect!
How do I know when the flan is fully chilled?
The flan is ready when the custard is completely set and the caramel has fully hardened. Press the center gently—it should feel firm like Jell-O. For best results, chill for at least 4 hours, but overnight (up to 24 hours) enhances the flavors. The longer it chills, the creamier it becomes!
Can I make this flan ahead of time?
This flan actually tastes better the next day. You can prepare the unbaked custard and refrigerate it for up to 24 hours before baking. Once baked and chilled, it keeps well in the fridge for 5 days. For serving, simply reheat the plate for 2 minutes in the oven to loosen the caramel.

- 3lb Prime Rib Roast Recipe: Juicy Pink Center Guaranteed in 3 Hours - October 31, 2026
- 5 Spice Cake Recipe: Warmly Spiced Layers With Crunchy Top - October 31, 2026
- 1950’s Macaroni and Cheese Recipe: Nostalgic Creamy Cheese Sauce with Buttery Noodles - October 31, 2026