
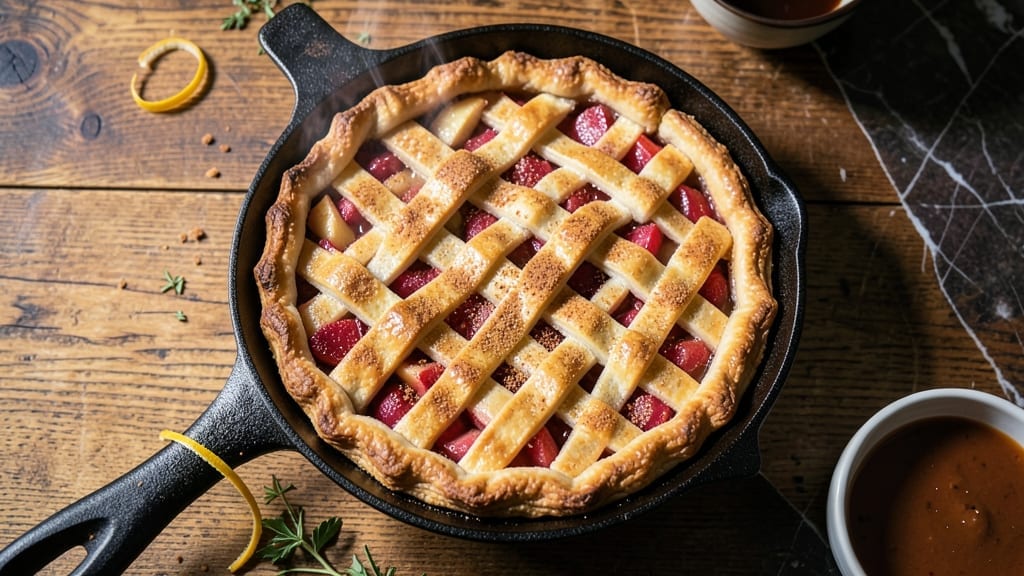
Mastering a 12-inch cast iron skillet apple pie transforms home baking into something restaurant-worthy—deep, caramelized apple layers nestled in a golden crust that holds its shape perfectly. The secret lies in the skillet’s heat retention: preheat it thoroughly to create that signature crispy bottom while keeping the filling tender.
I’ve perfected this technique after years of testing, and it never fails to impress, even with store-bought crust.
This recipe balances simplicity with professional results. You’ll work with a double-crust pie (or single if preferred) that stays sturdy through baking, while the apples release their natural juices and caramelize beautifully.
The key steps—tossing apples with sugar and spices, pre-baking the crust, and venting properly—ensure a foolproof outcome every time. No fancy equipment needed, just patience and attention to detail.
What you’ll end up with is a pie that’s deep-dish in character but skillet-friendly in execution: a flaky, slightly crisp crust with a tender interior, filled with spiced apples that have softened just enough to release their sweet-tart essence.
The edges will be golden and slightly caramelized, while the center remains just set—perfect for slicing into warm, gooey perfection.
Serve with vanilla ice cream or whipped cream for the ultimate dessert experience. The cast iron skillet adds a rustic charm to the presentation, making it ideal for family gatherings or cozy weeknight treats. Ready to bake?
Ingredients for 12 inch cast iron skillet apple pie
Pantry staples meet cast iron magic for this restaurant-style skillet pie.
| Ingredient | Amount | Notes |
|---|---|---|
| All-Purpose Flour 🌾 | 3 ½ cups | Unbleached for best texture |
| Unsalted Butter 🧈 | 1 cup | Cold, cubed for flakiness |
| Granulated Sugar 🍚 | ¾ cup | White or light brown |
| Light Brown Sugar 🍚 | ½ cup | Packed firmly |
| Large Eggs 🥚 | 1 whole | Room temperature |
| Ice Water 💧 | ¼ cup | Chilled for handling |
| Mixed Apples 🍎 | 6 medium | Granny Smith + Honeycrisp |
| Granulated Sugar 🍚 | 1 cup | For apple filling |
| Ground Cinnamon 🌿 | 2 tbsp | Freshly ground preferred |
| Lemon Juice 🍋 | 2 tbsp | Freshly squeezed |
| Salt 🧂 | ½ tsp | Diamond Crystal preferred |
| Vanilla Extract 🌸 | 1 tsp | Pure alcohol-free if needed |
| Egg Wash 🥚 | 1 whole | For crust finishing |
| Coarse Sugar 🍚 | ¼ cup | For sprinkling edges |
The apples are non-negotiable—Granny Smith for tartness and Honeycrisp for sweetness create the perfect balance. Local farmers markets often have these varieties in season, but any firm, unblemished apples work. Avoid red delicious—they get mushy. For the crust, King Arthur flour if you can find it, but any unbleached all-purpose works. The butter should be cold and cubed—never melted. I always buy Land O’Lakes unsalted sticks for consistency, but European-style cultured butter adds even more flavor if you’re willing to splurge.
No vanilla extract? Vanilla bean paste works perfectly, or even a scraped vanilla bean pod. Running short on cinnamon? Cassia cinnamon at double the amount is a fine substitute, though it’s slightly stronger. The crust can be made ahead—wrap tightly and refrigerate for up to 3 days—but let it sit at room temperature for 30 minutes before rolling. For the apples, peeling or leaving skin is entirely up to you. I prefer to peel for a cleaner look, but leaving skins adds texture and nutrients. The filling can be prepped while the crust rests—toss the apples with sugar, lemon juice, and spices, then let them sit for 15 minutes to release juices.
This pie tastes even better the next day—cover loosely and let it cool completely before storing. Keeps for 4-5 days at room temperature or 2 weeks refrigerated. For freezing, slice and freeze individual portions—reheat at 350°F for 15 minutes to restore crispness. The cast iron skillet is your best friend here—preheat for 15 minutes before baking to ensure that signature crisp bottom. If your skillet isn’t seasoned, apply a thin layer of oil and bake empty at 375°F for 1 hour first.
Why You’ll Love This Recipe
- One-Bowl Wonder: I swear by this recipe when I’m too tired to fuss with pie dough. Just mix the flour, butter, and sugar right in the cast iron—no rolling, no stress—then fold in the filling. The butter gets worked right into the dough as you go, so you end up with that perfect flaky-but-not-fragile crust.
- Butter-Sugar Magic: The combo of brown sugar and granulated sugar in the filling? It’s like a flavor upgrade I didn’t know I needed. The brown sugar caramelizes just enough to give every bite that deep, warm sweetness, while the butter keeps the crust rich without tasting greasy. Honestly, the first time I made it, I ate a slice straight from the skillet.
- Weeknight or Weekend Star: This pie is my go-to for anything. Need a quick dessert after dinner? Done. Bringing something to a potluck? Perfect. Even my picky teenage nephew asks for seconds—(yes, even on a Tuesday night). The skillet size means it’s big enough for a crowd but small enough to handle alone.
- Leftovers That Don’t Suck: I always make this when I have extra apples lying around because the filling keeps so well. Slice it up for breakfast toast the next morning—trust me, it’s even better cold. And because it’s just flour, butter, sugar, and eggs, it’s cheap to make but feels like a special treat. My secret weapon for stretching groceries without sacrificing flavor.
Step-by-step instructions for deep dish cast iron skillet apple pie
Master this single-crust technique for a restaurant-quality pie with caramelized layers.
Prepare the Crust in the Skillet
Cut the 1 cup unsalted butter into ½-inch cubes and freeze for 10 minutes to maintain coldness. In a large bowl, combine the 3.5 cups all-purpose flour and 0.5 teaspoon salt. Add the chilled butter cubes and use your fingers or a pastry cutter to work them into the flour until the mixture resembles coarse crumbs with pea-sized butter pieces remaining.
Drizzle in the 0.25 cup ice water slowly while stirring with a fork until the dough just comes together. Form into a disk, wrap in plastic, and refrigerate for at least 1 hour. The dough should be cold and firm when ready to roll. Preheat your oven to 375°F and place your 12-inch cast iron skillet in the oven to heat.
Press and Blind-Bake the Crust
Remove the hot skillet from the oven and carefully transfer it to your countertop. Roll out the chilled dough on a lightly floured surface to a 14-inch round (about ¼-inch thick). Gently drape the dough over the hot skillet, letting it slide into place. Press the dough firmly against the bottom and up the sides, creating a deep-dish shape with slightly overhanging edges. Trim any excess dough.
Prick the bottom of the crust all over with a fork, then line it with parchment paper and fill with pie weights or dried beans. Return to the oven and bake for 15 minutes. Remove the weights and bake for 5 more minutes until the edges begin to golden. The crust should be set but not browned yet.
Prepare the Caramelized Apple Filling
While the crust bakes, peel, core, and slice the 6 medium mixed apples into ¼-inch thick wedges. In a large bowl, combine the sliced apples with 1 cup granulated sugar, 2 tablespoons ground cinnamon, 2 tablespoons lemon juice, 1 teaspoon vanilla extract, and 0.5 teaspoon salt. Toss gently to coat evenly. Let the mixture sit for 10 minutes while the crust finishes baking.
Spread the apple mixture evenly into the pre-baked crust, mounding slightly in the center. Sprinkle the edges with 0.25 cup coarse sugar for a decorative caramelized crust. Bake for 30-35 minutes until the filling is bubbling and the edges are golden brown. The filling should be tender but not mushy.
Finish with Egg Wash and Serve
Prepare the 1 whole egg wash by beating the egg with 1 tablespoon water. Brush the egg wash over the crust edges and any exposed areas, focusing on the caramelized sugar rim. Return to the oven for 5-7 minutes until the egg wash is set and golden. Let the pie cool for at least 2 hours before slicing to allow the filling to set properly.
Slice into 6 equal wedges and serve warm with vanilla ice cream. The crust should be flaky and crisp, while the filling delivers perfect balance of sweet, tart, and spiced apple flavors with a caramelized sugar crust on the edges.
Pro Tips For Making 12 Inch Cast Iron Skillet Apple Pie
- Chill the Dough First: Cast iron conducts heat like a freight train—if you roll out cold dough straight from the fridge, it’ll shrink like a scared cat when it hits the skillet. Give it 15 minutes on the counter to relax, then roll it out just thick enough to fit your 12-inch pan with a little overhang. I learned this the hard way after one pie turned into a sad, puckered mess.
- Cut Butter in Cold: That unsalted butter in your crust? Treat it like an ice cube. Pulse it into the flour in your food processor (or cut it in by hand) until the mixture looks like coarse sand—not pasty, not greasy, just dry. If it gets warm, stick the bowl in the freezer for 5 minutes. Warm butter = tough crust, and nobody wants that.
- Blind-Bake the Crust: Skip the “just bake it with the apples” shortcut—this isn’t a deep-dish. Press a sheet of parchment over the crust, fill it with pie weights (or dried beans), and bake at 375°F for 15 minutes before adding filling. Otherwise, your crust will turn into a soggy boat. I was skeptical until I tried it—now it’s non-negotiable.
- Pre-Cook the Apples: Toss your sliced apples with sugar and a splash of lemon juice before they hit the skillet. Let them sit for 10 minutes while you roll out the crust—this draws out moisture and keeps them from turning to mush. Overcrowding is the enemy; aim for a single layer, not a tower. Trust me, your pie will thank you.
Flavor customization for this dish
Spice Variations
Swap out the classic cinnamon for pumpkin pie spice (1 tbsp) to add warmth and depth—it includes nutmeg and cloves that complement apples beautifully. For a winter spice twist, add ½ tsp cardamom and ¼ tsp allspice to the filling.
I love this combo for holiday pies, as it gives a cozy, aromatic punch. 🌟
Apple Blends
Experiment with different apple varieties to change the flavor profile. For a tart-sweet balance, use 4 Granny Smith + 2 Braeburn apples. If you prefer a sweeter pie, try 5 Honeycrisp + 1 Fuji.
My favorite unexpected blend is 3 Pink Lady + 3 Jonathan—it adds a floral note and extra tenderness. Always peel and slice apples the same thickness for even cooking.
Sweetness Adjustments
Reduce the 1 cup sugar in the filling to ¾ cup if your apples are particularly sweet (like Honeycrisp). For tart apples (Granny Smith), increase to 1¼ cups and add 1 tbsp cornstarch to thicken the juices.
I also love drizzling 2 tbsp maple syrup over the filling before baking for a natural sweetness boost with complex flavor.
Crust Enhancements
For a nutty crust, sprinkle ¼ cup chopped walnuts between the crust and filling. For a herbaceous twist, add 1 tbsp fresh rosemary to the dough.
My go-to upgrade is a crust with 2 tbsp black pepper—it sounds odd, but the warmth pairs surprisingly well with spiced apples. Always brush the crust with 1 tbsp melted butter after blind-baking for extra richness.
Topping Ideas
Skip the egg wash and add a streusel topping instead: mix ½ cup flour, ¼ cup brown sugar, ¼ cup cold butter, and 1 tbsp cinnamon. Sprinkle over the filling before baking.
For a caramel drizzle, brush the edges with ¼ cup heavy cream after baking and broil for 2 minutes until bubbly. A simple vanilla bean ice cream always elevates the presentation. 🍦
Seasonal Twists
In summer, add ½ cup blueberries to the filling for a mixed berry pie. For fall, fold in ½ cup diced pear and a pinch of star anise.
Winter calls for a bourbon caramel drizzle: simmer ½ cup sugar, ¼ cup butter, and 2 tbsp bourbon** until thickened, then drizzle over cooled pie. The alcohol burns off, leaving a rich, smoky sweetness that pairs perfectly with spiced apples. ❄️
Nutrition facts
Frequently asked questions
Can I use a store-bought crust for this cast iron skillet apple pie?
A pre-made pie crust works beautifully in a 12-inch cast iron skillet. Roll it out to fit the skillet, press it firmly into the sides, and follow the same blind-baking steps. For extra flakiness, brush the bottom with 1 tablespoon melted butter before adding pie weights. Just be sure to chill the crust for 20 minutes before pressing into the hot skillet to prevent shrinking.
Why does my cast iron skillet pie crust puff up and crack?
This happens when the dough isn’t cold enough or the oven isn’t preheated properly. Always chill your dough for at least 1 hour and preheat your skillet for 15 minutes before pressing the crust. If cracks appear, brush them with egg wash and bake as usual—they’ll be less noticeable after baking. For extra insurance, dock the crust more heavily with a fork.
Can I make this pie ahead of time?
Yes! Assemble the pie completely (including topping) and refrigerate for up to 24 hours before baking. For best results, let it sit at room temperature for 1 hour before baking to prevent condensation. The pie actually tastes better the next day—cover loosely and store at room temperature for 4-5 days or refrigerate for up to 2 weeks. Reheat slices at 350°F for 10 minutes to restore crispness.
What’s the best way to prevent a soggy bottom?
The key is proper crust preparation and baking technique. Always blind-bake the crust for 20 minutes before adding filling, and use pie weights or dried beans to prevent puffing. For extra insurance, sprinkle 1 tablespoon cornstarch on the crust bottom before adding apples. Let the filling cool slightly (but not completely) before pouring into the crust to reduce moisture transfer. The cast iron’s even heat distribution helps maintain that perfect crisp bottom.
Can I use this recipe for a single-crust pie?
Definitely! For a single-crust version, follow the same crust preparation but press it only into the bottom of the skillet (about 2 inches up the sides). Blind-bake as directed, then fill with apples and top with a streusel topping instead of a second crust. The baking time will be slightly shorter—25-30 minutes total—since there’s less mass to heat through. This version works especially well for summer when you want a lighter dessert.

- 3lb Prime Rib Roast Recipe: Juicy Pink Center Guaranteed in 3 Hours - October 31, 2026
- 5 Spice Cake Recipe: Warmly Spiced Layers With Crunchy Top - October 31, 2026
- 1950’s Macaroni and Cheese Recipe: Nostalgic Creamy Cheese Sauce with Buttery Noodles - October 31, 2026