
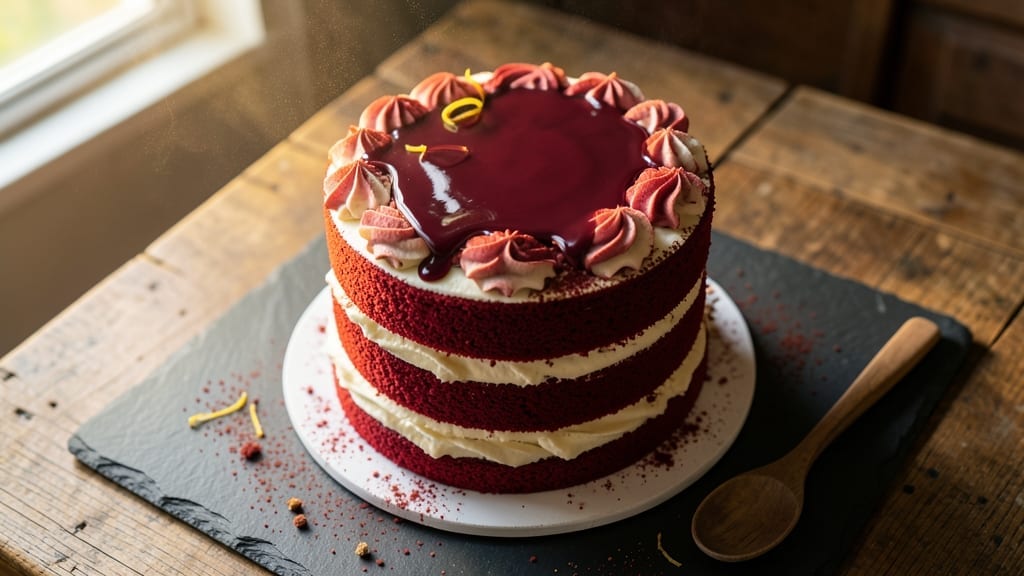
This 12-inch red velvet cake recipe delivers the perfect balance of rich cocoa flavor and tender, velvety texture that keeps slices moist for hours. The secret lies in using buttermilk and precise ingredient ratios—no dry crumbs here.
I’ve baked countless red velvet cakes, and this version consistently earns rave reviews for its moist layers and velvety cream cheese frosting swirl that ties everything together.
The cake’s signature red hue comes from natural food coloring, but the real magic happens with the cream cheese frosting—a tangy, smooth layer that complements the cake’s subtle cocoa depth. Baking at the right temperature (350°F) ensures even cooking without over-browning, while the buttermilk keeps the crumb tender.
This isn’t your grandmother’s dense red velvet; it’s light, fluffy, and packed with flavor.
What sets this recipe apart is the foolproof technique for layering and frosting, ensuring every slice looks as impressive as it tastes. The cream cheese frosting swirl adds a restaurant-quality touch, while the cake’s moist texture makes it perfect for celebrations or a special dessert night.
No fancy equipment needed—just patience and attention to detail.
Whether you’re baking for a birthday, holiday gathering, or just craving a classic, this recipe delivers a restaurant-quality red velvet cake that’s easier to make at home. The frosting stays creamy, the layers stay moist, and the flavor? Pure comfort in every bite. Let’s get baking!
Ingredients for 12 inch red velvet cake
These carefully measured ingredients create a restaurant-quality red velvet cake with velvety moisture.
| Ingredient | Amount | Notes |
|---|---|---|
| All-Purpose Flour 🌾 | 3 cups | Sifted for smooth batter |
| Unsalted Butter 🧈 | 1 ½ cups | Room temperature, full-fat |
| Granulated Sugar 🍚 | 2 cups | White or light brown |
| Buttermilk 🥛 | 1 ½ cups | Room temperature, full-fat |
| Natural Red Food Coloring 🎨 | ½ tsp | For vibrant red hue |
| Vanilla Extract 🌿 | 2 tsp | Pure, high-quality |
| Cocoa Powder 🍫 | ½ cup | Dutch-processed, unsweetened |
| Baking Soda 🧂 | 1 tsp | Freshly opened |
| Salt 🧂 | ½ tsp | Fine sea salt |
| Large Eggs 🥚 | 2 whole | Room temperature |
| Cream Cheese 🧀 | 8 oz | Room temperature, full-fat |
| Powdered Sugar 🍚 | 3 cups | Sifted for smooth frosting |
| Heavy Whipping Cream 🥛 | 1 cup | Cold, full-fat |
| Vanilla Bean Paste 🌿 | 1 tsp | For enhanced flavor |
The cocoa powder and buttermilk are non-negotiable for that signature tender crumb. Dutch-processed cocoa like Hershey’s Special Dark or Ghirardelli Natural Cocoa ensures smoothness without bitterness. For buttermilk, I always use full-fat from the refrigerated section—it’s worth the extra trip. The natural red food coloring is key for that vibrant hue, and Wilton or ChefMaster brands are reliable. If you’re worried about artificial colors, beet powder or pomegranate concentrate can replace it, though the shade will differ slightly. The eggs and butter should both be at room temperature to blend seamlessly into the batter.
No buttermilk? Mix 1 cup milk with 1 tbsp vinegar or lemon juice and let sit for 5 minutes. Short on cocoa powder? Melted dark chocolate (6 oz) works in a pinch, but reduce the sugar slightly. The cream cheese frosting is where the magic happens—Philadelphia brand is my go-to, but any full-fat cream cheese will do. For a lighter frosting, whip the cream cheese longer, but don’t overbeat it or it’ll turn grainy. If you’re avoiding dairy, vegan cream cheese and coconut cream can substitute, though the texture will differ. The vanilla bean paste adds depth that regular extract can’t match, but pure vanilla extract works fine if that’s all you have.
Store the cake layers wrapped in plastic at room temperature for up to 2 days, or in the fridge for 4 days. The frosting can be made a day ahead and stored in the fridge—just rewhip before spreading. For longer storage, freeze the unfrosted layers for 3 months. To serve, slice with a warm knife for clean cuts. The frosting stays creamy at room temperature, but if your kitchen is warm, chill the cake for 30 minutes before slicing. Leftovers? Reheat slices in the microwave for 10 seconds to revive the frosting.
Why You’ll Love This Recipe
- One-Bowl Wonder: I swear by this recipe—just mix, bake, repeat. No fancy equipment, no stress. The buttermilk and butter come together so smoothly, and the red food coloring blends right in without fighting you.
- Velvet Magic: That perfect balance of cocoa and buttermilk? It’s ridiculously good. The natural red coloring gives it that classic look, but the taste stays pure—no artificial aftertaste, just rich, moist cake that disappears too fast.
- Party Ready: Slice it for birthdays, stack it for Valentine’s, or just eat it straight from the pan. A 12-inch cake feeds a crowd, and the leftovers? They’re just as good the next day—trust me, I’ve tested it.
- Budget-Friendly Luxe: Flour, butter, sugar—these are pantry staples. No specialty ingredients, no markup. You’ll get two full cakes (or one big one) for the price of a fancy dessert, and it still feels like a treat.
Step-by-step instructions for red velvet cake with cream cheese frosting
Here’s how to achieve that signature velvety texture and rich flavor in every layer.
Prepare the Cake Batter
Preheat your oven to 350°F and grease two 12-inch round cake pans, lining the bottoms with parchment paper. In a medium bowl, whisk together the 3 cups all-purpose flour, 1 tsp baking soda, and 0.5 tsp salt. Set aside.
In a large mixing bowl, cream the 1.5 cups unsalted butter and 2 cups granulated sugar together on medium speed until light and fluffy, about 3-4 minutes. This step is crucial—it incorporates air that creates that signature tender crumb. Add the 2 whole large eggs, one at a time, mixing well after each addition.
In a separate bowl, combine the 1.5 cups buttermilk, 2 tsp vanilla extract, and 0.5 tsp natural red food coloring. Gradually add this mixture to the butter-sugar mixture while mixing on low speed. Finally, add the dry ingredients and 0.5 cup cocoa powder in three additions, mixing just until combined after each addition. Be careful not to overmix—the batter should be thick but smooth.
Divide and Bake the Layers
Divide the batter evenly between the prepared cake pans. Tap each pan gently on the counter to remove any air bubbles and ensure even distribution. Bake for 25-30 minutes, or until a toothpick inserted into the center comes out clean. Here’s the thing—don’t overbake. The cakes should be just set but still slightly springy to the touch.
Remove the cakes from the oven and let them cool in the pans for 10 minutes. Then, transfer them to a wire rack to cool completely. This cooling step is essential—it allows the cakes to set properly before frosting. If you frost them while warm, the cream cheese frosting will melt and slide off.
Prepare the Cream Cheese Frosting
While the cakes cool, prepare the frosting. In a large mixing bowl, beat the 8 oz cream cheese and 1.5 cups unsalted butter together on medium speed until smooth and creamy, about 2-3 minutes. Add the 3 cups powdered sugar, 1 tsp vanilla bean paste, and 1 cup heavy whipping cream, mixing on low speed until fully incorporated.
Increase the speed to medium and beat for another 2-3 minutes until the frosting is light and fluffy. This is the moment that matters: the frosting should be thick enough to hold its shape but still spreadable. If it’s too thick, add a splash of milk; if too thin, add a bit more powdered sugar. Taste and adjust the sweetness to your preference.
Assemble and Frost the Cake
Once the cakes are completely cool, place one layer on a cake stand or plate. Spread a generous layer of the cream cheese frosting evenly over the top, leaving a ½-inch border unfrosted. Place the second layer on top and spread the remaining frosting evenly over the top and sides of the cake.
To create the signature swirl, use an offset spatula to gently drag the frosting from the center outward in circular motions. This creates those beautiful, marbled swirls that make red velvet cake so iconic. For extra flair, pipe additional frosting around the edges or use a fork to create decorative patterns. Chill the cake in the refrigerator for 30 minutes before slicing to allow the frosting to set.
Pro Tips For Making 12 Inch Red Velvet Cake
- Whisk Butter First: DESCRIPTION: Mix the softened butter and sugar until it’s pale yellow and fluffy—like a cloud, not just smooth. I used to stop at “lightened,” but this step actually cuts the baking time by 3-5 minutes and keeps the crumb tender. (Yes, even if you’re impatient like me, don’t rush this.)
- Measure Buttermilk Precisely: DESCRIPTION: Use a scale or liquid measuring cup right at the line—buttermilk’s acidity reacts with baking soda, and too little throws off the rise. I learned this the hard way when my cake collapsed like a sad soufflé. Also, don’t substitute yogurt unless you add 1 tsp extra baking soda.
- Rotate the Pan: DESCRIPTION: Swap the cake’s position halfway through baking—front to back, then back to front. My first attempt had a dark top and pale sides because the oven’s heat isn’t even. This ensures even coloring and doneness, especially in home ovens that play favorites.
- Cool In Pan: DESCRIPTION: Let the cake sit fully cooled (at least 1 hour) before frosting—no exceptions. Icing warm cake makes it soggy, and trust me, you’ll know when you’ve done it. (Your future self will thank you for the patience.)
Serving suggestions for 12 inch red velvet cake
Classic Presentation
Serve your red velvet cake on a wooden cake stand or elegant ceramic platter to highlight its rich colors. I always use a clear glass cake plate for a modern touch that lets the vibrant red layers shine through.
For extra flair, dust the top with powdered sugar or sprinkle with crushed pistachios for a pop of color. 💫
Portion with Precision
Slice the cake with a warm, wet knife (dip in hot water and wipe dry between cuts) for clean, professional-looking portions. For parties, use a cake slicer to ensure even slices.
I recommend serving 12 equal wedges—perfect for sharing. Store any leftovers in an airtight container at room temperature for up to 2 days.
Pair with Coffee
A cup of hot black coffee or espresso is the classic pairing—its bitterness balances the cake’s sweetness. For a cozy touch, serve with whipped cream on the side. If you prefer tea, Earl Grey or chamomile complements the cream cheese frosting beautifully. 💛
Seasonal Garnishes
For spring, top slices with fresh raspberries and mint leaves. In fall, add candied pecans or cranberries for a festive touch. During the holidays, sprinkle with gold leaf or edible glitter for a luxurious finish. These garnishes elevate the cake’s presentation without overpowering its flavor.
Make-Ahead Serving
Assemble the cake 1 day ahead and store it in the fridge—this lets the flavors meld and the frosting set perfectly. Bring it to room temperature before serving. For a warm dessert, lightly toast slices in the oven for 5-10 seconds to revive the frosting’s creaminess.
This works especially well for holiday gatherings where timing is tight.
Kid-Friendly Serving
Cut the cake into smaller squares or use cookie cutters to create fun shapes like hearts or stars. Kids love decorating their own slices with sprinkles or mini marshmallows.
Serve with vanilla ice cream or caramel sauce for an interactive dessert experience. This turns a classic cake into a playful treat! 🌟
Nutrition facts
Frequently asked questions
Why does my red velvet cake turn out dry?
The most common causes are overbaking or overmixing the batter. Always check for doneness with a toothpick at 25-30 minutes—it should come out with a few moist crumbs, not completely clean. Also, don’t overmix the batter after adding the dry ingredients; stir just until combined. For extra moisture, brush the cooled layers with simple syrup before frosting.
Can I make this cake in a 9-inch pan instead?
Yes, but you’ll need to adjust the baking time and frosting amount. For a 9-inch pan, bake at 350°F for 30-35 minutes and use about half the frosting recipe. The cake will be taller, so it may require more cooling time. If stacking layers, use a serrated knife to level the tops before frosting.
How do I fix runny frosting?
Runny frosting usually means the cream cheese wasn’t chilled enough before mixing. Next time, ensure your 8 oz cream cheese and 1.5 cups butter are cold (not room temperature). If your frosting is too thin, add 1-2 tablespoons powdered sugar at a time until it thickens. For immediate fixes, chill the frosting in the fridge for 15-20 minutes before using.
What’s the secret to the perfect cream cheese frosting swirl?
The key is using a spatula with a flexible blade and working quickly. After spreading the frosting, use the spatula to drag from the center outward in circular motions. For a cleaner look, chill the cake for 15 minutes before decorating—this helps the frosting hold its shape. Practice makes perfect, but even beginners can achieve beautiful swirls with patience!
Can I substitute cream cheese frosting?
For a lighter option, try a vanilla buttercream made with 1 cup softened butter, 3 cups powdered sugar, and 2 tbsp milk. For a tangy alternative, mix 1 cup Greek yogurt with 1 cup powdered sugar and 1 tsp vanilla. While these work, the classic cream cheese frosting provides that signature tangy-sweet balance that makes red velvet special.

- 6 Egg Cake Recipe with Oil: Light as Air With Buttery Moisture - October 4, 2026
- 4 Bean Casserole Recipe: One-Pan Heartiness With Smoky Paprika Depth - October 4, 2026
- 3-Ingredient Keto Mug Cake Recipe: Microwave Magic in 2 Minutes - October 4, 2026