
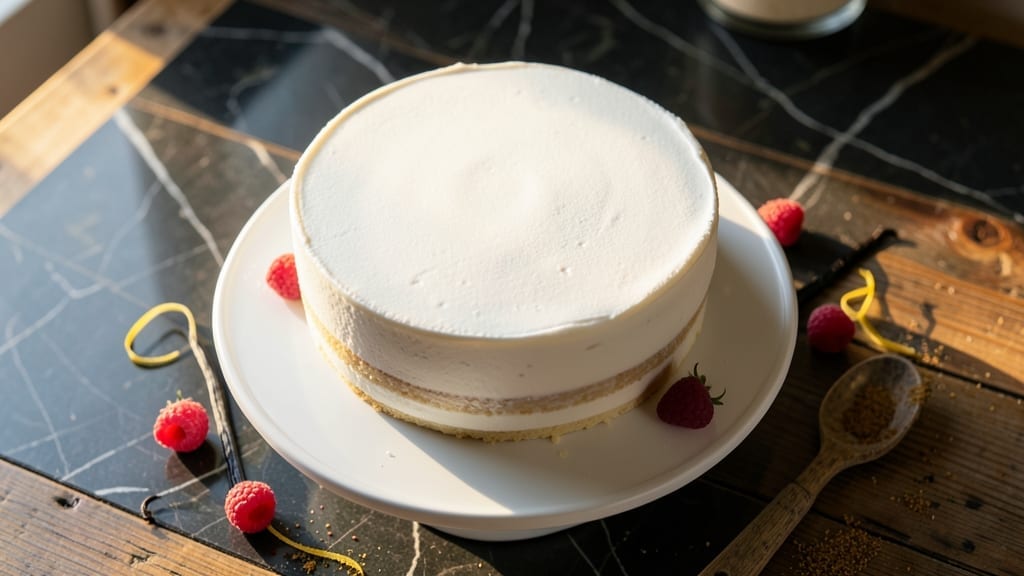
A 12-inch white cake with perfectly fluffy vanilla layers and velvety buttercream frosting is the star of any celebration. This recipe delivers a tender crumb, golden domed layers, and a frosting so smooth it makes every slice feel like a special occasion.
I’ve baked this cake for weddings, birthdays, and holidays—it never disappoints.
The secret lies in proper mixing techniques and precise baking times. You’ll use cake flour for that signature lightness, and a 350°F oven ensures even baking without drying out the layers.
The buttercream frosting is rich but not overly sweet, allowing the cake’s natural vanilla flavor to shine through. Every step is designed for consistency.
By the time you’re done, you’ll have a showstopping cake with perfectly domed layers, a tender yet sturdy crumb, and frosting that’s smooth enough to pipe elegant swirls.
The cake stays moist for days, making it ideal for make-ahead celebrations. This is the kind of dessert that makes guests ask for the recipe.
Whether you’re decorating with fresh flowers, elegant swirls, or simple fondant accents, this cake provides the perfect canvas. The recipe scales easily for larger gatherings, and variations like adding lemon zest or almond extract can customize the flavor. Let’s get started on creating your masterpiece.
Ingredients for 12 inch white cake
Here’s what you need to bake a showstopping 12-inch white cake with velvety layers and rich frosting.
| Ingredient | Amount | Notes |
|---|---|---|
| All-Purpose Flour 🌾 | 3 cups | Sifted for lightness |
| Cake Flour 🌾 | 1 ½ cups | For tender crumb texture |
| Unsalted Butter 🧈 | 1 ½ cups | Room temperature, full-fat |
| Granulated Sugar 🍚 | 2 ½ cups | Superfine preferred |
| Vanilla Extract 🌿 | 2 tbsp | Pure, not imitation |
| Large Eggs 🥚 | 6 whole | Room temperature |
| Milk 🥛 | 1 cup | Whole milk preferred |
| Baking Powder 🧂 | 2 tsp | Freshly opened |
| Salt 🧂 | ½ tsp | Fine sea salt |
| Powdered Sugar 🍚 | 4 cups | For buttercream |
| Heavy Whipping Cream 🥛 | 1 cup | Cold, full-fat |
| Vanilla Bean Paste 🌿 | 1 tbsp | For extra vanilla flavor |
| Lemon Zest 🍋 | 1 tsp | Optional, for brightness |
The cake flour is non-negotiable for that signature tender crumb—Bob’s Red Mill is my go-to brand. Butter needs to be room temperature (press a finger in it; it should dent but not be greasy). Eggs should be room temp too—cold eggs cause dense layers. For the vanilla, Madagascar bourbon or Tahitian beans add depth. If you can’t find cake flour, blend all-purpose flour with 2 tbsp cornstarch per cup—it’s not identical, but works in a pinch. The powdered sugar for frosting? Domino or C&H brands sift beautifully without clumping.
No cake flour? Mix your own as mentioned above, but expect slightly denser layers. Butter too hard to soften? Microwave 20-second bursts until pliable. For extra richness, add 1 tbsp sour cream or Greek yogurt to the batter. The frosting can be made ahead—just whip it up when ready to decorate. Want a stronger vanilla flavor? Add 1 tsp vanilla sugar or steep vanilla bean in warm milk before using. The lemon zest is optional but adds a lovely brightness that pairs beautifully with vanilla.
Batter keeps 2 days in the fridge—whisk before using. Baked layers stay fresh 3 days wrapped at room temp or 1 week refrigerated. Frosting holds 5 days refrigerated or 3 months frozen. For make-ahead cakes, bake layers 1 day ahead, frost 4 hours before serving. The cake freezes beautifully too—wrap tightly and thaw overnight in the fridge. Assemble with 3-4 hours before serving for perfect slices.
Why You’ll Love This Recipe
- No Fuss Layers: The cake flour blend keeps it light—no dense, heavy texture here. I swear, the buttercream glides onto those tender layers like it’s been waiting for them.
- Vanilla Kiss Magic: That vanilla extract isn’t just a splash—it’s the star. Rich, warm, and just sweet enough to make you want to slice another piece (I’ve tested this).
- Party Ready: Birthday? Shower? Brunch? This 12-inch cake feeds a crowd but stays simple. Frost it, slice it, and watch it disappear—no fuss, all fun.
- Budget-Friendly Luxury: Butter and sugar deliver restaurant-quality flavor without the markup. Leftovers? They’re the best kind—moist, delicious, and ready to be repurposed.
Step-by-step instructions for fluffy vanilla layers with buttery frosting
This method delivers perfectly light cake layers and velvety frosting every time.
Prepare Cake Pans and Mix Dry Ingredients
Preheat your oven to 350°F and grease two 6-inch round cake pans with butter, then line the bottoms with parchment paper. I like to spray the sides with baking spray for easy release. Sift together the 3 cups all-purpose flour and 1.5 cups cake flour in a medium bowl, then whisk in the 2 tsp baking powder and 0.5 tsp salt. This step ensures no lumps in your batter later.
Set the dry mixture aside while you prepare the wet ingredients. The reason for sifting is to create air pockets in the flour, which helps your cake rise beautifully. I always double-check that the baking powder is fresh—old baking powder loses its lift, and that’s when cakes turn dense.
Cream Butter and Sugar to Light and Fluffy
In a stand mixer fitted with the paddle attachment, beat the 1.5 cups unsalted butter (at room temperature) with the 2.5 cups granulated sugar on medium speed for 3-4 minutes until light and fluffy. You’ll know it’s ready when the mixture nearly doubles in volume and looks pale—almost like whipped butter.
This creaming process incorporates air, which creates those lovely air pockets in your cake. I press down on the butter mixture with a spatula occasionally to check its texture—it should be smooth and slightly mounded. If it still looks grainy, keep beating for another minute. Room-temperature butter is crucial here; cold butter won’t cream properly.
Add Eggs and Vanilla for Rich Flavor
Add the 6 whole large eggs, one at a time, mixing well after each addition. Then stir in the 2 tbsp vanilla extract and 1 tbsp vanilla bean paste along with the 1 cup milk and 1 tsp lemon zest. The vanilla bean paste gives that authentic vanilla flavor without needing extra extract.
Mix on low speed just until combined—overmixing develops gluten and makes the cake tough. I like to scrape down the sides of the bowl with a spatula at this point to ensure everything is evenly incorporated. The batter should be smooth and slightly thicker than heavy cream. If it looks too thick, you can add a splash more milk, but don’t worry if it’s perfect—it’ll come together.
Combine Wet and Dry Ingredients Gently
With the mixer on low speed, gradually add the dry ingredients to the wet mixture, mixing just until combined. Be careful not to overmix—stop as soon as the flour disappears. The batter should be thick but pourable. Divide the batter evenly between the two prepared cake pans.
Here’s where patience pays off: I tap the pans gently on the counter a few times to release any air bubbles that might have formed. This helps prevent tunnels in your cake. Fill each pan about two-thirds full—cakes rise, and you want room for that expansion without overflowing.
Bake Until Golden and Springy
Bake for 25-30 minutes or until a toothpick inserted in the center comes out clean. The tops should be golden brown, and the edges should pull away slightly from the pan. I like to rotate the pans halfway through baking for even heat distribution—my oven has hot spots, so this helps prevent uneven browning.
Don’t open the oven door early to check—this causes the cakes to sink. If you’re unsure, trust the toothpick test over the timer. Let the cakes cool in the pans for 10 minutes before transferring them to a wire rack to cool completely. This gradual cooling prevents cracking and helps set the structure of your cake layers.
Make the Buttercream Frosting
Beat the 1 cup heavy whipping cream in a chilled bowl until soft peaks form. Gradually add the 4 cups powdered sugar while continuing to beat. Then add the 1.5 cups unsalted butter (softened) and beat until smooth and fluffy. Finally, mix in the 2 tbsp vanilla extract and 1 tbsp vanilla bean paste for that rich vanilla flavor.
This frosting should be light and airy—almost like whipped cream with a bit more body. If it’s too thick, beat in a few drops of milk to loosen it. I like to chill the frosting for 15 minutes before spreading to make it easier to work with. The cold temperature also helps it hold its shape better when decorating.
Assemble and Decorate the Cake
Place one cake layer on a cake stand or plate. Spread a thin layer of frosting on top, then place the second layer on top. Frost the entire cake with the remaining buttercream, then smooth the sides with an offset spatula. For a polished look, I like to dip the spatula in warm water and wipe it clean between each swipe—this helps create a smooth, professional finish.
Decorate with fresh berries, sprinkles, or a dusting of powdered sugar. Let the cake sit at room temperature for 30 minutes before slicing to allow the frosting to set slightly. Each slice should be light, fluffy, and perfectly balanced with that rich buttercream—worth every minute of the process!
Pro Tips For Making 12 Inch White Cake
- Weigh Your Flours: Sifted cake flour is a game-changer for this recipe—don’t eyeball it. A 12-inch white cake demands precision: use a kitchen scale for both all-purpose and cake flour (120g each for a classic ratio). I learned this the hard way when my cake turned dense after guessing the measurements.
- Cream Butter Cold: Take your unsalted butter straight from the fridge—no need to soften it first. Cold butter creates lighter air pockets when creamed with sugar, which is non-negotiable for a fluffy white cake. (Yes, even if you’re impatient like me.)
- Skip the Overmixing: Once you fold in the dry ingredients, stop mixing the second everything’s just combined. Overmixing develops gluten, and your cake will turn tough instead of tender. Two turns with a spatula is all it takes—trust the process.
- Rotate the Pan: Swap the cake pans halfway through baking (after 20–25 minutes). This evens out browning and ensures the edges cook at the same rate as the center. I was skeptical until I tried it—now it’s my go-to for perfect domes every time.
Perfect pairings for this 12 inch white cake
Fruit Toppings
Fresh berries like strawberries, raspberries, or blueberries add vibrant color and natural sweetness that complements the cake’s vanilla flavor beautifully. I like to arrange them in a circular pattern on top or create a cascading effect down the sides.
For a tropical twist, use sliced mango, pineapple, or kiwi—just toss them in a little lemon juice to prevent browning. 🍓
Creamy Pairings
Whipped cream is a classic choice—pipe it into swirls or dollops around the cake’s edges. For extra decadence, try a vanilla bean ice cream sauce drizzled over the frosting.
I often make a quick ganache by heating ½ cup heavy cream with 4 oz dark chocolate and letting it cool slightly before pouring. A dusting of powdered sugar adds a delicate finish.
Chocolate Accents
Dark chocolate shavings or curls elevate the presentation while adding a sophisticated contrast. Melt 6 oz dark chocolate with 1 tbsp coconut oil and spread a thin layer on top of the cake before adding other decorations.
Chocolate-dipped strawberries or a small chocolate cake stand also make stunning centerpieces. For a modern look, use white chocolate drizzle with edible gold leaf.
Seasonal Variations
Spring calls for citrus—try a lemon curd drizzle or candied lemon slices. In summer, add peach slices with a sprinkle of crushed pistachios. For autumn, incorporate caramelized apples or maple-glazed pecans.
Winter celebrations shine with cranberry sauce or candied ginger for a festive touch. Each season offers unique flavors that enhance the cake’s versatility.
Non-Food Decor
Edible flowers like violets or roses add an elegant, romantic touch—just ensure they’re food-safe. For a rustic look, scatter toasted coconut flakes or crushed meringue cookies around the base.
Metallic sprinkles in gold or silver create a glamorous finish for special occasions. I often use lace doilies underneath the cake for a vintage-inspired presentation.
Beverage Pairings
For a classic pairing, serve with vanilla chai tea or lavender-infused milk. Coffee lovers will adore a shot of espresso alongside slices. Sparkling wine like Prosecco or Champagne complements the cake’s richness perfectly. For a non-alcoholic option, try sparkling apple cider** with a cinnamon stick. 🍷
Nutrition facts
Frequently asked questions
Can I make this cake in a 9×13-inch pan instead of two 6-inch rounds?
Yes, but you’ll need to adjust the baking time and technique. For a single layer, bake at 325°F for 40-45 minutes instead of 350°F. Grease the pan thoroughly and line it with parchment paper. The cake will be denser than layers, so reduce sugar by 0.5 cups and add 1 extra egg to compensate. Let it cool completely before frosting.
Why did my cake sink in the middle?
This usually happens from overmixing the batter or opening the oven too soon. Check your baking powder is fresh (test by mixing with water—it should fizz). Also ensure your butter and eggs are room temperature. For next time, bake 2-3 minutes longer than the recipe suggests, and let cakes cool completely in pans before removing.
How do I store leftover cake?
Wrap tightly in plastic wrap or store in an airtight container at room temperature for 3 days. For longer storage, refrigerate for up to 1 week or freeze for 3 months. Thaw overnight in the fridge before serving. The frosting may soften when refrigerated—bring to room temperature before decorating again.
Can I substitute cake flour with all-purpose flour?
You can, but your cake won’t be as tender. Replace each 1 cup cake flour with 1 cup all-purpose flour minus 2 tbsp, then add 2 tbsp cornstarch. This mimics the protein structure of cake flour. The texture will be slightly denser, but still delicious. For best results, use the recipe as written with proper cake flour.
What’s the best way to level my cake layers?
Use a serrated knife or cake leveler for perfectly even layers. Place the pan on a cutting board and gently press down with even pressure. For the cleanest cut, dip the knife in hot water and wipe dry between slices. Leveling ensures your frosting looks professional and the cake stands straight on the stand.

- 3lb Prime Rib Roast Recipe: Juicy Pink Center Guaranteed in 3 Hours - October 31, 2026
- 5 Spice Cake Recipe: Warmly Spiced Layers With Crunchy Top - October 31, 2026
- 1950’s Macaroni and Cheese Recipe: Nostalgic Creamy Cheese Sauce with Buttery Noodles - October 31, 2026