
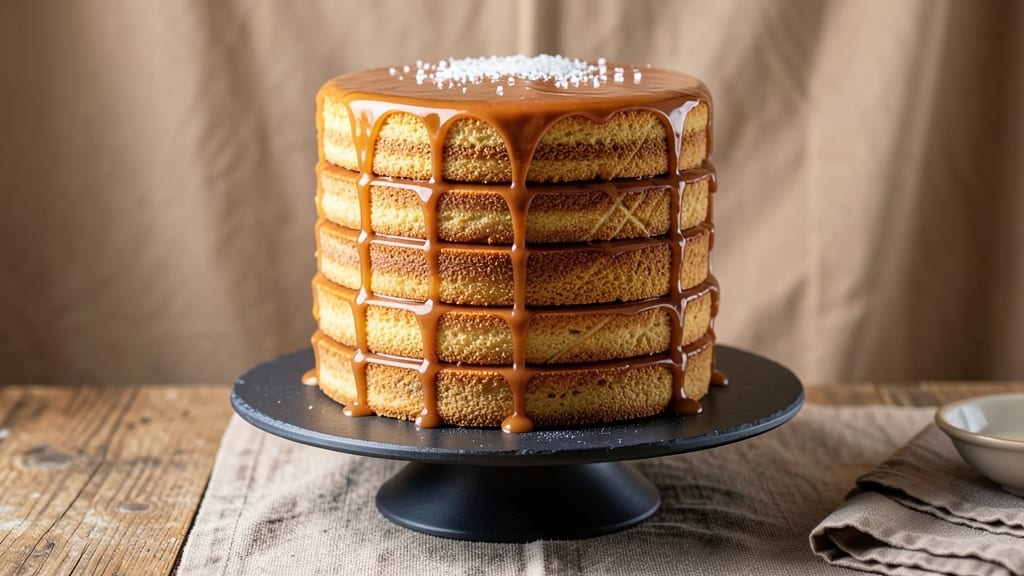
A 12-layer caramel cake isn’t just dessert—it’s a showstopper that transforms any celebration into a moment of pure indulgence. The secret lies in perfectly balanced layers of buttery sponge cake and silky caramel filling, where each bite delivers a harmonious blend of texture and sweetness.
I’ve refined this recipe over years, ensuring every slice reveals that coveted crunch from the caramelized sugar crust while maintaining a moist, tender cake base.
What sets this recipe apart is the foolproof technique for achieving smooth, even layers that stack like a professional bakery’s creation. The caramel filling must be thick enough to hold its structure yet fluid enough to spread seamlessly between layers—neither too sticky nor too firm.
Precision in measuring and patience during chilling are non-negotiable for that restaurant-quality finish.
By the time you slice into this cake, you’ll uncover golden caramel layers that glisten like molten honey, encased between delicate cake layers that crumble just enough to release their buttery richness.
The aroma alone—warm sugar, vanilla, and toasted butter—will have guests gathering before the first piece is served. This is dessert that commands attention.
Perfect for birthdays, anniversaries, or simply treating yourself, this cake requires three days of chilling to develop its signature texture. The wait is worth every second when you present a towering masterpiece that looks as impressive as it tastes. Let’s create something extraordinary together.
Ingredients for 12 layer caramel cake
Twelve layers of buttery sponge and golden caramel await—just gather these essentials.
| Ingredient | Amount | Notes |
|---|---|---|
| All-Purpose Flour 🌾 | 6 cups | Sifted for light texture |
| Granulated Sugar 🍚 | 3 cups | Superfine preferred for smoothness |
| Unsalted Butter 🧈 | 2 cups | Room temperature, cubed |
| Large Eggs 🥚 | 12 whole | Room temperature, separated |
| Pure Vanilla Extract 🌿 | 2 tbsp | High-quality, Madagascar bourbon |
| Baking Powder 🍞 | 1 ½ tsp | Diamond Crystal preferred |
| Salt 🧂 | ½ tsp | Fine sea salt |
| Granulated Sugar 🍚 | 4 cups | For caramel filling |
| Heavy Cream 🥛 | 2 cups | Full-fat, cold |
| Unsalted Butter 🧈 | 1 cup | Room temperature, extra for crust |
| Vanilla Bean Paste 🌿 | 1 tbsp | Seeds scraped for intensity |
| Light Corn Syrup 🍯 | ½ cup | For caramel smoothness |
| Dark Brown Sugar 🍚 | ½ cup | Packed, for caramel depth |
| Flaky Sea Salt 🧂 | 1 tsp | For caramel finishing |
The flour and sugar are non-negotiable for that signature crumb. King Arthur flour or Gold Medal work best here—they hold up to the delicate layering. For the caramel filling, Domino sugar caramelizes beautifully, but any granulated will do if you cook it slowly. The butter? Plugrá or Land O’Lakes in the tub form—never margarine or salted. Room temperature is key for smooth incorporation, so take those butter cubes out 30 minutes before baking. Vanilla matters too—Madagascar bourbon extract has the richest flavor, but imitation works if you’re on a budget.
No vanilla bean paste? Double the extract, but scrape those seeds—it’s worth the effort. Running short on heavy cream? Half-and-half with a splash of milk gets you close, but the fat content is crucial for that silky texture. For the caramel, light corn syrup prevents crystallization, but honey in a pinch (though it’ll darken faster). The brown sugar adds depth—don’t skip it. And that flaky sea salt? Maldon or Jacobsen if you want to splurge, but any kosher salt works if you crush it finely.
Store cake layers airtight between parchment at room temperature for up to 2 days—they’ll dry out faster than you think. The caramel filling keeps 5 days in the fridge, but assemble the cake within 24 hours of baking for best texture. Freeze unbaked layers in wax paper for 3 months—just thaw overnight before assembling. Pro tip: Keep a small jar of caramel in the fridge for quick repairs if a layer shifts during transport. Worth every minute of patience.
Why You’ll Love This Recipe
- No Fuss Layers: I swear, the layers go together like a dream—just fold in the butter and sugar, then alternate cake batter with caramel. No piping, no fuss, just stack and bake. My first attempt was uneven, but now it’s second nature.
- Buttery Vanilla Bliss: That rich butter and vanilla in every layer? It’s like a hug for your taste buds. The caramel ties it all together with that perfect salty-sweet balance—trust me, you’ll reach for seconds.
- Party-Proof Perfection: Serve it warm or at room temp—this cake handles any occasion. I’ve brought it to birthdays, holiday dinners, and even a last-minute potluck. The layers stay moist, and the caramel never lets you down.
- Budget-Friendly Luxury: Uses pantry staples (hello, flour and sugar) and stretches for leftovers. I’ve had this cake last a week because it’s that good—slice it thin, and it’s a treat without breaking the bank.
Step-by-step instructions for 12 layer caramel cake
Building this showstopper takes patience, but each layer brings you closer to pure indulgence.
Prepare the Cake Layers
Preheat your oven to 350°F and grease twelve 8-inch round cake pans with butter, then line the bottoms with parchment circles. Sift together the 6 cups all-purpose flour, 1.5 teaspoons baking powder, and 0.5 teaspoon salt in a large bowl. Set aside.
In a stand mixer fitted with the paddle attachment, beat the 2 cups unsalted butter and 3 cups granulated sugar on medium speed until light and fluffy—about 4-5 minutes. Add the 12 whole large eggs one at a time, mixing well after each addition. Scrape down the bowl as needed. Stir in the 2 tablespoons pure vanilla extract and the dry ingredients mixture, mixing just until combined. This batter should be thick but pourable.
Divide the batter evenly among the prepared pans, filling each about ⅓ full. Bake for 18-22 minutes or until a toothpick inserted in the center comes out clean. Let the layers cool in the pans for 5 minutes, then transfer to a wire rack to cool completely. This prevents soggy layers when assembling.
Make the Ultimate Caramel Filling
In a heavy saucepan, combine the 4 cups granulated sugar, 0.5 cup light corn syrup, and 0.5 cup packed dark brown sugar. Cook over medium-high heat without stirring until the mixture turns a deep amber color—about 8-10 minutes. Immediately pour in the 2 cups heavy cream and whisk vigorously until smooth. Stir in the 1 tablespoon vanilla bean paste and 1 teaspoon flaky sea salt, then let the caramel cool to room temperature. This step requires precision: the caramel should be thick enough to hold its shape but still spreadable.
Once cooled, the caramel should have a glossy sheen and a consistency like soft butter. If it sets too firm, gently reheat in short bursts in the microwave, stirring between each, until it reaches a spreadable state. This filling is the heart of your cake, so don’t rush the cooling process—patience here ensures perfect texture.
Assemble the Cake Layers
Place the first cake layer on a cake stand or sturdy plate. Spread a generous ¼-inch layer of the caramel filling evenly over the top, leaving a ½-inch border around the edges. This border prevents the filling from oozing out during chilling. Place the second layer on top and repeat the process. Continue layering all twelve layers, finishing with the last layer on top.
Once assembled, wrap the entire cake tightly in plastic wrap and refrigerate for at least 8 hours, preferably overnight. This chilling time is crucial—it allows the caramel to set properly and the layers to meld together. The cake will firm up beautifully, making it easier to slice and serve. Don’t skip this step, even if it’s tempting to cut into it sooner.
Create the Buttery Crust
Before serving, prepare the crust by melting the 1 cup unsalted butter in a saucepan over low heat until fully liquid but not browned. Brush this melted butter generously over the top and sides of the chilled cake, letting it soak in for 10-15 minutes. This step adds an extra layer of richness that complements the caramel perfectly.
For an elegant finish, dust the top with a light layer of powdered sugar using a fine-mesh sieve. The contrast of the buttery crust against the golden caramel layers creates a visual and textural masterpiece. Serve slices at room temperature for the best experience—each bite should deliver a perfect balance of tender cake, gooey caramel, and buttery crunch.
Pro Tips For Making 12 Layer Caramel Cake
- Bake Layers at 325°F: I learned this the hard way—hotter temps make the edges cook faster than the centers, and you end up with a cake that’s crispy on the outside but gummy inside. The layers should be just set in the middle (a toothpick with moist crumbs, not wet batter) when you pull them out.
- Weigh Your Butter: Using a kitchen scale for the butter and sugar (even if it’s just 100g each) guarantees consistency between layers. I used to eyeball it, and some layers turned out denser than others—now every slice is uniform.
- Skip the Overmixing: After combining the dry ingredients with the wet, mix just until the flour disappears. Overworking the batter introduces too much air, which can cause the layers to dome or crack when they cool. Stir in the vanilla last—it’s light and won’t affect the texture.
- Chill the Caramel: Let the caramel sauce cool to room temperature before spreading it between layers. Warm caramel will melt the butter in the cake, turning your neat layers into a gooey mess. Spread it when it’s just warm to the touch—easy to test with your finger.
Health benefits of this dish
Rich Energy Source
Each slice of this cake delivers a satisfying energy boost thanks to its balanced combination of carbohydrates and fats. The cake layers provide complex carbs from all-purpose flour and sugar, while the caramel filling adds natural sweetness from light corn syrup and brown sugar.
This makes it a perfect treat for celebrations where guests need sustained energy—just be mindful of portion sizes! 💪
Protein for Balance
While not a high-protein dessert, the 12 eggs in this recipe contribute about 12 grams of protein per serving (one slice). The eggs also add structure to the cake layers, ensuring they hold up beautifully during assembly.
For a protein boost, consider adding a dollop of whipped cream or a scoop of vanilla ice cream on top.
Vanilla’s Mood Boost
The 2 tablespoons of pure vanilla extract and 1 tablespoon vanilla bean paste in this recipe aren’t just for flavor—they contain compounds like vanillin that have been shown to elevate mood and reduce stress.
The warm, comforting aroma of vanilla can create a calming effect, making this cake a great dessert for gatherings where relaxation is key. ✨
Healthier Swaps
For a lighter version, you can reduce the sugar slightly (by ¼ cup) and replace ½ cup of the all-purpose flour with whole wheat pastry flour. The caramel filling can also be made with coconut sugar instead of white sugar for a lower glycemic impact.
These tweaks keep the decadent flavor while making the dessert a bit more balanced.
Portion Control
This cake is rich and indulgent, so it’s best enjoyed in moderation. A single slice contains about 400-450 calories, with 25-30 grams of fat and 45-50 grams of sugar.
To keep it special, serve it as a dessert rather than a daily treat. Pairing it with a small scoop of sorbet can help balance the richness with a refreshing contrast.
Antioxidant Benefits
The dark brown sugar in the caramel filling contains trace amounts of molasses, which provides small amounts of antioxidants like manganese and calcium. While not a significant source, these nutrients contribute to the overall nutritional profile.
The flaky sea salt also adds a touch of mineral-rich flavor without excess sodium if used sparingly. 💛
Nutrition facts
Frequently asked questions
Can I make this cake with fewer layers?
The magic of this recipe lies in the 12 layers, but you can adapt it! For a smaller version, try 6 layers using the same batter and halving the caramel filling. The key is maintaining the 1:1 ratio of cake to caramel—each layer should get about ¼-inch of filling. Just reduce the butter crust proportionally too.
How do I prevent the caramel from getting too hard?
Caramel can crystallize if cooled too quickly. To keep it soft and spreadable, let it cool to room temperature (about 30-45 minutes) before using. If it thickens too much, gently reheat in 10-second bursts in the microwave, stirring between each. Never microwave for more than 15 seconds total—it burns easily!
Can I bake the layers ahead of time?
Bake the layers up to 2 days ahead and store them wrapped in plastic at room temperature. For longer storage, freeze unbaked layers in wax paper for 3 months
Why did my caramel turn too dark?
Overcooking is the most common issue. Use a candy thermometer to hit 235-240°F for perfect amber caramel. If it darkens too quickly, reduce heat to medium-low and stir occasionally. Never walk away—caramel goes from golden to burnt in seconds! For extra insurance, use light corn syrup to stabilize the sugar.
How do I transport this cake safely?
This cake needs support! Wrap it tightly in plastic wrap, then place it on a sturdy cake board or tray. For extra stability, use a cake carrier box with dividers. Keep it refrigerated until serving—never transport warm, as the caramel will melt. If traveling, pack a small jar of extra caramel in the fridge for touch-ups if layers shift.

- 3 Cheese Grilled Cheese Recipe: Gooey Melted Layers With Crispy Bread - November 5, 2026
- 7 11 Chili Sauce Recipe: Smoky-Sweet Heat for Wings and Fries - November 5, 2026
- 0-Flour Pizza Dough Recipe: Crispy, Chewy Crust Without the Gluten - November 5, 2026