
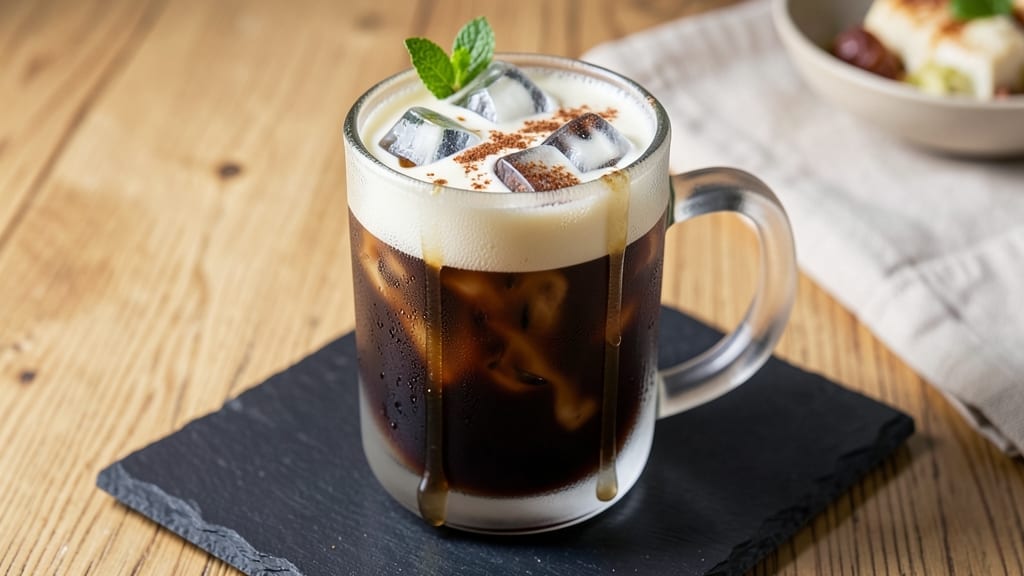
This 12-ounce iced coffee recipe delivers the perfect balance of bold flavor and refreshing chill—ideal for hot days or when you need an energy boost without the jitters.
The secret lies in using a strong brew method, whether through a French press, pour-over, or cold brew, to ensure every sip packs maximum caffeine and depth. I’ve perfected this over years of trial and error, and it’s now my go-to for both quick mornings and lazy afternoons.
The beauty of this recipe is its versatility—you can customize it with vanilla, caramel, or even a hint of cinnamon for warmth. A splash of cold milk or cream adjusts the richness, while sweetener (simple syrup or sugar) balances the bitterness to your taste.
The key is chilling the coffee properly: either by brewing it cold or pouring hot coffee over ice to avoid dilution. This method keeps the flavor intact while delivering that satisfying, icy refreshment.
What you’ll end up with is a smooth, bold iced coffee that’s strong enough to wake you up but refreshing enough to enjoy all day. The texture is perfectly balanced—no watery aftertaste, no overly sweet overload.
Garnish with whipped cream, a sprinkle of cocoa, or even a cinnamon stick for an extra touch of elegance. It’s the kind of drink that feels like a treat, not just a caffeine fix.
Whether you’re brewing for one or prepping a pitcher for a crowd, this recipe scales effortlessly. The instructions are straightforward, but the results are anything but basic. Let’s get brewing—your taste buds (and energy levels) will thank you.
Ingredients for 12 oz iced coffee
Pantry staples plus a few specialty touches—your bold iced coffee starts here.
| Ingredient | Amount | Notes |
|---|---|---|
| Coffee Beans ☕ | ½ cup | Freshly ground, medium-dark roast |
| Hot Water 💧 | 2 cups | Just boiled, about 200°F |
| Ice Cubes ❄️ | 1 ½ cups | Freshly made, no ice rings |
| Cold Milk 🥛 | ¼ cup | Whole or 2% preferred |
| Simple Syrup 🍯 | 2 tbsp | 1:1 sugar to water ratio |
| Vanilla Extract 🌿 | ½ tsp | Pure vanilla preferred |
| Cinnamon Stick 🌳 | 1 whole | For garnish, optional |
| Whipped Cream 🍦 | ¼ cup | Homemade or store-bought |
| Cocoa Powder 🍫 | 1 tsp | Unsweetened, for garnish |
| Salt 🧂 | ⅛ tsp | Fine sea salt for balance |
| Lemon Juice 🍋 | 1 tsp | Freshly squeezed, optional |
The coffee beans are everything. Medium-dark roast gives that perfect balance of richness and acidity—Starbucks or local roasteries usually have great options. If you’re grinding at home, use a burr grinder for even consistency. The water should be just boiled (200°F) to avoid over-extraction. I always use freshly ground beans—pre-ground loses flavor fast. For extra boldness, try a French press or pour-over method instead of a drip machine.
No vanilla extract? A pinch of cinnamon or a dash of almond extract works in a pinch. The simple syrup can be homemade (equal parts sugar and water, simmered) or store-bought—Trader Joe’s or Whole Foods have great options. Want it sweeter? Add another tablespoon. The milk adds creaminess, but oat or almond milk works too if you prefer dairy-free. The salt might seem odd, but it enhances all flavors—trust me on this. Lemon juice brightens everything up if you’re feeling fancy.
Prep the simple syrup ahead—it keeps for 2 weeks in the fridge. The whipped cream should be chilled until ready to use (or buy the aerosol kind if you’re in a rush). Store your coffee concentrate (unmixed) in the fridge for 3-4 days—just add ice and milk when ready. For a crowd, double the recipe and use a large insulated pitcher to keep it cold. Garnishes like cinnamon sticks or cocoa powder add that restaurant-quality touch without much effort.
Why You’ll Love This Recipe
- Five-Minute Fix: I swear by this—just grind the beans, steep, dump in ice and milk. No blender, no fuss, and honestly? It’s the fastest way to beat a 3 PM slump without sacrificing quality.
- Creamy Without Guilt: That simple syrup isn’t just for sweetness—it balances the bitterness so the milk feels luxurious, not watery. I’ll be real: my barista friend tried it and asked for the recipe. (Yes, even on a Tuesday night.)
- Office or Picnic: Make a big batch Sunday night and stash it in jars—perfect for lunches, road trips, or impressing coworkers. The ice keeps it cold for days, and the syrup prevents it from getting watery. My go-to for “I forgot my coffee maker” days.
- Budget Coffee Hack: Freshly ground beans? Check. Milk and syrup? Pantry staples. I spend half what I do on café drinks, and it tastes like I’m sipping a $5 pour-over. Not the prettiest, but the taste makes up for it every time.
Step-by-step instructions for bold iced coffee
Here’s how to make a rich, refreshing iced coffee that keeps its bold flavor—no watery disappointment here.
Brew the Coffee Concentrate
Start by grinding the 0.5 cup coffee beans to a medium-fine consistency—think slightly coarser than table salt. Place the grounds in a French press or pour-over brewer and pour the 2 cups hot water over them. Let it steep for 4 minutes if using a French press, or 3 minutes for pour-over, until you achieve a strong, concentrated brew.
This extra brewing time ensures maximum flavor extraction, which is crucial for an iced coffee that won’t taste weak when chilled. If using a French press, press the plunger down gently but firmly to separate the grounds completely. Strain the coffee if using a pour-over method, and let it cool to room temperature before proceeding. Patience here prevents a diluted final drink.
Sweeten and Flavor the Brew
While the coffee cools, stir in the 2 tbsp simple syrup and 0.5 tsp vanilla extract until fully dissolved. The syrup will dissolve more easily if the coffee is still slightly warm. Add the 0.125 tsp salt—this might seem odd, but it enhances the coffee’s natural flavors and balances sweetness. Give it a taste at this stage to adjust sweetness if needed.
Here’s the thing—adding these ingredients now ensures they’re evenly distributed throughout the entire drink. If you wait until later, you risk ending up with pockets of sweetness or vanilla that don’t blend smoothly, especially when you add ice later. Stir well for at least 30 seconds to incorporate everything completely.
Chill and Dilute with Ice
Fill a large pitcher or serving container with 1.5 cups ice cubes—use freshly made ice with no ice rings to prevent watering down your drink. Slowly pour the flavored coffee concentrate over the ice, stirring gently as it mixes. This gradual addition prevents the ice from melting too quickly and diluting your carefully brewed coffee.
Add the 0.25 cup cold milk now and stir again. The milk should be cold to maintain the iced coffee’s refreshing quality. If you prefer a creamier texture, you can add a splash more milk later, but start with this amount to avoid making the drink too thin. The ice will continue melting as it chills the coffee, so don’t worry about the exact proportions—this is where the magic happens.
Finish and Garnish
Once the coffee is thoroughly chilled and the ice has melted slightly, taste and adjust the sweetness if needed. Add the 1 tsp lemon juice if using—this brightens the coffee’s flavor and cuts through any bitterness. Stir in the 0.5 tsp vanilla extract again at this stage to ensure it’s fully incorporated.
For serving, pour the iced coffee into glasses filled with fresh ice cubes. Top each with 0.25 cup whipped cream, then dust with 1 tsp cocoa powder for a beautiful finish. Add the 1 whole cinnamon stick as a garnish if desired—it adds a subtle warming spice note that complements the cool drink. Serve immediately for the perfect balance of bold coffee flavor and refreshing chill.
Customize to Your Taste
This recipe makes 4 servings of 12-ounce iced coffee, so feel free to adjust the proportions to your preference. For a stronger coffee taste, use slightly more concentrate; for a milder version, add an extra splash of milk. The beauty of this method is its flexibility—you can make it as rich or as light as you like while keeping that signature bold flavor.
If you prefer a different flavor profile, try adding a splash of caramel syrup instead of vanilla, or a dash of cinnamon directly into the brew. The key is to balance your additions with the coffee’s natural strength. Remember, the goal is to enhance the coffee’s flavor, not overpower it. Enjoy your perfectly chilled, bold iced coffee!
Pro Tips For Making 12 Oz Iced Coffee
- USE FRESH BEANS: I learned this the hard way—stale beans taste like cardboard, no matter how much you grind. Buy whole beans the day before brewing, grind right before making coffee, and store the rest in an airtight container. That extra effort keeps the flavor bright, especially in a 12 oz serving where every sip counts.
- BREW STRONG, DILUTE LATER: Don’t skimp on coffee-to-water ratio—aim for 1:2 (coffee to water) when brewing. You’ll dilute it with milk and ice anyway, but starting strong guarantees depth. I used to brew weak, thinking I’d fix it later. Spoiler: You can’t.
- CHILL THE COFFEE FAST: Pour your hot brew into a cold pitcher or metal bowl filled with ice cubes for 2-3 minutes before adding the rest of the ice. This shock-chills the coffee without watering it down, so your 12 oz glass stays bold, not weak and watery. (Yes, it’s a pain, but it works.)
- WEIGH THE SYRUP: Simple syrup is easy to eyeball wrong—too little tastes bitter, too much turns it cloying. For 12 oz, use 1 tablespoon (about 15g) of syrup per 8 oz of coffee. I used to guess, and my drinks always ended up either too sweet or too sharp. Measuring fixes that.
Serving suggestions for leftovers
Classic Glassware
Serve your iced coffee in 12-ounce glass mugs or tumbler glasses to keep it cold longer. I love using double-walled stainless steel tumblers (like Yeti or Hydro Flask) for on-the-go sipping—they keep drinks cold for hours without condensation.
For a more elegant touch, opt for clear glass mason jars with wide mouths, which let you see the layers of coffee, ice, and cream. 🥤
Garnish Like a Pro
Elevate your presentation with simple but effective garnishes. A dollop of homemade whipped cream topped with a sprinkle of unsweetened cocoa powder adds visual appeal and a subtle chocolate note.
For warmth, add a cinnamon stick or a pinch of ground cinnamon—it pairs beautifully with the vanilla and enhances the cozy vibe. A few drops of vanilla syrup drizzled over the top creates an elegant, restaurant-worthy finish.
Milk Alternatives
Not a fan of dairy? No problem! Swap the cold milk for coconut milk (for a tropical twist), oat milk (for creaminess), or almond milk (for a lighter texture). I’ve also had great success with half-and-half for extra richness or condensed milk (just a splash!) for a dessert-like sweetness.
Each alternative changes the mouthfeel slightly, so experiment to find your favorite. 🥛
Spiced Variations
Add warmth to your iced coffee with a dash of ground nutmeg or cinnamon directly into the brew. For a festive touch, infuse the coffee with a star anise pod or cardamom pod while brewing—remove before serving.
A splash of orange juice or grenadine adds a citrusy brightness that cuts through the bitterness. These spices work especially well in the chilled concentrate before adding ice and milk.
Creamy Upgrades
Take your iced coffee to the next level with cold foam—whisk heavy cream or half-and-half with a pinch of sugar until stiff peaks form, then spoon it over the top.
For a caramel drizzle, warm 2 tbsp caramel sauce and let it cool slightly before pouring a zigzag over the whipped cream. A mocha twist? Stir in 1 tbsp chocolate syrup before adding ice. These upgrades make it feel like a specialty coffee shop treat. 🍫
Batch Prep Tips
Make a large batch ahead of time by brewing a gallon of concentrate (double the recipe) and storing it in the fridge for up to 3 days. When ready to serve, simply pour over ice and add milk.
For parties, use a pitcher with a lid to keep it cold and prevent dilution. Label it with the date and flavor—this way, you can prep once and enjoy all week. Pro tip: Freeze leftover concentrate in ice cube trays** for single-serving iced coffee later! ❄️
Nutrition facts
Frequently asked questions about bold iced coffee
Why does my iced coffee taste weak or watery?
The key is using a strong coffee concentrate before adding ice. Brew with a French press or pour-over method and let it cool completely before mixing with ice. If it still tastes weak, reduce the ice by 0.5 cup or use slightly more concentrate. The ice should chill, not dilute!
Can I make this recipe with instant coffee?
Instant coffee works in a pinch, but fresh-ground beans create a richer flavor. If using instant, dissolve 2 tbsp in 1 cup hot water instead of brewing, then follow the same process. For best results, try a cold brew concentrate (steep instant coffee in cold water for 4 hours), which yields a smoother, stronger base.
How do I adjust sweetness for different tastes?
Start with the 2 tbsp simple syrup and adjust by 0.5 tbsp increments. For a natural sweetener, swap syrup for 1 tbsp honey or maple syrup (dissolve in warm coffee). If you prefer less sweetness, reduce to 1 tbsp syrup or omit entirely. The salt in the recipe helps balance sweetness naturally—don’t skip it!
What’s the best way to store leftover concentrate?
Store the flavored coffee concentrate in an airtight container in the fridge for up to 3-4 days. For longer storage, freeze it in ice cube trays—each cube makes a 1 oz serving. Thaw overnight in the fridge before adding ice and milk. Avoid freezing with milk or cream, as it alters texture.
Can I make this without dairy?
Replace the 0.25 cup cold milk with oat milk (creamy), almond milk (light), or coconut milk (tropical). For richness, use coconut cream or a splash of cashew cream. Dairy-free whipped cream (made with coconut or almond milk) works perfectly for topping. The flavor stays bold—it’s all about the coffee concentrate!

- 3lb Prime Rib Roast Recipe: Juicy Pink Center Guaranteed in 3 Hours - October 31, 2026
- 5 Spice Cake Recipe: Warmly Spiced Layers With Crunchy Top - October 31, 2026
- 1950’s Macaroni and Cheese Recipe: Nostalgic Creamy Cheese Sauce with Buttery Noodles - October 31, 2026