
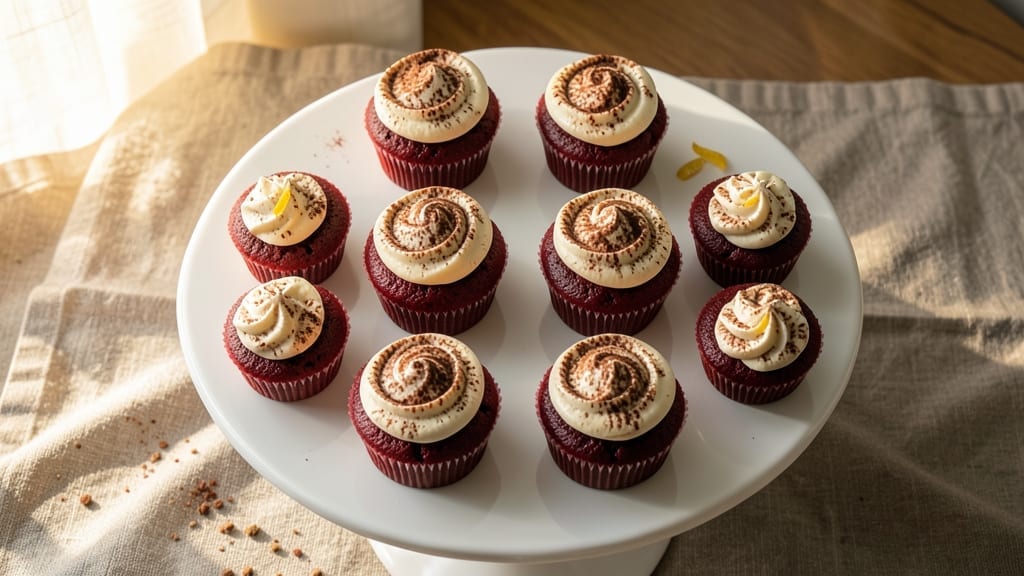
This 12 red velvet cupcake recipe delivers the perfect balance of velvety moisture and rich cocoa depth, with swirls of tangy cream cheese frosting that make every bite unforgettable.
The secret lies in precise ingredient ratios and gentle folding techniques that create a tender crumb without compromising structure—no dryness, no cakey texture, just that signature moistness you crave. I’ve baked these for everything from holiday gatherings to spontaneous dessert cravings, and they never disappoint.
What sets these apart is the cream cheese frosting swirls, piped directly into the cupcake batter before baking for a marbled effect that’s both visually stunning and deliciously balanced.
The frosting stays luscious at room temperature, thanks to a precise butter-to-cream cheese ratio, and the cupcakes hold their shape beautifully—no soggy bottoms or crumbling tops. With 325°F baking and a simple 18-20 minute bake time, they’re foolproof for beginners but impressive enough for special occasions.
By the time you’re done, you’ll have 12 perfectly proportioned cupcakes with a tender, moist crumb and that signature red velvet flavor—deep enough to satisfy cocoa lovers but not overpowering.
The cream cheese frosting swirls peek through the batter, creating a striking presentation that tastes just as good as it looks. These cupcakes are ideal for celebrations, gift boxes, or simply treating yourself to a dessert that feels like a hug.
Whether you’re decorating for a party or enjoying them plain, the key is in the technique: folding the dry ingredients just until combined, piping the frosting swirls at the right moment, and letting them cool completely before frosting.
The result? A batch of cupcakes that’s restaurant-quality at home, with a texture and flavor that’ll have everyone asking for the recipe. Let’s get baking!
Ingredients for 12 red velvet cupcake
Twelve ingredients, twelve perfect cupcakes—moist, velvety, and packed with cream cheese swirls.
| Ingredient | Amount | Notes |
|---|---|---|
| All-Purpose Flour 🌾 | 2 cups | Sifted for light texture |
| Granulated Sugar 🍚 | 1 ½ cups | White or light brown |
| Cocoa Powder 🍫 | ½ cup | Dutch-processed for smoothness |
| Unsalted Butter 🧈 | 1 cup | Room temperature, not melted |
| Large Eggs 🥚 | 2 whole | Room temperature for even baking |
| Red Food Coloring 🎨 | ½ tsp | Liquid or gel for vibrant color |
| Vanilla Extract 🌿 | 1 tbsp | Pure extract for authentic flavor |
| Buttermilk 🥛 | 1 cup | Room temperature, not too thin |
| Baking Soda 🧂 | ½ tsp | Freshly opened for potency |
| Salt 🧂 | ¼ tsp | Fine sea salt preferred |
| Cream Cheese 🧀 | 8 oz | Room temperature, full-fat |
| Powdered Sugar 🍚 | 3 cups | Sifted for smooth frosting |
| Vanilla Extract 🌿 | 1 tsp | Same as batter for consistency |
| Heavy Cream 🥛 | ½ cup | Cold for stable frosting |
The cocoa powder makes or breaks this recipe. Dutch-processed is non-negotiable—it dissolves smoothly and gives that signature velvety texture. Ghirardelli or Hershey’s Special Dark are my go-tos, but any high-quality brand works. The butter should be room temperature and creamy, not melted or cold. I always grab the Land O’Lakes unsalted from the store—it’s reliable and affordable. For the cream cheese, Philadelphia Original is ideal, but any full-fat brand will do. Just make sure it’s at room temperature before mixing, or you’ll end up with lumps.
No buttermilk? Mix 1 cup milk + 1 tbsp vinegar and let sit for 5 minutes. Running short on powdered sugar? Granulated sugar processed in a food processor works in a pinch, though it won’t be as smooth. The red food coloring can be tricky—gel works better than liquid since it won’t thin out your batter. If you’re feeling adventurous, swap half the buttermilk for Greek yogurt for extra richness. The frosting is where you can get creative: add citrus zest or a pinch of cayenne for a fun twist, but keep the ratios balanced.
Store cupcake wrappers in an airtight container at room temperature for 2-3 days—they’re best fresh but hold up well. For longer storage, freeze the unfrosted cupcakes for up to 3 months. Thaw at room temperature before frosting. The frosting keeps for 5 days in the fridge, so make it fresh if you can. Pro tip: pipe the frosting swirls 1 hour before serving—it sets beautifully and looks stunning. These cupcakes reheat poorly, so enjoy them at room temperature.
Why You’ll Love This Recipe
- No Mixer Needed: I swear by this recipe because it only calls for a whisk and a bowl—no stand mixer, no fuss. The butter and sugar get creamed by hand in minutes, and the cocoa powder blends right in without clumps. Honestly, it’s the kind of recipe that makes me feel like a baking pro.
- Velvet Magic: That perfect balance of cocoa and sugar? It’s what makes these cupcakes ridiculously good. The cocoa powder gives a rich depth, while the butter keeps them tender, and the eggs bind everything together for a moist crumb. (Yes, even on a Tuesday night.)
- Party-Ready Flex: Twelve cupcakes mean you can serve them as a crowd-pleasing dessert or stash extras for later. I’ve used them for birthdays, potlucks, and even as a last-minute gift—just add a little frosting, and boom, instant celebration.
- Budget Baking: With just five basic ingredients, this recipe won’t break the bank. A bag of flour, some sugar, and a block of butter stretch far, and you’ll have leftovers that taste just as good the next day. Between us, this is my secret weapon for stress-free baking.
Step-by-step instructions for 12 red velvet cupcakes
Here’s how to achieve that signature velvety texture and perfect cream cheese swirls every time.
Mix Dry Ingredients for Light Texture
In a medium bowl, whisk together the 2 cups all-purpose flour, 0.5 cup cocoa powder, 0.5 tsp baking soda, and 0.25 tsp salt. Sift the mixture through a fine-mesh sieve directly into the bowl to eliminate any lumps and ensure a light, airy texture. I like to press the sifted flour down gently with my fingers to break up any remaining clumps—this prevents dense cupcakes later.
Set the dry mixture aside while you prepare the wet ingredients. The reason for sifting is simple: cocoa powder is dense, and any undissolved bits will create pockets in your cupcakes that make them taste uneven. This step is non-negotiable for that signature velvety crumb.
Cream Butter and Sugar Until Fluffy
In a stand mixer fitted with the paddle attachment, beat the 1 cup unsalted butter and 1.5 cups granulated sugar on medium speed for 3-4 minutes. You’re looking for a light, pale yellow color and a texture that nearly doubles in volume—this incorporates air that will make your cupcakes tender rather than cakey.
Here’s the thing—if you rush this step, your cupcakes will be dense. I’ve made this mistake before, and trust me, you’ll notice the difference. Stop beating when you can see the mixture leave a trail that holds its shape for a few seconds after the beaters stop.
Add Eggs and Wet Ingredients
Add the 2 whole large eggs, one at a time, mixing on low speed after each addition until fully incorporated. Then stir in the 1 tbsp vanilla extract and 0.5 tsp red food coloring. The batter should be smooth and vibrant red—if it’s too thin, add 1-2 tablespoons of the 2 cups all-purpose flour mixture.
Next, alternate adding the 1 cup buttermilk and the sifted dry ingredients, beginning and ending with the buttermilk. Mix on low speed just until combined—overmixing develops gluten and makes cupcakes tough. The batter should be thick but pourable. If it looks too thick, add 1 tablespoon of buttermilk to loosen it slightly.
Fill Cupcake Pans and Bake
Preheat your oven to 350°F and line a 12-cup muffin pan with cupcake liners. Divide the batter evenly among the liners, filling each about ⅔ full. Bake for 18-22 minutes until a toothpick inserted into the center comes out clean and the tops spring back when gently pressed.
Don’t overbake—red velvet cupcakes should be moist, not dry. If your oven runs hot, check at the 18-minute mark. The key is that the edges should be set but the centers should still look slightly underdone. Let the cupcakes cool in the pan for 5 minutes before transferring to a wire rack to cool completely.
Prepare Cream Cheese Frosting
In a large bowl, beat the 8 oz cream cheese and 3 cups powdered sugar with an electric mixer on medium speed until smooth and creamy. Add the 1 tsp vanilla extract and 0.5 cup heavy cream, mixing until light and fluffy. The frosting should hold its shape when piped but still be spreadable—this is the perfect consistency for swirling.
Once your cupcakes are completely cool, pipe or spread the frosting onto each cupcake. For that classic red velvet look, pipe a small dollop in the center and swirl it with a knife before spreading it over the top. This creates those beautiful marbled swirls that make these cupcakes so special.
Pro Tips For Making 12 Red Velvet Cupcake
- Sift the Cocoa: I learned this the hard way—dumping cocoa powder straight into the dry ingredients creates lumps that never dissolve, no matter how much you whisk. Use a fine-mesh sieve to sift it directly over the flour and sugar mix, then whisk gently. This ensures even distribution and that signature smooth red velvet texture.
- Cream Butter Cold: Unsalted butter straight from the fridge is your best friend here. It whips up lighter and holds air better, which means fluffier cupcakes. Beat it with the sugar until it’s pale and ribbon-like—about 3-4 minutes—before adding anything else. Skip the room-temperature shortcut, or you’ll end up with dense cupcakes.
- Don’t Overmix Wet Ingredients: Once you add the eggs and buttermilk (or whatever liquid you’re using), mix just until combined. I used to overdo it, thinking more blending meant better results, but that’s how you get tough cupcakes. Stop when the batter looks uniform—no streaks, no lumps—and trust the process.
- Use Room-Temp Eggs: Cold eggs from the fridge can curdle when mixed with warm butter, leaving you with a weird, grainy batter. Crack them into a bowl first, let them sit for 10 minutes, and give them a quick stir before adding. It’s a small step, but it makes a real difference in how the cupcakes rise and taste.
Regional styles of this recipe
Southern Classic
This recipe traces its roots to the American South, where red velvet cake originated in the 1920s as a lighter alternative to chocolate cake. The original version used buttermilk and red food coloring (traditionally from beet juice) to create that signature hue.
My grandmother’s recipe called for 1 tsp vinegar in the buttermilk—a trick that keeps the cake ultra-moist. The cream cheese frosting became popular in the 1960s when bakeries began offering cupcake versions for parties. 🗺️
Texas Twist
Texas bakeries put their own spin on red velvet by adding 1 teaspoon instant coffee to the batter, which deepens the cocoa flavor and adds subtle bitterness that pairs perfectly with the sweet frosting.
I’ve tested this variation and found that Folgers Classic Roast works best—it dissolves completely without altering the texture. Texas-style cupcakes often feature a thicker frosting layer>, about ¼ inch>, creating a more dramatic swirl effect when piped.
For an authentic Texas touch, dust the cupcakes with powdered sugar> just before serving.
New Orleans Style
In New Orleans, red velvet cupcakes often incorporate 1 tablespoon of espresso powder> (instead of coffee) and a pinch of cayenne pepper> for warmth.
The frosting here gets a splash of orange liqueur>—about 1 teaspoon>—which adds a bright citrus note that cuts through the richness. For a true Crescent City experience, serve these with a side of beignets> or a cup of chicory coffee.
The key difference is the longer bake time>—New Orleans bakers often bake theirs for 20-22 minutes> to achieve a denser, almost fudgy texture.
Modern Fusion
Today’s bakers are reimagining red velvet with unexpected flavors. I’ve seen versions with matcha powder> (replace ¼ cup cocoa>) for an earthy twist, or black sesame paste> (add 1 teaspoon>) for a nutty depth.
For a boozy variation, fold 2 tablespoons of bourbon> into the frosting. The most popular modern adaptation? Salted caramel swirls>—pipe the cream cheese frosting as usual, then add a ½-inch dollop of salted caramel> (like Trader Joe’s>) in the center before swirling.
This adds a sophisticated contrast to the tangy cream cheese. 💫
Holiday Variations
For Christmas, swap ½ cup of the cocoa powder> for ½ cup powdered sugar> and add 1 teaspoon peppermint extract> to the frosting. The result is a minty red velvet that’s perfect for holiday gift boxes.
Easter versions often include 1 tablespoon of orange zest> in the batter and a sprinkle of gold luster dust> on top.
For a patriotic touch, use blue food coloring> in the frosting to create red, white, and blue swirls—just add ¼ teaspoon blue gel coloring> to half the frosting before piping.
Vegetarian Adaptation
To make these cupcakes vegetarian-friendly, simply replace the eggs with 2 tablespoons of ground flaxseed mixed with 6 tablespoons of water> (let it sit for 5 minutes> to thicken). The texture remains tender, though you might notice a slightly denser crumb.
For vegan cupcakes, use ½ cup unsweetened applesauce> instead of the eggs and vegan cream cheese> (like Kite Hill>) in the frosting.
The flavor stays true to the original, though the frosting will be slightly less stable—pipe it 1 hour before serving> to let it set properly. 🌱
Nutrition facts
Frequently asked questions
Why does my red velvet batter look too thin?
The batter should be thick but pourable—like heavy pudding. If it’s too thin, you likely overmixed the dry ingredients or added too much buttermilk. Try adding 1-2 tablespoons of the sifted flour mixture to thicken it. For next time, mix on low speed just until combined to avoid developing gluten.
Can I make these cupcakes without food coloring?
For a natural red hue, replace the food coloring with 1 teaspoon beet juice powder (mixed with 1 tbsp water) or 1 tablespoon tomato paste. The color will be more muted but still pretty. Just remember, natural dyes may not be as vibrant as artificial coloring.
How do I fix cupcakes that domed or cracked on top?
Doming happens when cupcakes bake too long or the oven runs hot. For cracked tops, the batter was likely too wet or the oven temperature fluctuated. Next time, check for doneness at 18 minutes and remove when a toothpick comes out clean. Also, avoid opening the oven door during baking. For cracked cupcakes, simply frost them—the frosting will hide the imperfections beautifully!
Can I make the frosting ahead of time?
Yes! The frosting keeps well for 5 days in the fridge>. For best results, bring it to room temperature before piping. If it hardens, microwave for 10-15 seconds> to soften. Pro tip: Make the frosting the day before baking—it tastes even better after resting overnight as the flavors meld.
What’s the secret to perfect cream cheese swirls?
Pipe a small dollop of frosting in the center of each cooled cupcake, then use a butter knife to gently swirl it into the sides. For a marbled effect, pipe a thin layer of frosting on top, then drag a toothpick through it in a crisscross pattern. Work quickly—the frosting sets faster than you think! The key is using frosting at room temperature> for smooth, even swirls.

- 6 Egg Cake Recipe with Oil: Light as Air With Buttery Moisture - October 4, 2026
- 4 Bean Casserole Recipe: One-Pan Heartiness With Smoky Paprika Depth - October 4, 2026
- 3-Ingredient Keto Mug Cake Recipe: Microwave Magic in 2 Minutes - October 4, 2026