
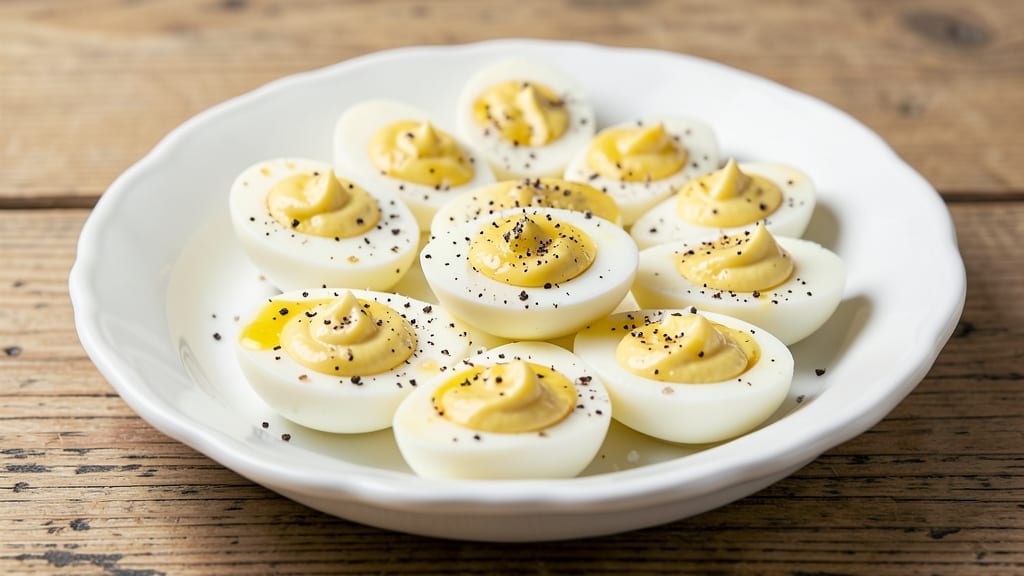
This 14 deviled eggs recipe delivers the perfect balance of creamy, tangy filling and tender egg whites—every bite is a harmonious blend of texture and flavor. 💛 The secret lies in properly hard-boiling the eggs for uniform doneness, then mixing the yolks with just the right amount of mayo and mustard to create a velvety filling that stays together without being too rich.
I’ve perfected this recipe over years of hosting brunch gatherings, where these deviled eggs consistently disappear first.
The magic happens in the preparation: peeling eggs efficiently, carefully removing the yolks, and whipping the filling until smooth but not runny. A light touch with the seasoning—just a pinch of salt, pepper, and a hint of paprika—enhances the natural flavors without overpowering them.
The filling should be thick enough to hold its shape when piped back into the egg whites, yet still creamy enough to melt in your mouth.
What you’ll end up with is a platter of perfectly balanced deviled eggs—creamy, tangy, and just slightly spicy, with a smooth, glossy finish. The contrast between the tender whites and the rich filling is what makes these deviled eggs irresistible.
Whether served as an appetizer at a holiday gathering or as a light snack on a busy weeknight, they’re guaranteed to impress.
For extra flair, garnish with a sprinkle of paprika, chopped chives, or a dash of hot sauce for those who love a little kick. These deviled eggs keep well in the refrigerator for up to 2 days, making them perfect for meal prep.
Let’s get started on creating your perfect batch!
Ingredients for 14 deviled eggs
Fresh eggs, creamy mayo, and a pinch of magic for perfect deviled eggs every time.
| Ingredient | Amount | Notes |
|---|---|---|
| Large Eggs 🥚 | 14 whole | Fresh, room temperature preferred |
| Mayonnaise 🥫 | ½ cup | High-quality, not low-fat |
| Dijon Mustard 🌶️ | 1 tbsp | Mild or hot, depending on preference |
| Yellow Mustard 🌶️ | 1 tsp | For tangy depth |
| Kosher Salt 🧂 | ½ tsp | Diamond Crystal preferred |
| Freshly Ground Black Pepper 🌶️ | ¼ tsp | For subtle heat |
| Smoked Paprika 🌶️ | ¼ tsp | For subtle smokiness |
| Fresh Chives 🌿 | 2 tbsp | Chopped, for garnish |
| Hot Sauce 🌶️ | 1 tsp | Optional, for serving |
| Lemon Juice 🍋 | 1 tsp | Freshly squeezed, for brightness |
| White Vinegar 💧 | 1 tsp | For hard-boiling eggs |
The eggs are everything—fresh, room-temperature eggs peel easier and cook more evenly. Grab a dozen organic or free-range eggs from the store—they’re worth the extra buck for the richer yolks. I always buy Dressed to Impress brand when I can, but any good-quality eggs work. The key is uniform doneness: if one egg is overcooked, the whole batch suffers. Pro tip: Add a splash of vinegar to the boiling water—it helps the whites hold together better when peeling. And no, don’t skip the ice bath—it stops the cooking process instantly for perfectly set yolks.
No mayo? Greek yogurt or vegan mayo works in a pinch, though the texture will be slightly different. The mustard is non-negotiable—it’s what gives that tangy kick. Dijon for depth, yellow for brightness. If you’re avoiding mustard, a splash of hot sauce or extra lemon juice can mimic that zing. For the smoked paprika, regular paprika at half the amount works if you’re out, but you’ll miss that smoky aroma. And if you’re serving these at a party? Prep the filling ahead—it actually tastes better after sitting for an hour or two as the flavors meld. Just don’t overmix, or you’ll end up with a runny mess.
Hard-boiled eggs keep for up to 1 week in the fridge, but these deviled eggs are best within 2 days—the whites stay firmer. Store the filling separately in an airtight container with plastic wrap pressed right on top to keep it from drying out. Reheat gently in the microwave for 10 seconds if they’ve been sitting too long. Garnish just before serving—chives wilt fast, and hot sauce loses its kick when sitting. These are perfect for meal prep: assemble 12 eggs, store in a container, and add the last 2 fresh as garnishes. Trust me, your guests won’t notice the difference.
Why You’ll Love This Recipe
- I’ll be real: peeling hard-boiled eggs was my least favorite part—until I realized you can crack them straight into an ice bath. The yolks slide out like butter, and the filling mix (just mayo, mustards, and salt) takes two minutes with a fork. Honestly, it’s the kind of recipe where you’ll wonder why you ever overcomplicated it.
- No-Fuss Assembly: I’ll be real: peeling hard-boiled eggs was my least favorite part—until I realized you can crack them straight into an ice bath. The yolks slide out like butter, and the filling mix (just mayo, mustards, and salt) takes two minutes with a fork. Honestly, it’s the kind of recipe where you’ll wonder why you ever overcomplicated it.
- Addictive Crunch: That crispy egg white shell paired with the creamy Dijon-mayo center? It’s the kind of contrast that makes you reach for seconds without thinking. The yellow mustard adds a tangy kick, but the salt ties everything together—simple, but ridiculously satisfying. (Yes, even on a Tuesday night.)
- Party-Proof Snack: These disappear at gatherings—no one ever leaves a platter untouched. Serve them at picnics, potlucks, or as a game-day spread, and they’ll be the star without stealing the show. Pro tip: swap the mustard for hot sauce if your crowd likes heat, but the classic combo works every time.
Step-by-step instructions for creamy deviled eggs
Here’s how to achieve that perfect balance of creamy yolk filling and tender egg whites every time.
🍳 Step 1: Hard-Boil the Eggs to Perfection
Place the 14 whole large eggs in a single layer in a large saucepan. Add enough cold water to cover the eggs by 1 inch. Stir in the 1 teaspoon white vinegar—this helps prevent the yolks from turning greenish-gray. Bring to a rolling boil over high heat, then immediately reduce to a gentle simmer for exactly 10 minutes.
Set a timer and don’t peek! The moment the timer dings, transfer the eggs to an ice bath (a bowl of cold water with ice cubes) for 10 minutes. This stops the cooking process and makes peeling easier. You’ll know they’re done when the yolks are set but still slightly jiggly—this ensures perfect texture for deviling.
🥘 Step 2: Prepare the Yolk Filling Mixture
While the eggs cool, whisk together the 0.5 cup mayonnaise, 1 tablespoon Dijon mustard, and 1 teaspoon yellow mustard in a medium bowl until smooth. Add the 0.5 teaspoon kosher salt, 0.25 teaspoon freshly ground black pepper, and 0.25 teaspoon smoked paprika, whisking until fully combined.
Here’s the thing—this is where the magic happens. The smoked paprika adds subtle depth, while the Dijon mustard gives that perfect tang. I like to press a plastic wrap directly onto the surface of the mixture to prevent a skin from forming while we work with the eggs.
🔪 Step 3: Halve and Remove the Egg Yolks
Gently tap each egg on a hard surface to crack the shell all over, then peel under cool running water. Using a small spoon or melon baller, carefully remove the yolks and place them in a separate bowl. Add the 1 teaspoon lemon juice to the yolks—this keeps them bright and prevents any bitterness from developing.
Mash the yolks with a fork until completely smooth, then add them to the filling mixture. Stir gently to combine—you want to maintain that creamy texture. If the mixture seems too thick, add just a splash of water to loosen it slightly. The filling should be smooth enough to pipe but still hold its shape.
👨🍳 Step 4: Fill and Garnish the Egg Whites
Using a small spoon or piping bag, carefully fill each egg white half with the yolk mixture. I like to pack it in firmly but not overfill—this prevents leaks and ensures clean presentation. Place the filled halves on a serving platter or individual plates.
Garnish immediately with the 2 tablespoons chopped fresh chives and a tiny drizzle of hot sauce if using. The chives add freshness and a pop of color, while the hot sauce gives that final kick of heat. For extra flair, I like to arrange them in a circular pattern on the platter.
⏰ Step 5: Chill and Serve for Perfect Texture
Refrigerate the deviled eggs for at least 30 minutes before serving—this allows the flavors to meld and the filling to set slightly. The chilling time is crucial for that perfect balance of creamy filling and firm egg whites that hold their shape.
Serve with toothpicks for easy handling. Each bite should deliver that creamy yolk filling with perfect texture—neither too runny nor too thick. The lemon juice brightens the flavor, while the smoked paprika adds just the right amount of warmth. Enjoy immediately for the best experience!
Pro Tips For Making 14 Deviled Eggs
- Boil Eggs 9 Minutes: I learned this the hard way—undercooked yolks turn to mush when you slice, and overcooked ones dry out. Set a timer for exactly 9 minutes in simmering water (not rolling boil), then plunge into ice water for 5 minutes. The whites will hold shape, and the yolks stay creamy.
- Use Room-Temp Eggs: Cold eggs from the fridge shock the filling and make it separate. Let them sit in warm water for 10 minutes before boiling—this keeps the yolks intact and the filling smooth. (Yes, even if you’re impatient like me.)
- Mix Filling Slowly: Dumping all the mayo and mustard into the yolks at once can turn the filling into a greasy mess. Start with half the mayo, then add mustard gradually while stirring gently—this prevents lumps and keeps the texture uniform.
- Salt the Filling First: Taste the yolk-mayo mixture before adding salt to the finished eggs. If you wait, you’ll end up with bland halves and over-salted filling. A pinch of kosher salt in the mix makes all the difference—trust the process.
Dietary considerations for this 14 deviled eggs
Egg Allergy Adaptations
If you’re serving guests with egg allergies, this recipe isn’t suitable as-is—but there are creative workarounds. For a similar texture, try avocado-based deviled eggs: blend 1 ripe avocado with 2 tbsp Greek yogurt, 1 tsp lemon juice, and your seasonings.
The result is creamy without eggs. Always confirm with the host about severity, as even trace amounts can be dangerous. 🥑
Gluten-Free Considerations
This recipe is naturally gluten-free since it contains no wheat-based ingredients. However, double-check your mayonnaise and mustard brands—some contain hidden gluten. I recommend Hellmann’s Gluten-Free Mayo and Maille Dijon Mustard (certified gluten-free). Always read labels, as formulations can change. The smoked paprika and chives are also safe choices.
Dairy-Free Options
To make this recipe dairy-free, simply swap the mayonnaise for a high-quality vegan mayo like Just Mayo or Sir Kensington’s. The texture will be slightly lighter but still creamy. For extra richness, add 1 tbsp olive oil to the filling mixture.
The Dijon mustard and lemon juice keep the tangy brightness intact, while the smoked paprika adds depth without dairy.
Lower-Calorie Modifications
For a lighter version, replace half the mayo with non-fat Greek yogurt—it reduces calories by about 40% per serving while keeping the creaminess. Use 1 tbsp Greek yogurt + 2 tbsp light mayo instead of the full ½ cup mayo.
Skip the smoked paprika (it adds minimal calories but noticeable flavor) and boost the lemon juice to 2 tsp for brightness. The result is still indulgent but with fewer calories.
Vegan Substitutions
For a fully vegan version, use silken tofu as the base. Blend 1 cup silken tofu with 2 tbsp vegan mayo, 1 tbsp Dijon mustard, and 1 tsp lemon juice until smooth.
Add seasonings as directed. The texture will be firmer, so pipe into halved cherry tomatoes or bell pepper halves instead of egg whites. Garnish with chives or a sprinkle of paprika for color.
Nutrition facts
Frequently asked questions
Why do my deviled egg fillings turn out runny?
Overmixing the yolks creates air pockets that make the filling too light and runny. Instead, mash the yolks just until smooth, then gently fold in the mayo mixture. Also, ensure your eggs are fully cooked but not overdone—overcooked yolks release more moisture. For extra stability, chill the filled eggs for 30 minutes before serving.
Can I make deviled eggs ahead of time?
Prepare the filling and fill the egg whites up to 2 days in advance. Store them in an airtight container with plastic wrap pressed directly on the filling to prevent drying. Refrigerate until ready to serve. The flavors actually meld better over time, making them taste even more delicious at your gathering.
What’s the best way to peel hard-boiled eggs?
Start by rolling the eggs gently on a hard surface to crack the shell all over, then place them in an ice bath for 5 minutes to firm up the whites. Tap the egg on a counter to loosen the shell, then peel under cool running water—the water helps separate the membrane from the white. Use your fingers to gently lift the shell away in one piece.
How do I keep the egg whites from cracking when filling?
Use a spoon or piping bag to carefully pack the filling into the whites, but don’t overfill—leave about 1/4 inch space at the top. For extra stability, press a toothpick into each filled half before chilling. This prevents leaks and keeps the filling contained. Also, work quickly to avoid warm filling from melting the whites too soon.
What’s the secret to perfectly creamy filling?
The magic is in the ratio: 1/2 cup mayo to 14 yolks gives the ideal balance. Add the Dijon mustard for tang and smoked paprika for depth, but don’t overdo it—just 1 tsp each. Press plastic wrap directly on the filling while prepping to prevent a skin from forming. For extra richness, add a pinch of sugar to balance the acidity.

- 3lb Prime Rib Roast Recipe: Juicy Pink Center Guaranteed in 3 Hours - October 31, 2026
- 5 Spice Cake Recipe: Warmly Spiced Layers With Crunchy Top - October 31, 2026
- 1950’s Macaroni and Cheese Recipe: Nostalgic Creamy Cheese Sauce with Buttery Noodles - October 31, 2026