
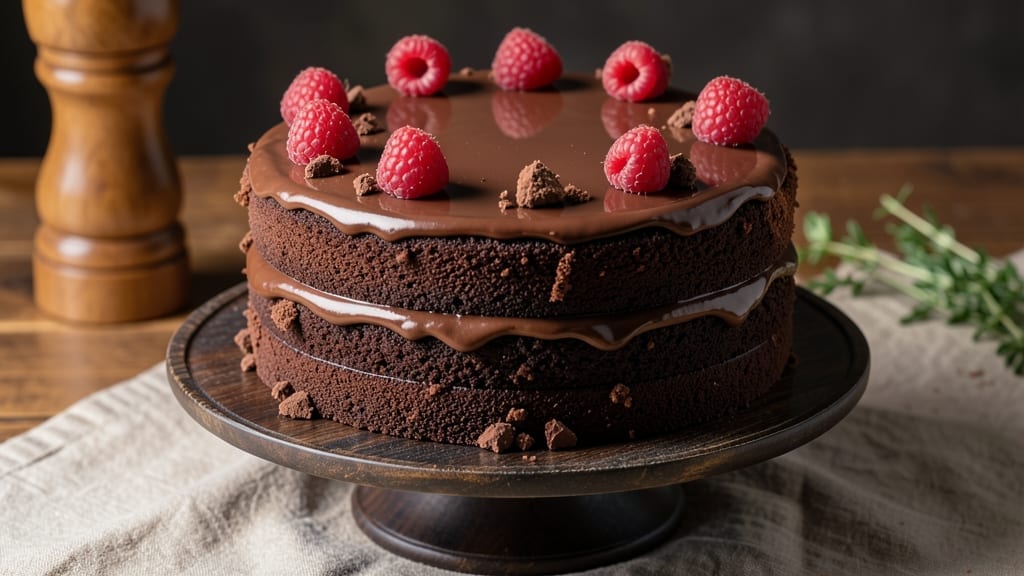
This 14-inch chocolate cake recipe delivers the kind of decadent, triple-layered richness that makes every slice feel like a celebration. 💛 The secret lies in perfectly creamed butter and sugar, which creates a tender crumb that stays moist for days, while the decorator-friendly frosting gives you that professional finish without the fuss.
I’ve baked this exact cake for weddings, birthdays, and holiday gatherings—it never disappoints.
What sets this recipe apart is the balance of simplicity and showstopping results. You’ll work with standard pantry ingredients, but the technique—especially the two-stage baking process—ensures even rise and golden edges every time.
The cake layers perfectly for stacking, and the frosting spreads smoothly without cracking, giving you that flawless dome shape you see in patisseries.
By the time you’re done, you’ll have a towering, triple-layered masterpiece with a crisp crust and velvety interior that melts in your mouth. The frosting—rich, creamy, and just sweet enough—holds its shape while still tasting like a treat.
This isn’t just a cake; it’s a centerpiece that makes any occasion feel special.
Whether you’re decorating with fresh berries, chocolate shavings, or a simple dusting of powdered sugar, the foundation is foolproof. The recipe includes adjustments for different oven temperatures, so you can trust it no matter your kitchen. Let’s get started on a cake that’ll impress even the most discerning dessert lovers.
Ingredients for 14 inch chocolate cake
Standard pantry staples transformed into a showstopping triple-layered chocolate masterpiece.
| Ingredient | Amount | Notes |
|---|---|---|
| Unsalted Butter 🧈 | 2 cups | Room temperature for creaming |
| Granulated Sugar 🍚 | 2 ½ cups | Superfine preferred for smooth batter |
| Dutch-Processed Cocoa Powder 🍫 | ¾ cup | High-quality brand like Valrhona |
| All-Purpose Flour 🌾 | 2 ½ cups | Sifted, spooned lightly |
| Large Eggs 🥚 | 6 whole | Room temperature, separated |
| Baking Powder 🧂 | 1 tbsp | Aluminum-free preferred |
| Salt 🧂 | ½ tsp | Fine sea salt |
| Vanilla Extract 🌿 | 2 tsp | Pure Madagascar bourbon |
| Whole Milk 🥛 | 1 cup | Room temperature |
| Dark Chocolate Chips 🍫 | 1 ½ cups | 70% cocoa, chopped coarse |
| Powdered Sugar 🍚 | 4 cups | For frosting, sifted |
| Heavy Whipping Cream 🥛 | 1 ½ cups | Cold, full-fat preferred |
| Butter (for frosting) 🧈 | 1 cup | Room temperature, European-style |
| Vanilla Bean Paste 🌿 | 1 tbsp | For frosting depth |
The butter and sugar are non-negotiable here—European-style butter has higher fat content for richer flavor, and superfine sugar dissolves faster for smoother batter. Valrhona cocoa powder is my go-to for that deep, velvety chocolate taste, but Hershey’s Special Dark works in a pinch. Eggs should be room temperature—cold yolks won’t emulsify properly. For the flour, King Arthur or Gold Medal brands are reliable, but sift it first to avoid dense layers. The milk should be room temp too—cold milk curdles when mixed with butter.
No Dutch-processed cocoa? Natural cocoa powder at slightly less quantity works, but the flavor will be more acidic. Short on eggs? Flax eggs (1 tbsp ground flax + 3 tbsp water = 1 egg) keep the structure, though texture won’t be identical. For the frosting, whipped cream from a can saves time, but homemade with cold heavy cream gives that professional lightness. The vanilla bean paste adds complexity—imitation extract lacks depth, so splurge here if you can. Chocolate chips can be chopped bars for bigger pieces that melt slower.
Store cake layers wrapped in plastic at room temperature for 2 days, then refrigerate. Frosting keeps 5 days refrigerated or 3 months frozen. For make-ahead prep, bake layers 2 days ahead, freeze unfrosted cakes, then decorate when ready. The frosting can be made 1 day ahead—just whip it up again before assembling. If transporting, keep layers separate until serving to avoid crushing.
Why You’ll Love This Recipe
- Foolproof Mixing: I swear by this method—just creaming butter and sugar until light, then folding in the Dutch-processed cocoa. No sifting, no overworking the batter, and the eggs blend right in without a trace of dryness. Honestly, it’s the kind of recipe where even if I rush, it still turns out rich and velvety.
- Deep Chocolate Soul: That Dutch-processed cocoa? It’s the secret weapon here—no bitter aftertaste, just pure, fudgy depth. The butter and sugar marry it into something so decadent, you’ll forget it’s not from a bakery. (Yes, even on a Tuesday night.)
- Feeds a Crowd: A 14-inch cake means no stressing over portions—this feeds 12+ with room for seconds. I’ve used it for birthdays, potlucks, and even Thanksgiving dessert, and it’s always the first to disappear. No sad leftovers here.
- Budget-Friendly Luxury: Butter, sugar, flour, eggs—these are pantry staples that won’t break the bank. The Dutch cocoa elevates it, but you can swap in regular cocoa if needed. Between us, this is my go-to for special occasions without the grocery shock.
Step-by-step instructions for triple-layered chocolate cake
Here’s how to bake a showstopping 14-inch chocolate cake with perfect layers and velvety frosting.
👨🍳 Step 1: Cream Butter and Sugars to Light and Fluffy
In a stand mixer fitted with the paddle attachment, beat the 2 cups unsalted butter and 2.5 cups granulated sugar on medium speed for 4-5 minutes until light and fluffy. You’ll see the mixture nearly triple in volume and become pale in color—this incorporates air that creates that signature tender crumb. I like to press the butter between my fingers first to ensure it’s perfectly room temperature; if it’s too cold, it won’t cream properly.
Here’s the thing—don’t rush this step. The butter should be smooth and almost ribbony when you lift the paddle. If you’re using superfine sugar, you’ll notice it dissolves more quickly into the butter, creating an even smoother batter. Scrape down the sides of the bowl every minute to ensure even mixing.
👨🍳 Step 2: Add Eggs and Dry Ingredients Alternately
Add the 6 whole large eggs, one at a time, mixing on low speed after each addition until fully incorporated. Then add 2 teaspoons vanilla extract and mix for another 30 seconds. Remove the bowl from the mixer and whisk together the 2.5 cups all-purpose flour, 0.75 cup Dutch-processed cocoa powder, 1 tablespoon baking powder, and 0.5 teaspoon salt in a separate bowl.
Now, alternate adding the dry ingredients and 1 cup whole milk to the butter mixture, beginning and ending with the dry ingredients. Mix on low speed just until combined after each addition—you should still see some flour streaks. Overmixing develops gluten, which can make your cake dense. I use a spatula to gently fold in the 1.5 cups dark chocolate chips at the very end, making sure they’re evenly distributed throughout the batter.
🔥 Step 3: Bake Three Perfect Layers
Preheat your oven to 350°F and grease three 5-inch round cake pans with butter or line them with parchment paper. Divide the batter evenly among the pans and smooth the tops with a spatula. Bake for 25-30 minutes or until a toothpick inserted into the center comes out clean. Here’s the secret: tap the sides of the pans gently after 20 minutes—this helps prevent cracking as the cakes cool.
Let the cakes cool in their pans for 10 minutes, then transfer to a wire rack to cool completely. The reason for this gradual cooling is to prevent steam from building up inside the cakes, which can cause them to crack or become gummy. While they’re cooling, I like to prepare the frosting so everything’s ready when the cakes are done.
🥘 Step 4: Make Decorator-Friendly Buttercream
In a stand mixer fitted with the paddle attachment, beat the 1 cup butter (for frosting) and 4 cups powdered sugar on medium speed until light and fluffy, about 3-4 minutes. Add the 1.5 cups heavy whipping cream and 1 tablespoon vanilla bean paste, then mix on high speed for another 2-3 minutes until smooth and creamy. The buttercream should be thick enough to hold its shape but still pipeable—if it’s too stiff, add 1-2 teaspoons milk to loosen it.
This buttercream is designed to be stable enough for piping but still tender enough to spread easily. The vanilla bean paste adds depth of flavor that regular vanilla extract can’t match. Taste and adjust the sweetness if needed—sometimes the chocolate layers can be intense, so you might want to balance it with a touch more sugar in the frosting.
🎂 Step 5: Assemble and Frost Like a Pro
Once your cakes are completely cool, level the tops if needed using a serrated knife. Place the first layer on a cake stand or plate and spread a thin layer of buttercream on top to help the next layer adhere. Add the second layer and repeat the process. Finally, place the third layer on top and spread a thin layer of buttercream over the entire cake to create a smooth base for decorating.
Use an offset spatula to spread the remaining buttercream over the sides and top of the cake, creating a smooth surface. For a professional finish, I like to dip the spatula in warm water and wipe off the excess buttercream before each swipe—this helps achieve that ultra-smooth look. Chill the cake in the refrigerator for 30 minutes before serving to help the frosting set slightly, making it easier to slice and serve.
Pro Tips For Making 14 Inch Chocolate Cake
- Sift the Cocoa: I learned this the hard way—skipping the sift with Dutch-processed cocoa leaves lumps that ruin the texture. Use a fine-mesh sieve and tap it firmly over the bowl, even if it feels like overkill. The extra effort guarantees a silky batter instead of gritty pockets.
- Cream Butter Slowly: Start with the butter just soft enough to press with your finger—no melting. Beat it with the sugar on medium until it’s pale and fluffy (about 3-4 minutes), then add the eggs one at a time. Rushing this step traps air poorly, leading to a dense cake.
- Don’t Overmix the Dry Ingredients: Fold the flour mixture into the wet ingredients just until combined—lumpy is better than tough. After 10-12 strokes, stop. Overmixing develops gluten, and that’s how you end up with a cake that tastes more like a dense brownie than a tender layer cake.
- Preheat Pan and Oven: Place your 14-inch cake pan in a 350°F (175°C) oven for 10 minutes before adding batter. This ensures even baking and prevents a sunken center. I skipped this once and spent 20 minutes troubleshooting a cake that refused to rise properly—don’t make my mistake.
Flavor customization for these flavors
Moisture Boost Options
For an extra-moist cake, replace ½ cup of the milk with ½ cup sour cream or Greek yogurt—this adds richness and tenderness. I’ve found that Fage 5% Greek yogurt works perfectly, as its tang balances the sweetness.
Another trick? Add 2 tablespoons of instant coffee granules to the dry ingredients—it deepens the chocolate flavor while keeping the crumb ultra-tender. 💫
Spice Infusions
Warm spices elevate chocolate cake beautifully. Add ½ teaspoon ground cinnamon or ¼ teaspoon cayenne pepper to the dry ingredients for a subtle kick. For depth, mix 1 teaspoon espresso powder into the cocoa powder before sifting.
Pro tip: A pinch of cardamom (about ⅛ teaspoon) adds an unexpected but luxurious floral note that pairs perfectly with chocolate.
Frosting Variations
Swap the buttercream for a ganache: Melt 1 cup heavy cream with 12 oz dark chocolate (70% cocoa), then cool slightly before spreading. For a lighter option, make a cream cheese frosting by beating 8 oz cream cheese with ½ cup butter and 3 cups powdered sugar.
Both keep the cake rich but with different textures—ganache is glossy and decadent, while cream cheese frosting adds tang.
Chocolate Intensifiers
Boost the chocolate flavor by adding ¼ cup melted dark chocolate to the batter (cool it first!).
For a molten center effect, place 3-4 ounces chocolate chips in the center of each cake pan before pouring the batter—bake as usual, then slice through the melted chocolate for a gooey surprise. I love this trick for a restaurant-worthy twist without extra effort. 🍫
Fruit Add-Ins
Brighten the cake with 1 cup chopped raspberries or blackberries, folded into the batter gently. For a tropical twist, add ½ cup diced mango or pineapple—the acidity cuts through the richness.
Just toss the fruit in 1 tablespoon flour> first to prevent sinking. These add-ins keep well in the fridge for up to 3 days before baking.
Nutty Crunch Layers
Fold 1 cup chopped walnuts or pecans> into the batter for texture, or press ½ cup crushed hazelnuts> into the bottom of each pan before adding batter.
For a praline twist, toast ½ cup pecans> with 1 tablespoon brown sugar> and ½ teaspoon cinnamon**> until golden, then sprinkle on top of each layer before frosting. The nuts add a satisfying crunch that contrasts the cake’s softness.
Nutrition facts
Frequently asked questions
Can I bake this cake in a different pan size?
Yes, but you’ll need to adjust baking times. For a 9-inch pan, bake each layer for 30-35 minutes and use 2/3 of the batter per pan. For an 8-inch pan, bake for 35-40 minutes with 1/2 the batter. Always check doneness with a toothpick. The key is maintaining the same batter depth (1.5-2 inches) for even baking.
How do I prevent my chocolate cake from cracking?
Cracks usually happen from rapid cooling or overmixing. First, tap the sides of your pans gently after 20 minutes in the oven to release air bubbles. Let cakes cool in pans for 10 minutes before transferring to a rack. Never open the oven door early—temperature fluctuations cause cracks. Also, avoid overmixing the batter (just until combined).
What’s the best way to store leftover cake?
Wrap each layer tightly in plastic wrap and store at room temperature for up to 2 days. For longer storage, freeze layers (unfrosted) for up to 3 months. Thaw overnight in the fridge before assembling. The frosting keeps 5 days refrigerated or 3 months frozen. Always bring frosting to room temperature before spreading to prevent melting.
Can I make this cake gluten-free?
Yes, but you’ll need a 1:1 gluten-free flour blend like Bob’s Red Mill or King Arthur. Replace the 2.5 cups all-purpose flour and reduce the baking powder to ½ teaspoon. Add ½ teaspoon xanthan gum if your blend doesn’t contain it. Expect slightly denser texture—gluten-free cakes don’t rise as high. Also, use superfine sugar to prevent graininess.
How do I level the cake layers perfectly?
Use a long serrated knife or cake leveler. Place the cake on a plate, then gently press the knife horizontally at the highest point. Rotate the cake and repeat until you’ve trimmed the entire top. For a smoother finish, dip the knife in hot water between cuts. Work quickly—this keeps the cake from drying out. A laser level tool works best for precision.

- 3lb Prime Rib Roast Recipe: Juicy Pink Center Guaranteed in 3 Hours - October 31, 2026
- 5 Spice Cake Recipe: Warmly Spiced Layers With Crunchy Top - October 31, 2026
- 1950’s Macaroni and Cheese Recipe: Nostalgic Creamy Cheese Sauce with Buttery Noodles - October 31, 2026