
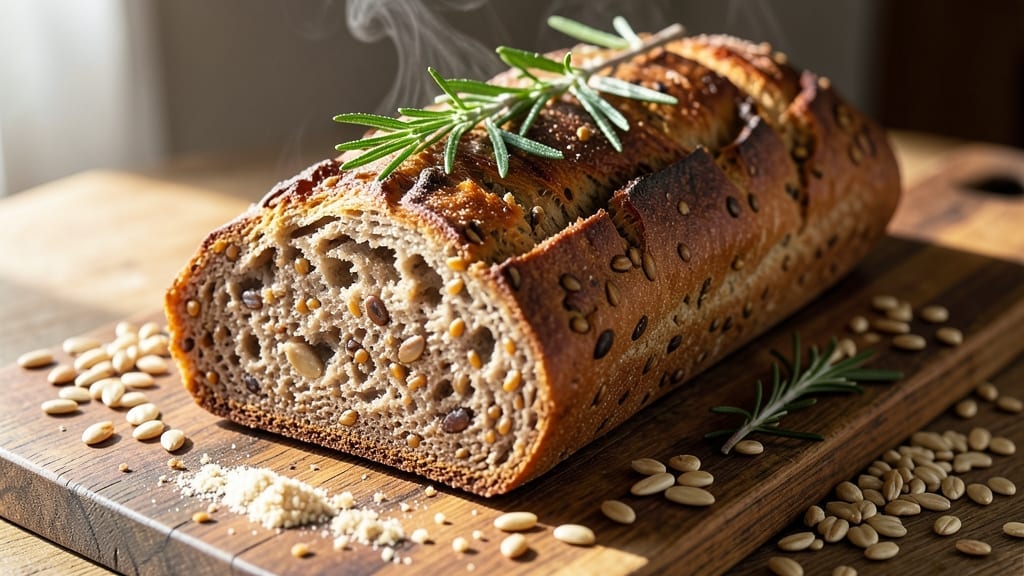
This 15-grain bread recipe delivers a loaf with nutty depth, chewy texture, and a satisfying crunch—perfect for sandwiches, toast, or serving alongside soups. 🌾 The secret lies in balancing 15 whole grains (including farro, spelt, and rye) for a hearty bite, while precise hydration and kneading create an open crumb structure that holds up beautifully.
Unlike store-bought loaves, this recipe builds flavor through slow fermentation, transforming simple ingredients into something truly special.
The process begins with a hydration ratio of 75%—just enough moisture to develop gluten without making the dough sticky.
After an initial 30-minute knead, the dough rests for 2 hours at room temperature, allowing flavors to meld before a 12-hour cold fermentation (overnight in the fridge) for enhanced complexity.
This slow rise isn’t just about flavor—it’s what makes the crust crisp yet tender, with a golden-brown hue that’s impossible to resist.
Baking at 375°F with steam ensures a crisp exterior and even rise, while scoring the loaf before baking prevents cracking. The result? A hearty, nutty loaf with a satisfying snap and a crumb so open it feels almost airy.
Each slice reveals layers of toasted grains, making this bread as beautiful as it is delicious. Whether you’re a home baker or a novice, this recipe delivers professional-quality results with minimal fuss.
For extra flavor, consider adding sunflower seeds, flaxseeds, or herbs to the dough, or brush the crust with garlic-infused olive oil after baking. Store wrapped at room temperature for 3–4 days or freeze for up to 3 months—though it’s unlikely to last that long. Let’s get baking!
Ingredients for 15 grain bread
Fifteen grains, precise ratios, and slow fermentation transform simple ingredients into artisan-quality bread.
| Ingredient | Amount | Notes |
|---|---|---|
| Bread Flour 🌾 | 2 ½ cups | High-protein for structure |
| Farro Grains 🌾 | ½ cup | Toasted for nutty depth |
| Spelt Berries 🌾 | ½ cup | Soaked overnight for digestibility |
| Rye Flour 🌾 | ½ cup | Dark rye for earthy flavor |
| Whole Wheat Flour 🌾 | ½ cup | For chewy texture |
| Oat Groats 🌾 | ½ cup | Steamed for tenderness |
| Buckwheat Flour 🌾 | ¼ cup | Gluten-free for complexity |
| Amaranth Grains 🌾 | ¼ cup | Toasted for crunch |
| Quinoa Flakes 🌾 | ¼ cup | Lightly toasted |
| Millet Flour 🌾 | ¼ cup | Fine texture preferred |
| Barley Flour 🌾 | ¼ cup | For malty undertones |
| Wild Rice Flour 🌾 | ¼ cup | Subtle nutty flavor |
| Sunflower Seeds 🌻 | ¼ cup | Toasted for crunch |
| Flaxseeds 🌿 | 2 tbsp | Ground for omega-3s |
| Active Dry Yeast 🍞 | 1 tbsp | Freshly opened for vitality |
| Honey 🍯 | 2 tbsp | Wildflower preferred |
| Salt 🧂 | 1 ½ tsp | Diamond Crystal preferred |
| Extra-Virgin Olive Oil 🫒 | ½ cup | For dough elasticity |
| Water 💧 | 1 ½ cups | Room temperature |
| Garlic-Infused Olive Oil 🧄🫒 | 2 tbsp | For brushing crust |
The grains are the heart of this recipe—each contributes unique texture and flavor. Farro and spelt need soaking (overnight in cold water) to soften, while rye and whole wheat add depth without overpowering. For seeds, King Arthur or Bob’s Red Mill brands provide consistent quality. Toast your grains lightly in a dry pan before grinding to enhance their nutty profiles—this step is non-negotiable for flavor development. The 75% hydration ratio balances moisture with structure, preventing a gummy crumb while allowing proper gluten development.
No farro? Substitute with additional spelt or barley—both work similarly. Short on sunflower seeds? Pumpkin seeds at equal measure offer comparable crunch. For gluten-free adaptation, replace bread flour with brown rice flour (reduce hydration by 5%). The yeast should be freshly opened—test its vitality by dissolving 1 tsp in warm water with 1 tsp sugar; if it foams within 10 minutes, it’s active. Honey can be swapped for maple syrup, though it may slightly alter fermentation timing.
Store the loaf wrapped in a clean kitchen towel at room temperature for 3–4 days—this maintains freshness while preserving the crust’s crispness. For longer storage, freeze unwrapped for up to 3 months; thaw at room temperature before serving. The garlic-infused olive oil brushes best when applied immediately after baking—this creates that signature golden crust while infusing subtle garlic notes. Portion seeds in small batches to prevent burning during toasting.
Why You’ll Love This Recipe
- No-Knead Magic: I swear by this—just mix, let it rise overnight, and bake. The farro and spelt do all the heavy lifting while you sleep, so you’re not stuck babysitting dough all day.
- Nutty Crunch Perfection: That toasted farro and rye? It’s like biting into a warm, chewy hug with a little crunch. Honestly, I’ve never met a slice of bread that hits this hard.
- Meal Prep MVP: Slices beautifully for sandwiches, freezes like a dream for quick toast, and even holds up to grilled cheese without falling apart. (Yes, even on a Tuesday night.)
- Budget-Friendly Powerhouse: Uses pantry staples and bulk grains—no fancy ingredients, just real flavor. I’ve made a loaf for under $3, and it feeds my whole family for days.
Step-by-step instructions for 15-Grain bread
This method ensures a perfectly balanced loaf with a nutty crust and dense, flavorful crumb.
👨🍳 Step 1: Prepare the Grains and Seeds
Toast the 0.5 cup farro grains, 0.25 cup amaranth grains, and 0.25 cup quinoa flakes in a dry skillet over medium heat for 5-6 minutes, stirring constantly until fragrant and lightly golden. This enhances their nutty flavors and prevents a raw taste in the bread.
While still warm, transfer the toasted grains to a food processor and pulse until they reach a coarse meal consistency—think of it as a cross between flour and crumbs. Set aside. In a separate bowl, toast the 0.25 cup sunflower seeds and 2 tbsp flaxseeds in the same skillet for 3-4 minutes until golden and aromatic. Let them cool completely before adding to your mix.
👨🍳 Step 2: Mix the Dough Components
In a large mixing bowl, combine the toasted grain mixture with 2.5 cups bread flour, 0.5 cup rye flour, 0.5 cup whole wheat flour, 0.5 cup oat groats, 0.25 cup buckwheat flour, 0.25 cup millet flour, 0.25 cup barley flour, and 0.25 cup wild rice flour. Whisk thoroughly to distribute the toasted grains evenly throughout the dry ingredients.
In a separate bowl, dissolve the 1 tbsp active dry yeast in the 1.5 cups room-temperature water with 2 tbsp honey. Let it sit for 5-10 minutes until frothy—this confirms the yeast is active. Add the yeast mixture, 0.5 cup extra-virgin olive oil, and 1.5 tsp salt to the dry ingredients. Stir with a wooden spoon until a shaggy dough forms.
🍳 Step 3: Knead and Develop Gluten
Turn the dough onto a lightly floured surface and knead for 8-10 minutes until smooth and elastic. You’re aiming for a dough that springs back slowly when poked. The high grain content makes this dough denser than standard bread dough, so don’t be surprised if it feels slightly sticky—this is normal.
For best results, I use a stand mixer fitted with a dough hook, kneading on medium speed for 5-6 minutes. The mixer ensures consistent gluten development without overworking the delicate grain components. Once kneaded, place the dough in a lightly oiled bowl, cover with a damp towel, and let it rise in a warm place for 1-1.5 hours or until doubled in size.
⏰ Step 4: Shape and Proof the Loaf
Punch down the risen dough to release air, then divide it into two equal portions. Shape each into a round boule by pulling the edges toward the center and sealing tightly. Place the shaped loaves on a parchment-lined baking sheet, seam-side up. Cover loosely with plastic wrap and let them proof for another 30-45 minutes until they’ve risen about 25-30%.
Here’s the thing—this dough is dense, so don’t expect dramatic rises. Instead, look for a gentle expansion and slightly rounded tops. Brush the loaves generously with 2 tbsp garlic-infused olive oil before baking to create that coveted nutty crust and add extra flavor.
🔥 Step 5: Bake for Maximum Crust Development
Preheat your oven to 375°F with a Dutch oven inside for 30 minutes. This creates a steam environment that’s crucial for the bread’s texture. Carefully transfer the loaves to the hot Dutch oven and bake, covered, for 30 minutes. Then remove the lid and bake for another 15-20 minutes until the crust is deep golden brown and the internal temperature reaches 205-210°F.
For that perfect crust, I like to sprinkle a few extra sunflower seeds on top during the final baking stage. The bread should sound hollow when tapped on the bottom. Let it cool on a wire rack for at least 1 hour before slicing—this prevents a gummy crumb. The result? A loaf with a crisp, nutty exterior and a dense, flavorful interior packed with all those wholesome grains.
Pro Tips For Making 15 Grain Bread
- TOAST YOUR GRAINS: Farro and spelt berries taste bland straight from the package—I learned this the hard way. Dry-toast them in a 350°F oven for 10-15 minutes before adding to the dough. The nuttiness deepens, and your bread won’t taste like you’re chewing on wet cardboard.
- PRE-SOAK THE RYE: Rye flour absorbs moisture like a sponge, and mixing it dry into your dough is a recipe for gummy bread. Mix it with warm water (about 1/4 cup per 1/2 cup rye) and let it sit for 30 minutes before combining with the rest of the dough. Your future self will thank you—yes, even if you’re impatient like me.
- KNEAD LESS, STRETCH MORE: This isn’t your standard white bread—over-kneading turns the farro and whole wheat into a dense brick. After the initial mix, do 3-4 sets of 30-second stretches instead of long kneading sessions. The gluten will develop just enough to hold the grains without overpowering them.
- STEAM THE FIRST 20: The grains in this bread release a ton of moisture during baking, which means a dry crust if you’re not careful. Spray the oven walls with water or place a baking sheet with boiling water on the bottom rack for the first 20 minutes. The steam keeps the top from hardening too fast—trust the process.
Pro cooking tips for this recipe
Hydration Balance
The 75% hydration ratio (1.5 cups water to 2 cups flour equivalent) is critical for this dense dough. Too much water creates a gummy crumb, while too little makes it dry and crumbly.
I weigh my flours for precision—King Arthur bread flour works best here due to its high protein content. The toasted grains absorb moisture differently, so don’t adjust water based on them alone. 💧
Kneading Precision
This dough resists traditional kneading—it’s stickier and denser than standard bread. Use a stand mixer with dough hook on medium speed for 5-6 minutes to avoid overworking. I press the dough gently to check elasticity: if it springs back slowly, it’s ready.
For hand-kneading, wet your hands frequently to prevent sticking. The goal is gluten development without breaking the grain structure.
Cold Fermentation Secret
The 12-hour cold proof in the fridge transforms this bread. Place the shaped loaves in a lightly greased bowl, cover with plastic wrap, and refrigerate. This slow fermentation enhances flavor complexity and improves texture.
I set my oven timer to wake me up—it’s worth the wait! The dough will rise about 20% during this time. ❄️
Steam is Non-Negotiable
Preheat your Dutch oven with lid for 30 minutes before baking. The steam creates that signature open crumb. I place a pan of boiling water on the lower rack for extra moisture during the first 20 minutes of baking.
Without this step, your loaves will develop a tough crust instead of the crisp, nutty exterior you want.
Scoring for Control
Use a sharp lame or razor blade to score the loaves just before baking. The crosshatch pattern prevents cracks and controls expansion. I make ¼-inch deep cuts—deeper scores can cause the bread to tear open prematurely.
This step is especially important with dense doughs that resist even rising. The cuts should be clean and confident, not hesitant. ✨
Internal Temp Check
Your bread is done when the internal temperature reaches 205-210°F. Use an instant-read thermometer—this is more reliable than color alone. The bread should sound hollow when tapped on the bottom.
I let mine bake 5-10 minutes uncovered at the end for maximum crust development. Never skip this final step—it makes all the difference in texture. 🔥
Nutrition facts
Frequently asked questions
Why does this recipe use 15 different grains?
Each grain contributes unique texture and flavor—farro adds nutty depth, rye brings earthiness, while amaranth and quinoa provide subtle crunch. The combination creates a complex, satisfying bite that single-grain breads can’t match. The toasted grains also develop deeper flavors during baking, making every slice taste like fresh-baked artisan bread.
Can I make this bread without a stand mixer?
Hand-kneading works perfectly—just wet your hands frequently to prevent sticking. Knead for 10-12 minutes on a lightly floured surface until the dough springs back slowly when poked. The dense grain content makes it stickier than standard dough, so be patient and let the dough rest between kneading sessions if needed.
How do I know when the dough is properly kneaded?
Press the dough gently with one finger—if it springs back slowly (not instantly) and the surface feels smooth, it’s ready. For this recipe, the dough should be elastic but still slightly tacky. Over-kneading can break down the grain structure, so stop when it passes the “windowpane test” (stretching a small piece until translucent).
What if my bread doesn’t rise much during proofing?
This is normal with dense grain doughs—they rise more slowly than white bread. Look for a 20-30% increase in size during cold proofing. If using active dry yeast, ensure it’s fresh (test by dissolving in warm water with sugar—it should foam within 10 minutes). For better results, try increasing proofing time by 1-2 hours or using a slightly warmer environment.
Can I substitute any of the grains for easier sourcing?
Yes! Swap wild rice flour with additional barley flour (equal measure) or replace buckwheat with millet. For texture, ensure at least 3-4 grains remain to maintain the hearty bite. Toast all substitutions lightly before using—this step enhances flavor regardless of grain type. Store-bought grain blends work too, but fresh-toasted grains yield the best results.

- 3lb Prime Rib Roast Recipe: Juicy Pink Center Guaranteed in 3 Hours - October 31, 2026
- 5 Spice Cake Recipe: Warmly Spiced Layers With Crunchy Top - October 31, 2026
- 1950’s Macaroni and Cheese Recipe: Nostalgic Creamy Cheese Sauce with Buttery Noodles - October 31, 2026