
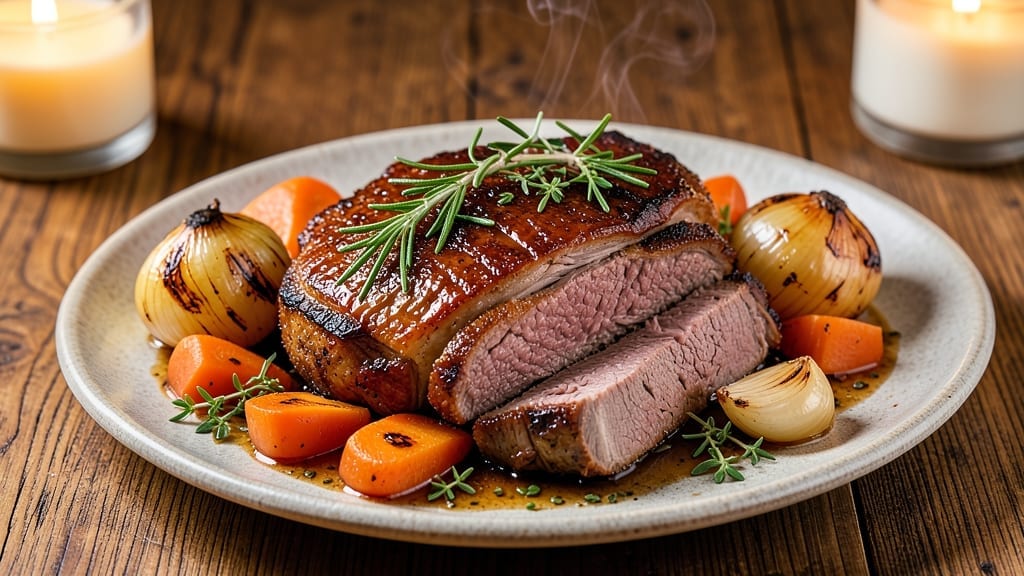
A 1.5-pound chuck roast transforms into melt-in-your-mouth perfection with slow cooking—rich, tender, and packed with deep flavor that makes every bite unforgettable. The secret lies in searing first to lock in juices, then braising until the meat falls apart effortlessly.
This method turns a tough cut into a restaurant-worthy centerpiece with minimal effort, proving slow cooking delivers results even busy weeknights can handle.
The process begins with a quick sear in a hot pan, creating a flavorful crust that holds up through hours of simmering. From there, it’s all about patience: low heat, aromatic liquids, and time work together to break down the connective tissue into silky richness.
Unlike quick-cooked cuts, chuck roast rewards slow cooking with texture that’s tender yet substantial—never mushy or dry. The aroma alone will have everyone gathering at the table.
By the time it’s done, you’ll have perfectly caramelized edges and meat so tender it practically melts off the bone. The sauce reduces into a glossy glaze that coats every bite, carrying layers of savory depth from herbs, garlic, and slow-cooked vegetables.
This isn’t just dinner; it’s a meal that feels like a celebration, even on a regular night.
Pair it with crusty bread for soaking up every last drop of sauce or serve alongside roasted potatoes and steamed greens for a complete, hearty spread. The leftovers? Even better the next day, making this the ultimate make-ahead recipe for feeding a crowd or meal prepping for the week.
Ingredients for 1.5 pound chuck roast
Gather these quality ingredients for melt-in-your-mouth chuck roast perfection.
| Ingredient | Amount | Notes |
|---|---|---|
| Chuck Roast 🥩 | 1 ½ lb | With visible marbling for tenderness |
| Yellow Onion 🧅 | 1 whole | Cut into 1-inch chunks |
| Carrots 🥕 | 3 medium | Whole, peeled, cut into 2-inch pieces |
| Garlic Cloves 🧄 | 4 cloves | Smashed with side of knife |
| Fresh Thyme 🌿 | 2 sprigs | Stems removed, leaves only |
| Fresh Rosemary 🌿 | 1 sprig | Woody stems removed |
| Beef Broth 💧 | 2 cups | Low-sodium preferred |
| Red Wine 🍷 | 1 cup | Dry, bold variety |
| Olive Oil 🫒 | 2 tbsp | For searing |
| Tomato Paste 🍅 | 2 tbsp | Smooth, no sugar added |
| Salt 🧂 | 1 ½ tsp | Kosher or sea salt |
| Black Pepper 🌶️ | 1 tsp | Freshly ground |
| Balsamic Vinegar 🍶 | 1 tbsp | For finishing |
The chuck roast is non-negotiable here—look for pieces with good marbling at your local butcher or grocery store’s meat counter. Costco or Whole Foods often carry excellent cuts, but don’t overlook your neighborhood butcher if they offer dry-aged options. Fresh herbs make all the difference: thyme and rosemary should smell vibrant, not dried out. For the wine, any bold red—Cabernet Sauvignon, Merlot—works perfectly. If you prefer not to use alcohol, beef broth with an extra splash of balsamic delivers similar depth.
No red wine? Substitute with an extra 1/2 cup beef broth plus 1 tbsp balsamic vinegar. Swap fresh thyme for 1/2 tsp dried thyme if needed, but fresh is ideal. The tomato paste can be omitted entirely if you dislike its texture, though it adds richness. For extra flavor, add 1 tsp Worcestershire sauce if you’re not avoiding it. The carrots and onions can be pre-cut to save time—just store them in a sealed container in the fridge for up to 5 days. If using baby carrots, no need to peel them.
Prep ahead by cutting all vegetables and measuring spices the night before—this roast practically cooks itself after the initial sear. Store any prepped ingredients in airtight containers in the fridge for up to 3 days. The finished roast reheats beautifully: 350°F for 20-30 minutes covered with foil, or microwave in 1-minute intervals until warmed through. Leftovers keep for 4-5 days in the fridge or 3 months frozen. Portion into individual containers for easy lunches—every bite tastes even better the next day.
Why You’ll Love This Recipe
- No-Chop Night: I swear by the “chop if you want to” rule here—just slice those onions and carrots into big chunks, toss them in, and forget about it. The roast does all the work while you sip wine and pretend you’re a fancy chef.
- Thyme for Magic: That little sprig of fresh thyme? It turns this into something restaurant-worthy without trying. The garlic cloves sizzling in the pan? Pure golden flavor that makes the whole kitchen smell like Sunday dinner.
- Leftovers I’ll Beg For: Between us, the second day is even better. The roast gets tender enough to shred, and I’ll eat it cold in sandwiches or reheated with mashed potatoes—no judgment. It’s my secret weapon for lazy days.
- Budget Beef Bonanza: A 1.5-pound chuck roast feeds four for under $10, and the veggies stretch it further. Honestly, I’d call this the most honest meal I’ve ever made—tastes expensive, costs pennies. (Yes, even on a Tuesday night.)
Step-by-step instructions for slow-cooked chuck roast
Transform tough chuck roast into tender, flavorful perfection with this method.
Sear the Chuck Roast for Maximum Flavor
Heat a Dutch oven over medium-high heat and add 2 tablespoons olive oil. Once hot, place the 1.5 lb chuck roast in the pan, searing on all sides until deeply browned—about 4-5 minutes per side. This step develops the Maillard reaction, creating rich, caramelized flavors that penetrate the meat during cooking.
Remove the roast and set it aside. In the same pot, add the 1 whole yellow onion cut into chunks and the 3 medium carrots cut into pieces. Cook for 3-4 minutes until the onions begin to soften. This jump-start builds layer upon layer of flavor in your finished dish.
Build the Flavor Base with Aromatics
Add the 4 smashed garlic cloves, 2 sprigs fresh thyme, and 1 sprig fresh rosemary to the pot, stirring for 30 seconds until fragrant. The garlic should sizzle slightly and release its aroma—this is when the herbs begin to infuse their essence into the oil.
Sprinkle in 1.5 teaspoons salt and 1 teaspoon black pepper, stirring to coat the vegetables evenly. Then add 2 tablespoons tomato paste and cook for 1 minute, stirring constantly. This creates a flavorful paste that will form the foundation of your sauce.
Deglaze and Simmer the Roast
Pour in the 1 cup red wine and scrape up any browned bits from the bottom of the pot. Let it simmer for 2-3 minutes until the wine reduces by half. This deglazing step captures all the concentrated flavors that would otherwise be lost.
Return the seared chuck roast to the pot. Add the 2 cups beef broth, ensuring the roast is mostly submerged. Bring to a gentle boil, then reduce heat to low and cover. Let it simmer for 2.5 hours—this slow cooking time is crucial for breaking down the tough muscle fibers.
Finish with Balsamic and Rest
After 2.5 hours, stir in the 1 tablespoon balsamic vinegar. This final touch adds depth and a subtle tang that complements the rich flavors. Let the roast cook uncovered for another 15-20 minutes to allow the sauce to thicken slightly.
Remove the roast from the pot and let it rest for 15 minutes before slicing. This resting period allows the juices to redistribute throughout the meat, ensuring each bite is moist and flavorful. The vegetables in the pot will be tender and infused with all the beautiful flavors you’ve built.
Pro Tips For Making 1.5 Pound Chuck Roast
- SEAR THE ROAST FIRST: Chuck roast needs that crust—don’t skip the initial sear. Hit the meat with high heat for 3-4 minutes per side until deep brown, then pull it out. I used to rush this, and the flavor was always flat. That crust locks in juices when it slow-cooks later.
- CHOP ONIONS THICK: Thin slices turn mushy—cut yellow onions into ½-inch chunks instead. They’ll hold shape and caramelize better, adding texture without disappearing. (Yes, even if it looks uneven—it’s worth it.)
- DON’T OVERCROWD THE PAN: If you’re sautéing garlic and onions, spread them out. A crowded pan steams instead of browns, and you’ll end up with bland, watery aromatics. Give them space to crisp—it makes a real difference.
- REST THE MEAT UNDER FOIL: After cooking, transfer the roast to a cutting board and tent it loosely with foil for 10 minutes. This keeps it warm while juices redistribute—slicing too soon means dry, stringy meat. (Your future self will notice.)
Flavor customization for these flavors
Herb Variations
Swap out the thyme and rosemary for other aromatic herbs based on what you have. Try 1 sprig fresh sage and 1 sprig fresh oregano for a Mediterranean twist, or add ½ teaspoon dried marjoram for a subtle citrus note.
I love using fresh bay leaves (remove before serving) for an earthy depth that pairs beautifully with red wine. 🌿
Spice Level Boost
For heat lovers, add ½ teaspoon crushed red pepper flakes or 1 teaspoon smoked paprika when building the flavor base. If you prefer a sweeter heat, stir in 1 teaspoon brown sugar with the tomato paste.
For a slow-building spice, add ½ teaspoon cayenne pepper during the final 15 minutes of cooking. Always taste as you go!
Umami Enhancers
Deepening the umami flavor is easy with pantry staples. Stir in 1 teaspoon soy sauce or 1 tablespoon Worcestershire sauce when deglazing with wine. For extra richness, add 1 tablespoon miso paste (white or red) with the tomato paste.
I also love adding 1 teaspoon fish sauce for a Southeast Asian-inspired depth that works surprisingly well. 🍶
Sweet-Savory Balance
Add a touch of sweetness to complement the savory flavors. A 1 tablespoon honey or maple syrup stirred in with the balsamic vinegar creates a perfect balance. For a caramelized finish, sprinkle 1 teaspoon brown sugar over the roast during the last 30 minutes of cooking.
This works especially well with beef broth instead of wine.
Global Twists
Transform this classic into an international dish with simple swaps. For a French bistro style, add 1 teaspoon Dijon mustard and 1 sprig tarragon with the herbs. For an Italian version, use ½ cup crushed tomatoes instead of wine and add ½ teaspoon fennel seeds.
A Mexican-inspired roast calls for 1 teaspoon cumin and 1 chipotle pepper in adobo sauce (minced) for smoky heat.
Finishing Touches
Elevate the dish with garnishes that add texture and freshness. Top with chopped fresh parsley or cilantro for brightness, or sprinkle with toasted breadcrumbs for crunch. A drizzle of high-quality olive oil or truffle oil adds luxury.
For a pop of color, add thinly sliced radishes or pickled onions on the plate before serving. ✨
Nutrition facts
Frequently asked questions
Can I use a different cut of beef instead of chuck roast?
While chuck roast is ideal for this recipe, you can substitute with chuck eye roast or bottom round roast—both work well for slow cooking. Avoid leaner cuts like sirloin or flank steak, as they lack the connective tissue needed for tenderizing. The cooking time may vary slightly depending on fat content and marbling.
How do I know when the chuck roast is fully cooked?
The meat should be fork-tender and easily pull apart with two forks. For safety, use a meat thermometer: the internal temperature should reach 195-203°F in the thickest part. This ensures all connective tissue has broken down and the meat is safe to eat.
Can I make this recipe in a slow cooker?
Sear the roast first, then transfer it to your slow cooker with all ingredients. Cook on low for 6-8 hours or high for 3-4 hours. The liquid will reduce more slowly, so you may need to add ¼ cup broth if the roast isn’t fully submerged. The texture will be slightly different but still delicious.
What if I don’t have red wine?
No problem! Replace the wine with 1 cup beef broth plus 1 tablespoon balsamic vinegar for similar depth. For extra richness, add 1 teaspoon soy sauce or 1 tablespoon tomato paste. The dish will still be flavorful—just slightly less complex than with wine. The key is using aromatic liquids to build flavor.
How should I store and reheat leftovers?
Store leftovers in an airtight container in the fridge for 4-5 days or freeze for 3 months. To reheat, warm in a skillet with a splash of broth or water over medium-low heat until heated through (165°F). For microwave reheating, cover and heat in 1-minute intervals, stirring between each. Leftovers often taste even better the next day!

- 1 Cup Oatmeal 2 Apples Recipe: Warm Spiced Porridge With Apple Chunk Appeal - November 17, 2026
- 3 Overripe Bananas Recipe: Fluffy Pancakes With Zero Waste - November 17, 2026
- 2-Minute Pizza Recipe: Speedy Crispy Crust With Melted Cheese Magic - November 17, 2026