
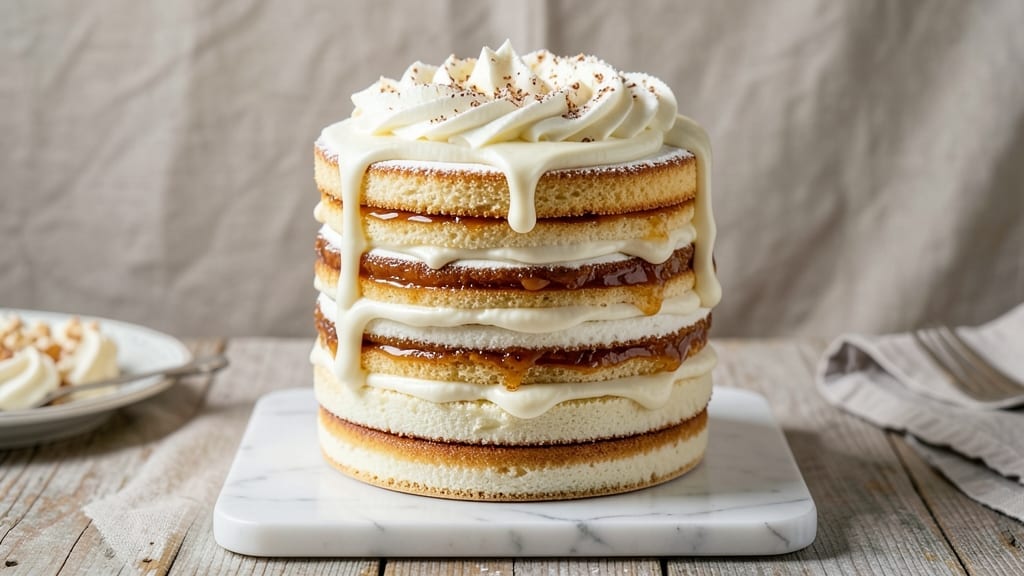
An 18-layer cake isn’t just dessert—it’s a showstopper that transforms any celebration into something extraordinary. 💛 The secret lies in perfectly balanced vanilla sponge layers and velvety cream cheese frosting, where precision meets indulgence.
I’ve refined this recipe over years to ensure stability, rich flavor, and that signature towering elegance without the risk of collapse.
What makes this recipe work is the foolproof layering technique—each cake layer is baked to exact proportions, then stacked with precision to create a sturdy foundation.
The cream cheese frosting isn’t just sweet; it’s tangy, smooth, and holds the layers together like architectural glue. No special tools required—just patience and attention to detail.
By the time you’re done, you’ll have a graceful, golden tower that’s as impressive to look at as it is to taste. The vanilla layers remain moist and tender, while the frosting delivers that perfect balance of sweetness and creaminess. This isn’t just a cake—it’s a centerpiece that commands attention.
Ready to impress? This recipe scales perfectly for gatherings, and I’ll show you how to adapt flavors or fillings to suit any occasion. Let’s build this masterpiece layer by layer.
Ingredients for 18 layer cake
Precision ingredients for an architectural masterpiece of vanilla and cream cheese harmony.
| Ingredient | Amount | Notes |
|---|---|---|
| All-Purpose Flour 🌾 | 6 cups | Sifted for lightness, bleached preferred |
| Granulated Sugar 🍚 | 3 ½ cups | Superfine preferred for smooth texture |
| Unsalted Butter 🧈 | 2 ½ cups | Room temperature, European style preferred |
| Large Eggs 🥚 | 12 whole | Room temperature, separated for stability |
| Vanilla Extract 🌿 | 1 tbsp | Pure Madagascar bourbon preferred |
| Baking Powder 🧂 | 1 ½ tsp | Aluminum-free for consistent rise |
| Salt 🧂 | ½ tsp | Fine sea salt for balance |
| Milk 🥛 | 1 ½ cups | Whole milk for richness |
| Cream Cheese 🧀 | 32 oz | Full-fat, room temperature |
| Powdered Sugar 🍚 | 6 cups | Sifted for smooth frosting |
| Heavy Whipping Cream 🥛 | 2 cups | Cold, heavy whipping type |
| Lemon Juice 🍋 | 1 tbsp | Freshly squeezed for brightness |
| Vanilla Bean Paste 🌿 | 1 tbsp | For authentic vanilla flavor |
| Unflavored Gelatin 🍬 | 1 tbsp | Bloomed in cold water |
| Water 💧 | 3 tbsp | For gelatin solution |
The flour and sugar form the foundation of each delicate layer. King Arthur or Gold Medal flours yield the finest texture, but any high-quality all-purpose will work. Superfine sugar dissolves completely, preventing graininess—Domino or C&H brands excel here. European-style butter like Plugrá or President adds richness without overpowering. Room-temperature eggs prevent cracks in the layers, so take them out 30 minutes before baking. The vanilla extract should be pure bourbon—Madagascar or Tahitian varieties provide the deepest flavor profile. For the cream cheese frosting, Philadelphia or Kraft Original brands are consistent, but avoid low-fat versions—they lack stability.
Substitutions require careful consideration to maintain structural integrity. Cake flour can replace all-purpose at a 1:1 ratio, but add 1 tsp baking powder per cup to compensate. For sugar, turbinado or coconut sugar work but may alter color slightly. If you lack vanilla extract, vanilla bean paste or even vanilla sugar (1 tsp dissolved in warm water) will suffice. The gelatin is critical for frosting stability—agar-agar can substitute at half the amount, though texture differs. For dairy-free adaptations, vegan butter and coconut cream work but require additional stabilizers like xanthan gum. Always ensure all ingredients are at room temperature to prevent layer collapse during stacking.
Store cake layers wrapped in plastic between parchment paper at room temperature for up to 2 days to maintain moisture. The frosting can be made 1 day ahead and refrigerated, then whipped to room temperature before assembly. Once fully assembled, the cake keeps 3 days in the fridge or 1 month frozen. For freezing, wrap each layer individually in plastic wrap before stacking. When serving, allow the cake to sit at room temperature for 30 minutes to soften the frosting and enhance presentation. The final tower should rest for 1 hour before cutting to ensure clean slices.
Why You’ll Love This Recipe
- No-Fuss Layers: I swear by this recipe because it’s all about the process—just fold, bake, repeat. No piping bags, no stress. The buttercream between each layer? You can make it ahead and let the cake cool while you whip it up. That’s 18 layers of actual cake, not just frosting.
- Vanilla Buttercream Magic: Honestly, the secret’s in the buttercream—rich, smooth, and just sweet enough to let the vanilla shine. The eggs and sugar create this tender crumb, while the butter makes every bite feel like a hug. It’s the kind of cake that makes people pause mid-bite and go, “Wait, is this really homemade?”
- Party-Proof Flexibility: Between us, this cake is my go-to for birthdays, graduations, or even just because. You can stack it high for a showstopper or cut it into squares for a crowd. Leftovers? Wrap them tightly—they’ll stay fresh for days, and trust me, they’ll disappear faster than you think.
- Budget-Friendly Luxury: Here’s what sold me—this cake costs half of what store-bought fancies look like. All-purpose flour and granulated sugar stretch far, and the butter and eggs make it feel indulgent without breaking the bank. Plus, the layers mean more cake for the same price. Win.
Step-by-step instructions for stacked vanilla bliss cake
Precision is key when building an 18-layer masterpiece—follow these steps exactly.
👨🍳 Step 1: Prepare the Cake Layers
Preheat your oven to 350°F and grease 18 round 3-inch cake pans with butter, then dust with flour. Sift together the 6 cups all-purpose flour, 1.5 tsp baking powder, and 0.5 tsp salt in a large bowl. Set aside.
In a stand mixer with the paddle attachment, cream the 2.5 cups unsalted butter and 3.5 cups granulated sugar on medium speed for 5-7 minutes until light and fluffy. Add the 12 whole large eggs one at a time, mixing well after each addition. Scrape down the sides as needed. Mix in the 1 tbsp vanilla extract and 1 tbsp vanilla bean paste until fully combined.
With the mixer on low speed, alternate adding the dry ingredients and 1.5 cups milk in three parts, beginning and ending with the dry ingredients. Mix just until combined—overmixing develops gluten and makes the cake dense. Divide the batter evenly among the prepared pans, filling each about ⅓ full.
🔥 Step 2: Bake and Cool the Layers
Bake the layers for 12-15 minutes or until a toothpick inserted into the center comes out clean. Rotate the pans halfway through for even baking. Let the layers cool in their pans for 5 minutes, then transfer to a wire rack to cool completely.
Once fully cooled, level the tops of each layer with a serrated knife if necessary. Place parchment paper between each layer to prevent sticking as you stack them. I like to wrap the cooled layers in plastic wrap and refrigerate for 1 hour before assembling—they’ll be easier to handle and less likely to crumble.
🥘 Step 3: Prepare the Cream Cheese Frosting
In a medium bowl, combine the 32 oz cream cheese and 6 cups powdered sugar. Beat with an electric mixer on medium speed until smooth and creamy. Add the 2 cups heavy whipping cream, 1 tbsp lemon juice, and 1 tbsp vanilla bean paste, mixing until fully incorporated and fluffy.
For the stabilizing layer, bloom the 1 tbsp unflavored gelatin in the 3 tbsp water for 5 minutes until fully dissolved. Gently fold this mixture into the cream cheese frosting to create a stable base for stacking. Chill the frosting in the refrigerator for 30 minutes before using—this makes it easier to spread and prevents melting when you assemble.
🥘 Step 4: Assemble the 18-Layer Cake
Place the first layer on a cake stand or plate. Spread a thin layer of the chilled frosting on top, about ¼ inch thick. Place the second layer on top, then repeat the process. Continue stacking all 18 layers, ensuring each one is centered perfectly. Use a cake leveler or your hands to gently press each layer down as you go.
Once all layers are stacked, apply a final layer of frosting to the entire cake, smoothing with a spatula. For a polished finish, use a bench scraper to create clean edges. Refrigerate the assembled cake for 2 hours before serving to allow the frosting to fully set and the layers to adhere properly.
⏰ Step 5: Final Touches and Serving
Before serving, run a warm knife around the edges of the cake to release it from the stand. Dust the top with a light coating of powdered sugar if desired, or add decorative elements like fresh berries or edible flowers. This cake is best served at room temperature, so let it sit for 30 minutes before slicing.
Slice carefully between the layers—each bite should reveal perfect vanilla cake and creamy frosting. The secret to success lies in patience and precision at every step. Serve immediately to enjoy the cake at its peak texture and flavor.
Pro Tips For Making 18 Layer Cake
- Weigh Your Butter: I learned this the hard way—measuring butter by volume in cups leads to uneven layers. Use a kitchen scale for the butter and eggs; 18 layers demand precision, and packed cups throw off the ratio.
- Cool Layers Fully: Skip the urge to rush and pull layers out early. Let them cool completely on a wire rack—at least 20 minutes—before stacking. Warm layers smash together, ruining that signature height.
- Sift the Flour: No, really. For 18 layers, sifting the flour removes lumps and aerates the batter, making each layer lighter. I used to skip it, and the cakes turned dense. Two minutes of effort saves hours of frustration.
- Chill the Cake Between Layers: This isn’t just about patience—it’s about structure. After frosting each layer, pop the cake in the fridge for 10-15 minutes. The frosting sets, preventing collapse when you add the next layer. (Yes, even if you’re impatient like me.)
Storing and reheating this dish
Layer Storage Essentials
Store each baked cake layer individually between parchment paper in airtight containers at room temperature for up to 2 days. I use clear plastic wrap to seal tightly—this prevents drying while maintaining moisture.
For longer storage, wrap layers in plastic wrap and refrigerate for up to 5 days. The key is keeping them separate to avoid sticking during assembly. 💫
Frosting Prep Ahead
Prepare the cream cheese frosting 1 day in advance and refrigerate in an airtight container. The gelatin stabilizer prevents separation, but give it a quick whisk before using to restore smoothness.
Chill for 30 minutes before assembling—this makes spreading easier and prevents melting between layers. I like to use a piping bag for clean application between layers. ✨
Freezing for Long-Term
For maximum freshness, freeze layers individually in ziplock bags with parchment paper between them. Label with the date—they’ll stay fresh for 3 months. Thaw at room temperature for 2-3 hours before assembling.
The frosting can also be frozen separately in a freezer-safe container for up to 2 weeks. Just thaw in the fridge overnight before use. ❄️
Reheating Served Slices
If you have leftovers, store them in an airtight container in the fridge for 3 days. To refresh, microwave slices for 5-10 seconds on 50% power—this warms the frosting without making it soggy.
For oven reheating, place slices on a baking sheet at 300°F for 5 minutes. Always cover with a damp paper towel to retain moisture. 🔥
Assembled Cake Storage
Once fully assembled, cover the cake with plastic wrap and refrigerate for up to 3 days. For longer storage, freeze the entire cake (unfrosted or with a thin layer of frosting) for 1 month.
To serve, let it sit at room temperature for 30 minutes—this softens the frosting and makes slicing cleaner. The gelatin in the frosting keeps it stable even after freezing. 💡
Room-Temp Serving
Always bring the cake to room temperature before serving to prevent frosting from melting or becoming grainy. If refrigerated, let it sit for 1 hour uncovered. For a polished presentation, dust with powdered sugar or add edible flowers right before serving.
The layers should be firm but not crumbly—this means proper storage and handling. 🌸
Nutrition facts
Frequently asked questions
How do I prevent my 18-layer cake from collapsing during assembly?
Chill the frosting for 30 minutes before using—this makes it firm enough to support each layer. Use a thin layer (¼ inch) of frosting between layers and press gently with your hands to create a stable base. The gelatin in the frosting adds structural support, so don’t skip it! Also, work in a cool room to prevent melting.
Can I use fewer layers if I don’t need 18?
This recipe scales perfectly—just adjust the batter and frosting quantities proportionally. For a 6-layer cake, use ¼ of the batter and ⅙ of the frosting. The key is maintaining the same layer-to-frosting ratio to ensure stability. The same techniques apply for any number of layers!
Why does my frosting look grainy after chilling?
Graininess usually means the powdered sugar wasn’t sifted properly or the frosting wasn’t mixed long enough. Always sift the sugar first, and beat the frosting for 3-5 minutes until completely smooth. If it happens after chilling, whisk vigorously to restore smoothness before using. The gelatin helps, but proper mixing is still critical!
What’s the best way to level the cake layers?
Use a serrated knife or cake leveler at a slight angle, pressing gently while pulling toward you. For perfect results, place a ruler or guide along the edge of the pan to keep the knife straight. Leveling ensures even frosting distribution and a professional finish. Never skip this step—uneven layers make stacking difficult!
How do I decorate an 18-layer cake without it toppling?
Start with a sturdy base—use a wide cake stand or plate to distribute weight. Add decorations like fresh berries or chocolate shavings to the top third only to avoid overloading. For extra stability, refrigerate the cake for 1 hour before decorating. If adding a cake topper, secure it with a small dab of frosting or toothpicks.

- 6 Egg Cake Recipe with Oil: Light as Air With Buttery Moisture - October 4, 2026
- 4 Bean Casserole Recipe: One-Pan Heartiness With Smoky Paprika Depth - October 4, 2026
- 3-Ingredient Keto Mug Cake Recipe: Microwave Magic in 2 Minutes - October 4, 2026