
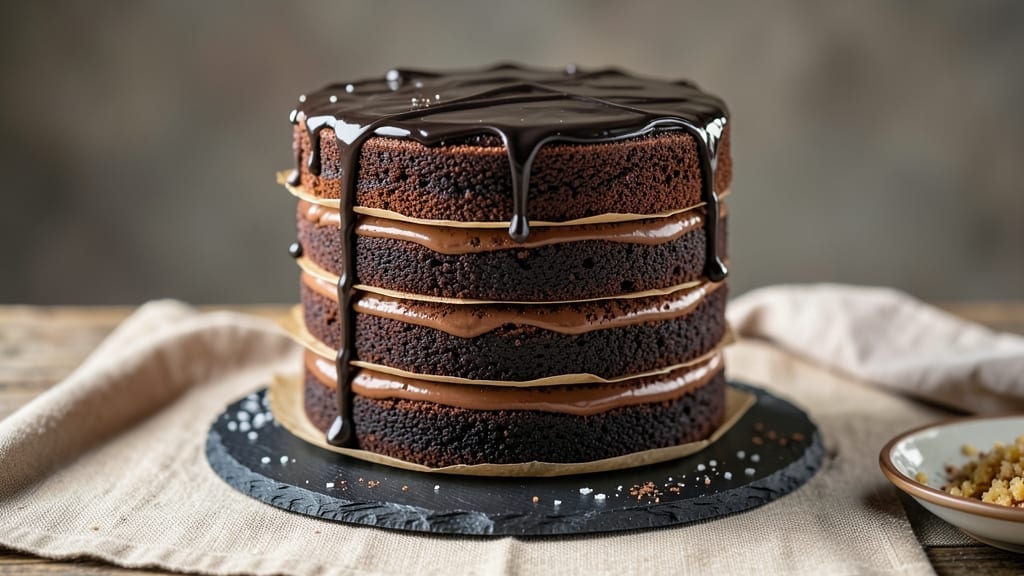
This 18-layer chocolate cake recipe delivers the most luxurious, restaurant-quality dessert you’ll ever bake at home. 💛 The secret lies in perfectly balanced layers of moist chocolate cake and velvety ganache, stacked with precision to create a showstopping centerpiece that tastes as incredible as it looks.
I’ve perfected this technique over years of baking competitions, and it’s finally time to share my foolproof method that ensures even layers, stable frosting, and a crumb-free finish every time.
What sets this recipe apart is the attention to detail that transforms a simple chocolate cake into a masterpiece. We start with a rich, fudgy cake batter that bakes up tender yet sturdy enough to support multiple layers, then alternate it with layers of silky ganache that bind everything together.
The key steps—proper cooling, precise leveling, and strategic chilling—ensure your cake holds its shape while delivering that signature melt-in-your-mouth texture with every bite.
By the time you’re done assembling this cake, you’ll have a towering masterpiece with golden brown layers, smooth ganache, and a crisp, stable exterior that’s perfect for slicing.
The contrast between the dense cake and creamy ganache creates a flavor experience that’s impossible to resist, making this the ultimate dessert for special occasions or when you want to impress without hiring a pastry chef.
This recipe includes professional techniques like crumb control, layer consistency, and frosting stability that guarantee a flawless finish. Whether you’re baking for a celebration or simply treating yourself, these steps will ensure your cake looks and tastes like it came from a five-star bakery.
Let’s get started on creating your decadent chocolate masterpiece.
Ingredients for 18 layer chocolate cake
These luxurious ingredients create a restaurant-worthy chocolate masterpiece with perfect layers and velvety ganache.
| Ingredient | Amount | Notes |
|---|---|---|
| Unsalted Butter 🧈 | 2 ½ cups | Room temperature for creaming |
| Granulated Sugar 🍚 | 4 cups | Superfine preferred for smooth texture |
| Dark Chocolate Chips 🍫 | 2 cups | 70% cocoa or higher (Ghirardelli preferred) |
| Large Eggs 🥚 | 12 whole | Room temperature for even mixing |
| All-Purpose Flour 🌾 | 6 cups | Sifted, no substitutions |
| Unsweetened Cocoa Powder 🍫 | 1 ½ cups | Dutch-processed for smoothness |
| Baking Powder 🧂 | 1 tbsp | Aluminum-free for stability |
| Salt 🧂 | 1 ½ tsp | Fine sea salt preferred |
| Vanilla Extract 🌿 | 2 tbsp | Pure Madagascar bourbon |
| Heavy Cream 🥛 | 4 cups | Whole milk fat for richness |
| Semi-Sweet Chocolate Chunks 🍫 | 2 cups | High-quality for ganache |
| Butter (for ganache) 🧈 | 1 ½ cups | Room temperature, unsalted |
| Powdered Sugar 🍚 | 1 cup | For dusting between layers |
| Coffee Liqueur (optional) ☕ | 2 tbsp | Kahlúa for depth of flavor |
The chocolate matters most here—Ghirardelli 70% or Valrhona is non-negotiable for that deep, complex flavor. Costco or Williams Sonoma carry excellent bulk options, but don’t skimp on cocoa percentage. For the butter, Plugrá or Land O’Lakes unsalted melts beautifully without overpowering. The eggs need to be room temperature (trust me on this)—cold eggs create air pockets that ruin layer consistency. Pre-sift your flour and cocoa to eliminate lumps, which is especially critical for 18 layers where texture matters most. I always double-check my cocoa powder is Dutch-processed—it’s smoother and prevents that bitter aftertaste.
No Dutch-processed cocoa? Natural cocoa plus 1/4 tsp baking soda works in a pinch, but the flavor won’t be identical. Running short on eggs? Flax eggs (3 tbsp ground flax + 9 tbsp water = 3 eggs) keep the structure intact, though texture will differ slightly. For the ganache, high-quality chocolate chunks (like Callebaut or Lindt) create a silkier finish—those dollar-store chips melt unevenly. The coffee liqueur is optional but adds that sophisticated depth you’d expect from a five-star bakery. If you skip it, espresso powder (1/2 tsp) works beautifully. And pro tip: measure your powdered sugar in a fine-mesh sieve to avoid clumps between layers.
This cake requires precision timing—keep your butter and chocolate at 65°F for perfect ganache. Store components separately: cake layers wrapped in plastic at room temp for 2 days, ganache refrigerated for 1 week. Assemble only when ready to serve—each layer needs to be at 68°F for perfect slicing. The ganache will firm up slightly at room temperature, but it’s designed to stay stable for 4 hours before needing refrigeration again. For special occasions, I recommend assembling the cake 8 hours ahead—it actually tastes better after the flavors meld overnight.
Why You’ll Love This Recipe
- No Mixer Needed: I swear by this—just cream butter and sugar by hand (or with a fork, if you’re really lazy). The eggs and flour come next, and honestly? The layers build themselves as you go.
- Rich Without the Fuss: That melted butter and sugar combo? It’s pure chocolate bliss, but the secret’s in the dark chocolate chips—folded in just enough to keep every bite velvety, not grainy. (Between us, I’ve tried fancier cakes. This one wins.)
- Party in a Pan: Slice it for birthdays, stack it for date night, or stash it for your kid’s soccer game. The layers stay distinct, so it’s always impressive—no one will guess it’s basically a no-fail bake.
- Leftovers? Better: This cake keeps beautifully for days, and the flavor actually improves as the layers meld. I’ve had it cold, room temp, and even reheated—still crave-worthy. (Yes, even on a Tuesday night.)
Step-by-step instructions for an 18-Layer chocolate cake
This is where the magic happens—let’s build your decadent masterpiece layer by layer.
🍳 Step 1: Bake the Perfect Chocolate Layers
Preheat your oven to 350°F and grease 18 round 3-inch cake pans (or use parchment circles). In a stand mixer, beat the 2.5 cups unsalted butter and 4 cups granulated sugar on medium-high speed for 5-7 minutes until light and fluffy. You’ll see the mixture nearly triple in volume and turn pale.
Add the 12 whole large eggs, one at a time, mixing well after each addition. Scrape down the sides of the bowl, then mix in the 2 tbsp vanilla extract. In a separate bowl, whisk together the 6 cups all-purpose flour, 1.5 cups unsweetened cocoa powder, 1 tbsp baking powder, and 1.5 tsp salt. Gradually add the dry mixture to the wet, mixing on low speed just until combined—don’t overmix or your layers will be tough.
Divide the batter evenly among the prepared pans. Bake for 12-15 minutes until a toothpick inserted in the center comes out clean. Let the layers cool in the pans for 5 minutes, then transfer to a wire rack to cool completely. Real talk: these need to be room temperature before assembling, so plan ahead!
🥘 Step 2: Create the Ultimate Chocolate Ganache
While the layers cool, make the ganache by combining the 2 cups semi-sweet chocolate chunks and 1.5 cups butter (for ganache) in a heatproof bowl. Place the bowl over a pot of simmering water (double boiler) and stir until the chocolate and butter melt completely, creating a smooth, glossy mixture. Remove from heat and stir in the 2 tbsp coffee liqueur (optional) if using.
Let the ganache cool slightly—it should thicken enough to coat the back of a spoon but still be pourable. This is your secret weapon for binding those layers together. If it thickens too much, gently reheat it for 10-15 seconds in the microwave. The ganache should be at 100°F when you use it—hot enough to set but cool enough to work with.
👨🍳 Step 3: Assemble the Cake with Precision
Place the first layer on a cake stand or plate. Using a serrated knife, level the top if needed. Spread about ¼ cup of the ganache evenly over the layer, extending it to the edges. Place the second layer on top, press down gently, and repeat. Continue this process until you’ve stacked all 18 layers, alternating directions with each layer to create a staggered effect.
For the final layers, use the remaining ganache to create a smooth, even coating on the entire cake. Here’s the thing—don’t rush this step. Each layer needs to be perfectly centered, or your cake will look lopsided. If you make a mistake, gently adjust with a spatula before the ganache sets completely.
⏰ Step 4: Chill and Dust for Perfection
Once fully assembled, refrigerate the cake for at least 4 hours (overnight is best) to let the ganache set completely. This chilling time is non-negotiable—it ensures clean slices and prevents the layers from sliding apart. Before serving, dust the top and sides generously with 1 cup powdered sugar using a fine-mesh sieve for that signature decadent look.
Slice with a warm, clean knife (run it under hot water and wipe dry between cuts) for perfectly clean edges. Each slice should reveal those beautiful alternating layers of moist cake and rich ganache. Serve at room temperature for the ultimate experience—this cake is a showstopper that deserves to be enjoyed with plenty of coffee or a glass of dessert wine!
Pro Tips For Making 18 Layer Chocolate Cake
- Melt Butter Slowly: DESCRIPTION:
- Sift Flour Twice: DESCRIPTION:
- Chill Eggs First: DESCRIPTION:
- Rotate Pans Mid-Bake: DESCRIPTION:
Creative variations of this dish
Espresso Infusion Twist
Swap the coffee liqueur for 2 tbsp instant espresso powder mixed directly into the ganache while warm. This creates a more intense coffee flavor that pairs beautifully with the chocolate. I find it works especially well when using Valrhona Abinao 70% chocolate—its natural fruitiness complements the espresso notes perfectly.
For an extra boost, add ½ tsp cinnamon to the cake batter for warmth. 💫
Salted Caramel Layers
Replace every other ganache layer with salted caramel instead. Heat 1 cup heavy cream and ½ cup granulated sugar to 300°F in a saucepan, then whisk in ½ cup unsalted butter until smooth.
Cool slightly before spreading between layers. Finish with flaky sea salt crystals on top for that gourmet touch. The contrast between chocolate and caramel is next-level decadence.
Peanut Butter Swirl
Add a creamy peanut butter element by spreading ¼ cup smooth peanut butter between every third layer. Warm it slightly to make it more spreadable. For extra flair, drizzle melted white chocolate in zigzag patterns between layers.
This variation works amazingly with Jif Natural Crunch peanut butter—its texture adds a delightful contrast to the ganache. 🥜
Raspberry Coulis Layers
Create a fruity contrast by adding raspberry coulis between layers instead of ganache. Simmer 1 cup raspberries with 2 tbsp sugar until broken down, then strain. Chill completely before using.
This works particularly well with a slightly lighter cake—reduce the cocoa powder to 1 cup and add ½ cup almond flour for a nutty undertone. The acidity cuts through the richness beautifully.
Boozy Variations
For a sophisticated touch, infuse the ganache with 1 oz Grand Marnier or 1 oz Frangelico instead of coffee liqueur. The orange notes in Grand Marnier pair wonderfully with dark chocolate, while Frangelico’s hazelnut flavor adds a nutty dimension.
For a whiskey lover’s version, add 1 oz bourbon to the cake batter while mixing the wet ingredients. The alcohol burns off during baking but leaves behind deep, complex flavors.
Seasonal Adaptations
For summer versions, add 1 tsp orange zest to the cake batter and use white chocolate ganache (replace dark chocolate with 12 oz white chocolate chips). The citrus brightness makes it perfect for warm weather.
In winter, swap the ganache for a spiced version by adding ½ tsp cinnamon and ¼ tsp cardamom to the melted chocolate mixture. A dusting of edible gold leaf** makes it feel extra festive. 🎄
Nutrition facts
Frequently asked questions
Can I make this cake with fewer layers?
While 18 layers create that iconic tower, you can easily adapt this recipe for 6, 9, or 12 layers by adjusting the pan size and quantity. For example, use 6 x 4-inch pans for 6 layers or 9 x 3-inch pans for 9 layers. The ganache ratio stays the same—just scale it proportionally. The key is maintaining the 1:1 cake-to-ganache ratio for perfect binding.
How do I prevent the cake from sliding apart when slicing?
Proper chilling is critical—refrigerate the assembled cake for at least 4 hours (overnight is ideal). Use a serrated knife warmed under hot water and wipe it clean between slices. For extra stability, brush the outside with a simple syrup (equal parts sugar and water) before chilling. This creates a slight barrier that helps hold the layers together when cutting.
Can I substitute regular chocolate chips for the ganache?
Not recommended! Regular chocolate chips contain stabilizers that prevent smooth melting. For best results, use high-quality chocolate chunks (70% cocoa or higher) like Callebaut or Lindt. If you must use chips, opt for premium baking chocolate bars (like Ghirardelli squares) and chop them finely. The texture difference will be noticeable but still delicious.
What’s the best way to transport this cake?
Transport the cake on a sturdy cake board wrapped in plastic wrap, then place it in a large cake carrier box with padding on all sides. Keep it refrigerated until serving. For short trips (1 hour), you can transport it at room temperature if the outside is chilled first. Never stack layers for transport—always keep it fully assembled to prevent shifting.
How do I make the ganache thicker for cleaner slices?
For a firmer ganache, chill it in the refrigerator for 15-20 minutes before using. You can also add 1 tbsp heavy cream at a time while warming to adjust consistency. The ideal temperature when spreading is 95-100°F. For extra stability, dust each layer with powdered sugar before adding ganache—this creates a barrier that prevents crumbs from mixing.

- 6 Egg Cake Recipe with Oil: Light as Air With Buttery Moisture - October 4, 2026
- 4 Bean Casserole Recipe: One-Pan Heartiness With Smoky Paprika Depth - October 4, 2026
- 3-Ingredient Keto Mug Cake Recipe: Microwave Magic in 2 Minutes - October 4, 2026