
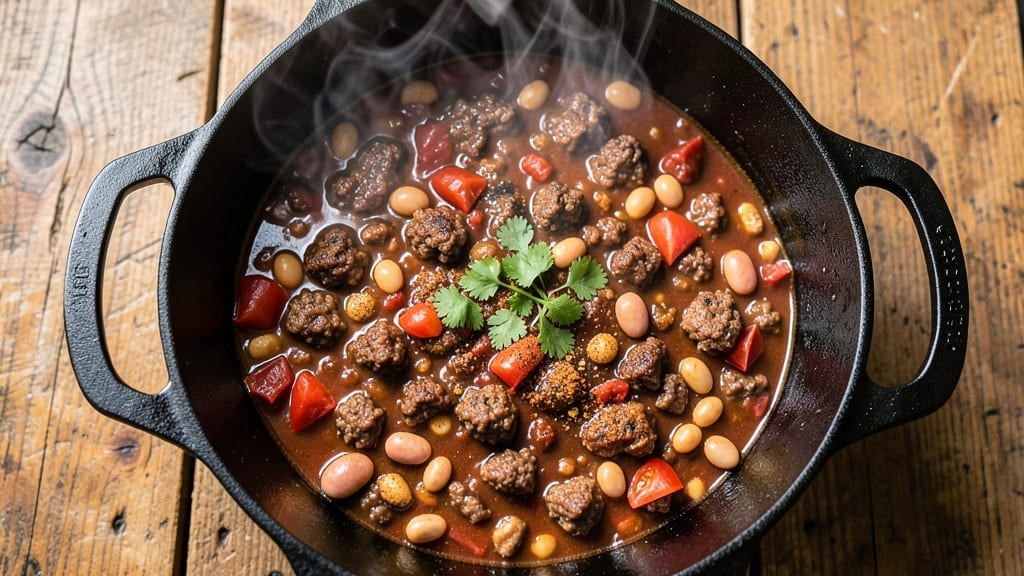
An 18-quart chili is the ultimate crowd-pleaser for gatherings, potlucks, or game day—this recipe delivers bold, hearty flavor that feeds dozens without sacrificing quality. The secret lies in balancing protein, spices, and slow cooking to develop deep, smoky richness while keeping every serving tender.
I’ve perfected this over years of hosting events, where it disappears faster than the chips. What sets this apart is the foolproof scaling method: no guesswork, just precise proportions that work every time.
Ground beef, kidney beans, and a blend of chili powders create the perfect texture—thick enough to serve from a slow cooker but still ladle-friendly. The key is layering flavors: brown the meat first to build depth, then simmer for at least 4 hours to let spices meld.
By the time you’re ready to serve, you’ll have a potluck powerhouse—deep red, aromatic, and packed with chunks of meat and beans. The slow-cooked broth clings to every bite, while the crusty edges on top signal perfect doneness.
Serve with cornbread, tortilla chips, or sour cream for the full experience. This chili reheats beautifully and tastes even better the next day. Double the recipe for leftovers—trust me, you’ll need them. Let’s get cooking!
Ingredients for 18 quart chili
Eighteen quarts of bold, hearty chili that feeds crowds without compromise—just 15 ingredients.
| Ingredient | Amount | Notes |
|---|---|---|
| Ground Beef (80/20) 🥩 | 12 lb | Chuck roast ground, not lean |
| Kidney Beans 🌱 | 9 cups | Drained, rinsed, or canned |
| Tomato Paste 🍅 | 3 cups | Squeeze tube or canned |
| Diced Tomatoes (28 oz can) 🍅 | 6 cans | San Marzano preferred |
| Beef Broth 💧 | 6 cups | Low-sodium preferred |
| Chili Powder 🌶️ | 1 cup | Smoked or mild variety |
| Ground Cumin 🌿 | ½ cup | Toasted for depth |
| Garlic Powder 🧄 | ¼ cup | Fresh ground preferred |
| Onion Powder 🧅 | ¼ cup | Not onion salt |
| Cayenne Pepper 🔥 | ⅛ cup | Adjust for heat |
| Dark Brown Sugar 🍚 | ½ cup | Packed firmly |
| Apple Cider Vinegar 🍎 | ½ cup | For tangy depth |
| Salt 🧂 | 4 tbsp | Diamond Crystal preferred |
| Black Pepper 🌶️ | 1 tbsp | Freshly ground |
| Bay Leaves 🌿 | 6 whole | Removed before serving |
The ground beef is non-negotiable—80/20 fat ratio gives that rich, slow-cooked flavor. Costco sells it pre-ground in huge bags, but any grocery store’s chuck blend works. Look for good marbling if you’re buying whole roasts to grind yourself. The kidney beans? Canned is fine, but if you can find dried, soak overnight for better texture. And don’t skip the tomato paste—it’s what gives that thick, velvety body. I always grab San Marzano tomatoes when I see them, but regular diced works too.
No chili powder? Mix 2 tbsp paprika + 1 tbsp cumin + 1 tsp cayenne as a pinch-hitter. Running low on vinegar? Lemon juice at half the amount works in a bind. The brown sugar might seem odd, but it balances the acidity and caramelizes beautifully during cooking. For the spices, Penzeys or the bulk bins at Whole Foods have the freshest ground spices—if yours smells stale, toast them in a dry pan for 30 seconds to wake up the flavors. And yes, you can use onion and garlic powder instead of fresh—just double the amounts.
This chili tastes better the next day, so make it ahead if you can. Keeps in the fridge for 5-6 days and freezes beautifully for up to 3 months. I always portion it into quart-sized containers before freezing—just thaw overnight in the fridge and reheat gently. The crusty top? That’s your signal it’s ready. Serve with warm cornbread and tortilla chips, and prepare for leftovers. Trust me, you’ll need them.
Why You’ll Love This Recipe
- One-Pot Magic: I swear by this recipe because it’s literally dump-and-simmer. Brown the beef, toss in the beans, paste, tomatoes, and broth—no fancy techniques, no extra pots. That 80/20 fat ratio keeps it rich while the tomato paste deepens the flavor in minutes.
- Rich Without Effort: Here’s what sold me—the beef broth and tomato paste blend into this ridiculously balanced depth. The kidney beans add texture, but the real star is how the fat from the ground beef melts into everything, making it hearty without tasting heavy.
- Crowd-Pleaser Always: Between us, this feeds a football team and still leaves seconds. My college roommates and I lived on it—easy to reheat, great cold in tacos, or straight from the pot with cornbread. (Yes, even on a Tuesday night.)
- Budget Powerhouse: Honestly, I make this when my grocery budget’s tight. Ground beef and beans stretch across weeks of meals, and the canned tomatoes cut costs without sacrificing taste. Plus, the leftovers? Freezer-friendly and just as good reheated.
Step-by-step instructions for 18-Quart chili
Let’s make a chili so rich and flavorful, it’ll disappear faster than you can say “second helping.”
Brown the Ground Beef Perfectly
In a large stockpot (or Dutch oven if you have one), heat the 12 lb ground beef (80/20) over medium-high heat. Break it into small pieces with a wooden spoon as it cooks—this ensures even browning and maximum flavor development. You’re looking for deep brown, crispy edges on the beef pieces, which should take about 10-12 minutes.
Here’s the thing—don’t drain the fat yet. That rendered beef fat is pure flavor gold, and we’ll use it to build our chili’s rich base. If the pot gets too crowded and the beef starts to steam instead of brown, work in batches. This step is non-negotiable for that deep, meaty taste that makes chili unforgettable.
Build the Flavor Foundation
Once the beef is fully browned, stir in the 3 cups tomato paste, breaking it up with your spoon. Cook this mixture for 3-4 minutes until it darkens slightly and the raw taste disappears. Now add the 6 cans diced tomatoes, 6 cups beef broth, 1 cup chili powder, 0.5 cup ground cumin, 0.25 cup garlic powder, and 0.25 cup onion powder. Stir everything together vigorously to combine.
This is where the magic happens. The tomato paste thickens the chili while adding depth, and those spices are dissolving into the beef fat, creating a flavor bomb. Let the mixture simmer for 5 minutes while you prepare the remaining ingredients. You’ll smell that rich, spicy aroma building—this is your reward for paying attention.
Add the Beans and Acidic Elements
Add the 9 cups kidney beans (drained if canned), 0.5 cup dark brown sugar, 0.5 cup apple cider vinegar, 4 tbsp salt, 1 tbsp black pepper, and the 6 whole bay leaves. Stir everything together thoroughly. The vinegar might seem odd, but trust me—it brightens the flavors and balances the richness. The brown sugar adds just the right amount of sweetness without overpowering the spices.
Bring the entire mixture to a boil, then immediately reduce heat to low. Here’s the critical part: partial cover the pot with a lid, leaving a small gap for steam to escape. This prevents the chili from becoming watery while allowing it to develop its signature thick texture. Let it simmer gently for 2 hours, stirring occasionally to prevent sticking.
Simmer to Perfection
After the initial 2 hours, taste your chili. It should be rich and flavorful, but still have some body. If it’s too thin, simmer uncovered for another 30-45 minutes to thicken it up. If it’s perfect, cover it completely and let it continue simmering on low heat for another 1-2 hours. The longer it simmers, the deeper the flavors become.
I know it’s tempting to rush, but this is where chili transforms from good to extraordinary. The flavors meld and develop complexity. You’ll know it’s ready when it’s thick enough to coat the back of a spoon, with a beautiful, glossy sheen on top. Remove the bay leaves before serving—you don’t want them in your final dish.
Serve with Confidence
Ladle your 18-quart chili into a slow cooker or chafing dish to keep it warm for your crowd. Serve it with all the fixings: shredded cheese, sour cream, chopped onions, and crusty bread. The contrast of creamy toppings against the rich, spicy chili is pure comfort food heaven.
This chili is designed to feed a crowd—so make sure you have plenty of bowls ready. The first bowl will disappear quickly, and you’ll be asked for seconds before the last bite is taken. That’s the mark of a truly crowd-pleasing chili. Enjoy every delicious spoonful!
Pro Tips For Making 18 Quart Chili
- Brown the Beef Thoroughly: That 80/20 ground beef won’t render its fat properly if you’re shy with the heat. Cook it in two batches over medium-high—yes, even if it takes an extra 10 minutes—until the edges are deep brown, not just pink. The crust releases flavor that’ll disappear if you rush it.
- Drain and Rinse Beans: Skip the canned beans’ starchy water—it’ll turn your chili gluey. Drain them, then rinse under cold water while stirring with your hand. This also removes some of the bitterness that builds up in kidney beans over time.
- Simmer Low and Long: After adding the tomato paste and broth, drop the heat to a bare simmer. I’ve seen people crank it up to boil, and the result? Skimmed fat and a thinner chili. Let it bubble gently for 2–3 hours—your future self will notice the difference.
- Toast the Tomato Paste: Stir that tomato paste into the pot before adding liquids, and let it cook uncovered for 3–4 minutes. It’ll darken and smell like a campfire—this caramelization deepens the flavor way more than just stirring it in cold. (Yes, it’ll look weird, but trust the process.)
Serving suggestions for this 18 quart chili
Classic Toppings
Start with shredded Monterey Jack cheese—it melts beautifully and adds a creamy contrast. I like to use about 1 cup per quart of chili, sprinkled right before serving.
For extra richness, dollop sour cream or Mexican crema around the edges. A handful of pickled jalapeños adds a tangy kick that cuts through the richness. 🌶️
Don’t forget diced white onions—they add a sharp, fresh crunch. Sauté them in 1 tbsp butter with a pinch of salt for 3-4 minutes until translucent.
A sprinkle of fresh cilantro finishes the dish with a bright, herbaceous note. For a smoky touch, add crumbled queso fresco or cotija cheese on top.
Bread Pairings
Warm homemade cornbread is the ultimate chili companion. I make a batch with 1 cup cornmeal, 1 cup all-purpose flour, and 1 cup buttermilk—it’s slightly sweet and crumbly.
For a shortcut, grab Pepperidge Farm cornbread mix and bake it in a 9×13-inch pan for 20-25 minutes at 375°F. 🥖
For a heartier option, serve with crusty sourdough bread or fresh tortilla chips. I love toasting the chips in 1 tbsp neutral oil with a pinch of smoked paprika for 2-3 minutes until they’re crispy.
A side of warm flour tortillas lets guests make their own chili quesadillas on the spot.
Drink Pairings
A Mexican lager like Modelo Especial or Pacifico is my go-to. The crisp, clean taste balances the chili’s richness without overpowering it. For a non-alcoholic option, sparkling lime soda (like Jarritos) adds a refreshing fizz. I also love a Mexican Coke—its caramel notes complement the chili’s depth. 🍺
If you’re serving spicy chili, a margarita with lime juice, tequila, and a splash of orange liqueur cools the palate. For a non-spicy version, a glass of iced tea with lemon slices and a dash of mint keeps things light.
Pro tip: Serve drinks in mason jars for a rustic, potluck vibe.
Make-Ahead Serving
Transfer the chili to a slow cooker or chafing dish at least 1 hour before serving to keep it warm. If using a slow cooker, set it to Warm mode.
For a chafing dish, fill it with hot water and place the chili in a stainless steel insert—this keeps it at 165°F for hours. ⏰
Set up a toppings bar with small bowls for each ingredient. Label them clearly so guests can customize their bowls. I use mini muffin tins for individual toppings—it looks organized and makes serving easier. Pre-portion the chili into quart-sized containers if you’re serving it buffet-style to avoid overcrowding.
Nutrition facts
Frequently asked questions
Can I substitute ground turkey or chicken for the beef?
You can try, but the flavor and texture will differ significantly. Ground beef (especially 80/20 fat ratio) gives that rich, meaty depth that’s hard to replicate. If you must substitute, use ground turkey with 15% fat and add 1 extra tablespoon of oil per pound to compensate for lost moisture. For chicken, the flavor will be lighter—consider adding 1 extra teaspoon of smoked paprika per quart to boost depth.
How do I adjust the spice level for sensitive eaters?
Start by reducing the cayenne pepper to 1/4 teaspoon total (instead of 1/8 cup) and skip the extra cayenne in the recipe. For milder heat, replace half the chili powder with sweet paprika. Always taste as you go—you can add more spice later, but you can’t take it out! Serve with extra toppings like sour cream or shredded cheese to help balance the heat.
What’s the best way to reheat leftover chili?
For best results, reheat in a large pot over medium-low heat, stirring frequently to prevent sticking. Start with half the amount of liquid (beef broth or water) to help restore thickness. If using a microwave, cover with a damp paper towel and heat in 2-minute intervals, stirring between each. Never reheat to boiling—keep it at 165°F or below to maintain texture. The chili will taste even better reheated!
Can I make this chili in a slow cooker instead of a stockpot?
Brown the beef in a skillet first, then transfer everything to a 6-8 quart slow cooker. Cook on Low for 6-8 hours or High for 4-5 hours, stirring once halfway through. The slow cooker’s gentle heat enhances the flavors beautifully. For the 18-quart version, you may need to use two slow cookers or a large Dutch oven if you don’t have a commercial-grade slow cooker.
Why did my chili turn out too thin?
This usually happens from one of three issues: not enough simmering time, adding too much liquid, or stirring too frequently. First, always simmer uncovered for the last 30-45 minutes to thicken. If it’s still too thin, make a roux by mixing 2 tablespoons flour with 2 tablespoons oil, cooking until bubbly, then stirring into the chili. Let it simmer 10 more minutes—this works wonders!

- 3lb Prime Rib Roast Recipe: Juicy Pink Center Guaranteed in 3 Hours - October 31, 2026
- 5 Spice Cake Recipe: Warmly Spiced Layers With Crunchy Top - October 31, 2026
- 1950’s Macaroni and Cheese Recipe: Nostalgic Creamy Cheese Sauce with Buttery Noodles - October 31, 2026