
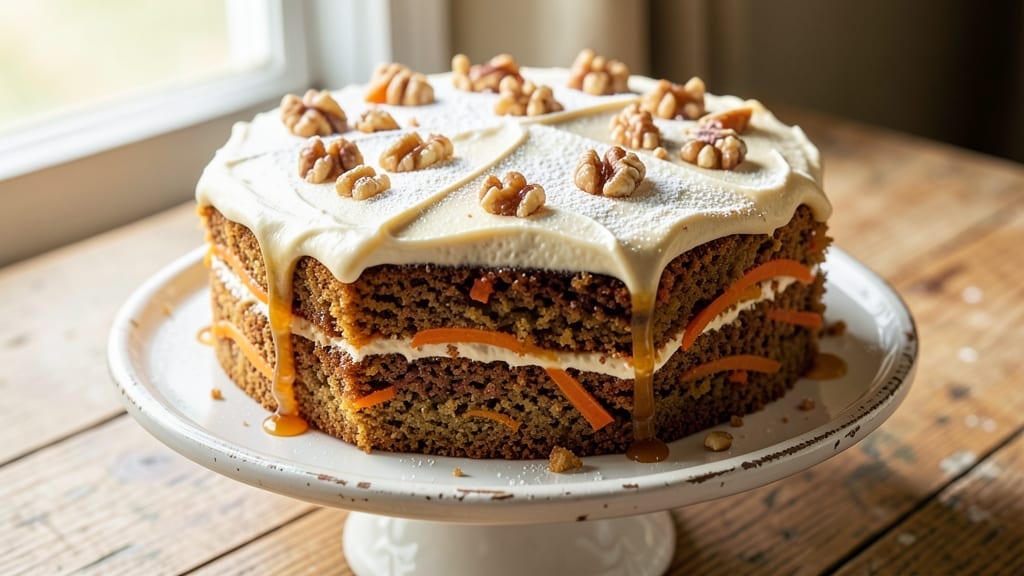
This 1940s carrot cake recipe brings back the warmth of mid-century baking with a walnut-date swirl and spiced frosting that feels like a hug from your grandmother’s kitchen. 💛 The secret lies in the perfect balance of moist carrot layers, crunchy walnuts, and chewy dates—all wrapped in a tangy cream cheese frosting that’s become a classic.
I’ve adapted this recipe to modern tastes while keeping the nostalgic charm that made it a staple in Depression-era homes.
The cake’s magic starts with a simple yet flavorful batter—carrots, warm spices like cinnamon and nutmeg, and a touch of pineapple for brightness (a nod to 1940s rationing-friendly ingredients). The walnut-date swirl adds texture and depth, while the spiced frosting ties everything together with a creamy, slightly sweet finish.
What makes this recipe special is how it delivers that homestyle comfort without requiring fancy techniques—just patience and love.
By the time you pull this cake from the oven, you’ll have a golden, moist masterpiece with layers that flake apart at the edges and a frosting so smooth it’ll have everyone asking for seconds.
The aroma alone—warm spices, caramelized sugar, and toasted walnuts—will transport you to a simpler time. This isn’t just dessert; it’s a piece of history you can enjoy today.
Perfect for family gatherings, holiday tables, or a cozy Sunday treat, this cake scales beautifully and keeps well for days. Whether you’re a baking novice or a seasoned pro, the step-by-step instructions will guide you through every layer. Let’s get baking!
Ingredients for 1940 carrot cake
Gather these nostalgic pantry staples for a carrot cake that tastes like home.
| Ingredient | Amount | Notes |
|---|---|---|
| All-Purpose Flour 🌾 | 2 ½ cups | Sifted for light texture |
| Granulated Sugar 🍚 | 1 ½ cups | White or light brown |
| Packed Brown Sugar 🍚 | ½ cup | Light or dark |
| Vegetable Oil 🫒 | 1 cup | Light or canola oil |
| Unsalted Butter 🧈 | ¾ cup | Softened to room temp |
| Large Eggs 🥚 | 2 whole | Room temperature |
| Vanilla Extract 🌿 | 2 tsp | Pure vanilla extract |
| Ground Cinnamon 🌶️ | 2 tsp | For warm spice flavor |
| Ground Nutmeg 🌿 | ½ tsp | Freshly grated preferred |
| Ground Ginger 🌶️ | 1 tsp | For subtle warmth |
| Salt 🧂 | ½ tsp | Kosher or sea salt |
| Shredded Carrots 🥕 | 3 cups | Packed, medium grated |
| Crushed Pineapple 🍍 | ½ cup | Drained well, for brightness |
| Chopped Walnuts 🥜 | 1 ½ cups | Toasted for extra flavor |
| Pitted Dates 🍇 | 1 cup | Chopped, Medjool preferred |
| Cream Cheese 🧀 | 8 oz | Room temperature for frosting |
| Powdered Sugar 🍚 | 3 cups | For smooth frosting |
| Heavy Cream 🥛 | ½ cup | Cold, for frosting |
| Lemon Juice 🍋 | 1 tbsp | Freshly squeezed |
The carrots are the star here, so grab the bright orange, firm ones—the kind that look like they’ve been sitting in your fridge for a week actually work best. Trader Joe’s has the best pre-shredded carrots if you’re short on time, but if you’re chopping them yourself, go medium-fine so they blend into the batter without making it gritty. Walnuts? Costco sells them in bulk, which is a steal, but toast them yourself—5 minutes in a dry pan until fragrant. Dates can be a pain to pit, so Medjool ones are easiest—just chop them roughly. The pineapple adds that vintage brightness, and Dole crushed pineapple works perfectly if you don’t want to drain fresh.
No pineapple? Extra lemon juice (another tablespoon) or orange zest keeps the brightness. Walnuts too pricey? Pecans or almonds toasted work too. The cream cheese frosting is non-negotiable for that tangy kick—Philadelphia brand is foolproof, but any good-quality cream cheese will do. If you’re making this ahead, room-temperature butter and cream cheese are key for a smooth frosting. The spices? Penzeys or bulk bins for the freshest ground spices—nutmeg especially loses its punch fast. And if your dates are dry, soak them in warm water for 10 minutes to soften.
This cake keeps beautifully for 4-5 days covered at room temperature, but the frosting might weep if it gets too warm. For longer storage, wrap tightly in plastic wrap and refrigerate—it’ll last 1 week. The walnut-date swirl stays fresh for 3 days in the fridge if you make it ahead. Freeze the unfrosted cake layers for up to 3 months—just thaw overnight before frosting. Pro tip: Toast the walnuts fresh day-of for maximum crunch, or they’ll get soggy in the cake.
Why You’ll Love This Recipe
- No Mixer Needed: I swear by this recipe because it’s one of those rare cakes where you can literally stir the batter with a wooden spoon—no electric mixer required. The brown sugar and butter blend so smoothly with the oil that you’ll end up with that classic 1940s tender crumb without fighting your kitchen tools.
- Sweet-Spiced Magic: That combo of granulated and packed brown sugar? It’s what makes this cake sing—caramel depth with just enough chew. Honestly, the way the vegetable oil keeps it moist while the butter adds richness? It’s the kind of flavor balance that makes you want to bake it twice in one weekend.
- Pantry Staple Power: Between us, this recipe uses ingredients you already own—no specialty items, no last-minute grocery runs. All-purpose flour, basic sugars, and a stick of butter? That’s it. I’ve made this for potlucks, birthday slumps, and even as a “I need dessert now” fix, and it never lets me down.
- Leftovers That Last: The good news? This cake stays fresh for days, and the slices reheat beautifully—whether you’re packing it for lunch or serving it cold. (Yes, even on a Tuesday night.) Plus, the brown sugar caramelizes slightly over time, making older slices even more irresistible. Budget-friendly? Absolutely. Reliable? Even more so.
Step-by-step instructions for 1940s carrot cake
Here’s how to make this nostalgic classic with moist layers and that perfect walnut-date swirl.
👨🍳 Step 1: Mix the Cake Batter with Perfect Texture
Preheat your oven to 350°F and grease two 9-inch round cake pans with vegetable oil, then line the bottoms with parchment paper. In a large mixing bowl, whisk together the 2.5 cups all-purpose flour, 2 tsp ground cinnamon, 0.5 tsp ground nutmeg, 1 tsp ground ginger, and 0.5 tsp salt. Set aside.
In another large bowl, cream together the 0.75 cup unsalted butter and 1 cup vegetable oil until light and fluffy. Gradually add the 1.5 cups granulated sugar and 0.5 cup packed brown sugar, beating on medium speed for 3-4 minutes until the mixture is pale and thick. This step is crucial—it incorporates air that makes the cake light and tender.
Add the 2 whole large eggs, one at a time, beating well after each addition. Mix in the 2 tsp vanilla extract until combined. With the mixer on low speed, gradually add the dry ingredients to the wet mixture, mixing just until combined. Fold in the 3 cups shredded carrots, 0.5 cup crushed pineapple, 1.5 cups chopped walnuts, and 1 cup pitted dates by hand using a rubber spatula. Be gentle—overmixing develops gluten and makes the cake dense.
🥘 Step 2: Create the Walnut-Date Swirl Filling
In a small bowl, combine ½ cup chopped walnuts and ½ cup pitted dates. Pulse in a food processor until finely chopped but not pasty. This mixture will create the signature swirl in your cake. If you don’t have a food processor, finely chop the walnuts and dates by hand using a sharp knife.
Divide the cake batter evenly between the two prepared pans, spreading it out smoothly. Drop spoonfuls of the walnut-date mixture evenly over each cake layer, about 1 tablespoon apart. Using a butter knife, gently swirl the filling into the batter in a circular motion, creating a marbled effect. This is where the classic 1940s carrot cake gets its distinctive look and extra flavor.
🔥 Step 3: Bake to Golden Perfection
Place both cake pans in the preheated oven and bake for 25-30 minutes, or until a toothpick inserted into the center comes out clean. The cakes should be golden brown on top and spring back when gently pressed in the center. I like to rotate the pans halfway through baking for even cooking.
Here’s the thing—don’t overbake. The cakes will continue cooking slightly as they cool. If the tops brown too quickly, loosely cover them with aluminum foil after 20 minutes to prevent over-browning while the centers finish cooking. Let the cakes cool in their pans for 10 minutes, then transfer to a wire rack to cool completely.
🍳 Step 4: Whip Up the Spiced Frosting
While the cakes cool, make the frosting by beating the 8 oz cream cheese and 0.75 cup unsalted butter together until smooth and creamy. Add the 3 cups powdered sugar, 0.5 cup heavy cream, and 1 tbsp lemon juice, beating on medium speed until light and fluffy, about 3-4 minutes. This is where the magic happens—the lemon juice brightens the flavors and prevents the frosting from being too sweet.
Add the 2 tsp vanilla extract and 1 tsp ground cinnamon, mixing until fully incorporated. Taste and adjust sweetness if needed—you can add more powdered sugar if desired, but be careful not to make it too thick. The frosting should be smooth enough to spread easily but not runny. Let it sit at room temperature for 10 minutes before using to make it easier to work with.
🎂 Step 5: Assemble and Decorate Like a 1940s Classic
Once the cakes are completely cool, place one layer on a serving plate. Spread a generous layer of the spiced frosting over the top, then place the second cake layer on top. Frost the top and sides of the cake with the remaining frosting, using a spatula to create smooth sides. For that authentic 1940s look, pipe a simple border around the edges using the leftover frosting.
Here’s a pro tip: To make the frosting look extra smooth, dip a warm metal spatula in hot water, then wipe it dry and run it over the frosted cake. The heat from the spatula melts the frosting slightly, creating a professional, glossy finish. Let the cake chill in the refrigerator for at least 1 hour before serving to allow the flavors to meld and the frosting to set properly.
Pro Tips For Making 1940 Carrot Cake
- Mix Dry First: DESCRIPTION: Combine your flour, baking soda, and spices before adding wet ingredients—this keeps the batter smooth and prevents lumps. I learned this the hard way after scraping a grater for 10 minutes trying to fix a clumpy mess.
- Brown the Butter: DESCRIPTION: Swap half the butter for browned butter—it adds a nutty depth that vintage recipes rely on. Just melt 4 tbsp in a pan until golden, then cool before mixing. (Yes, it smells amazing while it cooks.)
- Don’t Overmix: DESCRIPTION: Once the flour joins the wet ingredients, mix just until combined—overworking makes the cake dense. I used to beat it like I was kneading dough, and the texture suffered.
- Test for Doneness Early: DESCRIPTION: Check the cake at 45 minutes—if the edges are pulling away but the center’s still jiggly, that’s perfect. Ovens vary, and 1940 recipes assumed a hotter oven than most of us use today.
Common mistakes when making perfect results
Overmixing the Batter
This is the #1 mistake I see with carrot cake—especially when people switch to hand mixing. Once you add the dry ingredients, stop mixing the second they’re incorporated. Overmixing develops gluten, which makes your cake dense and tough instead of tender.
I’ve ruined cakes by beating them for an extra 30 seconds just to “make sure it’s all combined”—don’t fall into this trap! Fold in those shredded carrots and walnuts by hand with a spatula. 🥕
Skipping the Walnut-Date Prep
Many recipes just toss chopped walnuts and dates into the batter, but that doesn’t create the signature swirl. For that authentic 1940s texture, pulse the walnuts and dates together until they form a fine paste.
This lets them distribute evenly and creates those beautiful marbled streaks when you swirl. If you’re short on time, chop them extremely finely by hand—just don’t skip this step entirely!
Underbaking or Overbaking
I’ve seen cakes pulled too soon (still jiggly in the center) and others left in too long (dry, crumbly). The perfect moment is when a toothpick comes out with just a few moist crumbs—no wet batter.
If your oven runs hot, check for doneness at 20 minutes. For older ovens, you might need the full 30 minutes. Never rely on color alone—always test with a toothpick. 🔥
Room-Temp Ingredients
Cold butter, eggs straight from the fridge, and chilled cream cheese are common culprits for dense cake and grainy frosting. Let your butter, eggs, and cream cheese sit out for at least 1 hour before using.
I keep my eggs in the fridge but pull them out while preheating the oven. For the frosting, room-temperature ingredients blend together smoothly—no lumps or separation! This simple step makes all the difference.
Frosting Too Thick
Nothing ruins a cake faster than frosting that’s too stiff to spread or too runny to hold its shape. The key is patience—let your frosting sit for 10 minutes after mixing to thicken slightly. If it’s still too thick, add 1 tsp heavy cream at a time.
Too thin? Add 1 tbsp powdered sugar and mix well. The perfect consistency should be like “soft-serve ice cream”—easy to spread but holds its shape. 🧀
Ignoring the Cooling Time
Fresh from the oven, cakes are fragile and frosting won’t set properly. Let your cake cool completely in the pan for 10 minutes, then transfer to a wire rack. Before frosting, let it cool to room temperature—this prevents melting and soggy layers.
And that hour in the fridge before serving? Non-negotiable! It lets all the flavors meld together and the frosting set properly for clean slices. Patience here makes all the difference. ⏰
Nutrition facts
Frequently asked questions
Why does this 1940s recipe use pineapple in carrot cake?
Pineapple was a rationing-friendly ingredient during the 1940s that added bright acidity to balance the sweetness. It also mimicked the texture of fresh fruit while being shelf-stable. Today, it keeps the cake moist and adds that nostalgic vintage flavor—though you can substitute with extra lemon juice if preferred.
Can I make this cake without walnuts or dates?
For walnuts, try pecans or almonds (toasted for extra flavor). Skip dates entirely if needed, but the cake will be less moist. For a sweeter alternative, add ½ cup raisins or chopped apricots. The walnut-date swirl is traditional but not mandatory for delicious results.
How do I store leftovers to keep them fresh?
Wrap tightly in plastic wrap and store at room temperature for 2-3 days. For longer storage, refrigerate (up to 1 week) or freeze unfrosted layers for 3 months. The frosting may weep slightly if refrigerated, so bring it to room temp before serving. Keep the cake in an airtight container to maintain moisture.
What makes this frosting different from regular cream cheese frosting?
The secret is the lemon juice and cinnamon—they brighten the sweetness and add warmth. This vintage version is also slightly less sweet than modern recipes, letting the carrot and spice flavors shine. The texture is ultra-smooth thanks to the butter-cream cheese blend, which gives that classic 1940s “pillowy” quality.
Can I use this recipe for a gluten-free version?
Yes! Swap the all-purpose flour for a 1:1 gluten-free baking blend (like Bob’s Red Mill). Add ½ tsp xanthan gum if your blend doesn’t include it. Note the texture will be slightly denser, but the flavor remains rich. For best results, let the cake cool completely before frosting to prevent crumbling.

- 3lb Prime Rib Roast Recipe: Juicy Pink Center Guaranteed in 3 Hours - October 31, 2026
- 5 Spice Cake Recipe: Warmly Spiced Layers With Crunchy Top - October 31, 2026
- 1950’s Macaroni and Cheese Recipe: Nostalgic Creamy Cheese Sauce with Buttery Noodles - October 31, 2026