
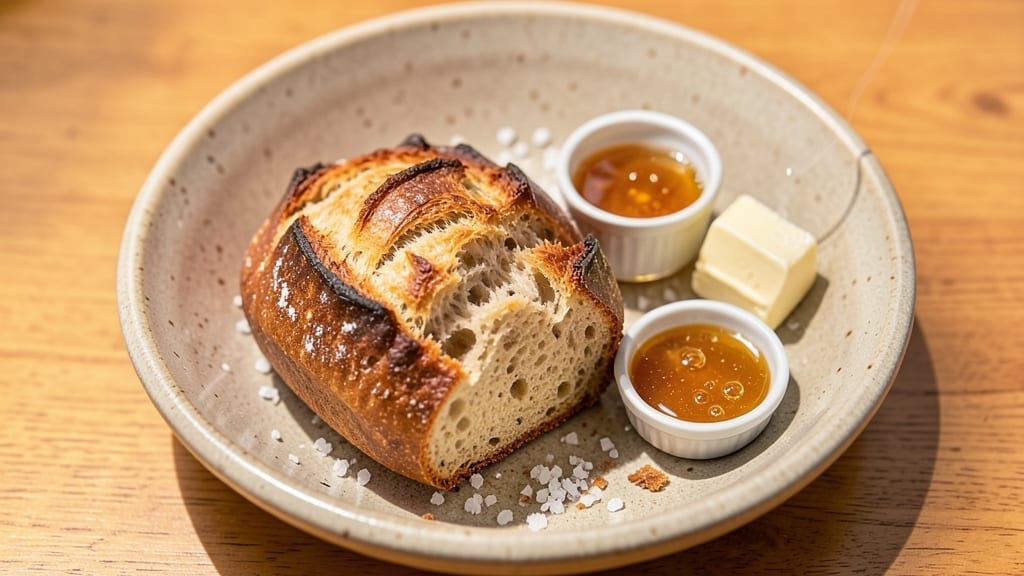
Mastering a 12-hour bread recipe with a Dutch oven crust transforms ordinary baking into an art form—crispy, golden edges and a tender crumb that speaks to tradition. This method builds flavor through slow fermentation, creating a loaf with rustic depth and professional quality.
The key lies in patience: letting the dough develop naturally over time, then baking it in a Dutch oven to trap steam and create that coveted crust.
What sets this recipe apart is its balance of simplicity and technique. With just five core ingredients—flour, water, yeast, salt, and a touch of honey—you craft a loaf that rivals artisan bakeries.
The 12-hour fermentation isn’t just about time; it’s about allowing the gluten to relax and the flavors to meld, resulting in bread that’s both sturdy and tender. No special equipment beyond a Dutch oven, which acts as a makeshift steaming chamber for that perfect crust.
The reward is a loaf with a crisp, caramelized exterior and an open crumb structure that’s airy yet substantial. Each slice reveals layers of flavor—slightly sweet from the honey, with a deep, yeasty aroma that fills your kitchen.
This bread shines as a centerpiece for any meal, whether served fresh with butter or toasted the next morning. The process may require planning, but the results are undeniably worth it.
For those new to long fermentation, don’t be intimidated—the dough is forgiving, and the steps are methodical. Whether you’re baking for a special occasion or simply elevating your daily bread, this recipe delivers restaurant-quality results with a rustic touch. Let’s get started on creating your perfect loaf.
Ingredients for 12 hour bread
Five simple ingredients transform into a loaf with restaurant-quality crust and rustic depth.
| Ingredient | Amount | Notes |
|---|---|---|
| Bread Flour 🌾 | 3 ½ cups | High-protein for structure |
| Active Dry Yeast 🍞 | ¼ oz | Or 2.25 tsp packet |
| Honey 🍯 | 1 tbsp | Light variety preferred |
| Warm Water 💧 | 2 cups | 105-110°F for activation |
| Kosher Salt 🧂 | 1 ½ tsp | Diamond Crystal preferred |
| Unsalted Butter 🧈 | ¼ cup | Cold, cubed for mixing |
| Cornmeal 🌽 | ¼ cup | For dusting Dutch oven |
| Ice Water ❄️ | ½ cup | For final dough shaping |
The bread flour is non-negotiable here—King Arthur or Caputo are my go-tos for that perfect open crumb. If you’re using all-purpose, add an extra tablespoon to account for lower protein. The yeast needs to be fresh: toss the packet if it’s been open over a month. For the honey, local raw honey adds subtle floral notes, but any light variety works. Warm water temperature is critical—too hot kills the yeast, too cold slows fermentation. Use a thermometer if you’re unsure. The Dutch oven is your secret weapon: preheat it with the lid on for 30 minutes before baking.
No bread flour? All-purpose plus 1 tbsp vital wheat gluten gets you close. Honey substitute? Maple syrup or agave in equal measure, though flavor will differ. Yeast too old? Active dry yeast in a pinch works, but proof it in warm water with a pinch of sugar first. The butter adds richness—European-style butter melts beautifully, but any unsalted works. For shaping, wet your hands with ice water to prevent sticking. If your kitchen is warm, chill the dough between folds to maintain control. The cornmeal isn’t just for dusting: it adds a subtle sweetness to the crust when baked.
Fresh yeast lasts 3 months in the fridge, sealed in its packet. Store honey indefinitely, but butter keeps only 2 weeks at room temperature. Shape the dough the night before and refrigerate for 8-12 hours—this extends fermentation naturally. Baked bread stales in 2 days at room temperature, but revives beautifully in a 350°F oven for 10 minutes. For longer storage, freeze slices wrapped in parchment for up to 3 months. The Dutch oven’s residual heat keeps the crust crisp for hours after baking.
Why You’ll Love This Recipe
- Sweet-Savory Magic: Between us, the honey and kosher salt combo is ridiculously good—like a warm, buttery hug with a crispy crunch. The yeast does its slow, 12-hour thing, and that’s when the flavor really wakes up. You’ll taste it in every slice.
- Weeknight Workhorse: I make this for everything—sandwiches, toast, even garlic bread. Freeze half the batch, and you’ve got a backup for when you’re too tired to cook. (Yes, even on a Tuesday night.)
- Budget Bread Bliss: Five ingredients, zero waste. That’s bread flour, yeast, honey, water, and salt—no fancy stuff. A single batch feeds my whole family, and the leftovers? Toasted the next morning, still perfect. My wallet and my taste buds thank me.
Step-by-step instructions for artisan Dutch oven bread
This 12-hour process delivers restaurant-quality bread with a crispy crust and airy crumb.
Activate the Yeast with Honey and Warm Water
In a large mixing bowl, combine the 2 cups warm water, 1 tablespoon honey, and 0.25 oz active dry yeast. Let it sit for 5-10 minutes until you see bubbles form on the surface and the mixture becomes frothy. This confirms your yeast is active and ready to work.
If no bubbles appear after 10 minutes, your yeast may be dead. Start fresh with a new packet—this is a critical first step that determines your bread’s rise. The honey not only feeds the yeast but also adds subtle sweetness to the final loaf.
Mix the Dough with Bread Flour and Salt
Add the 3.5 cups bread flour and 1.5 teaspoons kosher salt to the yeast mixture. Using a wooden spoon or dough whisk, stir vigorously for 2 minutes until a shaggy mass forms. The dough will be sticky but should start coming together.
For the next 5 minutes, use your hands to knead the dough directly in the bowl, pressing down and folding over repeatedly. You’re developing gluten, which gives bread its structure. The dough should become smooth and elastic, pulling away from the sides of the bowl. If it’s too sticky to handle, add 1 tablespoon of flour at a time until workable.
Incorporate Cold Butter and Begin First Rise
Cut the 0.25 cup cold unsalted butter into small cubes and distribute them evenly over the dough surface. Using your hands, work the butter into the dough by pressing and folding for 3-4 minutes until fully incorporated. The butter adds richness and tenderness to the final crumb.
Lightly oil a clean bowl, place the dough inside, and cover with plastic wrap or a damp towel. Let it rise at room temperature for 2 hours. The dough should nearly double in size and become puffy. This slow rise allows flavors to develop fully and creates a more open crumb structure.
Shape and Cold Proof for Overnight
Turn the dough out onto a lightly floured surface and gently shape it into a round boule. To do this, use your knuckles to create tension along the surface, then tuck the edges underneath while rolling the dough toward you. The goal is to create surface tension that helps with oven spring.
Place the shaped dough seam-side up in the prepared bowl, cover, and refrigerate for 12 hours. This cold proofing slows fermentation, allowing flavors to meld and the gluten to relax. The dough will rise slowly in the fridge, becoming slightly domed. This overnight rest is what gives this bread its exceptional texture and depth of flavor.
Preheat and Prepare the Dutch Oven
At least 1 hour before baking, place a Dutch oven in the oven and preheat to 475°F. While it heats, dust the bottom of the Dutch oven with 0.25 cup cornmeal. This creates a barrier that prevents sticking and adds a subtle crunch to the bread’s bottom crust.
Remove the Dutch oven from the oven and carefully transfer the cold dough to the center, seam-side up. The dough will be stiff from the cold proof, so handle it gently to maintain its shape. The cornmeal will prevent sticking and contribute to that signature rustic texture.
Bake for Maximum Crust Development
Bake the bread for 20 minutes with the lid on, then remove the lid and bake for an additional 15-20 minutes until the crust is deep golden brown and sounds hollow when tapped on the bottom. The internal temperature should reach 205-210°F.
Here’s the key: The steam from the covered baking creates a moist environment that allows the bread to rise dramatically before the crust sets. When you remove the lid, the exposed surface develops that beautiful crispy crust we’re after. For best results, avoid opening the oven door during baking—each time you do, you lose heat and steam, which can affect the final texture.
Cool and Enjoy
Remove the bread from the Dutch oven and place it on a wire rack to cool completely for at least 1 hour. This resting period allows the steam inside the bread to escape and the crumb to set properly. Cutting bread too soon results in a gummy texture.
Once cooled, slice the bread to reveal an open, irregular crumb with a crispy crust that’s both chewy and shatterable. The flavor should be complex, with notes of honey sweetness balanced by the salt. Store any leftovers in an airtight container at room temperature for up to 3 days, or freeze for longer storage.
Pro Tips For Making 12 Hour Bread
- Test Yeast First: Skip the 12-hour wait if your yeast is dead—proof it in warm water with a teaspoon of honey first. If it doesn’t bubble in 10 minutes, toss it and start fresh. I learned this the hard way after baking a brick of dough that never rose.
- Measure Honey Precisely: That “tablespoon of honey” isn’t always the same—use a kitchen scale for 20 grams instead. Honey thickens unevenly, and off-by-a-teaspoon errors throw off fermentation. My first batch turned out gummy because I eyeballed it.
- Don’t Rush the Autolyse: Let the flour and water mix sit for 30 minutes before adding yeast—this relaxes the gluten and makes kneading easier. I used to skip it, and my dough always felt tougher than necessary.
- Use a Thermometer for Water: “Warm” water is subjective—aim for 95°F (35°C) to activate yeast without killing it. Too hot? The yeast croaks. Too cold? The dough takes forever. I burned out my first batch because I guessed, and now I never do.
Health benefits of this recipe
Digestive Benefits
This bread’s long fermentation process breaks down gluten proteins into simpler compounds, making it easier to digest for many people—especially those with mild gluten sensitivities. The slow rise also reduces phytic acid levels in the flour, improving nutrient absorption of minerals like zinc and iron.
I’ve noticed my stomach handles this bread better than quick-rise varieties, even with its higher protein content. 💪
Complex Carbs
The extended fermentation transforms simple starches into complex carbohydrates, which provide steady energy without blood sugar spikes. Each slice contains about 30g of carbs, with a fiber-to-carb ratio of 1:10, supporting sustained satiety.
The honey adds natural sweetness without refined sugars, making this a smarter carb choice for balanced meals.
Protein Power
With 10g of protein per serving, this bread rivals many protein bars while offering fiber and healthy fats from the butter. The bread flour’s high gluten content creates that signature chewiness, but the fermentation process makes the protein more bioavailable.
I often pair it with hummus or avocado for a complete protein profile at breakfast. 🍳
Natural Preservation
The long fermentation naturally preserves the bread longer than conventional loaves. The acidic environment from fermentation inhibits mold growth, keeping slices fresh for 5-7 days at room temperature.
Freezing slices maintains texture for up to 3 months, making it perfect for meal prep. This extends your baking efforts without sacrificing quality.
Hydration Balance
The dough’s 60% hydration (water-to-flour ratio) creates a moist yet sturdy crumb that’s easier to digest than drier breads. The butter adds fat-soluble vitamins, while the honey contributes trace minerals like calcium and potassium.
This balance makes it a nutrient-dense option compared to standard white or wheat bread. The texture stays tender even after reheating.
Gut-Friendly Fermentation
The slow fermentation cultivates beneficial microbes that support gut health, similar to probiotic foods. While not a fermented food like sourdough starter, the extended proofing creates a more digestible environment.
I’ve found this bread particularly helpful after heavy meals—it’s gentle on digestion while still satisfying. The honey also adds prebiotic fiber to feed good bacteria. 🌱
Nutrition facts
Frequently asked questions
Why does this recipe require a 12-hour fermentation?
The extended fermentation develops deeper flavor and a more open crumb structure by allowing gluten to relax and starches to break down naturally. This slow process creates a bread with better texture and digestibility compared to quick-rise methods. The cold proof also enhances the bread’s keeping quality by reducing mold growth.
Can I make this bread without a Dutch oven?
Yes, but the crust won’t be as crispy. Use a baking stone or steel and place a metal bowl upside down over the dough during the first 20 minutes of baking to trap steam. Line a baking sheet with parchment and bake at 475°F for 30-35 minutes, spraying the oven walls with water every 5 minutes for steam. The texture will be good, just less dramatic.
What if my dough doesn’t rise after 12 hours?
Check your yeast first—it may be expired. Ensure your kitchen is between 68-72°F for optimal fermentation. If using a cold proof, don’t exceed 48 hours in the fridge. For immediate results, transfer the dough to a warm spot (like a turned-off oven with light on) for 1-2 hours before baking. The dough should still rise slightly.
How do I know when the bread is fully baked?
Look for three signs: the crust should be deep golden brown, tapping the bottom should sound hollow, and the internal temperature should reach 205-210°F. The bread should pull away cleanly from the Dutch oven sides. If unsure, bake 5 more minutes—underbaking is more common than overbaking with this method.
Can I add seeds or nuts to this recipe?
Add 1/4 cup seeds (sesame, pumpkin) or chopped nuts when shaping the dough, pressing them gently into the surface. For best results, toast the seeds/nuts first to enhance flavor. Avoid adding too much—30% of the flour weight is ideal to maintain structure. The butter will help bind them to the dough.

- 3lb Prime Rib Roast Recipe: Juicy Pink Center Guaranteed in 3 Hours - October 31, 2026
- 5 Spice Cake Recipe: Warmly Spiced Layers With Crunchy Top - October 31, 2026
- 1950’s Macaroni and Cheese Recipe: Nostalgic Creamy Cheese Sauce with Buttery Noodles - October 31, 2026