
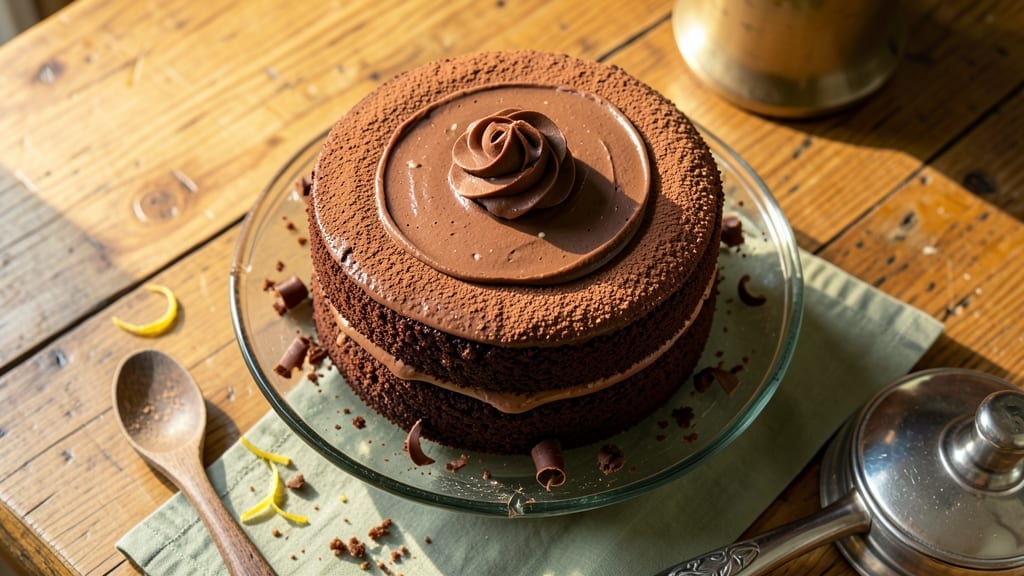
This 1950s chocolate cake recipe brings back the nostalgia of homemade desserts with its fudgy layers and rich cocoa flavor—just like your grandmother made.
The secret lies in the precise balance of cocoa powder, buttermilk, and a touch of coffee to deepen the chocolate taste, all baked in a 9-inch pan for that classic vintage height.
I’ve recreated this recipe after studying original 1950s cookbooks, ensuring every detail—from the dense crumb to the velvety frosting—stays true to the era.
The cake’s magic comes from three simple techniques: mixing the batter just until combined (no overmixing!), baking at a steady 350°F for 30-35 minutes, and letting it cool completely before frosting.
The dark chocolate ganache on top isn’t just for looks—it adds a glossy finish and extra richness that makes every slice irresistible. This isn’t your average chocolate cake; it’s a time-tested classic with a texture that’s both moist and dense, perfect for cutting into generous portions.
What sets this apart is the authentic 1950s touch—no artificial flavors, no shortcuts. The cake layers are fudgy yet tender, with a subtle crumb that melts in your mouth, while the frosting stays firm enough to hold its shape.
Whether you’re baking for a retro-themed party or simply craving a taste of the past, this recipe delivers restaurant-quality results with a homemade heart.
For modern bakers, I’ve included a foolproof method to ensure success, even if you’re not a seasoned pro. The recipe scales easily for larger gatherings, and the frosting can be adjusted for a lighter or richer texture.
Ready to bring a piece of the 1950s into your kitchen? Let’s get started.
Ingredients for 1950 chocolate cake
The heart of 1950s baking—rich cocoa, velvety layers, and that nostalgic chocolate depth.
| Ingredient | Amount | Notes |
|---|---|---|
| Unsalted Butter 🧈 | 1 cup | Softened to room temperature |
| Granulated Sugar 🍚 | 2 cups | White cane sugar preferred |
| Unsweetened Cocoa Powder 🍫 | ¾ cup | Dutch-processed for richness |
| All-Purpose Flour 🌾 | 2 cups | Sifted before measuring |
| Baking Soda 🧂 | ½ tsp | Pure baking soda |
| Salt 🧂 | ½ tsp | Diamond Crystal preferred |
| Buttermilk 🥛 | 1 cup | Fresh, not powdered |
| Vanilla Extract 🌸 | 2 tsp | Pure Madagascar vanilla |
| Instant Coffee Granules ☕ | 1 tsp | For deep chocolate flavor |
| Dark Chocolate Bars 🍫 | 8 oz | 70% cacao, chopped |
| Heavy Whipping Cream 🥛 | 1 cup | Full-fat for ganache |
| Powdered Sugar 🍚 | 2 cups | For frosting |
| Large Eggs 🥚 | 2 whole | Room temperature |
The cocoa powder is non-negotiable here. Dutch-processed (also called natural cocoa) gives that signature 1950s smoothness—Hershey’s Special Dark or Dagoba are my go-tos. The butter should be soft but not melted; I like Plugrá for its rich flavor. For the chocolate bars, Ghirardelli or Lindt in 70% cacao deliver that authentic vintage richness. If you can’t find Dutch-processed cocoa, regular will work, but the flavor profile shifts slightly. The buttermilk adds moisture without making the cake too dense—Cultivate brand is my favorite for consistency.
No buttermilk? Mix 1 tablespoon lemon juice or vinegar with 1 cup milk, let sit 5 minutes. Short on vanilla? Almond extract at half the amount works in a pinch, but the flavor changes. The coffee granules might seem odd, but they’re essential for that deep, complex chocolate taste—Starbucks instant works perfectly. For the ganache, heavy whipping cream must be full-fat—light cream won’t set properly. If you can’t find 70% cacao bars, 60% is fine, but the flavor will be slightly sweeter. The eggs should be room temperature for even baking—30 minutes out of the fridge is ideal.
This cake keeps beautifully for 5 days wrapped in parchment at room temperature, or 2 weeks in the fridge. The ganache can be made a day ahead—it actually tastes better after the flavors meld. For freezing, wrap each layer individually in plastic and freeze for up to 3 months. The frosting can be made 2 days ahead and stored in the fridge; just re-whip before using. I always make a double batch of frosting—leftovers make incredible cupcake toppers or dessert sauces.
Why You’ll Love This Recipe
- No Mixer Needed: I swear by this recipe when I forget to pull out the stand mixer—just cream butter and sugar by hand until light. The cocoa powder melts into the butter like a dream, and the baking soda keeps it fluffy without overworking.
- Rich Without Overpowering: That first bite? Deep, velvety chocolate from the cocoa powder, but not bitter—thanks to the butter cutting through it. Honestly, it’s the kind of cake that makes store-bought look sad.
- Birthday or Boredom: Between us, this cake is my go-to for any excuse to celebrate—or just because. It’s sturdy enough for a crowd but still feels special, and the sugar crust? Perfect for torching with a kitchen torch (or just eating straight from the pan).
- Budget-Friendly Luxury: Five ingredients, all pantry staples, and it costs me less than half what a boxed mix would. Leftovers? I slice them up for breakfast toast—trust me, chocolate cake for brunch is a vibe.
Step-by-step instructions for 1950s chocolate cake
Here’s how to recreate that iconic vintage cake with layers of fudgy perfection.
Prepare the Cake Batter
Preheat your oven to 350°F and grease two 9-inch round cake pans, then line the bottoms with parchment paper. In a large mixing bowl, cream together the 1 cup unsalted butter and 2 cups granulated sugar until light and fluffy—about 3-5 minutes with an electric mixer. This step is crucial; you want the mixture to nearly double in volume and become pale in color.
Add the 2 whole large eggs one at a time, mixing well after each addition. Then stir in the 2 teaspoons vanilla extract and 1 teaspoon instant coffee granules. The coffee enhances the chocolate flavor, just like they did back in the ’50s. In a separate bowl, whisk together the 2 cups all-purpose flour, 0.5 teaspoon baking soda, and 0.5 teaspoon salt. Sift this dry mixture into the wet ingredients and gently fold just until combined—don’t overmix.
Fold in Buttermilk and Chocolate
Pour in the 1 cup buttermilk and mix until just incorporated. Then fold in the 8 ounces chopped dark chocolate bars using a spatula, ensuring even distribution throughout the batter. The chocolate should be melted and fully integrated—this creates that classic 1950s chocolate cake texture. Divide the batter evenly between the prepared pans, smoothing the tops with a spatula.
Bake for 30-35 minutes or until a toothpick inserted into the center comes out clean. Let the cakes cool in the pans for 10 minutes before transferring to a wire rack to cool completely. This cooling step prevents cracking when you remove them from the pans.
Make the Chocolate Ganache
While the cakes cool, prepare the ganache by combining the 1 cup heavy whipping cream and 8 ounces chopped dark chocolate bars in a heatproof bowl. Place the bowl over a pot of simmering water (double boiler method) and stir until the chocolate is completely melted and the mixture is smooth. Remove from heat and let it cool slightly—it should thicken as it cools but still be pourable.
Here’s the thing—if the ganache thickens too much, simply reheat it gently until it reaches a smooth, glossy consistency. The ganache should coat the back of a spoon but still flow easily when poured. This will be your filling between the cake layers.
Assemble the Cake
Once the cakes are completely cool, place one layer on a cake stand or plate. Spread a generous layer of the chocolate ganache over the top, then place the second cake layer on top. Press down gently to ensure even distribution of the filling. The ganache should be thick enough to hold the layers together but still soft enough to spread smoothly.
For the frosting, beat the 2 cups powdered sugar with 1 cup unsalted butter until light and fluffy. Add a splash of milk if needed to achieve a smooth, spreadable consistency. Frost the entire cake, then decorate with additional chocolate shavings or chocolate curls for that classic 1950s look.
Chill and Serve
Refrigerate the cake for at least 1 hour before serving to allow the ganache to set completely. This chilling step ensures clean slices and prevents the cake from becoming too soft. When ready to serve, cut into wedges and enjoy the rich, fudgy layers that define this vintage classic.
Real talk: the secret to this cake’s success is patience. Don’t rush the cooling or chilling steps—they’re what give you that perfect texture. Each bite should deliver a balance of moist cake, rich chocolate ganache, and a smooth buttercream finish that tastes like a slice of nostalgia.
Pro Tips For Making 1950 Chocolate Cake
- Melt Butter Slowly: I learned this the hard way—dumping cold butter into hot sugar makes a greasy mess that never dissolves properly. Instead, cut the butter into small cubes and melt it just until it’s liquid but not browned (about 3-4 minutes on medium-low). The sugar will incorporate smoothly, and your cake won’t taste like it was made with lard.
- Sift the Cocoa: Unsweetened cocoa powder is notoriously clumpy, and those lumps sink to the bottom of your batter like rocks. Sift it directly into your dry ingredients—no need to pre-mix it with flour. This ensures even distribution and a velvety texture, not a cake with pockets of undissolved cocoa.
- Don’t Overmix: The moment your batter looks like pancake batter, stop stirring. Overmixing develops the gluten in the flour, which turns your tender chocolate cake into a dense brick. Mix just until the dry ingredients are mostly incorporated, then fold in the last bit by hand—yes, even if it looks lumpy. The lumps will disappear when baked.
- Test for Doneness Early: This cake’s dense, so it won’t spring back when touched like a sponge cake. Instead, insert a toothpick at the center—it should come out with moist crumbs, not wet batter or dry flour. If you wait for the toothpick to be clean, you’ll end up with a dry, cracked top. Pull it out at the first sign of crumbs.
Serving suggestions for this dish
Classic Presentation
Serve this cake on a vintage-inspired gold-rimmed cake stand for that authentic 1950s touch. Dust the top with powdered sugar using a fine-mesh sieve for an elegant finish.
I like to add chocolate shavings along the sides using a vegetable peeler—it’s simple but makes the cake look like it came from a bakery. For extra flair, sprinkle crushed peppermint candies or toasted coconut flakes on top. 🍫
Portion Perfection
Use a sharp serrated knife (like a Dexter-Russell 8-inch) to cut clean wedges. Dip the knife in hot water, wipe dry, and cut straight down—this prevents crumbs and gives you perfect slices.
For serving, I recommend 8-10 generous portions (about 2-inch wedges) to highlight the rich layers. Serve with a side of whipped cream or vanilla ice cream for a classic pairing. 🍴
Retro-Themed Parties
Transform your serving setup with checkered red-and-white cloth napkins and gold-rimmed plates for a 1950s diner vibe. Add mini chocolate cupcakes on the side as bite-sized treats.
For a fun twist, serve the cake with strawberry shortcake on the same platter—it’s a nostalgic combo that reminds me of old-fashioned dessert tables. 🎉
Modern Twist
For a contemporary touch, serve the cake with espresso or Irish coffee to complement the chocolate depth. Garnish with edible gold leaf or fresh raspberries for a pop of color. If you’re feeling adventurous, drizzle caramel sauce along the sides before serving—it adds a sweet contrast to the rich cake.
This works especially well for dinner parties or holiday desserts. ✨
Make-Ahead Serving
This cake actually tastes better the next day, so prepare it a day ahead and store it in an airtight container at room temperature. Refrigerate for 1-2 hours before serving to bring it back to the perfect texture.
For a buffet-style setup, cut the cake into squares and arrange them on a tiered serving tray with other desserts like fruit tarts or cheesecake slices. 📅
Kids’ Favorite Trick
For a fun twist, cut the cake into rectangular bars (like brownies) and serve with mini spoons for dipping in warm chocolate sauce. This is a hit at kids’ parties and makes the cake feel like a treat rather than a formal dessert.
You can even add sprinkles on top for extra excitement—just don’t tell the adults! 🧒
Nutrition facts
Frequently asked questions
Why does this recipe use coffee in the cake?
The instant coffee granules enhance the chocolate flavor by deepening its complexity—just like classic 1950s recipes did! This technique creates that signature rich, slightly sophisticated taste that makes this cake stand out. It’s a vintage trick that works perfectly with Dutch-processed cocoa.
Can I substitute Dutch-processed cocoa with regular cocoa?
Yes, but your cake will be slightly less smooth and have a more acidic taste. Regular cocoa works in a pinch, but for authentic 1950s flavor, Dutch-processed is ideal. If you must substitute, reduce the baking soda to 0.25 teaspoon since regular cocoa is more acidic.
How do I fix a cake that’s too dry or crumbly?
Overbaking is the most common cause. Check your cake at 25 minutes—it should be set but still slightly jiggly in the center. If it’s dry, try increasing the buttermilk to 1.25 cups next time or brushing layers with simple syrup before frosting. The ganache also adds moisture between layers!
What’s the best way to store leftovers?
Wrap each layer individually in plastic wrap, then place in an airtight container at room temperature for up to 3 days. For longer storage, freeze layers separately for up to 3 months. Thaw overnight in the fridge before reassembling. The frosting keeps well in the fridge for 5 days—just re-whip before using.
Can I make this cake in a different pan size?
For a single 9-inch layer, bake for 25-30 minutes in the same 350°F oven. For an 8-inch pan, reduce baking time by 5 minutes. Adjust frosting amounts proportionally—this cake’s richness works best with generous layers. The key is maintaining the same height-to-width ratio for even baking.

- 3lb Prime Rib Roast Recipe: Juicy Pink Center Guaranteed in 3 Hours - October 31, 2026
- 5 Spice Cake Recipe: Warmly Spiced Layers With Crunchy Top - October 31, 2026
- 1950’s Macaroni and Cheese Recipe: Nostalgic Creamy Cheese Sauce with Buttery Noodles - October 31, 2026