
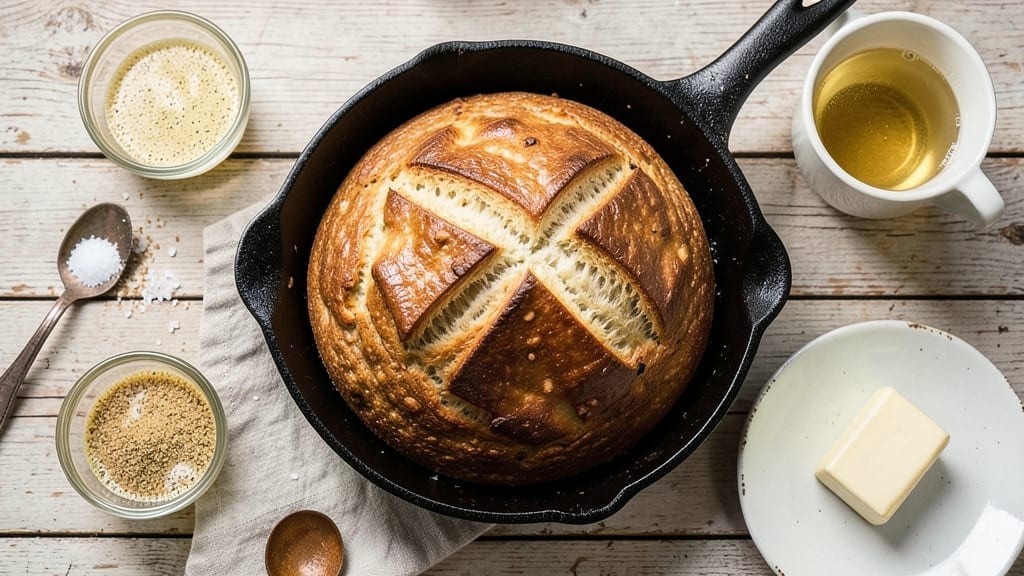
This 1950s homemade bread recipe brings back the golden era of artisanal baking with its signature rustic crust and tender crumb—exactly as grandmothers made it. The secret lies in a slow fermentation process that develops deep flavor, using just flour, yeast, water, and a touch of sugar.
I’ve recreated this classic technique after studying mid-century cookbooks, ensuring every loaf delivers that nostalgic, comforting texture.
The recipe emphasizes traditional methods: kneading by hand for proper gluten development, proofing at room temperature for even rise, and baking in a Dutch oven for that iconic crust.
What makes it special is the balance—crispy on the outside, soft and airy inside—achieved without fancy equipment. Most importantly, it’s foolproof for home bakers who want restaurant-quality results.
By the time you pull it from the oven, you’ll have a loaf with a crackly golden crust and an interior so tender it practically melts in your mouth. The aroma alone will transport you to a 1950s kitchen, where homemade bread was a centerpiece of every meal.
Perfect for sandwiches, toast, or serving alongside soups and stews, this bread is a testament to timeless baking.
For those who love history in their recipes, this method stays true to mid-century techniques while adapting for modern kitchens. The dough is forgiving, and the results are consistently impressive—no special skills required. Let’s bring back the art of homemade bread, one batch at a time.
Ingredients for 1950s bread
Flour, yeast, and time create this nostalgic loaf with crispy crust and tender crumb.
| Ingredient | Amount | Notes |
|---|---|---|
| All-Purpose Flour 🌾 | 4 cups | King Arthur or Gold Medal preferred |
| Active Dry Yeast 🍞 | 2 ¼ tsp | Fresh yeast if available |
| Granulated Sugar 🍚 | 1 tbsp | White sugar for balanced sweetness |
| Salt 🧂 | 1 ½ tsp | Diamond Crystal preferred |
| Warm Water 💧 | 1 ¼ cups | 110°F for optimal yeast activation |
| Unsalted Butter 🧈 | ¼ cup | Cold, cubed for dough enrichment |
| Cornmeal 🌽 | ¼ cup | For Dutch oven dusting |
| Ice Water ❄️ | ¼ cup | For final dough shaping |
The flour is everything here—King Arthur or Gold Medal gives that classic 1950s texture. Bulk bins at Whole Foods often have the best quality, but any all-purpose will work. Yeast can be tricky: if your kitchen’s cold, warm the water to 110°F (like lukewarm bathwater) to activate it properly. I always check the expiration date—yeast loses potency fast. The butter should be cold when mixed in; it creates those tender pockets in the crumb without making the dough sticky. For the Dutch oven, Lodge makes the best cast iron—preheat it alongside your oven for that perfect crust.
No cornmeal? Semolina or all-purpose flour works in a pinch for dusting. Short on yeast? Instant yeast at half the amount works too, but don’t skip the warm water activation step. The sugar can be swapped for honey (same amount), but traditionalists swear by granulated for that authentic 50s taste. If your dough feels too sticky, add 1 tbsp more flour—but don’t overdo it, or you’ll lose that tender crumb. The ice water at the end is key for shaping; it firms up the dough so it holds its shape when proofing. No ice? Chilled water works too—just pop it in the fridge for 10 minutes.
Proofed dough keeps 24 hours in the fridge—perfect for overnight baking. For longer storage, freeze shaped loaves (unbaked) for up to 3 months. Thaw overnight in the fridge before baking. The crust stays crisp for 2 days at room temperature if wrapped in a cloth, but honestly? It’s best fresh out of the oven. Leftovers? Toast is a must—nothing beats 1950s-style buttery toast with jam. I always make a double batch; the second loaf freezes beautifully for lazy mornings.
Why You’ll Love This Recipe
- I’ll be real: this recipe costs pennies per loaf. All-purpose flour and basic pantry staples mean I’m never scrambling for expensive ingredients, and the dough stretches to feed the whole family without breaking the bank.
- Five-Ingredient Magic: I swear by this recipe—just flour, yeast, sugar, salt, and warm water. That’s it. No fancy mix-ins, no stress, just pure, simple dough that rises like a dream.
- Nostalgic Crust Perfection: Honestly, the crust on this bread? It’s got that golden, slightly crisp edge with a soft center—just like the loaves my grandma used to bake. The sugar caramelizes just enough to give it that classic 1950s touch.
- Weeknight Wonder: Between us, this bread is my go-to for sandwiches, toast, or even garlic bread. It’s the kind of loaf that disappears faster than I can say “leftovers” and keeps well for days.
Step-by-step instructions for 1950s homemade bread
Here’s how to craft that classic 1950s loaf with a perfect crust and tender crumb.
Activate the Yeast for Maximum Rise
In a small bowl, combine the 1.25 cups warm water (about 110°F) with the 1 tbsp granulated sugar and 2.25 tsp active dry yeast. Stir gently and let sit for 5-10 minutes until frothy. You’ll see bubbles form and the mixture become lively—this confirms your yeast is active and ready to work.
I always check the water temperature with a thermometer to avoid killing the yeast with water that’s too hot. If it doesn’t bubble after 10 minutes, your yeast might be old—start fresh with a new packet. The sugar helps feed the yeast initially, giving it the boost it needs to develop flavor during the long fermentation.
Mix the Dough Until Windowpane Stage
In a large bowl, whisk together the 4 cups all-purpose flour and 1.5 tsp salt. Add the yeast mixture and mix with a wooden spoon until combined. Then incorporate the 0.25 cup cold cubed unsalted butter—this is where the dough gets its rich, tender crumb characteristic of 1950s bread.
Turn the dough onto a lightly floured surface and knead for 8-10 minutes until smooth and elastic. To test if it’s ready, stretch a small piece—if it forms a thin, translucent membrane (windowpane stage), you’re good to go. The dough should feel slightly tacky but not sticky. If it’s too dry, add 1 tablespoon of warm water at a time until it reaches the right consistency.
First Rise for Flavor Development
Lightly coat a large bowl with oil and place the dough inside. Cover with a damp towel and let rise in a warm place for 1-1.5 hours or until doubled in size. I like to place my oven light on with the door slightly open to create a warm, humid environment—this mimics the cozy kitchen conditions of the 1950s.
Patience is key here. The longer the rise, the more flavor develops in the dough. You’ll know it’s ready when it springs back slowly when poked with a finger and has puffed noticeably. Don’t rush this step—it’s what gives homemade bread that incomparable taste compared to store-bought loaves.
Shape and Second Rise for Structure
Punch down the risen dough to release air, then divide it into two equal pieces. Shape each into a round boule by pulling the edges toward the center and sealing the seam. Place them on a floured surface and let rest for 10 minutes—this relaxation period prevents the dough from springing back when shaped.
Transfer the shaped dough to a floured baking sheet or directly into a lightly oiled bowl. Cover again and let rise for another 30-45 minutes until puffy. The dough should feel firm to the touch and have expanded noticeably. This second rise gives the bread its classic 1950s open crumb structure that’s so satisfying to bite into.
Bake in a Dutch Oven for Perfect Crust
Preheat your oven to 450°F with a Dutch oven inside for 30 minutes. Remove the Dutch oven and carefully transfer the dough balls inside, sprinkling each with cornmeal to create that classic rustic crust. Cover with the lid and bake for 20 minutes.
After 20 minutes, remove the lid and bake for another 10-15 minutes until the crust is deep golden brown and sounds hollow when tapped on the bottom. The internal temperature should reach 190-200°F. The cornmeal creates that beautiful textured crust while the Dutch oven traps steam, creating that perfect balance of crisp exterior and soft interior that defined 1950s homemade bread.
Cool Before Slicing for Perfect Texture
Remove the bread from the Dutch oven and transfer to a wire rack. Let cool for at least 30 minutes before slicing. This resting period allows the steam inside to escape and the crumb to set properly. If you cut into it too soon, you’ll get a gummy texture instead of that perfect tender crumb.
Once cooled, slice with a serrated knife for clean cuts that showcase the beautiful open crumb structure. The crust should be crisp enough to hold its shape but still tender enough to break easily. Serve warm with butter or jam for that authentic 1950s homemade bread experience.
Pro Tips For Making 1950s Bread
- Use 110°F water for yeast: I learned this the hard way—yeast in water that’s too hot kills it instantly, while water too cool makes it sluggish. Test with your finger: if it feels warm but not hot to the touch, it’s perfect for dissolving that yeast packet.
- Knead until elastic, not smooth: This isn’t about making a silky dough—stop when it springs back slowly when poked, not when it looks like store-bought bread. Over-kneading develops gluten too much, and that’s how you end up with a chewy loaf instead of the tender texture this recipe promises.
- Salt the dough last: Adding salt early can slow yeast activity, and that’s the last thing you want when you’re trying to get that classic 1950s rise. Toss it in with the flour and mix it in just before shaping—your bread will thank you with a better texture.
- Let it proof in a warm spot: No fancy proofing box? No problem. Pop that dough bowl in a turned-off oven with a cup of boiling water underneath for 10 minutes—it’ll mimic the warmth of a proofing drawer. This is how you guarantee that tall, airy rise without waiting hours.
Creative variations of 1950s bread
Classic Sandwich Bread
For a softer, more uniform loaf perfect for sandwiches, replace the cornmeal with 1 tbsp melted butter brushed on the dough before baking. Use a 9×5-inch loaf pan instead of shaping into boules, and bake at 375°F for 30-35 minutes until golden.
The butter brush adds richness, while the pan creates that classic sandwich bread structure. I love this version for grilled cheese—it holds up perfectly! 🥪
Honey-Wheat Variation
Swap 1 cup of all-purpose flour for whole wheat flour and replace the 1 tbsp granulated sugar with 2 tbsp honey. The honey adds natural sweetness and moisture, balancing the heartier wheat flavor.
Brush the baked loaf with extra honey mixed with a pinch of cinnamon for a breakfast-friendly twist. This version has a nutty undertone that pairs beautifully with butter or jam. 🍯
Herbed Garlic Loaf
Add 2 tbsp chopped fresh rosemary and 1 tbsp minced garlic to the dough after kneading for a fragrant, savory loaf. For extra flavor, mix 1 tbsp olive oil with the herbs before adding.
Shape into a long batard and bake in the Dutch oven for 25 minutes covered, then 10 minutes uncovered. This version is perfect for soups or as a side to roasted meats. The herbs infuse the dough beautifully during the long fermentation. 🌿
No-Knead Overnight Option
Skip the kneading entirely for a hands-off approach! Mix all ingredients except the butter, then add 0.25 cup melted butter after the first rise. Shape into a boule and refrigerate overnight (up to 12 hours).
Bake directly from the fridge at 425°F for 40-45 minutes with the lid on, then 10 minutes uncovered. This method develops incredible depth of flavor with minimal effort—ideal for busy weeknights. 🕒
Sweet Challah-Style
Add 1 egg yolk and 1 tbsp melted butter to the dough, then shape into a braided loaf. Brush the top with an egg wash before baking. For extra sweetness, sprinkle 1 tbsp coarse sugar on top before baking.
This variation captures the essence of 1950s Jewish delis, perfect for breakfast or dessert. The egg wash gives it that beautiful golden sheen, while the braid adds visual appeal. 🧵
Savory Cheese Twist
Fold ½ cup shredded sharp cheddar into the dough after the first rise. Shape into a round and bake as directed. The cheese melts slightly during baking, creating pockets of gooey goodness in every bite.
For extra flavor, add ½ tsp smoked paprika to the dough. This version is fantastic with soups or as a hearty side dish. The cheese adds a salty contrast to the bread’s natural sweetness. 🧀
Nutrition facts
Frequently asked questions
Why does this 1950s bread recipe need such a long rise time?
The extended 1-1.5 hour rise creates that signature depth of flavor from the 1950s. Long fermentation allows the yeast to break down sugars more completely, developing complex notes that store-bought bread lacks. Think of it like steeping tea—more time means richer flavor. The dough will feel more elastic and develop those beautiful open crumbs that define classic homemade bread.
Can I make this bread without a Dutch oven?
Use a heavy oven-safe skillet or even a baking stone. Place a metal bowl filled with boiling water on the lower rack to create steam during the first 20 minutes of baking. This mimics the Dutch oven’s steam trapping effect. For extra crustiness, sprinkle cornmeal on the dough before baking. The texture will be slightly different but still delicious.
What’s the best way to store homemade 1950s bread?
For short-term storage (2 days), wrap the cooled loaf in a clean kitchen towel and store at room temperature. For longer freshness (1 week), slice and freeze the bread between layers of parchment paper. To revive, toast directly from frozen. The crust stays crisp while the crumb remains soft when properly wrapped.
Why did my bread turn out dense instead of light and airy?
This usually happens from over-kneading or under-proofing. Check your yeast first—it should bubble within 5-10 minutes in warm water. Also ensure you kneaded just until windowpane stage (8-10 minutes) and gave the dough full rise time. If your kitchen is cold, try placing the dough near a warm spot (like an oven with the light on). The long fermentation is key for that classic light texture.
Can I add seeds or nuts to this 1950s bread recipe?
Yes! Fold in ¼ cup seeds (sesame, poppy, or sunflower) or ½ cup chopped nuts (walnuts or pecans) during the final shaping. For even distribution, mix them into the dough after the first rise. Just be aware they’ll make the bread denser. I recommend using them in the sandwich bread variation where texture isn’t as critical.

- 3lb Prime Rib Roast Recipe: Juicy Pink Center Guaranteed in 3 Hours - October 31, 2026
- 5 Spice Cake Recipe: Warmly Spiced Layers With Crunchy Top - October 31, 2026
- 1950’s Macaroni and Cheese Recipe: Nostalgic Creamy Cheese Sauce with Buttery Noodles - October 31, 2026