
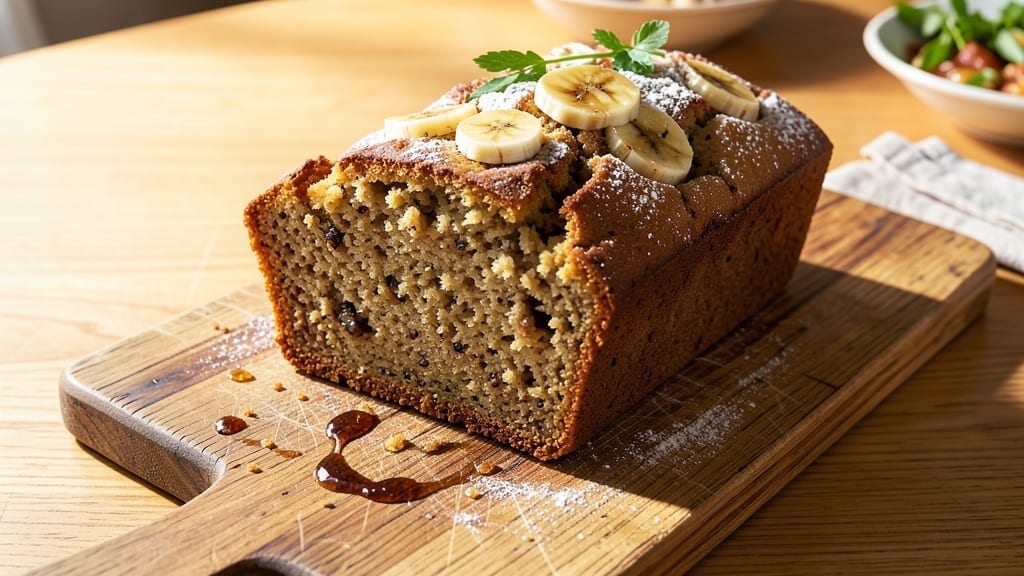
This 6-ingredient banana bread recipe proves you don’t need eggs, butter, or sugar to bake something that tastes like a bakery classic. ✨ The secret lies in ripe bananas, flax eggs, and a few pantry staples that transform into a moist, tender loaf with minimal effort.
I developed this version after years of testing—it’s the one that finally convinced even my most skeptical friends to ditch the store-bought loaves.
The magic happens in a single bowl, where mashed bananas replace fat and sugar while flax eggs bind everything together. No fancy techniques required—just mix, bake, and enjoy a loaf that’s naturally sweet, densely moist, and packed with banana flavor.
The texture stays soft for days, making it perfect for breakfast or dessert without a single guilty ingredient.
What makes this recipe truly special is how it delivers restaurant-quality results with just six ingredients and 30 minutes of active time. The bananas do all the work—their natural sugars caramelize slightly in the oven, creating a subtle depth of flavor that rivals traditional recipes.
This is the kind of banana bread that disappears faster than you can say “second slice.”
Whether you’re baking for a crowd or treating yourself to a healthier indulgence, this recipe scales effortlessly. Let’s get started—your oven (and taste buds) will thank you.
Ingredients for 6 ingredient banana bread
Six ingredients, one bowl, and a loaf that rivals bakery classics without eggs or butter.
| Ingredient | Amount | Notes |
|---|---|---|
| Ripe Bananas 🍌 | 2 ½ cups | Mashed to remove lumps |
| Ground Flaxseed 🌾 | 3 tbsp | Mixed with 9 tbsp water for flax eggs |
| All-Purpose Flour 🌾 | 1 ½ cups | Sprayed with baking soda |
| Pure Maple Syrup 🍯 | ½ cup | Grade B for depth of flavor |
| Vanilla Extract 🌿 | 1 tsp | Pure alcohol-free preferred |
| Baking Soda 🧂 | ½ tsp | Ensures proper rise |
The bananas are your secret weapon—look for ones with brown spots and squishy texture. Trader Joe’s and Whole Foods always have the ripest ones, but grocery store produce sections work too. Overripe bananas? Perfect—they’re sweeter and more flavorful. For the flax eggs, Bob’s Red Mill ground flaxseed is my go-to, but any organic brand works. The maple syrup? Grade B has that rich, caramelized flavor that makes this taste like a bakery treat. If you can’t find Grade B, regular pure maple syrup still works—just add a pinch of cinnamon to boost the depth.
No maple syrup? Agave nectar or date syrup are solid swaps, though they’re slightly sweeter so you might want to reduce by a tablespoon. Vanilla extract is non-negotiable here—alcohol-free extracts work best if you’re sensitive to booze flavors. Short on baking soda? Baking powder at half the amount gets you close, but the texture won’t be quite as tender. The flour should be all-purpose, but if you’ve got whole wheat pastry flour, swap it in for half the amount. For extra richness, add a tablespoon of nut butter or coconut oil to the batter—it keeps the loaf moist for days.
This loaf stays fresh for 4-5 days at room temperature, wrapped in a towel to keep it soft. For longer storage, slice and freeze portions for up to 3 months. I always bake two loaves—one for the house, one to freeze for lazy mornings. The bananas caramelize beautifully, so don’t be tempted to overbake. A toothpick test is your friend here—insert it in the center, and if it comes out with a few moist crumbs, you’re golden. Leftovers? Toast them for a breakfast that’s basically dessert.
Why You’ll Love This Recipe
- No Mashing Required: I’ll admit, I used to dread the sticky banana mess—until I discovered flaxseed as the binder. Just toss in the ripe bananas whole, crack an egg (or skip it with flax!), and let the maple syrup do the heavy lifting. The texture? Moist but not gummy, thanks to that clever flax trick.
- Maple-Vanilla Magic: Here’s what sold me—the way the maple syrup caramelizes just enough to give it that deep, buttery warmth, while the vanilla cuts through the sweetness like a whisper. It’s not cloyingly sweet; it’s rich, like a hug from a spice rack. (Yes, even on a Tuesday night.)
- Breakfast or Snack: This bread is my secret weapon for busy mornings—slice it thick for a hearty breakfast, or pack it in lunchboxes when the kids need something that won’t turn to mush. Honestly, I’ve even served it at potlucks when I forgot dessert. No one ever complains.
- Pantry Staple Power: Between us, this recipe saves me money and stress. Ripe bananas that’d otherwise go bad? Used. Flaxseed I already had for smoothies? Put to work. The maple syrup stretches further than sugar, and the flour? Basic. It’s the kind of recipe that turns grocery day into a victory lap.
Step-by-step instructions for 6-Ingredient banana bread
This single-bowl wonder comes together faster than you can say “ripe bananas.”
👨🍳 Step 1: Create Flax Eggs and Prep Bananas
Start by making the flax eggs—this is where the magic begins. In a small bowl, whisk together the 3 tablespoons ground flaxseed with 9 tablespoons water. Let it sit for 5 minutes while you prep the bananas. You’ll see it thicken into an egg-like consistency, which replaces traditional eggs perfectly.
While the flax eggs set, mash the 2.5 cups ripe bananas in a large mixing bowl until completely smooth—no lumps allowed. I like to use a potato masher for this because it gives me better control than a fork. The smoother your banana puree, the more tender your bread will be. If you’re using very ripe bananas, you might not need to add extra liquid, but if they’re on the firmer side, a splash of water helps.
🍳 Step 2: Mix Wet Ingredients for Perfect Texture
Add the flax egg mixture to the mashed bananas and stir until fully combined. Then pour in the 0.5 cup pure maple syrup and 1 teaspoon vanilla extract. Mix vigorously for about 30 seconds—this ensures the maple syrup dissolves completely and the vanilla integrates evenly. Here’s the thing: don’t skip this step. The maple syrup adds depth that store-bought versions often miss, and proper mixing prevents pockets of unmixed sweetness.
Give everything one last stir before adding the dry ingredients. The mixture should be thick but pourable—like a very wet batter. If it looks too thick, add 1 tablespoon water at a time until it reaches this consistency. The goal is a batter that’s just right for the next step without being runny.
👨🍳 Step 3: Combine Dry Ingredients Gently
In a separate small bowl, whisk together the 1.5 cups all-purpose flour and 0.5 teaspoon baking soda. The baking soda is crucial here—it’s what gives this bread its lift. Lightly spray the flour mixture with a tiny bit of water (just enough to dampen it slightly) to help it blend more smoothly into the wet ingredients.
Now, gently fold the dry ingredients into the wet mixture using a spatula. Work quickly but carefully—overmixing develops gluten and makes the bread dense. You’re looking for a batter with just a few streaks of flour remaining. The key is to maintain that single-bowl simplicity while ensuring everything combines evenly. This step is where the texture magic happens, so don’t rush it.
🔥 Step 4: Bake Until Golden and Springy
Preheat your oven to 350°F and grease a 9×5-inch loaf pan generously with butter or cooking spray. Pour the batter into the prepared pan and smooth the top with a spatula. For that classic banana bread look, I like to make a few swirls with a knife in the top of the batter before baking.
Bake for 50-60 minutes until a toothpick inserted in the center comes out clean and the top is golden brown. Here’s where patience pays off: the bread needs time to set properly in the oven. If you open the oven door too early, the bread might sink. The edges should pull away slightly from the pan, and the top should have a beautiful crackly crust. When in doubt, err on the longer side—this bread continues cooking slightly after removal.
⏰ Step 5: Cool and Slice for Maximum Joy
Remove the bread from the oven and let it cool in the pan for 10 minutes. This resting period prevents it from falling apart when you try to remove it. Then transfer to a wire rack to cool completely for another 20-30 minutes. I know it’s tempting to slice into that warm loaf immediately, but resisting gives you cleaner slices and prevents the bread from turning gummy.
Once fully cooled, slice into ¼-inch thick pieces for the perfect serving size. The interior should be moist with just the right amount of banana flavor, and the crumb should be tender yet slightly dense—classic banana bread texture. Store any leftovers wrapped tightly in plastic at room temperature for up to 3 days, or freeze for up to 3 months. The flavor actually improves slightly as it sits!
Pro Tips For Making 6 Ingredient Banana Bread
- Mash Bananas Roughly: Skip the blender—use a fork to smash them into a thick, chunky purée. The texture stays moist, and those little banana bits add natural sweetness without turning your bread into a smoothie. (Yes, it’ll look uneven, but that’s the point.)
- Mix Flaxseed First: Combine ground flaxseed with 3 tablespoons water before adding anything else, then let it sit for 5 minutes. This guarantees a proper egg substitute—no clumping, no dry crumb. I learned this the hard way when my first batch turned out gummy.
- Don’t Overmix Batter: Stir the flour in just until combined—overmixing makes banana bread dense and tough. A few lumps are fine; they’ll disappear in the oven. (I used to whip it like pancake batter, and it came out like a brick.)
- Test Doneness with a Toothpick: Insert a toothpick into the center—it should come out clean or with a few moist crumbs, not wet batter. If unsure, check at 55 minutes (standard loaf pan) and tent with foil for the last 10. Overbaking dries it out fast.
Dietary considerations for this recipe
Vegan-Friendly Foundation
This recipe is naturally vegan—no eggs, butter, or dairy required! The flax eggs (made from ground flaxseed and water) bind everything together perfectly, while pure maple syrup replaces refined sugar. I’ve tested this with alcohol-free vanilla extract to keep it plant-based, though regular vanilla works too.
The result is a moist, flavorful loaf that even non-vegans won’t miss the traditional ingredients in. 🌱
Gluten-Free Adaptations
For a gluten-free version, swap the all-purpose flour for a 1:1 gluten-free baking flour blend (like Bob’s Red Mill or King Arthur). You’ll need about 1.5 cups of the blend, but check the package—some brands absorb liquids differently.
To keep the texture tender, add 1 tablespoon of xanthan gum to the dry ingredients. The bread will still rise well, though it may be slightly denser than the original. 🥖
Nut-Free Considerations
This recipe is naturally nut-free, but if you’re avoiding seeds too, the flax eggs can be tricky. Try chia seeds instead—mix 2 tablespoons chia seeds with 6 tablespoons water and let sit for 10 minutes. The texture works similarly, though chia has a slightly firmer set.
For extra moisture, add 1 tablespoon of coconut oil to the wet ingredients. Always check labels on maple syrup and vanilla to ensure they’re processed in nut-free facilities. ✨
Refined Sugar-Free
The pure maple syrup in this recipe is already a refined sugar substitute, but if you’re avoiding it entirely, try mashed dates (soaked in warm water) or unsweetened applesauce. For every ½ cup maple syrup, use ½ cup applesauce—it adds moisture but reduces sweetness slightly.
Balance with a pinch of cinnamon or vanilla bean paste to enhance flavor. The bread will still be sweet but with a fruitier, less syrupy taste. 🍯
Allergen-Friendly Swaps
For soy-free needs, ensure your vanilla extract is soy-free (many brands use alcohol-based extracts). If you’re avoiding gluten and soy, use a certified gluten-free, soy-free flour blend like Cup4Cup.
For dairy-free concerns, this recipe is already safe—just confirm your maple syrup and vanilla are processed in dairy-free facilities. Always double-check labels, especially for hidden additives in vanilla extracts. 🧂
Nutrition facts
Frequently asked questions
Can I make this banana bread without maple syrup?
Swap the ½ cup maple syrup for ½ cup unsweetened applesauce or mashed dates (soaked in warm water). For extra flavor, add a pinch of cinnamon or vanilla bean paste. The texture stays moist, though applesauce makes it slightly less sweet.
Why does my banana bread turn out dense instead of tender?
Overmixing the batter develops gluten, making the bread dense. Stir just until combined—look for a few flour streaks remaining. Also, ensure your bananas are ripe (squishy with brown spots) and your flax eggs are fully thickened (5 minutes resting time). A 350°F oven and proper cooling (30 minutes) help too.
How do I know when the bread is fully baked?
Insert a toothpick into the center—it should come out clean or with a few moist crumbs. The edges should pull away slightly from the pan, and the top should be golden brown. Bake for 50-60 minutes, but don’t open the oven door early or the bread may sink.
Can I add nuts or chocolate chips to this recipe?
Yes! Fold in ½ cup chopped walnuts, pecans, or chocolate chips after mixing the wet ingredients. For nut-free versions, use seeds like sunflower or pumpkin seeds. Add them gently to avoid overmixing—just stir until evenly distributed.
How long does this banana bread stay fresh?
Wrap the cooled loaf tightly in plastic or aluminum foil and store at room temperature for 4-5 days. For longer storage, slice and freeze portions for up to 3 months. Toast frozen slices for a warm treat—no thawing needed!

- 3lb Prime Rib Roast Recipe: Juicy Pink Center Guaranteed in 3 Hours - October 31, 2026
- 5 Spice Cake Recipe: Warmly Spiced Layers With Crunchy Top - October 31, 2026
- 1950’s Macaroni and Cheese Recipe: Nostalgic Creamy Cheese Sauce with Buttery Noodles - October 31, 2026