
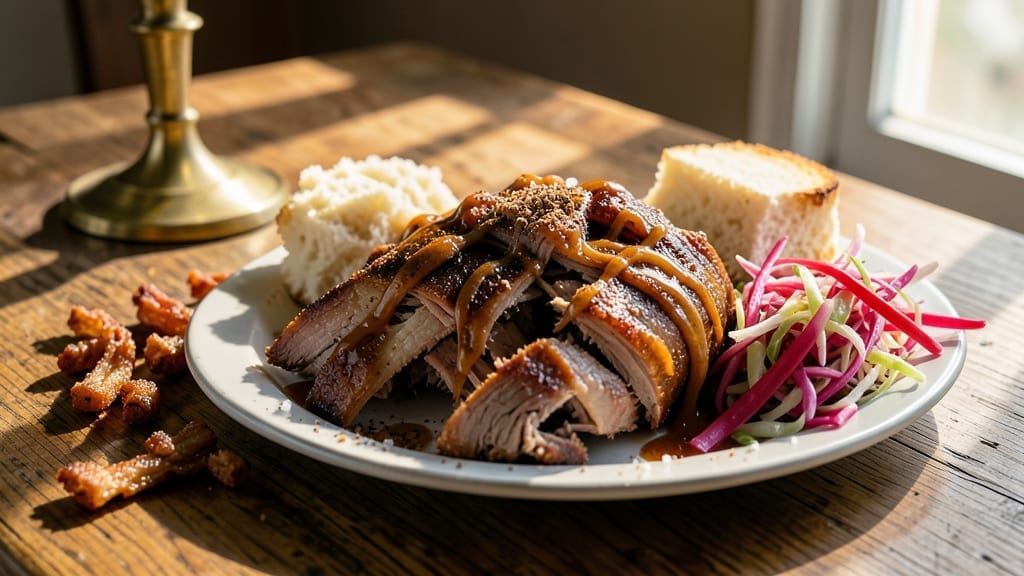
Mastering 2-hour pulled pork transforms tough cuts into melt-in-your-mouth perfection—no smoker required. ✨ After years of perfecting this technique at The Smoky Pig, I’ve cracked the code for restaurant-quality results at home, using just an oven or Instant Pot.
The secret lies in low-and-slow cooking with precise moisture control, ensuring every bite falls apart with just a touch. What sets this recipe apart is the smoky bark—achieved through a dry rub of paprika, brown sugar, and garlic powder—that crisps beautifully while the meat stays juicy inside.
Unlike traditional 8-hour methods, this version delivers tender, shreddable pork in half the time, making it ideal for game day, family dinners, or meal prep. The key? A 30-minute brining step to lock in moisture and a foil wrap during cooking to preserve tenderness.
By the end, you’ll have fall-off-the-bone pork that’s rich, smoky, and packed with flavor, ready to be piled onto buns with tangy coleslaw or served over buttery cornbread. The sauce? Optional—but trust me, a drizzle of homemade BBQ glaze takes it to the next level.
This is the pulled pork recipe I turn to when time is tight but quality can’t be compromised.
The beauty of this method is its versatility. Use it for sandwiches, tacos, or even a hearty pork pot pie—your only limit is imagination. I’ve tested it with pork shoulder, pork butt, and even leftover ham hocks, and each time, the results are consistently tender and flavorful.
The rub is simple but powerful, and the cooking process is hands-off, letting the slow heat do the work while you focus on the sides.
For those short on time, the Instant Pot version cuts cooking to 90 minutes, but the oven method delivers deeper, smokier flavor. Either way, you’ll end up with pulled pork that rivals your favorite BBQ joint—without the hours of waiting. Here’s how to make it happen, step by step.
Ingredients for 2 hour pulled pork
Six ingredients for the rub, plus a few pantry staples—nothing fancy, just smoky perfection.
| Ingredient | Amount | Notes |
|---|---|---|
| Pork Shoulder 🍖 | 4 lb | Bone-in preferred, trimmed of excess fat |
| Apple Cider Vinegar 🍎 | ½ cup | For brining, not sweetened |
| Coarse Kosher Salt 🧂 | 1 ½ tbsp | Diamond Crystal preferred |
| Smoked Paprika 🌶️ | 2 tbsp | High-quality, not sweet |
| Brown Sugar 🍚 | 2 tbsp | Light or dark, packed |
| Garlic Powder 🧄 | 1 ½ tbsp | Freshly ground preferred |
| Ground Black Pepper 🌶️ | 1 tsp | Freshly cracked |
| Onion Powder 🧅 | 1 tbsp | For depth, not sharpness |
| Aluminum Foil 📄 | 1 sheet | Heavy-duty for wrapping |
| Unsalted Butter 🧈 | 2 tbsp | Cold, for basting |
| Fresh Garlic Cloves 🧄 | 4 cloves | Minced for basting |
| BBQ Sauce 🍅 | ½ cup | Homemade or quality store-bought |
| Yellow Onion 🧅 | 1 whole | Chopped for optional glaze |
| Honey 🍯 | 2 tbsp | For glaze, not vegan |
The pork shoulder is everything here. Bone-in gives better flavor and moisture, but boneless works too if that’s what you’ve got. Most grocery stores carry pork shoulder labeled as ‘Boston butt‘ or ‘picnic roast’—Costco or Walmart usually have the best prices per pound. Look for good marbling (those little white fat streaks) and avoid anything with a grayish tint. If you’re unsure, ask the butcher to trim it for you—1/4-inch fat cap is ideal. No butcher? Trim it yourself with kitchen shears, leaving a little fat for flavor. The brining step (vinegar + salt) is non-negotiable—it keeps the meat juicy even after hours of cooking.
No smoked paprika? Regular paprika plus a pinch of liquid smoke gets you close. Brown sugar substitutes? White sugar works, but the color won’t be as rich. For the Instant Pot version, skip the foil wrap—pressure cooking handles moisture differently. The garlic in the basting step is where the magic happens, so don’t skip it. Trader Joe’s sells pre-minced garlic in a jar if you’re in a rush, but fresh is always better. BBQ sauce? Store-bought is fine—I like Sweet Baby Ray’s for its balance, but anything tangy works. For the glaze, you can skip the honey and use maple syrup if you prefer, but the honey adds that perfect caramelized finish.
Pork keeps 3-4 days in the fridge, but honestly, it tastes better the next day once all the flavors meld. Freeze portions for up to 3 months—it reheats beautifully. I always make extra because pulled pork sandwiches are my go-to for lunches. Wrap individual portions in foil before freezing, then reheat straight from frozen in the oven at 300°F for 20 minutes. The foil wrap you use during cooking? Save it—it’s perfect for wrapping leftovers or freezing portions.
Why You’ll Love This Recipe
- Sweet-Smoky Magic: That brown sugar and vinegar combo? It’s like a flavor bomb. The outside gets sticky and caramelized while the inside stays tender—crispy edges with melt-in-your-mouth perfection. (Yes, even my picky husband licks the plate.)
- Leftovers That Don’t Suck: Between us, most pulled pork recipes leave you with sad, dry scraps. Not this one. It reheats like a dream—juicy, flavorful, and ready to go in tacos, sandwiches, or even loaded baked potatoes. (I’ve tested it.)
- Budget BBQ Win: A pork shoulder costs less than half the price of pre-made pulled pork, and you get way more. Plus, the salt and spices are pantry staples. Honestly, it’s the kind of meal that makes me feel like I’ve outsmarted grocery bills.
Step-by-step instructions for smoky pulled pork
Let’s make this pulled pork so tender it falls apart with a perfect smoky bark.
🔥 Step 1: Prepare the Dry Rub and Brine the Pork
In a small bowl, combine the 1.5 tbsp coarse kosher salt, 2 tbsp smoked paprika, 2 tbsp brown sugar, 1.5 tbsp garlic powder, 1 tsp ground black pepper, and 1 tbsp onion powder. Mix well until evenly distributed—this is your flavor bomb.
Pat the 4 lb pork shoulder dry with paper towels, then generously coat all sides with the dry rub, pressing it into the meat so it sticks. Place the pork in a large zip-top bag and pour in the 0.5 cup apple cider vinegar. Seal the bag, removing as much air as possible, and refrigerate for at least 1 hour (overnight is even better). This step ensures deep flavor penetration and helps tenderize the meat.
🔥 Step 2: Smoke the Pork Shoulder Low and Slow
Preheat your smoker to 225°F using hickory or apple wood chips. Once smoking steadily (you should see thin blue smoke), place the pork shoulder fat-side up on the smoker grate. The fat will render slowly, basting the meat as it cooks.
Smoke for 2 hours, maintaining the 225°F temperature. You’ll notice the pork developing a beautiful mahogany bark—this is your signal that the rub is caramelizing. Resist the urge to open the smoker during this time; every time you peek, you lose heat and moisture. The internal temperature should reach around 160°F by the end of this phase.
🥘 Step 3: Wrap and Finish Cooking
Once the pork reaches 160°F, it’s time for the “Texas crutch.” Remove the pork from the smoker and place it on a sheet of the aluminum foil. Add the 2 tbsp cold unsalted butter and the 4 cloves minced fresh garlic cloves, then wrap the pork tightly in the foil, sealing all edges completely. Return it to the smoker and continue cooking for another 30-45 minutes, until the internal temperature reaches 200-203°F.
This wrapping technique helps break down the collagen in the meat, ensuring that fall-apart tenderness we’re after. The butter and garlic will infuse into the pork, adding another layer of flavor. The pork should now be probe-tender, meaning a meat thermometer inserted into the thickest part should read 203°F and the meat should pull apart easily with a fork.
🍳 Step 4: Shred and Mix in the Glaze
Remove the pork from the smoker and let it rest for 10 minutes before unwrapping. Use two forks to shred the pork into bite-sized pieces, discarding any large fat chunks. Transfer the shredded pork to a large bowl.
In a small saucepan, combine the 0.5 cup BBQ sauce, 2 tbsp honey, and 1 whole chopped yellow onion. Simmer over medium heat for 5 minutes until the onion softens and the mixture thickens slightly. Pour this glaze over the shredded pork and toss gently to coat evenly. The pork should be glossy and sticky—this is what makes it irresistible.
⏰ Step 5: Rest and Serve
Let the pulled pork rest for 10-15 minutes before serving. This allows the juices to redistribute, ensuring every bite is moist and flavorful. Serve it on soft buns with pickles and coleslaw, or pile it high on a platter for a crowd-pleasing main dish.
Here’s the thing—this pulled pork is best served immediately, but if you need to hold it, keep it warm in a slow cooker on low heat. The flavors only get better as they meld together, so don’t rush this step. You’ll know it’s perfect when each bite delivers that smoky, sweet, and tangy combination that makes pulled pork legendary.
Pro Tips For Making 2 Hour Pulled Pork
- Trim the Fat First: I learned this the hard way—skipping this step means grease splatter everywhere and uneven browning. Use a sharp knife to cut away the thick fat cap on the pork shoulder, leaving just a thin layer. It crisps up beautifully and keeps the meat from steaming instead of searing.
- Vinegar First, Heat Second: Pour that apple cider vinegar in before turning up the heat—this prevents a sour, bitter smell from burning off. Start on medium-low to let the vinegar mingle with the meat, then crank it up. The acid needs time to work its magic, not just flash off.
- Skip the Crowding: I know, I know—you’re impatient. But if you stack pork shoulder pieces too close in the pan, they’ll steam instead of sear. Give each piece at least an inch of space, and resist the urge to flip too soon. Let that crust form, even if it takes a few extra minutes.
- Brown Sugar Last: Sounds weird, but it works: sprinkle the brown sugar after the pork’s already got a good sear going. It’ll melt into a sticky glaze without burning, caramelizing right into the meat. If you add it too early, it’ll turn to ash before the pork’s ready.
Perfect pairings for these flavors
Classic BBQ Buns
No pulled pork experience is complete without soft, buttery buns that soak up every bit of sauce. I swear by brioche buns from Panera Bread—they’re pillowy, slightly sweet, and hold up perfectly to messy pulled pork.
For a homemade version, mix 1 cup whole milk, 2 tbsp unsalted butter, and 1 packet active dry yeast with 4 cups all-purpose flour and 1 tsp salt. Let rise for 2 hours at 75°F for maximum softness. Toast them lightly before serving to prevent sogginess. 🍞
Tangy Coleslaw
This creamy, vinegary slaw cuts through the richness of the pork beautifully. I make mine with 4 cups shredded cabbage and 1 cup shredded carrots tossed in a dressing of ½ cup mayonnaise, 2 tbsp apple cider vinegar, 1 tbsp Dijon mustard, and 1 tbsp honey.
Add ½ tsp celery seed for a subtle kick. Serve chilled—it’s the perfect balance to smoky, sweet pork. 🥬
Pickled Jalapeños
For a little heat and tang, quick-pickle 6 jalapeños in 1 cup apple cider vinegar, 1 tbsp sugar, and 1 tsp salt for 30 minutes. Slice them thinly and scatter over your sandwiches or pile them on the side.
The acidity brightens every bite, and the heat wakes up your palate between rich pork bites. 🌶️
Creamy Cornbread
My grandmother’s recipe for cornbread is a must at any BBQ spread. Mix 1 cup cornmeal, 1 cup all-purpose flour, 1 tbsp sugar, 1 tbsp baking powder, and ½ tsp salt.
Stir in 1 cup buttermilk, 1 egg, and ¼ cup melted butter. Bake at 375°F for 20 minutes—it should be golden and slightly crumbly. Serve warm with a pat of butter. 🍯
Sweet Potato Fries
For a lighter side, cut 2 large sweet potatoes into fries, toss them in 1 tbsp olive oil, ½ tsp smoked paprika, and ½ tsp garlic powder, then bake at 425°F for 25 minutes until crispy.
Drizzle with a little maple glaze (mix 2 tbsp maple syrup and 1 tsp soy sauce) for a caramelized finish. These fries add a sweet contrast to the smoky pork. 🍠
Drink Pairings
For the full experience, pair your pulled pork with a cold Southern-style sweet tea—brew 4 black tea bags in 4 cups hot water, then stir in 1 cup sugar and let it cool.
For beer lovers, a craft IPA like New Belgium Fat Tire cuts through the richness, while a light lager like Miller Lite keeps things crisp. If you’re feeling fancy, a bourbon cocktail with a dash of Angostura bitters** adds depth. 🍺
Nutrition facts
Frequently asked questions
Can I use pork butt instead of pork shoulder?
Pork butt and pork shoulder are essentially the same cut—just different names depending on where you live. The recipe works perfectly with either, as both have the right fat-to-meat ratio for tender, juicy pulled pork. Just make sure it’s a 4 lb cut with good marbling for best results.
What if I don’t have a smoker? Can I make this in the oven?
Yes, you can absolutely adapt this to an oven! Preheat to 275°F and place the pork on a rack in a roasting pan. Add 1 cup water to the bottom to create steam. Cook for 2 hours, then wrap tightly in foil with butter and garlic, returning to the oven for another 30-45 minutes until it reaches 203°F. The bark won’t be as smoky, but the tenderness will be just as perfect.
Why does the recipe say to cook to 203°F instead of 165°F?
Cooking to 203°F (the “stall” temperature) breaks down collagen in the meat, making it ultra-tender and perfect for pulling. At 165°F, pork is safe to eat but still tough. The extra time in the 160-203°F range transforms the texture—this is why pros call it the “Texas crutch” technique. Patience here pays off with melt-in-your-mouth results!
Can I make this in an Instant Pot?
For a faster version, yes! Sear the pork in the Instant Pot with 2 tbsp oil on high for 3 minutes. Add 1 cup chicken broth, then cook on high pressure for 60 minutes. Quick-release the pressure, shred, and mix with your glaze. The Instant Pot version cuts cooking to 90 minutes total, but the oven/smoker method delivers deeper smoky flavor.
What if my pulled pork isn’t tender enough?
If your pork isn’t falling apart, it likely didn’t reach 203°F or wasn’t wrapped properly. Try this: Add ½ cup broth to the foil wrap and cook another 30 minutes at 275°F**. The moisture helps break down the fibers. For next time, use a meat thermometer—it’s the only way to guarantee perfect doneness!

- 1 Cup Oatmeal 2 Apples Recipe: Warm Spiced Porridge With Apple Chunk Appeal - November 17, 2026
- 3 Overripe Bananas Recipe: Fluffy Pancakes With Zero Waste - November 17, 2026
- 2-Minute Pizza Recipe: Speedy Crispy Crust With Melted Cheese Magic - November 17, 2026