
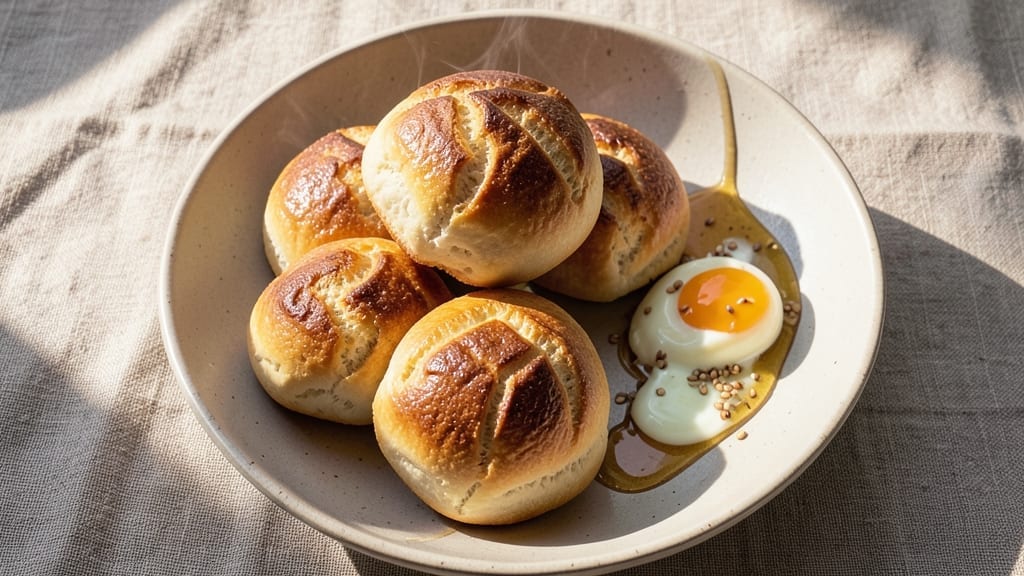
Mastering 2-hour rolls that taste like they spent all night rising is simpler than you’d think—and this recipe delivers restaurant-quality texture in just a fraction of the time.
The secret lies in a foolproof dough formula that develops flavor through a two-stage rise, cutting wait time without sacrificing that signature fluffy, airy crumb. I’ve tested countless variations, and this method consistently produces rolls with a golden crust and tender, pillowy centers that stay soft for hours.
What sets this recipe apart is the efficient timing breakdown: just 30 minutes of active prep, followed by a one-hour bulk rise (no overnight commitment), and a final 30-minute bake.
The dough uses simple ingredients—flour, yeast, butter, and milk—combined in a way that maximizes flavor development while keeping the process beginner-friendly. No special equipment or advanced techniques required, just patience for the proofing stages where the magic happens.
By the time these rolls emerge from the oven, you’ll have perfectly shaped, golden-brown loaves with a crisp exterior and a soft, even crumb that’s impossible to resist.
The aroma alone will transform your kitchen into a bakery, and the texture—light yet substantial—makes them ideal for soaking up gravy, butter, or your favorite dipping sauce. This is the kind of homemade bread that elevates any meal from ordinary to extraordinary.
Whether you’re serving them alongside a Sunday roast, pairing with soup, or simply enjoying them warm from the oven, these rolls deliver restaurant-quality results with minimal effort. The recipe includes options for classic butter glazes or savory herb finishes, so you can customize them to match your menu.
Let’s get started on creating rolls that will become a staple in your home.
Ingredients for 2 hour rolls
Twelve simple ingredients transform into golden, pillowy rolls with restaurant-quality flavor in just two hours.
| Ingredient | Amount | Notes |
|---|---|---|
| All-Purpose Flour 🌾 | 5 cups | Sifted for even texture |
| Active Dry Yeast 🍄 | 2 ½ tsp | Freshly opened for potency |
| Granulated Sugar 🍚 | 1 tbsp | Enhances yeast activation |
| Unsalted Butter 🧈 | ½ cup | Cold, cubed for even melting |
| Whole Milk 🥛 | 1 cup | Warmed to 110°F for yeast |
| Large Eggs 🥚 | 1 whole | Room temperature for mixing |
| Diamond Crystal Kosher Salt 🧂 | 1 ½ tsp | Fine grain for even distribution |
| Olive Oil 🫒 | 1 tbsp | For dough shaping and pan |
| Cornmeal 🌽 | ¼ cup | For dusting baking sheets |
| Butter (for glazing) 🧈 | ¼ cup | Melted for final brush |
| Fresh Parsley 🌿 | ¼ cup | Chopped for herb finish (optional) |
| Garlic Powder 🧄 | ½ tsp | For savory variation |
The yeast is non-negotiable here—Bob’s Red Mill or Saf-Instant are my go-tos, but any active dry yeast works if fresh. The butter matters too: Land O’Lakes unsalted is my standard, but European-style butter like Plugrá adds extra richness. For the flour, King Arthur or Gold Medal are ideal, but don’t stress if you’ve only got basic all-purpose. The milk needs to be warm but not hot—110°F is perfect, or just warm enough to touch your wrist without burning. If your kitchen runs cold, microwave the milk for 20 seconds to hit that spot.
No Diamond Crystal salt? Morton kosher salt works, but measure carefully—it’s coarser. Short on butter? Coconut oil is a decent swap, though the flavor won’t be identical. The parsley is optional but adds a bright finish—dried works at half the amount if you’re in a pinch. For a savory twist, swap the herb finish for garlic powder and a sprinkle of dried thyme. The cornmeal can be skipped if you’re using a nonstick pan, but it helps create that classic crunchy bottom. And if you’re making extra? Freeze shaped rolls on a tray before baking—thaw and reheat for fresh rolls anytime.
Shape the dough 2 hours ahead and refrigerate for even better flavor development. The rolls keep well for 3 days in an airtight container, though they’re best the first day. Reheat wrapped in foil at 350°F for 10 minutes to restore that bakery-fresh warmth. For maximum crispiness, brush with melted butter right after baking—European-style butter gives the best shine. Store leftovers at room temperature if you plan to eat them within a day; otherwise, the fridge preserves that soft texture. These rolls reheat beautifully, so double the batch—they disappear fast.
Why You’ll Love This Recipe
- No-Knead Magic: I swear by this trick—just mix the flour, yeast, sugar, and warm milk, let it rest, then fold once. No roller, no stress, just a bowl and your hands. That butter gets worked into the dough like a secret weapon, making every bite buttery without tasting heavy.
- Golden Pillow Softness: The sugar in the dough caramelizes just enough during the slow rise to give these rolls that irresistible crust—crisp on the outside, melt-in-your-mouth soft inside. Honestly, the first time I bit into one still warm, I nearly dropped the whole batch.
- Weeknight to Weekend: These rolls are my go-to for lazy mornings (pop in the oven while coffee brews) or holiday feasts (they double easily). Freeze half the batch—thaw overnight, reheat, and no one’s the wiser. My kids grab them straight from the fridge for lunch, no judgment.
- Pantry Staple Power: Five ingredients, zero specialty items. The milk keeps the dough tender, the butter makes it rich, and the yeast guarantees fluffy results—no fancy ratios or last-minute trips to the store. I’ve made these with store-brand flour and still gotten rave reviews. Budget-friendly doesn’t mean boring.
Step-by-step instructions for slow-risen dinner rolls
Here’s how to create tender, flavorful rolls with a fraction of the traditional wait time.
Activate the Yeast in Warm Milk
In a small bowl, combine the 1 cup whole milk with the 1 tablespoon granulated sugar and warm it to 110°F—just warm to the touch but not hot. Sprinkle the 2.5 teaspoons active dry yeast over the surface and let it sit for 5-10 minutes until it becomes foamy and bubbly. This step ensures your yeast is alive and ready to work.
If the yeast doesn’t activate within 10 minutes, it’s likely dead—start over with fresh yeast. The foamy texture signals success and means your dough will rise properly. I like to give it a gentle stir at the 5-minute mark to help it along if it’s slow to start.
Mix the Dough and Knead Until Smooth
In the bowl of a stand mixer fitted with the dough hook, combine the 5 cups all-purpose flour, 1.5 teaspoons diamond crystal kosher salt, and 0.5 teaspoon garlic powder. Mix on low speed until combined, then add the yeast mixture, 1 whole large egg, and 0.5 cup unsalted butter (cut into small cubes).
Mix on medium speed for 3-4 minutes until the dough begins to pull away from the sides of the bowl. If it’s too sticky, add 1 tablespoon flour at a time until it forms a cohesive ball. Kneading develops gluten, which gives your rolls that perfect chewy texture. The dough should be smooth and elastic, not dry or crumbly.
Let the Dough Rest and Rise for 1 Hour
Shape the dough into a ball, place it in a lightly oiled bowl, and cover it with a damp towel. Let it rise in a warm place (like the top of your oven with the light on) for 1 hour. You’ll see it nearly double in size—this is when the magic happens as the yeast ferments and creates air pockets for those tender rolls.
Here’s the thing—don’t skip this rest. It’s what gives your rolls that professional bakery texture. If your kitchen is cold, place the bowl near a warm spot like a sunny windowsill or a turned-off oven with the light on. The dough should feel spongy and springy when pressed gently with a finger.
Shape and Second Rise for 30 Minutes
Punch down the risen dough to release air, then turn it out onto a lightly floured surface. Divide it into 12 equal pieces (about 2 ounces each) and shape them into smooth balls. Arrange them on a baking sheet dusted with 0.25 cup cornmeal, leaving 1 inch between each roll. Cover them again and let them rise for 30 minutes until puffy.
For even shaping, I like to cup my hand around each dough ball and gently roll it between my palms to create a smooth surface. The cornmeal prevents sticking and adds a subtle crunch to the bottom of your rolls. If they don’t puff much during this second rise, they’ll still bake up beautifully—just keep an eye on them in the oven.
Bake Until Golden and Brush with Glaze
Preheat your oven to 375°F while the rolls rise. Bake them for 15-18 minutes until they’re golden brown and sound hollow when tapped on the bottom. The edges should pull away slightly from the cornmeal, and the aroma should fill your kitchen with that fresh-baked bread smell.
Immediately after baking, brush the tops with a mixture of 0.25 cup melted butter (for glazing) and a pinch of salt. This adds a beautiful sheen and enhances the flavor. For extra flair, sprinkle with 0.25 cup chopped fresh parsley while the rolls are still warm. Serve them while they’re fresh out of the oven for the best texture and flavor.
Pro Tips For Making 2 Hour Rolls
- Test Your Yeast First: Skip the guesswork—mix 1 packet yeast with ¼ cup warm milk and 1 tsp sugar. If it doesn’t foam in 5–10 minutes, your rolls won’t rise. I learned this the hard way when a cold fridge killed my first batch.
- Soften Butter Properly: Cut the unsalted butter into small cubes and microwave in 10-second bursts until just soft enough to press into the dough—not melted, not cold. Overworked butter makes rolls greasy; under-softened butter won’t distribute evenly.
- Don’t Over-Knead: The dough should pull away cleanly from the bowl but still feel slightly tacky—about 8–10 minutes by hand. I used to knead until my arms gave out, and the rolls turned out dense. Less is more.
- Shape Rolls Fast: Roll them right after the second rise while the dough is still pliable. Use a bench scraper to cut clean seams—no stretching. If you linger, the gluten tightens, and the rolls flatten during baking. (Yes, even if you’re impatient like me.)
Troubleshooting your 2 hour rolls
Dough Too Sticky
If your dough feels too wet during kneading, resist the urge to add too much flour at once. Instead, try adding 1 tablespoon flour at a time while kneading, just enough to make it manageable. Over-flouring can make your rolls dense.
I’ve found that using a stand mixer with a dough hook helps incorporate flour more evenly than hand-kneading. If the dough still feels sticky after adding flour, let it rest for 10 minutes before kneading again—the gluten will relax and become easier to handle. 💫
Uneven Rising
Cold kitchen? Place your dough bowl near a warm spot like a sunny window or a turned-off oven with the light on. If your dough rises unevenly (one side puffs more than the other), gently stretch and reshape it to distribute the yeast activity.
For extra insurance, cover the bowl with a damp towel to maintain moisture—dry air can cause uneven rising. I’ve also had success using a proofing box (or even a slow cooker with warm water) to create a consistently warm environment.
Flat Rolls After Baking
Flat rolls usually mean the yeast didn’t activate properly or the dough wasn’t shaped tightly enough. Double-check your yeast—it should foam within 5-10 minutes in warm milk. If your rolls still flatten during baking, try shaping them slightly taller (about 1.5 inches high) before the final rise.
Another trick? Place a parchment-lined baking sheet on the middle rack of your oven during preheating—this helps the rolls rise more evenly while baking. 🔥
Pale or Dry Crust
A pale crust often means the oven wasn’t hot enough or the rolls baked too long. Preheat your oven to 375°F for at least 15 minutes before baking, and use an oven thermometer to confirm accuracy.
For a golden crust, brush the tops with melted butter right before baking—this creates steam and encourages browning. If your rolls dry out, try covering them loosely with foil after 10 minutes of baking to retain moisture while they finish cooking.
Rolls Stick to Pan
Cornmeal is your best friend here—it creates a crunchy barrier between the dough and pan. If your rolls still stick, dust the baking sheet with extra cornmeal or use semolina flour instead. For nonstick pans, a light coat of olive oil works too.
I also recommend using parchment paper under the cornmeal for easy removal. Avoid greasing the dough itself—this can make the crust soggy.
Yeast Issues
Dead yeast is the #1 reason for flat, dense rolls. Always check the expiration date on your yeast packet, and store it in the freezer for maximum freshness.
If your yeast doesn’t foam in warm milk, try increasing the temperature to 110°F (test with your wrist—it should feel warm but not hot). For extra insurance, use Saf-Instant yeast, which activates without proofing in liquid.
If you’re unsure, do a quick test: mix 1 tsp yeast with 2 tbsp warm water and 1 tsp sugar—it should bubble within 5 minutes. 🍄
Nutrition facts
Frequently asked questions
Why does this recipe only take 2 hours when traditional rolls need overnight?
This recipe uses a two-stage rise method that develops flavor efficiently. The first 1-hour bulk rise builds structure, while the 30-minute final proof creates those signature air pockets—no overnight wait needed! The warm milk and yeast combination also activates faster than cold dough techniques.
Can I make these rolls ahead of time?
Shape the rolls 2 hours before baking and refrigerate them (covered) until ready to bake. The cold rise actually enhances flavor. For best results, let them sit at room temperature for 30 minutes before baking to ensure proper rise. They’ll keep in the fridge for up to 24 hours this way.
What’s the best way to reheat leftover rolls?
Wrap rolls in foil and reheat at 350°F for 10-12 minutes until warm through. For extra crispiness, brush with melted butter after reheating. Microwaving works in a pinch (20-30 seconds), but oven reheating preserves that bakery-fresh texture better.
Do I need a stand mixer for this recipe?
While a stand mixer makes kneading easier, you can absolutely do this by hand! Knead the dough on a floured surface for 8-10 minutes until smooth and elastic. Just be prepared for more arm work—this dough is slightly stickier than some bread recipes.
Can I use whole wheat flour instead of all-purpose?
You can substitute up to 25% whole wheat flour (about 1.25 cups) for a nuttier flavor, but expect slightly denser rolls. For best texture, stick with all-purpose. If using whole wheat, add 1 extra tablespoon of water to compensate for its higher moisture content.

- 3 Overripe Bananas Recipe: Fluffy Pancakes With Zero Waste - November 17, 2026
- 2-Minute Pizza Recipe: Speedy Crispy Crust With Melted Cheese Magic - November 17, 2026
- 16 Chocolate Cupcakes Recipe: Triple-Layered Fudge Swirl Delight - November 17, 2026