
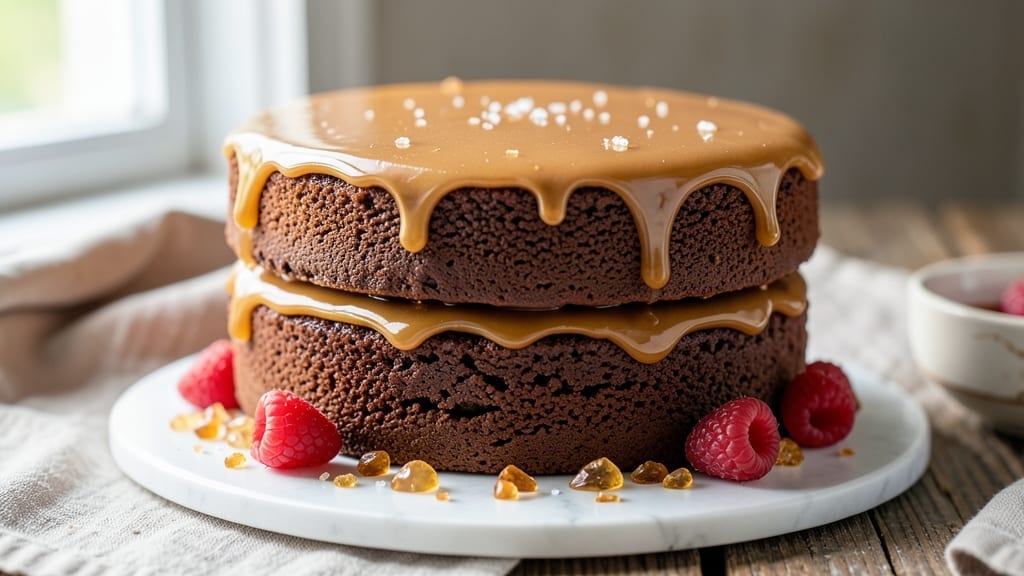
This 2 layer caramel cake recipe delivers the perfect balance of ultra-moist vanilla layers and a rich, salty-sweet caramel drizzle that makes every bite irresistible. 💛 The secret lies in a simple yet precise technique: combining buttermilk for tenderness with a touch of sour cream to keep the cake tender, while the caramel filling—made from scratch—adds depth and decadence without overwhelming the delicate cake structure.
What sets this recipe apart is the foolproof method for achieving perfectly even layers with a clean crumb, paired with a caramel ganache that’s neither too runny nor too thick.
No special equipment is needed beyond a standard kitchen setup, and the assembly process is straightforward, ensuring even beginners can achieve restaurant-quality results. The cake bakes at a controlled 325°F to prevent over-browning while ensuring a golden, inviting finish.
By the time you’re done, you’ll have a showstopping dessert with moist, fluffy layers that hold up to the weight of the caramel filling, all topped with a glossy, salty-sweet drizzle that ties the whole cake together.
The contrast between the tender cake and the rich caramel creates a harmony of textures and flavors that’s impossible to resist. This is the kind of cake that disappears in minutes, leaving only crumbs—and maybe a few disappointed guests.
Optional garnishes like whipped cream or chocolate shavings elevate the presentation, but the cake stands beautifully on its own. Perfect for celebrations, date nights, or satisfying a sweet craving, this recipe delivers professional-quality results with minimal fuss. Let’s get baking!
Ingredients for 2 layer caramel cake
These carefully measured ingredients create ultra-moist layers and velvety caramel that elevate any celebration.
| Ingredient | Amount | Notes |
|---|---|---|
| All-Purpose Flour 🌾 | 2 ½ cups | Sifted for even texture |
| Granulated Sugar 🍚 | 2 cups | Superfine preferred for smoothness |
| Light Brown Sugar 🍚 | ½ cup | Packed for accurate measurement |
| Unsalted Butter 🧈 | 1 ½ cups | Room temperature, cubed |
| Large Eggs 🥚 | 4 whole | Room temperature, separated |
| Buttermilk 🥛 | 1 cup | Room temperature for best results |
| Sour Cream 🥛 | ½ cup | Full-fat for optimal moisture |
| Pure Vanilla Extract 🌿 | 2 tsp | High-quality for authentic flavor |
| Baking Powder 🧂 | 2 tsp | Aluminum-free for consistent rise |
| Salt 🧂 | ½ tsp | Diamond Crystal preferred |
| Granulated Sugar 🍚 | 2 cups | For caramel filling |
| Heavy Cream 🥛 | 1 cup | 35% fat for rich caramel |
| Unsalted Butter 🧈 | ½ cup | Cubed for caramel base |
| Sea Salt 🧂 | 1 tsp | Flaky preferred for garnish |
| Vanilla Bean Paste 🌿 | 1 tsp | For enhanced vanilla depth |
The flour and sugars form the foundation—King Arthur or Gold Medal brands yield the best texture. For the butter, Plugrá or Land O’Lakes unsalted work perfectly when softened to room temperature (about 65°F). Eggs should be separated only when absolutely necessary; here, whole eggs ensure richness. Buttermilk and sour cream are non-negotiable for moisture—great value brands like Great Value or Store Brand deliver just as well as premium options. The vanilla extract should be pure Madagascar bourbon for authentic depth, while Walmart’s Great Value offers a budget-friendly alternative. Baking powder must be fresh; Aluminum-free brands like Bob’s Red Mill ensure consistent rise without metallic aftertaste.
No buttermilk? Substitute 1 cup milk + 1 tbsp vinegar (let sit 5 minutes). Sour cream unavailable? Greek yogurt at half the quantity works in a pinch. For the caramel, heavy cream must be full-fat—35% or higher—to achieve proper texture; Store Brand options often meet this requirement. Flaky sea salt can be swapped for kosher salt at half the amount, though texture differs. The vanilla bean paste adds complexity without overpowering; Nescafé or Goya brands are widely accessible. All ingredients should be measured precisely—digital scales for accuracy, especially with sugars and butter. Pre-sifted flour mixes save time but may alter texture slightly.
Store cake layers wrapped in plastic at room temperature for up to 2 days or refrigerated for 5 days. The caramel filling keeps 3 days refrigerated or 2 months frozen in airtight containers. For assembly, bring cake layers to room temperature before filling to prevent melting. Garnish with flaky salt immediately before serving—its texture softens slightly with time. Leftovers reheat beautifully in 30-second bursts at 50% power in the microwave, though fresh slices are always superior. Portion into individual servings for events to maintain presentation.
Why You’ll Love This Recipe
- No-Fuss Layers: Mixing the batter feels like a warm hug—just whisk flour, sugar, and melted butter until smooth. No sifting, no overcomplicating; the eggs bind it all while you’re still scraping the bowl.
- Buttercream Magic: That brown sugar caramel swirled between layers? It’s the star. Rich, salty-sweet, and the creamy buttercream on top makes every bite feel like a reward you earned.
- Party Ready: Slice it for birthdays, pack it for potlucks, or save half for your own dessert emergency. The layers hold up beautifully—no soggy middle here, just reliable, crowd-pleasing cake.
- Budget Win: Butter and sugar stretch far, and you’ll have leftovers that taste just as good the third day. Honestly, it’s the kind of cake where you’ll want to make two batches anyway.
Step-by-step instructions for 2 layer caramel cake
Master this technique and you’ll achieve perfectly moist layers with a glossy caramel drizzle every time.
👨🍳 Step 1: Prepare the Cake Batter
Preheat your oven to 350°F and grease two 8-inch round cake pans with nonstick spray, then line the bottoms with parchment paper. In a stand mixer fitted with the paddle attachment, cream together the 1.5 cups unsalted butter and both 2 cups granulated sugar and 0.5 cup light brown sugar on medium speed for 3-4 minutes until light and fluffy. This step incorporates air for that signature cake texture.
Add the 4 whole large eggs, one at a time, mixing well after each addition. Scrape down the sides of the bowl to ensure even incorporation. Then add the 2 tsp pure vanilla extract and mix for 30 seconds until fully combined. In a separate bowl, whisk together the 2.5 cups all-purpose flour, 2 tsp baking powder, and 0.5 tsp salt. With the mixer on low speed, gradually add the dry ingredients to the wet mixture, alternating with the 1 cup buttermilk and 0.5 cup sour cream in 3 additions, beginning and ending with flour.
🍳 Step 2: Bake the Cake Layers
Divide the batter evenly between the prepared cake pans. Tap each pan firmly on the countertop to remove any air bubbles. Bake for 25-30 minutes or until a toothpick inserted into the center comes out clean. The edges should be golden brown while the top remains slightly domed. Rotate the pans halfway through baking for even cooking.
Remove the cakes from the oven and let them cool in their pans for 10 minutes. Then transfer them to a wire rack to cool completely. This cooling phase is crucial—it prevents the cake from becoming gummy when you add the filling. Real talk: if you skip this, your layers will be soggy instead of moist.
🥘 Step 3: Make the Salted Caramel Filling
While the cakes cool, make the caramel filling. In a heavy-bottomed saucepan, combine the 2 cups granulated sugar and 0.5 cup unsalted butter over medium heat. Stir gently until the sugar melts completely and the mixture turns a deep amber color—this should take about 8-10 minutes. Be patient; rushing this step leads to grainy caramel.
Immediately remove the pan from heat and carefully whisk in the 1 cup heavy cream and 1 tsp vanilla bean paste. The mixture will bubble vigorously, so work quickly. Return the pan to low heat and simmer for 3-4 minutes until the caramel thickens slightly. Remove from heat and stir in the 1 tsp sea salt. Let it cool to room temperature before using.
🥘 Step 4: Assemble the Cake
Place the first cake layer on a serving plate. Spread a generous layer of the cooled caramel filling over the top, leaving a ½-inch border around the edges. This ensures the filling stays contained between the layers. Place the second cake layer on top and press gently to create a level surface.
Transfer the assembled cake to the refrigerator and chill for at least 4 hours or overnight. This chilling time allows the caramel to fully set and the layers to meld together. For the final touch, drizzle the remaining caramel over the top and sides of the cake, letting it cascade down the edges for that restaurant-worthy presentation.
Pro Tips For Making 2 Layer Caramel Cake
- Don’t Overmix the Batter: Once you fold in the dry ingredients, stop mixing after just 20 seconds—any more and you’ll end up with a dense, tough cake. I used to beat it until smooth, and the layers would turn out like hockey pucks. The moment the flour disappears, call it done.
- Chill the Butter First: Take your unsalted butter out of the fridge 30 minutes before creaming it with the sugars. Cold butter creates air pockets that make the cake light, but if it’s too soft, you’ll end up with a gummy mess. Trust me, your cake’s crumb depends on this.
- Skip the Oven Before Caramel: Let the cake cool in the pan for 10 minutes, then transfer it to a wire rack before adding the caramel layer. If you pour caramel on a hot cake, it’ll steam and turn grainy instead of smooth. Patience here saves you from a sticky disaster.
- Weigh Your Flour: Scoop and level your all-purpose flour into the measuring cup, then tap it gently on the counter to settle—don’t pack it down. Using a kitchen scale is even better, but if you’re eyeballing it, this small step keeps your cake from sinking in the middle. I learned this after three lopsided cakes.
Regional styles of these flavors
Classic Southern Style
In the American South, caramel cakes often feature a buttermilk-enriched batter with a salted caramel drizzle that’s less sweet and more buttery. I’ve seen Southern bakers add ½ tsp cinnamon to the cake batter for warmth, then top with a whipped cream frosting instead of extra caramel.
The key is baking at 325°F for 30-35 minutes to prevent over-browning while keeping the crumb tender. 🌶️
French-Inspired Caramel
French patisseries take this cake to elegant heights by using vanilla bean paste (not extract) and infusing the caramel with 1 tsp bourbon for depth. The cake layers are often soaked in coffee syrup before assembly, then topped with a dark chocolate ganache instead of caramel.
French techniques emphasize precision—weighing ingredients to the gram and baking at 300°F for 40 minutes to ensure even cooking. 🥖
British Twist
British versions often replace buttermilk with double cream (heavy cream) and fold in flaked almonds for texture. The caramel filling gets a rum infusion (1 tbsp) and is thickened with 1 tbsp cornflour (cornstarch) for stability.
These cakes are traditionally served with clotted cream on the side, allowing guests to drizzle it over slices. The British method calls for 325°F for 25 minutes to achieve a slightly denser crumb. 🍮
Modern Fusion Approach
Today’s bakers blend techniques—like using matcha powder (1 tsp) in the batter for a subtle earthy note, paired with a white chocolate caramel filling. Some add espresso powder (½ tsp) to enhance the caramel’s depth.
The trend is toward vegan adaptations: coconut milk replaces buttermilk, and aquafaba (chickpea brine) whips into a meringue for topping. These versions bake at 350°F for 20-25 minutes for faster results. 💫
Mexican-Inspired Version
For a Latin twist, swap vanilla for cinnamon and orange zest (1 tsp each) in the batter, then make the caramel with 1 tbsp tequila and a pinch of chili powder for a sweet-spicy kick.
Top with piloncillo sugar shavings (unrefined cane sugar) for a rustic finish. The baking time stays at 325°F for 30 minutes, but the caramel is thicker to hold up to the bold flavors. 🌶️
Nutrition facts
Frequently asked questions
Why does my caramel cake turn out dry?
Dry cake usually happens from overbaking or skipping the cooling step. Bake until a toothpick comes out clean (25-30 minutes at 350°F), then let layers cool completely before adding filling. Also, ensure your oven isn’t too hot—calibrate it with an oven thermometer if needed.
Can I make this cake without a stand mixer?
Use a hand mixer or even a whisk for 5-7 minutes when creaming butter and sugars. For the dry ingredients, whisk them in a separate bowl first, then gently fold into the wet mixture by hand. Just mix until just combined to avoid over-developing the gluten.
How do I fix runny caramel filling?
If your caramel is too thin, chill it for 15-20 minutes to thicken naturally. For immediate fixes, mix in 1 tsp cornstarch with 1 tsp water, heat briefly, then stir back in. Pro tip: Use a heavy-bottomed saucepan and simmer longer (up to 5 minutes) to achieve proper thickness.
Should I use store-bought caramel sauce instead?
Store-bought works in a pinch, but homemade caramel has deeper flavor and better texture. If substituting, use 1.5 cups of high-quality sauce (like Trader Joe’s or Ghirardelli) and add 1 tbsp butter to mimic the richness. For best results, still chill the cake 4+ hours to set the filling properly.
How far ahead can I bake the cake layers?
Bake layers up to 2 days ahead and store wrapped tightly at room temperature. For longer storage (5 days), refrigerate wrapped layers. Rewarm slices at 300°F for 5 minutes before adding filling to restore moisture. The caramel filling keeps 3 days refrigerated or 2 months frozen.

- 3lb Prime Rib Roast Recipe: Juicy Pink Center Guaranteed in 3 Hours - October 31, 2026
- 5 Spice Cake Recipe: Warmly Spiced Layers With Crunchy Top - October 31, 2026
- 1950’s Macaroni and Cheese Recipe: Nostalgic Creamy Cheese Sauce with Buttery Noodles - October 31, 2026