
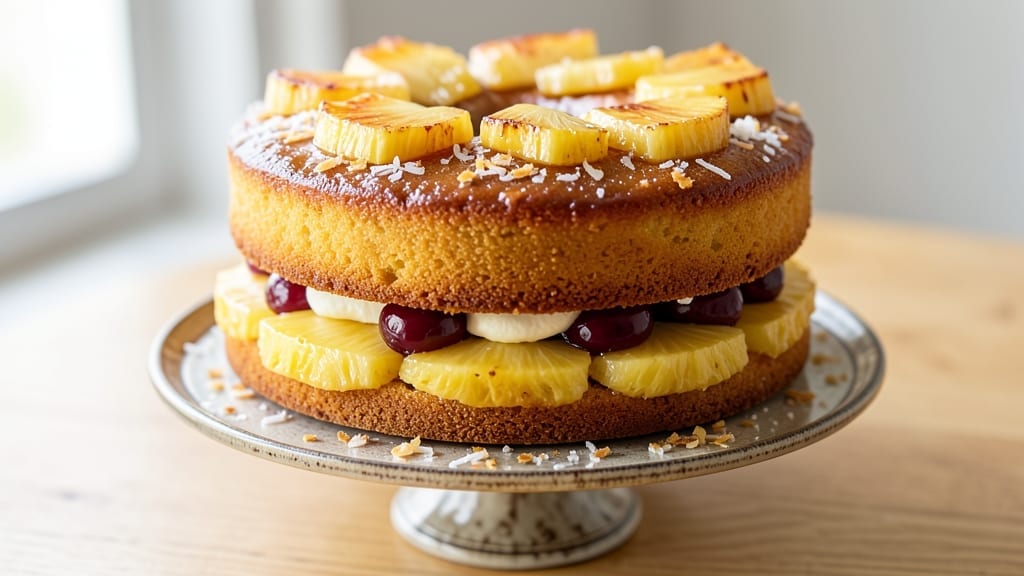
This 2-layer pineapple upside down cake recipe delivers the nostalgic magic of caramelized pineapple crowns layered over velvety vanilla swirls—every bite is a perfect balance of sweet, tangy, and buttery perfection.
The secret lies in the traditional upside-down technique, where pineapple rings and maraschino cherries bake directly on the sugar crust, creating a golden, crackly top that encases the moist layers below.
I’ve perfected this recipe through years of baking, ensuring the layers stay distinct and the texture remains moist for days.
The beauty of this cake is in its layers: the first is a classic upside-down cake with juicy pineapple and cherries, while the second adds a vanilla swirl layer that keeps the texture rich and tender.
Baking each layer separately ensures even cooking and prevents sogginess, a common pitfall in layered desserts. The caramelized sugar crust forms a delicate barrier, locking in moisture while adding a satisfying crunch with every bite.
What makes this recipe truly special is the harmony of flavors—tangy pineapple, sweet vanilla, and the subtle bitterness of maraschino cherries all come together in a dessert that feels both nostalgic and refined.
The cake stays moist thanks to a simple but effective technique: wrapping it tightly in plastic wrap and letting it rest overnight. This ensures the layers stay distinct and the flavors meld beautifully.
Perfect for celebrations, family gatherings, or a special treat, this cake is as impressive to serve as it is delicious to eat. The presentation is simple yet striking: the caramelized pineapple crown on top adds a touch of elegance, while the vanilla swirl layer adds a creamy contrast.
Let’s get baking!
Ingredients for 2 layer pineapple upside down cake
Fresh pineapple and maraschino cherries crown this layered cake, balanced by velvety vanilla swirls beneath.
| Ingredient | Amount | Notes |
|---|---|---|
| Fresh Pineapple 🍍 | 2 cups | Diced, for pineapple crown |
| Maraschino Cherries 🍒 | 12 whole | For pineapple crown layer |
| Granulated Sugar 🍚 | 2 cups | For caramelized crust |
| Unsalted Butter 🧈 | 1 cup | Melted, for crust |
| Large Eggs 🥚 | 6 whole | Room temperature preferred |
| All-Purpose Flour 🌾 | 2 ½ cups | Sifted for best texture |
| Baking Powder 🧂 | 2 tbsp | For leavening |
| Salt 🧂 | ½ tsp | Fine sea salt |
| Vanilla Extract 🍃 | 2 tbsp | Pure, for vanilla flavor |
| Milk 🥛 | 1 cup | Room temperature |
| Vanilla Cake Mix 🍰 | 1 box | 15.25 oz box (standard size) |
| Vanilla Pudding Mix 🥛 | 3.4 oz | Small box, for swirl layer |
| Heavy Whipping Cream 🧈 | 1 cup | Whipped for swirl layer |
| Powdered Sugar 🍚 | 1 cup | For dusting layers |
The pineapple is non-negotiable—fresh or high-quality canned makes all the difference. Dole brand or Del Monte crushed pineapple work in a pinch, but fresh diced pineapple has the best texture and flavor. Maraschino cherries should be plump and vibrant; Ghirardelli or Manischewitz brands are reliable. For the sugar crust, Domino or C&H granulated sugar works perfectly, but avoid powdered sugar—it won’t caramelize properly. The butter should be unsalted and high-fat (80% minimum)—Land O’Lakes or Plugrá are excellent choices. Room-temperature eggs prevent lumps in the batter, so take them out 30 minutes before baking.
No vanilla cake mix? Homemade vanilla cake batter works just as well—just ensure it’s moist and not too dense. For the swirl layer, Jell-O or Betty Crocker pudding mix are standard, but homemade vanilla pudding elevates the texture. Short on whipped cream? Coconut whipped cream gives a lighter texture, though it has a distinct flavor. The powdered sugar should be 10X or Domino for smooth dusting—avoid clumpy brands. If you’re baking in a high-altitude area, add 1/4 tsp more baking powder to the cake mix layer to compensate for reduced leavening.
Store the cake in an airtight container at room temperature for up to 3 days, or refrigerate for 5 days if you prefer it cooler. The pineapple crown layer stays crisp for 2 days at room temperature, but the vanilla swirl layer softens faster—cover it with plastic wrap if storing longer than a day. For serving, slice through the center to showcase both layers. The cake reheats beautifully in the microwave for 10-15 seconds if it’s been refrigerated, restoring the moisture and warmth.
Why You’ll Love This Recipe
- No-Carve Needed: The pineapple topping caramelizes into a golden crust—no fancy knife work required. Just flip, let it cool, and serve straight from the pan like a lazy Sunday morning.
- Cherry-Pineapple Magic: That first bite? Buttery cake, juicy pineapple, and the tangy pop of maraschino cherries—it’s like dessert hugged you. Honestly, the sugar-butter combo on the fruit makes it taste too good to skip.
- Party in a Pan: Double layers mean double the fun—perfect for birthdays, potlucks, or even a “I’m bored” afternoon. The cherries add color, so it looks fancy without the effort.
- Budget-Friendly Luxury: Fresh pineapple and a jar of cherries stretch further than you’d think. The recipe uses simple pantry staples, but the flavor? Feels like you spent hours baking. (Yes, even on a Tuesday night.)
Step-by-step instructions for creating a 2 layer pineapple upside down cake
Master this layered dessert with a caramelized pineapple crown and velvety vanilla swirl filling.
Prepare the Pineapple Crown and Caramelized Base
Preheat your oven to 350°F. In a 9-inch round cake pan, arrange the 2 cups diced fresh pineapple evenly in a circular pattern, leaving a 1-inch border. Place the 12 whole maraschino cherries in the center, nestled among the pineapple pieces. This creates the iconic upside-down cake crown that caramelizes beautifully.
In a saucepan over medium heat, combine the 2 cups granulated sugar and 1 cup melted unsalted butter. Stir until the sugar fully dissolves and the mixture reaches a deep amber color—about 8-10 minutes. This caramel will form the golden crust that encases the pineapple. Pour the caramel carefully over the pineapple arrangement, ensuring it reaches the edges of the pan. The heat will immediately begin setting the caramel around the fruit.
Bake the First Layer
In a separate bowl, whisk together the 6 whole large eggs, 1 cup milk, 2 tbsp vanilla extract, and the contents of the 1 box vanilla cake mix until just combined—do not overmix. Gently fold in the 2.5 cups all-purpose flour, 2 tbsp baking powder, and 0.5 tsp salt using a spatula until the batter is smooth. Pour this batter evenly over the caramelized pineapple in the prepared pan.
Bake for 25-30 minutes, or until a toothpick inserted into the center comes out clean. The edges should be golden brown, and the cake should spring back slightly when pressed gently. This first layer forms the foundation that will support the entire dessert when inverted. Allow the cake to cool in the pan for 10 minutes before proceeding—this prevents the layers from separating during the inversion process.
Create the Vanilla Swirl Filling
While the first layer bakes, prepare the swirl filling by combining the 3.4 oz vanilla pudding mix with 1 cup milk in a small saucepan. Cook over medium heat, stirring constantly, until the mixture thickens to a pudding consistency—about 3-5 minutes. Remove from heat and let cool to room temperature. In a separate bowl, whip the 1 cup heavy whipping cream to stiff peaks, then gently fold it into the cooled pudding mixture until fully incorporated.
Dust a clean work surface with 1 cup powdered sugar to prevent sticking. Transfer the first cake layer to this surface and carefully invert it onto a plate to reveal the caramelized pineapple crown. Spread half of the vanilla swirl mixture evenly over the exposed cake surface, leaving a ½-inch border around the edges. This layering technique creates the signature swirl effect that makes this cake so distinctive.
Assemble and Bake the Second Layer
Prepare a second 9-inch round cake pan by lightly greasing it with butter. Pour the remaining vanilla swirl mixture into the pan and spread it evenly to create the second layer. Sprinkle the 2.5 cups all-purpose flour, 2 tbsp baking powder, and 0.5 tsp salt over the swirl mixture, then gently press the inverted first layer (pineapple side down) onto the swirl to create the second cake layer. This sandwich-style assembly ensures each bite contains both cake and filling.
Bake at 350°F for 20-25 minutes, until the top is golden brown and a toothpick inserted into the center comes out clean. The cake should rise slightly and develop a crisp exterior. Once baked, carefully invert the cake onto a serving plate to reveal the caramelized pineapple crown at the top. Let it cool for 15 minutes before slicing to allow the layers to set properly.
Serve with Confidence
Use a long serrated knife to cut through the center of the cake, then slice outward in wedges. Each piece should reveal the layers of cake, caramelized pineapple, and vanilla swirl filling. The contrast of textures—crisp caramel, tender cake, and creamy swirl—makes this dessert unforgettable. Serve immediately while the cake is still warm, or chill for 1 hour in the refrigerator for a firmer texture that’s equally delicious.
This method delivers a professional-quality pineapple upside-down cake with perfect layering and caramelization. The key is patience during baking and careful assembly to maintain the integrity of each component. Enjoy every bite of this tropical-inspired classic!
Pro Tips For Making 2 Layer Pineapple Upside Down Cake
- Preheat Pan First: Your cake pan should be hot when you pour in the butter-sugar mixture—think 375°F for at least 15 minutes. I learned this the hard way after my first batch had a sad, flat caramel layer. The heat shock helps the butter melt faster and creates that glossy, crackly crust everyone loves.
- Core That Pineapple: Skip the pre-sliced rings unless you’re okay with soggy cake. Use a sharp knife to cut the pineapple into ¼-inch slices, then core each one by slicing a small X on the bottom and twisting out the center. Fresh pineapple holds its shape better, and the texture stays crisp under the caramel.
- Don’t Overmix Batter: The second layer’s batter is forgiving, but don’t go full speed with the mixer—just combine until just smooth. Overworking it adds air that collapses when baked, leaving you with a dense middle. My grandmother’s trick: Use a wooden spoon and fold gently. It’s slower, but the cake stays light.
- Flip When Cool Enough: The plate should be warm to the touch but not scorching when you flip the cake—around 10 minutes after baking. If you rush it, the caramel layer will slide right off, and your cherries might take a detour to the floor. A quick test: Touch the pan’s edge; if it’s cool enough to hold, you’re good.
Make-ahead tips for leftovers
Layer Prep Ahead
Bake the pineapple crown layer 1 day ahead—it keeps beautifully in an airtight container at room temperature. The caramelized sugar crust hardens slightly overnight, making it easier to invert later.
I like to wrap the cooled layer in plastic wrap and refrigerate it for 24 hours to enhance the pineapple’s sweetness. 🍍
Swirl Filling Prep
Make the vanilla swirl filling 2 days in advance and store it in the fridge. Whip the cream just before folding it into the pudding to maintain its light texture.
The filling thickens as it chills, so add 1-2 tablespoons of milk when reheating if it seems too stiff. This step saves time on baking day! ✨
Full Cake Assembly
Assemble the cake 4-6 hours before serving—this gives the layers time to meld without becoming soggy. Wrap the assembled cake tightly in plastic wrap and place it in the fridge.
The cold temperature helps set the layers perfectly. For extra insurance, place a small weight (like a plate) on top to keep the layers compressed. 💫
Make-Ahead Serving
If you’re baking for a party, assemble the cake the night before and store it uncovered at room temperature. The pineapple crown stays crisp, while the vanilla swirl remains creamy.
Bring it to room temperature for 1 hour before serving to restore the best texture contrast. This method ensures your cake is always restaurant-quality! 🍰
Freezer-Friendly Option
For long-term storage, bake both layers separately and freeze them on parchment paper. Thaw overnight in the fridge before assembling. The pineapple layer can go straight into the freezer, but the vanilla swirl layer should be wrapped tightly in plastic to prevent freezer burn.
Thaw for 8-12 hours before assembling. 🍶
Reheating Tips
If your cake was refrigerated, warm slices in the microwave for 10-15 seconds to restore moisture. For a stovetop option, place slices on a baking sheet and warm in a 300°F oven for 5-7 minutes**. The caramelized crust softens slightly, adding extra decadence to each bite. 🔥
Nutrition facts
Frequently asked questions
Can I substitute fresh pineapple with canned pineapple in this recipe?
Yes, but with some adjustments! Use 1 (20 oz) can crushed pineapple (undrained) for the crown layer. Drain well and pat dry with a paper towel to remove excess moisture, which prevents sogginess in the cake. Fresh pineapple has a better texture, but canned works in a pinch—just avoid pineapple juice, as it makes the cake too wet.
Why does my pineapple upside-down cake turn out too dense?
Overmixing the batter or underbaking are the most common culprits. Whisk the batter just until combined (about 1 minute) to avoid developing gluten, which makes the cake dense. Also, bake until a toothpick comes out clean—25-30 minutes is standard, but ovens vary. If your cake is still dense after baking, try adding 1 extra egg white to the batter for extra lift.
How do I prevent the layers from separating when I invert the cake?
Cool the first layer in the pan for 10-15 minutes before inverting—this lets the cake set slightly. Dust a clean surface with powdered sugar to create a barrier, then gently run a knife around the edges to loosen it. If the cake still resists, tap the pan firmly on the counter to release it. For extra security, chill the inverted layer in the fridge for 1 hour before adding the second layer.
Can I make this cake in a different pan size?
Yes, but you’ll need to adjust the recipe. For an 8-inch pan, reduce all ingredients by about 25% (use 1.5 cups flour, 1.5 cups sugar, etc.). For a 10-inch pan, increase by 30%. The baking time may also change—check for doneness with a toothpick. The key is maintaining the same batter-to-pan ratio to keep the texture consistent.
What’s the best way to store leftovers to keep them fresh?
Wrap the cake tightly in plastic wrap and store at room temperature for up to 3 days. For longer storage, refrigerate for 5 days or freeze the layers separately for up to 3 months. To reheat, microwave slices for 10-15 seconds or warm in a 300°F oven for 5-7 minutes. The caramelized crust softens slightly when reheated, adding extra richness!

- 3lb Prime Rib Roast Recipe: Juicy Pink Center Guaranteed in 3 Hours - October 31, 2026
- 5 Spice Cake Recipe: Warmly Spiced Layers With Crunchy Top - October 31, 2026
- 1950’s Macaroni and Cheese Recipe: Nostalgic Creamy Cheese Sauce with Buttery Noodles - October 31, 2026