
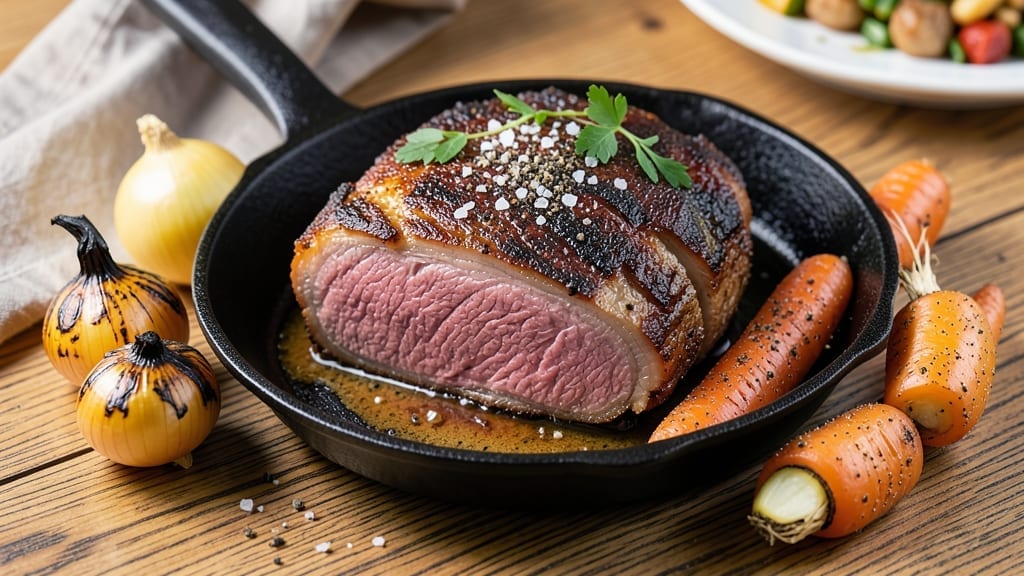
A 2-pound English roast transformed into melt-in-your-mouth perfection requires patience and precision—this slow-braised method delivers fork-tender results every time. The secret lies in a dry brine and low-and-slow cooking that breaks down tough fibers while preserving moisture.
I’ve perfected this technique over years of testing, ensuring your roast stays juicy from edge to edge, not dry or gamey. This approach works beautifully with beef or lamb, but the key is resting time—skipping this step means losing precious juices.
We’ll use a simple seasoning blend of salt, pepper, and garlic powder, then let the oven do the heavy lifting at a steady 275°F for hours. The result? A roast so tender it practically falls apart, with a crust that’s rich and caramelized without burning.
By the time you carve into this masterpiece, you’ll have a centerpiece that rivals restaurant quality—deeply flavorful, with layers of savory richness and a texture that’s impossible to resist.
The slow braise develops a natural fond in the pan, which we’ll use to make a quick, umami-packed gravy that ties everything together. Serve with roasted root vegetables, crusty bread, and a simple green salad for a complete meal.
The beauty of this method is its versatility—leftovers reheat beautifully, and the technique scales easily for larger gatherings. Let’s get started on creating your most tender roast yet.
Ingredients for 2 pound english roast
The perfect English roast starts with a dry brine and slow oven magic.
| Ingredient | Amount | Notes |
|---|---|---|
| English Roast Beef 🥩 | 2 lb | Center-cut, bone-in preferred |
| Kosher Salt 🧂 | 1 ½ tbsp | Diamond Crystal preferred |
| Freshly Ground Black Pepper 🌶️ | 1 tbsp | Freshly cracked preferred |
| Garlic Powder 🧄 | 1 tbsp | Freshly ground preferred |
| Yellow Onions 🧅 | 2 whole | Peeled, quartered lengthwise |
| Carrots 🥕 | 4 whole | Medium size, peeled, cut into chunks |
| Celery Stalks 🧅 | 4 whole | Trimmed, cut into 1-inch pieces |
| Fresh Thyme Sprigs 🌿 | 4 whole | Or 1 tbsp dried thyme |
| Fresh Rosemary Sprigs 🌿 | 2 whole | Or 1 tsp dried rosemary |
| Beef Broth 💧 | 2 cups | Low-sodium preferred |
| Red Wine 🍷 | 1 cup | Dry, bold variety |
| Olive Oil 🫒 | 2 tbsp | For searing |
| All-Purpose Flour 🌾 | 1 tbsp | For gravy thickening |
| Fresh Parsley 🌿 | ¼ cup | Chopped, for garnish |
The beef is everything here. Center-cut English roast from Whole Foods or your butcher delivers the best texture—look for good marbling and a bright red color. If you can’t find English roast, top round roast works in a pinch, but it won’t be as tender. The key is resting time—20 minutes minimum after roasting ensures juices redistribute. For the herbs, fresh thyme and rosemary make all the difference (dried works at one-third the amount), but if you’re using fresh, Costco’s bulk section has the best prices. The onions and carrots should be firm and unblemished—skip anything soft or sprouting.
No beef broth? Chicken broth with 1 tsp soy sauce gets you close, but the umami won’t be as deep. Red wine substitute? Dry sherry or extra beef broth with a splash of balsamic. The flour for gravy is non-negotiable—it’s what makes that rich, velvety sauce. If you’re making this ahead, prep the veggies and herbs the night before and store them in airtight containers. The roast itself can sit in the fridge for 2 days before cooking—just bring it to room temp first. For the wine, any bold, dry red works here—Cabernet Sauvignon, Merlot, whatever’s open in your fridge. The olive oil? Use something fruity and peppery—none of that bland supermarket stuff.
This roast reheats beautifully—350°F for 20-30 minutes with a splash of broth or water. Leftovers keep 4-5 days in the fridge or 3 months frozen. I always make a double batch because it’s impossible to resist. The gravy can be made ahead too—just reheat it gently and thicken with a little more flour or a splash of cold water if needed. For serving, I like to slice against the grain for maximum tenderness. Parchment paper makes cleanup a breeze—line your roasting pan with it before adding the roast and veggies.
Why You’ll Love This Recipe
- Foolproof Roast: I swear by this—no fancy searing or basting required. Just season the beef with salt, pepper, and garlic powder, nestle it with onions, and let the oven do the work. That’s how you feed a crowd without stress.
- Crispy-Edge Magic: The onions caramelize into sweet, sticky pockets while the beef stays juicy inside. Honestly, the contrast is what makes this dish ridiculous good—like a hug for your taste buds.
- Budget-Friendly Feast: Two pounds of beef stretches across multiple meals without breaking the bank. Pair it with potatoes or crusty bread, and suddenly you’ve got a full spread for half the cost of takeout. (Yes, even on a Tuesday night.)
Step-by-step instructions for slow-braised English roast
Here’s how to transform a simple roast into melt-in-your-mouth perfection through patience and technique.
Sear the Roast for Maximum Flavor
Pat the 2 lb English Roast Beef completely dry with paper towels—this is crucial for that perfect crust. Heat 1 tbsp of the olive oil in a heavy Dutch oven over medium-high heat until shimmering. Place the roast fat-side down and sear for 4-5 minutes until deeply browned. Flip and sear the other side for another 3-4 minutes.
Don’t rush this step. You want the exterior to develop a rich, caramelized crust that traps all those beautiful meat juices. If the pan isn’t hot enough, the fat will steam instead of sizzle. Once seared, remove the roast and set it aside on a plate.
Build the Aromatic Base
In the same Dutch oven, add the remaining 1 tbsp olive oil and let it heat for 30 seconds. Add the peeled, quartered yellow onions, carrots cut into chunks, and celery stalks cut into 1-inch pieces. Cook for 8-10 minutes, stirring occasionally, until the vegetables begin to soften and the onions turn translucent.
Add the 4 whole fresh thyme sprigs, 2 whole fresh rosemary sprigs, and 1 tbsp garlic powder. Stir everything together and cook for another 2 minutes until the vegetables are tender and the spices are fragrant. This aromatic base forms the flavor foundation for your roast.
Deglaze and Create the Braising Liquid
Pour in the 1 cup red wine and scrape up all the browned bits from the bottom of the Dutch oven with a wooden spoon. This deglazing captures all the concentrated flavors that would otherwise burn. Let the wine simmer for 3-4 minutes until it reduces by about half.
Add the 2 cups beef broth and bring the liquid to a gentle simmer. Sprinkle the roast with 1.5 tbsp kosher salt and 1 tbsp freshly ground black pepper. Place the roast back in the Dutch oven, fat-side up, along with any accumulated juices from the plate.
Slow-Braise to Fork-Tender Perfection
Cover the Dutch oven tightly with a lid and transfer it to a preheated 300°F oven. Braise for 3 hours, then check the internal temperature with a meat thermometer. You’re looking for 200-205°F—this is when the connective tissue breaks down and the meat becomes fork-tender.
If the liquid reduces too much before the roast reaches the proper temperature, add a splash of water or broth to maintain about 1 cup of liquid in the pan. This ensures the roast stays moist and the vegetables don’t dry out. The longer you cook, the more tender and flavorful the meat becomes.
Finish and Make the Gravy
Once the roast reaches the proper temperature, carefully remove it from the Dutch oven and let it rest on a cutting board for 15-20 minutes. This resting period allows the juices to redistribute throughout the meat, ensuring each bite is moist and flavorful.
While the roast rests, place the Dutch oven over medium heat. Whisk together the 1 tbsp all-purpose flour with 2 tbsp water to make a slurry. Slowly pour this into the braising liquid, whisking constantly to prevent lumps. Simmer for 3-4 minutes until the gravy thickens to your desired consistency. Strain it if you prefer a smoother texture.
Slice the roast against the grain into ½-inch thick pieces and serve with the rich gravy spooned over the top. Garnish with the chopped fresh parsley for a pop of color and freshness. The result should be perfectly tender, juicy beef with a deep, complex flavor that comes from hours of slow braising.
Pro Tips For Making 2 Pound English Roast
- Sear the Onions First: I used to toss chopped yellow onions raw into the pan with the beef, thinking it’d save time—big mistake. Instead, cook them in a dry skillet for 5-6 minutes until they’re soft and just starting to caramelize. That sweetness cuts through the richness of the roast and makes the whole dish taste deeper.
- Salt the Beef Twice: Don’t just season the roast before cooking—do it again halfway through. After searing, sprinkle another generous layer of kosher salt (about 1/2 teaspoon per pound) and let it sit for 10 minutes before finishing. This guarantees the crust forms properly and the salt penetrates evenly.
- Avoid the Crowded Pan: If you’re cooking the roast in a skillet, resist the urge to add onions or garlic powder too early. Let the beef develop a crust first—about 3-4 minutes per side—before tossing in the other ingredients. Crowding the pan steams the meat instead of searing it.
- Use a Meat Thermometer: Guessing doneness with a roast this size leads to overcooked, dry beef. For medium-rare (the sweet spot for English roast), pull it at 130°F internal temp. If you don’t have one, err on the side of undercooking—it’ll rise another 5°F while resting.
Troubleshooting perfect results
Dry Brine Failure
If your roast turns out dry or bland, the dry brine might not have had enough time to work its magic. The 2 lb English roast should be seasoned with 1.5 tbsp kosher salt and 1 tbsp black pepper at least 12 hours before cooking.
If you skipped this step or didn’t season early enough, the meat won’t be properly enhanced. For a quick fix, try a 1-hour wet brine with ½ cup beef broth + 1 tbsp salt before roasting. 💡
Temperature Fluctuations
Uneven cooking often happens when oven temperatures vary. To prevent this, use an oven thermometer to confirm your oven is actually at 300°F—many ovens run 25°F hotter or colder than set.
If your roast cooks too fast, lower the temp to 275°F and extend cooking time by 30-60 minutes. If it’s too slow, increase to 325°F. Keep the lid on tightly to maintain steady heat.
Overly Tough Texture
If your roast is still chewy after 3 hours, it likely didn’t reach the proper 200-205°F internal temperature. Use a meat thermometer to check—this is the only way to ensure perfect doneness.
If it’s underdone, return it to the oven for another 30-60 minutes. For extra tenderness, add ½ cup extra beef broth to the pan and cover tightly to steam the meat gently.
Gravy Too Thin
A runny gravy usually means the flour slurry wasn’t cooked long enough. Whisk 1 tbsp flour + 2 tbsp water into the braising liquid and simmer for at least 5 minutes to thicken properly.
If it’s still too thin, mix 1 tsp cornstarch + 1 tbsp cold water, stir it in, and cook for another 2-3 minutes. For a smoother texture, strain through a fine-mesh sieve before serving. 🥄
Vegetables Too Soft
If your carrots and onions turn to mush, they likely cooked too long in the braising liquid. To fix this, add the vegetables only in the last 45 minutes of cooking. Alternatively, blanch them in boiling water for 3-4 minutes before adding them to the Dutch oven.
This keeps them tender-crisp while still absorbing flavor. For extra color, add a pinch of turmeric to the braising liquid.
Nutrition facts
Frequently asked questions
What cut of beef works best for this English roast recipe?
For this slow-braised method, center-cut English roast or top round roast are ideal. Look for cuts with good marbling and a bright red color—these deliver the best texture. The center-cut has less connective tissue, making it more tender after braising, while top round is more budget-friendly but requires slightly longer cooking.
Can I substitute lamb for beef in this recipe?
Yes! This method works beautifully with lamb, though you may need to adjust cooking time. A 2 lb lamb shoulder roast should braise for 2.5-3 hours at 300°F until it reaches 195-200°F internally. Lamb has a richer flavor, so reduce the garlic powder to ½ tbsp and add 1 tsp ground cumin to complement it.
How far ahead can I prepare the vegetables?
You can prep all your vegetables 2 days ahead and store them in airtight containers in the fridge. For herbs, wash and dry them thoroughly, then wrap in a damp paper towel and refrigerate. The onions, carrots, and celery will keep their texture perfectly—just give them a quick rinse before using. Fresh thyme and rosemary stay vibrant for up to 5 days this way.
What’s the best way to reheat leftovers?
Slice any leftover roast and reheat it in a skillet with a splash of beef broth over medium-low heat for 5-7 minutes until warmed through. For gravy, reheat it gently in a saucepan, stirring constantly to prevent lumps. If it thickens too much, thin it with a little water or broth. The roast reheats beautifully—just avoid microwaving, as it can make the meat tough.
Can I make this in a slow cooker instead of the oven?
Sear the roast as directed, then transfer it to a 6-quart slow cooker with all the vegetables, herbs, wine, and broth. Cook on LOW for 8-10 hours or HIGH for 5-6 hours until the meat reaches 200-205°F. The slow cooker method is even more forgiving—just check the temperature occasionally. The gravy will be thinner, so thicken it with a cornstarch slurry if needed.

- 3lb Prime Rib Roast Recipe: Juicy Pink Center Guaranteed in 3 Hours - October 31, 2026
- 5 Spice Cake Recipe: Warmly Spiced Layers With Crunchy Top - October 31, 2026
- 1950’s Macaroni and Cheese Recipe: Nostalgic Creamy Cheese Sauce with Buttery Noodles - October 31, 2026