
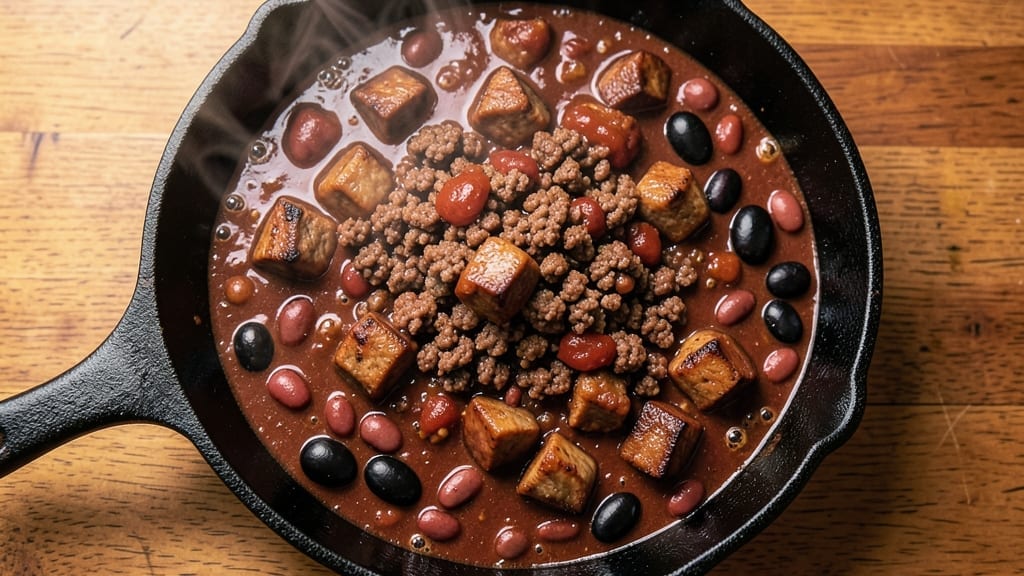
This 3lb chili recipe delivers the deep, smoky flavor that only gets better after a night in the fridge—perfect for feeding a crowd or prepping for the week. The secret lies in slow-cooked beef, layered spices, and a technique that balances rich, hearty textures with bold, complex flavors.
I’ve perfected this over years of chili cook-offs and family gatherings, where it’s always the first bowl to disappear.
What sets this chili apart is the two-step browning process—first searing the meat in batches for maximum flavor, then simmering it low and slow to develop deep, caramelized notes.
The combination of ground beef and chuck roast adds both tenderness and depth, while black beans and kidney beans create a satisfying texture contrast. Every ingredient plays a role, from the cumin and smoked paprika to the splash of beer that rounds out the flavors.
By the time it’s done, you’ll have a thick, hearty chili with a glossy, inviting sheen and an aroma that fills your kitchen. The flavors meld beautifully overnight, making it even richer the next day.
Serve it with shredded cheese, sour cream, and chopped onions for the full experience—or let the chili stand alone as the star of your meal.
This recipe scales perfectly for meal prep, freezer storage, or serving a crowd—just adjust the quantities while keeping the same ratios. The instructions are designed to be foolproof, with clear timing and tips to ensure you achieve that perfect balance of smoky, spicy, and savory. Let’s get cooking!
Ingredients for 3lb chili
Pantry staples plus a few crowd-pleasing ingredients for chili that tastes even better tomorrow.
| Ingredient | Amount | Notes |
|---|---|---|
| Chuck Roast 🥩 | 2 lb | Pre-cubed or cut into 1-inch pieces |
| Ground Beef 🥩 | 1 lb | 80/20 fat ratio for best flavor |
| Black Beans 🌽 | 1 can | Drained and rinsed, or 1.5 cups cooked |
| Kidney Beans 🌽 | 1 can | Drained and rinsed, or 1.5 cups cooked |
| Tomato Paste 🍅 | ½ cup | Squeeze tube works great |
| Beef Broth 💧 | 3 cups | Low-sodium preferred |
| Dark Beer 🍺 | 1 cup | Stout or porter for depth |
| Yellow Onion 🧅 | 1 whole | Diced, about 1.5 cups |
| Garlic Cloves 🧄 | 4 cloves | Minced for even distribution |
| Chili Powder 🌶️ | 2 tbsp | Smoked variety preferred |
| Ground Cumin 🌿 | 1 tbsp | Toasted for deeper flavor |
| Smoked Paprika 🌶️ | 1 tbsp | Adds authentic smokiness |
| Dried Oregano 🍃 | 1 tsp | Mexican oregano ideal |
| Salt 🧂 | 1 ½ tsp | Adjust to taste |
| Black Pepper 🌶️ | ½ tsp | Freshly ground preferred |
| Cayenne Pepper 🔥 | ¼ tsp | Adjust for heat preference |
| Tomatoes 🍅 | 2 cups | Crushed or diced San Marzano |
The beef is where the magic happens—chuck roast for tender chunks and ground beef for that rich, meaty texture. Grab the chuck from the butcher counter if you can; it’s cheaper per pound and more flavorful. I always look for good marbling when buying, and Costco has the best prices for bulk packs. For the ground beef, 80/20 fat ratio is non-negotiable—it keeps the chili juicy and full of flavor. If you’re prepping ahead, freeze the meat in portions so it’s ready to brown when you are. (Pro tip: thaw overnight in the fridge, not on the counter.)
No dark beer? Stout tea or extra beef broth works in a pinch, but the beer adds a depth you won’t get otherwise. The beans can be swapped for lentils or extra ground beef if you’re avoiding legumes, but I find they add that perfect hearty texture. For the tomatoes, San Marzano is ideal, but any good-quality canned tomatoes will do. If you’re short on time, fire-roasted diced tomatoes from a can save chopping. The spices? Toast your cumin seeds in a dry pan for 30 seconds before grinding—game changer. (And if you’re feeling fancy, smoked salt instead of regular salt adds that extra layer of complexity.)
This chili tastes even better the next day—plan ahead. It keeps for 5 days in the fridge or 6 months in the freezer. I like to portion it into ziplock bags with a layer of oil on top to preserve freshness. For serving, shredded cheddar and sour cream are musts, but honestly, the chili stands strong on its own. Leftovers? Double the batch—it disappears fast, and you’ll thank me when you’re not scrambling to make another pot.
Why You’ll Love This Recipe
- One-Pot Magic: I swear by this recipe because it’s literally one pot—no chopping, no fussing, just dump and simmer. The chuck roast and ground beef brown together while you’re still dicing onions, and by the time the beans are tender, the house smells like a cozy diner.
- Deep, Smoky Richness: That tomato paste? It’s the secret weapon—caramelizes into a glossy, slightly sweet base that makes every spoonful feel indulgent. The black and kidney beans add texture, but the real star is the slow-cooked beef melting in your mouth like it’s been simmering all day (even though it’s not).
- Meal Prep MVP: Between us, this chili begs to be made in bulk. It reheats beautifully, tastes even better the next day, and I’ve fed a crowd of six with leftovers for three lunches. (Pro tip: Freeze half—your future self will thank you.)
- Budget-Friendly Powerhouse: Chuck roast and ground beef stretch far with beans and tomato paste, but the flavor? It doesn’t taste cheap—it tastes like a restaurant-worthy meal. Honestly, I make this instead of takeout, and no one’s the wiser.
Step-by-step instructions for deep smoky chili
Let’s build this rich, smoky chili that only gets better the next day.
Brown the Meats for Maximum Flavor
Heat a large Dutch oven over medium-high heat. Add the 2 lb chuck roast cut into 1-inch pieces and cook for 5-6 minutes, stirring occasionally, until the meat develops a deep brown crust. This step is crucial—it builds the foundation of flavor through the Maillard reaction.
Push the chuck roast to one side of the pot and add the 1 lb ground beef. Break it up with a wooden spoon as it cooks, about 4-5 minutes, until it loses its raw color and turns rich brown. The beef should be fully cooked through but still slightly pink in the center. Remove both meats from the pot and set aside temporarily.
Sauté the Aromatics and Build the Base
In the same Dutch oven, reduce the heat to medium and add 2 tablespoons olive oil. Toss in the diced 1 whole yellow onion and cook for 5 minutes until softened and translucent. Add the 4 cloves minced garlic cloves and cook for another 30 seconds until fragrant—don’t let it burn or it’ll turn bitter.
Stir in the 0.5 cup tomato paste and cook for 2 minutes, stirring constantly, until it darkens slightly. This creates a rich, concentrated base for your chili. Add the 2 tbsp chili powder, 1 tbsp ground cumin, 1 tbsp smoked paprika, and 1 tsp dried oregano, stirring to coat everything evenly in these warm spices.
Combine Everything and Simmer
Return the browned meats to the pot. Pour in the 3 cups beef broth, 1 cup dark beer, and 2 cups tomatoes, stirring to combine. Bring the mixture to a gentle boil, then reduce heat to low. Add the 1 can black beans and 1 can kidney beans (drained and rinsed), plus the 1.5 tsp salt, 0.5 tsp black pepper, and 0.25 tsp cayenne pepper.
Partially cover the pot and let the chili simmer for 1.5 hours, stirring occasionally. The meat should become fork-tender, and the flavors should meld beautifully. If it gets too thick, add a splash of water or broth to maintain the right consistency.
Finish and Rest for Perfect Texture
After 1.5 hours, taste the chili and adjust the seasoning if needed—you might want to add more salt or cayenne for your preferred heat level. Let the chili continue to simmer uncovered for another 30-45 minutes to allow the flavors to deepen and the liquid to reduce slightly.
Once done, remove from heat and let it rest for at least 15 minutes. This resting period allows the flavors to fully develop and the chili to thicken slightly, making it even more delicious the next day. Serve with your favorite toppings like shredded cheese, sour cream, or chopped green onions.
Pro Tips For Making 3lb Chili
- Sear the Chuck First: I learned this the hard way—skipping the sear means flavorless chili. Cut the chuck into 1-inch cubes, pat them dry, and hit a screaming-hot Dutch oven with 1 tablespoon oil. Brown all sides before adding anything else. The crust locks in moisture and taste, so don’t rush it (yes, even if you’re impatient like me).
- Brown the Beef Separately: Mixing raw ground beef with other ingredients leads to gray, undercooked meat. Cook it first in batches—use 2 tablespoons oil, break it into small chunks, and brown until it loses its raw color. Drain excess fat if needed, then stir it into the pot last. This keeps the texture perfect and prevents a muddy chili.
- Rinse the Beans: Canned beans taste better when rinsed—seriously. Drain them, give them a quick cold-water rinse, and shake off excess. This cuts the metallic aftertaste and keeps the chili from getting too thick or gummy. Skip this, and you’ll taste the canned-bean vibe the whole time.
- Simmer Low and Slow: After adding everything, crank the heat to high for 10 minutes to build flavor, then drop it to a bare simmer. A true simmer (tiny bubbles, not a rolling boil) prevents the tomato paste from burning and lets the chuck tenderize properly. Cover loosely—this keeps moisture in without steaming the beans to mush.
Wine and beer pairings for these flavors
Red Wine Pairings
For this deep, smoky chili, I reach for a bold Zinfandel from California—its jammy blackberry and dark fruit notes complement the chili’s richness while standing up to the spices. A Syrah with its peppery finish also works beautifully, especially if your chili has a touch of heat.
Both wines have enough body to match the chili’s heartiness without overpowering the complex flavors. 🍷
Beer Pairings
Since the recipe already includes dark beer, why not continue the theme? A stout like Guinness or Samuel Smith’s Nut Brown Ale enhances the smoky depth and malty sweetness. For a lighter option, try a porter—its chocolatey notes play nicely with the chili powder and cumin.
If you prefer something crisp, a wheat beer with citrus notes cuts through the richness.
White Wine Surprise
Don’t overlook a dry Riesling—its bright acidity and subtle sweetness balance the chili’s smokiness, especially if you’ve added a bit of sweetness to the recipe. The wine’s crisp finish cleanses your palate between bites, making it a surprisingly great match for chili.
I love pairing this with a German Riesling from the Mosel region. 🍷
Craft Beer Options
For craft beer lovers, a Belgian-style dubbel with its caramel and spice notes complements the chili’s depth. Alternatively, a smoked beer like Goose Island Bourbon County Stout adds an extra layer of smokiness that mirrors the chili’s flavor profile.
These beers elevate the dish to new heights with their complex flavors. 🍺
Non-Alcoholic Choices
Skip the alcohol? No problem. A sparkling apple cider with a hint of spice provides the same refreshing contrast. For something richer, try a root beer with vanilla and caramel notes—it pairs surprisingly well with the chili’s smoky, savory profile. Both options keep the meal balanced and enjoyable. 🥤
Nutrition facts
Frequently asked questions
Can I make this chili in a slow cooker?
For a slow cooker version, brown the meats first in a skillet, then transfer everything to your slow cooker. Cook on low for 6-7 hours or high for 3-4 hours, stirring occasionally. The slow cooker method actually enhances the flavors even more by allowing them to meld gently over time.
How do I adjust the recipe for a bigger crowd?
Double all ingredients while keeping the same ratios—just use a larger pot (like a 6-8 quart Dutch oven). For 12 servings, you’ll need 4 lb chuck roast, 2 lb ground beef, and 6 cups broth. The cooking time remains similar, but you may need to simmer slightly longer for thicker consistency.
What if I don’t have dark beer?
No problem! Replace the 1 cup beer with 1 cup beef broth or 1 cup stout tea (simmer dried black tea in water). For extra depth, add 1 tsp molasses or 1 tbsp brown sugar to mimic the beer’s malty sweetness. The chili will still be delicious—just slightly less complex.
Why does my chili taste better the next day?
The flavors deepen overnight as the spices and acids in tomatoes continue to meld. The chili also thickens slightly as excess moisture evaporates, concentrating the flavors. Always let it rest 15 minutes after cooking before serving—this helps the textures and tastes come together perfectly.
Can I freeze this chili?
Yes! Portion into ziplock bags or airtight containers, leaving 1-inch headspace for expansion. Freeze for up to 6 months. Thaw overnight in the fridge, then reheat on the stove over medium-low heat, stirring occasionally. Add a splash of broth if it seems too thick after thawing.

- 3lb Prime Rib Roast Recipe: Juicy Pink Center Guaranteed in 3 Hours - October 31, 2026
- 5 Spice Cake Recipe: Warmly Spiced Layers With Crunchy Top - October 31, 2026
- 1950’s Macaroni and Cheese Recipe: Nostalgic Creamy Cheese Sauce with Buttery Noodles - October 31, 2026