
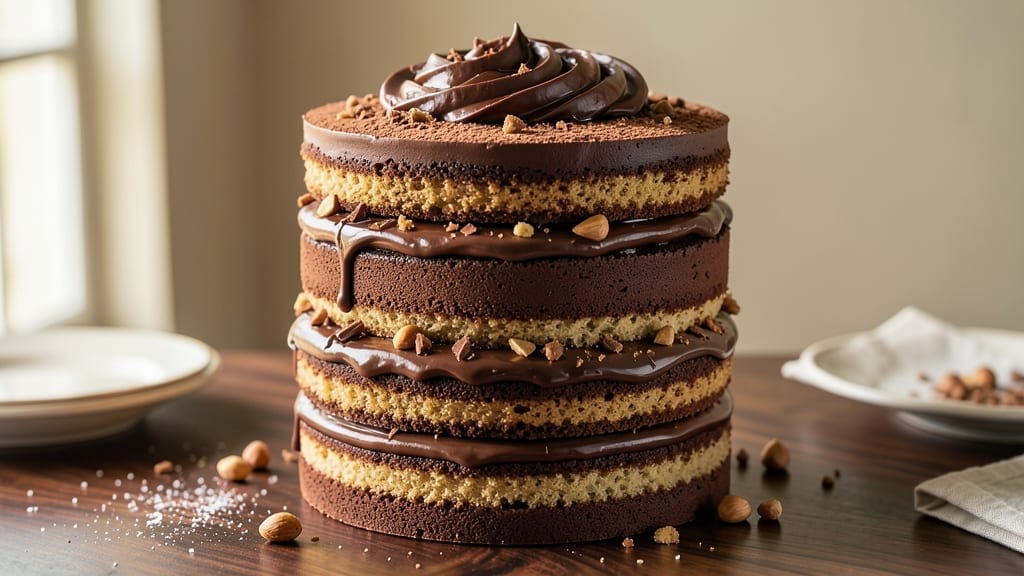
Creating a 20-layer chocolate cake requires precision, patience, and a deep love for fudgy, rich layers—this isn’t your average dessert. The key lies in baking thin, even layers that stack like a tower of decadence, each one perfectly moist and flavorful.
I’ve perfected this technique over years of trial and error, ensuring every slice delivers that melt-in-your-mouth texture without collapsing under its own weight.
The secret starts with the batter: a precise ratio of cocoa powder, buttermilk, and eggs creates the ideal consistency for thin, uniform layers. Each cake pan must be greased meticulously, and the batter poured to the same depth—about ¼-inch thick—to guarantee even baking.
Baking time is critical; even a minute too long risks drying out the layers, while underbaking leads to structural failure when stacking. Patience is your ally here.
Once baked, the real challenge begins: cooling and leveling. Each layer must be completely cooled before frosting to prevent crumbs and ensure clean cuts. A serrated knife and a cake leveler are non-negotiable tools for achieving those perfectly even surfaces that make the final tower stand tall.
The frosting—a velvety ganache or buttercream—binds the layers together, creating a seamless, glossy finish that’s as impressive as it is delicious.
When assembled, this cake isn’t just a dessert—it’s a centerpiece. Serve it with a dusting of cocoa powder, fresh berries, or a drizzle of caramel for contrast. The first slice reveals layers of fudgy perfection, proving that height and indulgence can coexist without compromise. Ready to build your masterpiece?
Ingredients for 20 layer chocolate cake
Precision ingredients for a towering masterpiece—each one critical for fudgy, flawless layers.
| Ingredient | Amount | Notes |
|---|---|---|
| Unsalted Butter 🧈 | 3 cups | Room temperature for creaming |
| Granulated Sugar 🍚 | 4 cups | Superfine preferred for smoothness |
| All-Purpose Flour 🌾 | 4 cups | Sifted, spooned lightly |
| Dutch-Processed Cocoa Powder 🍫 | 1 cup | High-quality, unsweetened |
| Baking Powder 🧂 | 1 tbsp | Freshly opened |
| Salt 🧂 | ½ tsp | Fine sea salt |
| Large Eggs 🥚 | 8 whole | Room temperature |
| Buttermilk 🥛 | 2 cups | Fresh, not powdered |
| Vanilla Extract 🌿 | 2 tbsp | Pure, high-quality |
| Dark Chocolate Chips 🍫 | 2 cups | 70% cocoa, chopped fine |
| Heavy Whipping Cream 🧈 | 3 cups | Cold, for ganache |
| Semisweet Chocolate Bars 🍫 | 12 oz | High-quality, chopped |
| Vegetable Oil 🫒 | ½ cup | For greasing pans |
| Powdered Sugar 🍚 | 4 cups | For dusting layers |
The cocoa powder and butter are non-negotiable here. Valrhona or Guittard cocoa powder delivers that deep, velvety flavor—don’t skimp on quality. For butter, Plugrá or Land O’Lakes unsalted work perfectly, but make sure it’s room temperature when creaming. The chocolate chips? Ghirardelli or Lindt are my go-tos, but any 70% cocoa will do. Pro tip: chop them extra fine so they melt seamlessly into the batter. The buttermilk should be fresh—if it smells sour, toss it and grab a new carton. For the eggs, room temperature ensures even incorporation, so take them out 30 minutes before mixing.
No Dutch-processed cocoa? Natural cocoa powder at 1.5 times the amount works in a pinch, but the flavor will be slightly sharper. Short on buttermilk? Mix 2 tablespoons lemon juice or vinegar with 2 cups milk—it’s a classic swap. Vanilla extract can be substituted with 1 teaspoon vanilla bean paste for extra depth. The ganache requires high-quality chocolate bars—avoid the grocery store’s generic brands here. For the frosting, if you’re not using ganache, a Swiss meringue buttercream (made with egg whites and butter) adds a silky finish. And if you’re worried about the cake being too rich, reduce the chocolate chips to 1.5 cups—it’ll still be decadent, just slightly lighter.
Store the dry ingredients—flour, cocoa, baking powder—in airtight containers in a cool, dark place for up to 6 months. Butter and eggs should be kept refrigerated until ready to use. Once baked, the layers can be stacked and frosted immediately, but if you’re assembling later, wrap each layer in plastic wrap and refrigerate for up to 2 days. The ganache keeps for 1 week in the fridge, but it’s best used within 3 days for peak texture. For long-term storage, freeze the assembled cake (unfrosted) for up to 3 months—just thaw it overnight in the fridge before serving.
Why You’ll Love This Recipe
- I’ll be real: you’ll make this twice in one week. The good news? The cake keeps better than store-bought—moist for days, no weird aftertaste. And since it’s just flour, sugar, and cocoa, it’s cheaper than takeout. My wallet and my sweet tooth both thank me.
- No Fuss Layers: I swear, it’s just mixing, baking, repeating—no fancy piping or tempering. The secret’s in the Dutch-processed cocoa; it dissolves smooth as butter, so no lumps, no stress. Twenty layers? More like twenty minutes of your life well spent.
- Rich Without Guilt: That first bite—oh. The sugar-butter ratio is just sweet enough to balance the deep, velvety cocoa, but here’s the magic: the baking powder keeps it light, so it doesn’t turn into a dense brick. Honestly, it tastes like a bakery cake, but I’m the one who made it.
- Party in a Box: This isn’t just dessert; it’s the centerpiece. Birthday? Check. Holiday potluck? Double-check. Between us, I’ve even brought it to book clubs (yes, people actually clap). The layers hold up for days, so you can slice it after the guests leave—no sad, dry crumbs here.
Step-by-step instructions for building a 20-Layer chocolate cake
Building this towering masterpiece requires precision and patience—let’s create fudgy, moist layers that stack beautifully.
Prepare the Cake Batter for Perfect Layers
Preheat your oven to 350°F and grease 20 round 3-inch cake pans with the 0.5 cup vegetable oil, then dust with flour. In a stand mixer, beat the 3 cups unsalted butter and 4 cups granulated sugar on medium speed until light and fluffy—about 5 minutes. This creaming process incorporates air for tender layers.
Add the 8 whole large eggs one at a time, mixing well after each addition. In a separate bowl, whisk together the 4 cups all-purpose flour, 1 cup Dutch-processed cocoa powder, 1 tablespoon baking powder, and 0.5 teaspoon salt. Gradually add the dry mixture to the wet ingredients, alternating with the 2 cups buttermilk beginning and ending with flour. Mix just until combined—overmixing develops gluten and makes layers dense.
Divide the batter evenly among the prepared pans (about 2 tablespoons per pan) and fold 1 cup dark chocolate chips into each layer. Bake for 12-15 minutes until a toothpick comes out clean. Let cool in pans for 5 minutes before transferring to a wire rack to cool completely.
Create the Chocolate Ganache for Binding Layers
While the cakes cool, prepare the ganache by chopping the 12 oz semisweet chocolate bars into small pieces. In a heatproof bowl, combine the chopped chocolate with the 3 cups cold heavy whipping cream. Place the bowl over a pot of simmering water, ensuring the bottom doesn’t touch, and stir until the chocolate melts completely and the mixture is smooth. Remove from heat and let cool to 90°F—it should thicken slightly but still be pourable.
This ganache acts as both a glue and a flavor enhancer between layers. If it thickens too much, gently reheat with a splash of cream. The ganache should coat the back of a spoon but still flow easily when poured.
Assemble the Cake with Precision
Place the first cake layer on a serving plate and spread a thin layer of ganache (about 1 teaspoon) over the top. Add the second layer, press down gently, and repeat the process. Continue stacking all 20 layers, ensuring each layer is centered and level. Use a cake turntable to rotate the cake as you build, keeping the structure stable.
After the final layer is placed, pour the remaining ganache over the entire cake, allowing it to drip down the sides. This creates a glossy finish and ensures every bite has rich chocolate flavor. Let the cake set at room temperature for 2 hours before refrigerating for 4 hours to firm up completely.
Dust with Powdered Sugar for Final Elegance
Once fully set, dust the cake generously with the 4 cups powdered sugar using a fine-mesh sieve. Shake the sieve gently to create an even, snowy coating that contrasts beautifully with the deep chocolate layers. For extra flair, add a few whole dark chocolate chips or a drizzle of melted chocolate along the sides.
Slice carefully with a serrated knife dipped in hot water for clean cuts. Each layer should reveal moist, fudgy cake with ganache seeping between them—a true decadent experience. Serve chilled for the best texture and presentation.
Pro Tips For Making 20 Layer Chocolate Cake
- Sift That Cocoa: Dutch-processed cocoa powder is finicky—it clumps like a stubborn guest at a party. Sift it with the flour and baking powder before mixing, or you’ll end up with dense, uneven layers. (Yes, even if you’re tempted to skip it—trust me, the texture suffers.)
- Cream Butter Cold: Take your unsalted butter straight from the fridge and beat it with sugar until it’s light but still holds shape. Warm butter makes for a greasy, flat cake—this recipe needs structure, not a puddle. (I learned this after a cake that collapsed like a house of cards.)
- Don’t Overmix Layers: Fold in dry ingredients just until combined—overmixing develops gluten, and your layers will turn tough instead of tender. Stop when there’s one flour streak left; that’s your cue. (I used to beat like I was punishing the batter, and it showed.)
- Chill Between Layers: Let each layer cool completely (10 minutes) before spreading frosting, or your cake will turn into a soggy mess. Pop it in the fridge for 5 minutes if you’re impatient—your future self will thank you. (I know, I know, but trust the process.)
Creative variations of this dish
Fudgy vs. Cakey Layers
For a more fudgy texture, reduce the flour by ¼ cup and add ½ cup extra cocoa powder to the batter. This increases density while keeping moisture. For cakey layers, increase flour by ¼ cup and reduce cocoa by 2 tbsp—this creates a lighter crumb.
I’ve found that Valrhona cocoa enhances fudginess more than natural cocoa. 🍫
Flavor Variations
Add 1 tsp instant espresso powder to the batter for a mocha twist—it deepens chocolate flavor without bitterness. For a peppermint version, fold ½ cup crushed candy canes into the ganache. A raspberry variation uses ½ cup raspberry jam mixed into the ganache for a fruity surprise. 🌟
Layer Thickness Adjustments
For thicker layers (½-inch), bake in 2-inch pans and reduce batter per pan to 3 tbsp. For ultra-thin layers (⅛-inch), use 4-inch pans and 1 tbsp batter per pan.
Thin layers bake faster (8-10 minutes) but require more ganache between them to prevent collapse. I prefer ¼-inch layers for balance—they’re sturdy yet delicate. ✨
Alternative Frostings
Swap ganache for Swiss meringue buttercream—whip 1 cup egg whites and 1 cup sugar over a double boiler until stiff, then beat in 2 cups softened butter. This adds airiness but requires more precision.
For a cream cheese frosting, mix 8 oz cream cheese, ½ cup butter, and 3 cups powdered sugar—it’s tangier and pairs well with chocolate. 🧈
Regional Twists
In Southern U.S. styles, add ½ cup pecans to the batter and top with bourbon caramel (simmer 1 cup sugar, ½ cup butter, ¼ cup bourbon, and ½ cup cream).
For Italian variations, fold 1 tsp orange zest into the batter and dust with powdered sugar mixed with 1 tsp cinnamon. 🗺️
Make-Ahead Strategies
Bake layers up to 2 days ahead and store wrapped in plastic at room temperature. Assemble the cake 1 day before serving—this lets flavors meld. For long-term storage, freeze the unfrosted stacked cake (wrapped tightly) for up to 3 months**. Thaw overnight in the fridge before adding frosting. 💫
Nutrition facts
Frequently asked questions
How do I prevent my 20-layer cake from collapsing?
Collapse happens when layers aren’t fully cooled or frosting is too heavy. Always let each layer cool completely before stacking, and use a thin layer of ganache (1 teaspoon) between them. Let the cake set at room temperature for 2 hours before refrigerating. A cake turntable helps keep the structure stable during assembly.
Can I make this cake in smaller batches?
For a 10-layer version, halve all ingredients and use 10 pans. Keep layer thickness consistent (¼-inch) and adjust baking time to 10-12 minutes. The ganache quantity should also be halved. This works perfectly for smaller gatherings or practice runs.
What’s the best way to level each cake layer?
Use a serrated knife and a cake leveler (or a thin plate) for perfectly even layers. Place the layer on the leveler, then gently press down with the knife at a 45-degree angle. Wipe the knife with a damp cloth between cuts. For extra precision, chill the layers for 10 minutes before leveling—they’ll hold their shape better.
How do I store leftover cake?
Wrap the entire cake in plastic wrap and refrigerate for up to 5 days. For longer storage, freeze the unfrosted stacked cake (wrapped tightly) for up to 3 months. Thaw overnight in the fridge before adding frosting. Slice with a hot knife for clean cuts.
Can I substitute buttercream for ganache?
Yes, but adjust the technique. Use a Swiss meringue buttercream (lighter and less dense) or cream cheese frosting for better structural support. Apply a thin layer (½ teaspoon) between layers and let it set for 10 minutes before adding the next layer. Buttercream requires more precision to prevent crumbs.

- 3lb Prime Rib Roast Recipe: Juicy Pink Center Guaranteed in 3 Hours - October 31, 2026
- 5 Spice Cake Recipe: Warmly Spiced Layers With Crunchy Top - October 31, 2026
- 1950’s Macaroni and Cheese Recipe: Nostalgic Creamy Cheese Sauce with Buttery Noodles - October 31, 2026