
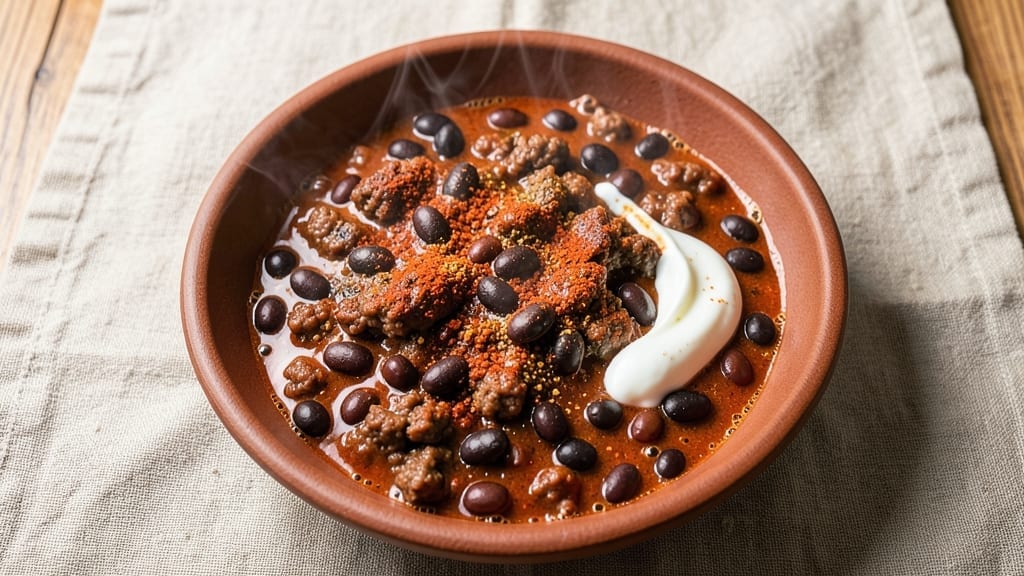
When you crave a hearty bowl of chili but don’t have hours to spare, this 20-minute chili recipe delivers bold flavors and satisfying texture without the wait.
The secret lies in pre-cooked ingredients and a quick-spiced broth that simmers into depth in less time than it takes to set the table. I’ve perfected this method after years of testing shortcuts, and it never disappoints—especially when you’re hungry now.
This recipe builds on classic chili foundations but skips the long cook times by using canned beans, ground meat (or plant-based crumbles), and a one-pot technique that cuts active prep to just 15 minutes.
The spices—cumin, chili powder, and smoked paprika—infuse the broth quickly, while a splash of vinegar brightens the flavors. It’s the kind of meal that feels indulgent but comes together faster than takeout.
By the time you’re done, you’ll have a steaming pot of chili with tender meat, hearty beans, and a rich, spiced sauce that clings to every bite. The texture is perfect—hearty yet light, with just enough kick to satisfy.
Top it with shredded cheese, sour cream, or green onions for a restaurant-style finish. This is comfort food at its fastest.
Whether you’re feeding a family or craving a solo dinner, this chili scales effortlessly and reheats beautifully. The best part? No cleanup beyond one pot. Let’s make it—your taste buds (and schedule) will thank you.
Ingredients for 20 minute chili
Pantry staples and a few fresh aromatics—this chili comes together faster than takeout.
| Ingredient | Amount | Notes |
|---|---|---|
| Ground Beef (80/20) 🥩 | 1 lb | Browned and drained |
| Kidney Beans (Canned) 🌽 | 1 can | Drained, rinsed |
| Black Beans (Canned) 🌽 | 1 can | Drained, rinsed |
| Chili Powder 🌶️ | 2 tbsp | Smoked or mild |
| Ground Cumin 🌿 | 1 tbsp | Toasted for depth |
| Smoked Paprika 🌶️ | 1 tbsp | Adds smoky flavor |
| Garlic Cloves 🧄 | 4 cloves | Minced for aroma |
| Yellow Onion 🧅 | 1 whole | Diced small |
| Tomato Paste 🍅 | 2 tbsp | Or 1 squeeze tube |
| Beef Broth (Low-Sodium) 💧 | 1 ½ cups | Or water + bouillon |
| Apple Cider Vinegar 🍎 | 1 tbsp | Brightens flavors |
| Salt 🧂 | 1 tsp | Adjust to taste |
| Black Pepper 🌶️ | ½ tsp | Freshly ground |
| Vegetable Oil 🫒 | 1 tbsp | For browning meat |
The ground beef is your flavor anchor here. 80/20 fat ratio gives the best texture and richness—don’t skimp on the fat. I grab mine from the butcher counter when possible, but the pre-packaged stuff at Walmart or Kroger works fine. The canned beans? Muir Glen or Libby’s are my go-tos—they hold up better than store brands. For the spices, Penzeys or bulk bins are worth it if you cook often, but the regular grocery store stuff is fine for this quick recipe. The key is toasting your cumin and paprika in the pot for 30 seconds before adding everything else—it wakes up those flavors instantly.
No beef? Plant-based crumbles like Beyond Meat or lentils work perfectly. Short on beans? Double the broth and add corn for bulk. The tomato paste can be swapped for crushed tomatoes (1 can), but you’ll need to reduce it longer. Vinegar substitute? Lemon juice at half the amount. The onion and garlic are non-negotiable for flavor, but if you’re in a rush, onion powder (1 tsp) and garlic powder (1 tsp) will get you close. For extra depth, add a bay leaf while simmering—just remove it before serving.
This chili reheats beautifully—honestly tastes better the next day. Keeps in the fridge for 4-5 days, freezes for 3 months. I always make a double batch because it’s perfect for meal prep. Portion into containers with shredded cheese and sour cream on top—they stay fresh separately for up to a week. The spices mellow slightly after a day, so if you want extra kick, add a pinch of cayenne or hot sauce when reheating.
Why You’ll Love This Recipe
- No-Fuss Pantry Staples: I swear by this combo—just open a can, dump in spices, and let the beef brown. Honestly, the only measuring I do is the cumin and chili powder, and even then, I eyeball it after the first time.
- Deep, Smoky Kick: That 80/20 beef? Rich and juicy. The cumin and chili powder toast in the pan first—that’s where the magic happens. It’s not just spicy; it’s got this warm, earthy depth that lingers.
- Game for Any Night: Between us, this is my go-to when I’m too tired to plan. Serve it over rice for a heartier meal, or let it sit for 10 minutes to thicken if you’re feeding a crowd. (Yes, even on a Tuesday night.)
- Leftovers That Don’t Suck: The beans keep it filling, and the flavors only get better overnight. I double the batch on Sundays—freezes perfectly, and reheats like it was just made. My wallet and my lunchbox thank me.
Step-by-step instructions for 20 minute chili
Here’s how to make a bold, flavorful chili in just 20 minutes—no shortcuts, just smart prep.
Brown the Ground Beef
Heat the 1 tablespoon vegetable oil in a large pot over medium-high heat. Add the 1 lb ground beef (80/20) and break it apart with a wooden spoon, letting it brown for 5-6 minutes. You want the meat to lose its raw color and develop a deep brown crust—this builds rich flavor.
Once the beef is mostly browned, drain most of the fat (leave about 1 tablespoon) and add the 1 diced small yellow onion and 4 minced garlic cloves. Cook for 2 minutes until the onion softens and the garlic becomes fragrant. This step is where the chili’s foundation begins—don’t skip it.
Build the Spice Base
Stir in the 2 tablespoons chili powder, 1 tablespoon ground cumin, and 1 tablespoon smoked paprika. Cook for 30 seconds, stirring constantly, until the spices are toasted and aromatic. This releases their oils and deepens the chili’s complexity—you’ll smell the difference.
Add the 2 tablespoons tomato paste and cook for another 1 minute, stirring to create a thick, glossy paste. This step ensures your chili has body and richness, not just liquid. The tomato paste also helps thicken the chili as it simmers.
Add Liquids and Simmer
Pour in the 1.5 cups low-sodium beef broth and 1 tablespoon apple cider vinegar, scraping up any browned bits from the bottom of the pot. Bring the mixture to a gentle boil, then reduce heat to medium-low and let it simmer for 8 minutes. The vinegar brightens the flavors while the broth helps balance the spices.
After 8 minutes, the chili should be thick and flavorful. Taste it and adjust seasoning with the 1 teaspoon salt and ½ teaspoon black pepper if needed. This is your chance to make sure the chili has the right balance—spicy but not overpowering, savory but not bland.
Finish with Beans and Rest
Add the 1 can drained, rinsed kidney beans and 1 can drained, rinsed black beans to the pot. Stir gently to combine, then let the chili simmer for 2-3 minutes—just enough to heat the beans through. The beans will absorb the chili’s flavors and make it heartier.
Remove the pot from heat and let the chili rest for 5 minutes. This step allows the flavors to meld and the chili to thicken slightly. Serve warm, garnished with extra chili powder or a dollop of sour cream if you like. Each bite should deliver a perfect balance of spice, smokiness, and hearty texture.
Pro Tips For Making 20 Minute Chili
- CRACK THE FAT FIRST: High heat for 3 minutes—don’t skip this. The beef’s fat renders fast, and that’s your flavor base. If you rush it, you’ll end up with greasy, unseasoned chili instead of rich, caramelized depth.
- DRAIN AND RINSE BEANS: Cold water rinse, no excuses. Canned beans taste metallic if you skip this, and your chili will have a weird aftertaste. Drain them, swish them under the tap, and drain again—it’s 10 seconds that makes a real difference.
- TOAST THE SPICES: Bloom the cumin and chili powder in the same pan for 30 seconds. I learned this the hard way—adding them dry to the beans just makes your chili taste like dust. A quick toast wakes up those spices and ties everything together.
- ADD BEANS LAST: Keep them warm, not simmering. Toss the drained beans in at the very end, just to heat through. They’ll soak up flavor like sponges if you let them sit too long in the pot—your chili will turn mushy, not hearty.
Storing and reheating your leftovers
Fridge Storage Tips
Let your chili cool to room temperature for no more than 2 hours before transferring to an airtight container. I use glass containers with tight-sealing lids—I recommend Pyrex or Rubbermaid for durability.
Store at 40°F or below and it’ll keep for 4-5 days. The flavors actually deepen overnight as the spices meld, making leftovers even more delicious. 💫
Freezer Prep
For long-term storage, portion your chili into quart-sized freezer bags or airtight containers. Leave 1 inch headspace for expansion—chili thickens as it freezes. Label with the date and freeze for up to 3 months.
When ready to eat, thaw overnight in the fridge or use the microwave’s defrost setting. I always freeze a double batch because it’s perfect for quick meals. ❄️
Stovetop Reheating
My preferred method is stovetop reheating—it preserves texture better than microwaving. Transfer chili to a pot and heat over medium-low heat for 8-10 minutes, stirring occasionally. Add 2-3 tablespoons water or broth if it looks too thick.
Taste and adjust seasoning—chili often needs a pinch of salt or extra chili powder after reheating. 🔥
Microwave Quick Fix
For faster reheating, use the microwave on 50% power in 1-minute intervals, stirring between each. Cover loosely with a microwave-safe lid to retain moisture. If the chili seems dry, add a splash of water or broth.
This method works best for single servings—just be careful not to overheat, or the beans may get mushy. 💡
Garnish Before Serving
Always add fresh toppings after reheating. A sprinkle of shredded cheddar, dollop of sour cream, or chopped green onions brightens the dish. I love a pinch of fresh cilantro for extra freshness.
These toppings stay fresh in the fridge for up to 5 days, so store them separately until ready to serve. 🌿
Meal Prep Strategy
Divide your chili into individual portions with toppings on the side. Store the chili in one container and toppings in a separate small container. This keeps everything fresh and lets you customize each serving.
I prep 3-4 servings at a time for easy lunches—just reheat and assemble. This method saves time and reduces waste. ✨
Nutrition facts
Frequently asked questions
Can I substitute ground turkey or chicken for beef in this quick chili?
Yes! Ground turkey or chicken works perfectly—just use the same 1 lb amount. For best results, drain the meat well after cooking to prevent a watery chili. You may want to add 1 extra tablespoon of tomato paste to compensate for the leaner protein. The flavor will be slightly lighter but still delicious.
What if I don’t have canned beans?
No problem! Use 1.5 cups cooked dried beans (soaked overnight) or 2 cups frozen beans thawed and drained. For extra texture, add 1 cup corn kernels or ½ cup diced tomatoes. The chili will still be hearty—just reduce the broth to 1 cup to maintain balance.
How can I make this chili spicier?
Add ½ teaspoon cayenne pepper with the other spices or stir in 1 tablespoon hot sauce at the end. For smoky heat, increase smoked paprika to 1.5 tablespoons. If you love ghost peppers, mash ½ a pepper into the chili during the final 2 minutes of simmering. Always taste first—you can adjust!
Why does my chili taste bland after reheating?
Reheating often dulls flavors because moisture evaporates. Fix it by adding 1 tablespoon vinegar or lemon juice and a pinch of salt. For depth, stir in 1 teaspoon soy sauce or Worcestershire sauce. The vinegar in the original recipe helps prevent this, but a splash of broth or even a dash of chili powder can revive it.
Can I make this chili in a slow cooker for hands-off cooking?
Follow the same steps, but after adding the broth, transfer everything to a slow cooker and cook on High for 1 hour or Low for 2 hours. The beans will soften more, and the flavors will meld beautifully. For a quicker version, use High for 30 minutes—just add beans at the end and heat through.

- 3lb Prime Rib Roast Recipe: Juicy Pink Center Guaranteed in 3 Hours - October 31, 2026
- 5 Spice Cake Recipe: Warmly Spiced Layers With Crunchy Top - October 31, 2026
- 1950’s Macaroni and Cheese Recipe: Nostalgic Creamy Cheese Sauce with Buttery Noodles - October 31, 2026